Decoding AVIF: Deep dive with cats and imgproxy


AVIF, a child-wonder image format backed by industry giants, is finally reaching wide browser support with Firefox getting fully on board. We are here to investigate whether the successor to WebP lives up to its promise to obliterate JPEG and PNG and how to hop on the AVIF conversion train early with imgproxy—the cutting-edge Martian tool for transforming images on the web. And be warned, this text is primed for cat lovers!
As Firefox 92 is getting ready to be shipped, we can finally expect AVIF to become more than a gimmick and reach wider browser support. There is also evidence of AVIF decoding support in WebKit, the engine that powers Safari. It feels like AVIF adoption will skyrocket in the coming years.
So we feel that this is the right time to take a deep dive into modern image compression formats and show you how easy it is to create light, quality AVIF versions of your images on the fly—without the tedious task of using command-line image conversion tools or thinking about how to store variants.
Strap in tight, as we will start with some history and go deep into how modern codecs work, so this is not a quick read. It is also a great introduction to imgproxy, our free and open source tool for converting images on the fly.
From images to frames
Nowadays, the images online are still ruled by a format created in a pre-Internet era: 40% of pictures on the web are good ol’ JPEG files.
In 1992, when JPEG was created, early digital cameras could store just a handful of photos, early networks exchanged data over telephone wires, it took minutes to send an image digitally, and YouTube was 15 years in the future.
At that time, only fiction writers could imagine watching 8K videos streamed to a pocket device via satellites and radio waves so you can check out a cat video while sipping tomato juice 30,000 feet above the ground.
JPEG did all the job required to pack the image into something smaller than a raw bitmap and did it well, so no one felt pressured to come up with something radically new. Until the moving pictures felt the need to go digital too.
If you have a static picture of a cat 500 pixels wide and 350 pixels tall, you can easily calculate the size of a resulting bitmap file:
(500 × 350) × 8 bits per sample × 3 samples = 512KB!It will take about 73 seconds to send it via 52K modem. If you somehow compress your cat photo with JPEG, you will get only about 15KB, which is 34 times less. Using moderns formats like WebP or AVIF will allow you to make it even smaller, but the difference would not be drastic. It is not surprising that JPEG still dominates the Internet. Its compression is just good enough.


As you can see from the table below, the Internet is being quite slow at adopting new image formats.


AVIF is not breathing down the JPEG’s neck yet
However, with videos taking the web by storm, industry giants were forced to come up with a way to stream moving images efficiently.
Most of the modern image formats (WebP, AVIF, and something called HEIF) are, in essence, based on video formats. If we can compress 1000 frames, we obviously can compress a single one, which would be your cat meme.
Let’s look at the crudely drawn timeline. As we can see, at certain points in time, video formats spawn image formats.


AVIF is a child of AV1 that places video keyframes into containers called HEIF (for High Efficiency Image File Format) and calls them images. By the way, your iPhone pics are stored in HEIF containers too.


But why should we even care about any new fancy formats? Why are they better than the good old JPEG? Let’s figure it out while taking a crash course in video compression.
Video compression 101
When we watch a video on YouTube, we observe a sequence of static pictures decoded from the original video stream. This stream was compressed by a special program called a video codec. Codec stands for enCOder-DECoder.


It would be super inefficient to compress every video frame as a standalone “picture”, as it used to be the case with GIF files. Instead, video codecs exploit two important properties of any video: spatial locality and temporal locality.
Spatial locality means that the adjacent pixels are not independent and are somehow сonnected. Temporal locality means that two adjacent frames are most likely to be similar.
We can split our bitstream into a sequence of frames. Then we can select some ��“special” frames, call them keyframes and encode them as standalone pictures. The rest of the frames could then be derived from the keyframes. This process is called interframe compression.
Instead of storing pixels for each block in the keyframe, we are storing just the reference blocks in different keyframes along with motion vectors. Motion vectors show how different parts of the reference frames have to shift to arrive at a current frame.


Since each keyframe is encoded as a standalone picture, it could be decoded independently. The encoding of each separate keyframe is called intraframe compression.
To encode a keyframe, we should split our picture into several layers, where each layer corresponds to a particular aspect of the pixel visual properties, described as YCbCr or YUV.
Y stands for luma (brightness aspect), and Cb/Cr stands for chroma (color aspect). This way of splitting is chosen because the human eye is more sensitive to luma changes than the chroma. That is also true for most mammals.


That means we can decrease detail in chroma channels and downsample its resolution without compromising quality in human perception.
Commonly, three numbers are used to specify downsampling:
- the first is always 4, don’t ask me why 🤷♀️;
- the second is a horizontal sampling of chroma channels;
- the third is either 0, which means 2:1 vertical subsampling, or equals the second one, which means no vertical subsampling.
4:2:0 is the most popular case. Four luma samples per one chroma


After downsampling is done, we can encode luma and chroma layers separately.
To do that, we first split our image into rectangular blocks and encode block-wise. The size and structure of blocks depend on the encoder. Good old JPEG uses square 8×8 blocks, while AVIF creates a block hierarchy that starts with 128×128 (for luma) superblocks that can be further split into smaller blocks up to 4 pixels in size.


Now, the spatial locality comes into play. Meaning, we don’t encode each block individually. Instead, we are trying to predict a new block from its neighbors. The way we predict is called the prediction mode.
Typically, the encoder calculates predicted values in the block from the top and left neighboring pixels. To get a basic understanding of how it works, let’s consider some examples of prediction modes. The number of used prediction modes varies from codec to codec:
DC prediction mode—fill the block with an average value of all neighboring pixels. This is the most common mode in most of the codecs.
Directional predictions—fill the block with neighboring pixels values based on the particular direction. The number of directions varies for different codecs. AVIF has 56 directional modes, while H.264 has only two. Here are the simplest modes, illustrated:


There are some specific prediction modes that are only used in AVIF:
Chroma from luma—the name speaks for itself: you calculate chroma pixels from corresponding luma pixels
Color Palette—It’s a “GIF mode” for AVIF. The encoder extracts the palette from the block and encodes each sample as an index in the palette, see below:


Smooth and PAETH prediction mode groups—the predicted sample value is calculated from the corresponding top and left pixels of neighboring blocks with the distance from edges of the block taken into account.
Recursive Intra Prediction—sample values are recursively predicted from the previous samples in the block.
And last but not least—Intra Block Copy. As you probably have guessed, in this mode, the encoder just references previously encoded pixels.
Prediction modes are tricks from the video playbook; static-by-design JPEG is not smart enough to do this math.
After we predicted everything, it is time to apply something called discrete cosine transform. When we apply DCT to the block, we change its representation from pixel values (like brightness and color) to feature values. See for yourself on the image below:


At this point, we just changed the way we store information. The next step would be to tweak the coefficients till we get as many similar values as possible. Similar means it can be run-length encoded, resulting in a string that looks like 12W1B12W3B24W1B14W where B stands for black and W for white.


To tweak the coefficients, we use the process called quantization: we take a pre-defined matrix of numbers and divide each block by the values in this matrix. We can use different matrices for different picture regions, achieving dynamic quality: you don’t need as much detail for the wall as you need for the cat’s fur.


The resulting set of numbers can be compressed even further with some cool lossless algorithm, which is just another bunch of boring math and statistics that you might have missed (or not) in your high school.
There is just one problem: as we do everything block-wise, the resulting cat might turn out to be more rectangular than it is. But don’t fret; we can still smooth things out with some filters.


The unfiltered block above versus the filtered one below
JPEG doesn’t use filters at all, while the AV1 encoder uses a 3-stage pipeline (where some stages are optional) to get the best quality.
First, deblocking filter smoothes the boundaries of blocks. The next filter (called CDEF) analyses the block and tries to remove ringing artifacts and avoid blurring sharp edges. Then the process called restoration could be used to recover some of the information lost during the previous compression steps.
If one of these filters is presented in AV1 bitstream, it will be applied to the frame in the decoding loop.
AV1 specification describes two more cool tricks.
The first is called “super-resolution,” which allows to downscale a frame, encode it and then upscale back while decoding.
The second one aims to fight the main enemy of compression—randomness. The idea is simple: many videos contain film grain which adds random noise to our frame. AV1 removes the grain and compresses the result. Then the decoder adds the synthetic analog of a film grain back to achieve the same look and feel.
To summarize, we have described six stages that take place while during the video compression:
- Splitting a keyframe into blocks.
- Predicting blocks from each other.
- Applying a transform.
- Quantization.
- Filtering.
- Lossless compression.
The only real difference between modern image formats is in the details of these steps.
Advances in these stages drive the evolution of modern media formats, as you can see in the following table:


As you can see, AVIF/AV1 packs most features and wins the scientific competition while also being royalty-free. The format is developed by an Alliance for Open Media governed by Amazon, ARM, Cisco, Facebook, Google, IBM, Intel, Microsoft, Mozilla, Netflix, Nvidia, Samsung Electronic, Tencent, Apple, and many more.
All these companies are for-profit, but they also want to make sure that you are using the best codecs so you can consume more content and use less bandwidth. Hence, AV1 and AVIF are both free; you don’t have to pay royalties if you decide to build a business around image compression.
It’s all subjective
Cool cool, AVIF is theoretically much-much better than JPEG by all means. But where is the proof? How do we compare these two formats? It turns out that it’s a super difficult task.
AVIF and JPEG are standards. These standards were implemented with different real codecs in different ways. And implementation matters. To make things even more difficult, recall that video codecs are sets of tools, and you can turn some of them off (for example, filters).
It means you cannot compare formats—you can only compare particular implementations and try to match a set of command-line arguments.
The type of asset that you choose to compress matters too. For example, AV1 has a set of built-in tools to achieve better compression for “screen content”, such as intra-block copy. AV1 could be better at compressing text, but JPEG could probably be better at compressing cats! So we need to choose a proper data set for compression.
And now the funniest part: how do we compare two compressed images? Let’s try!
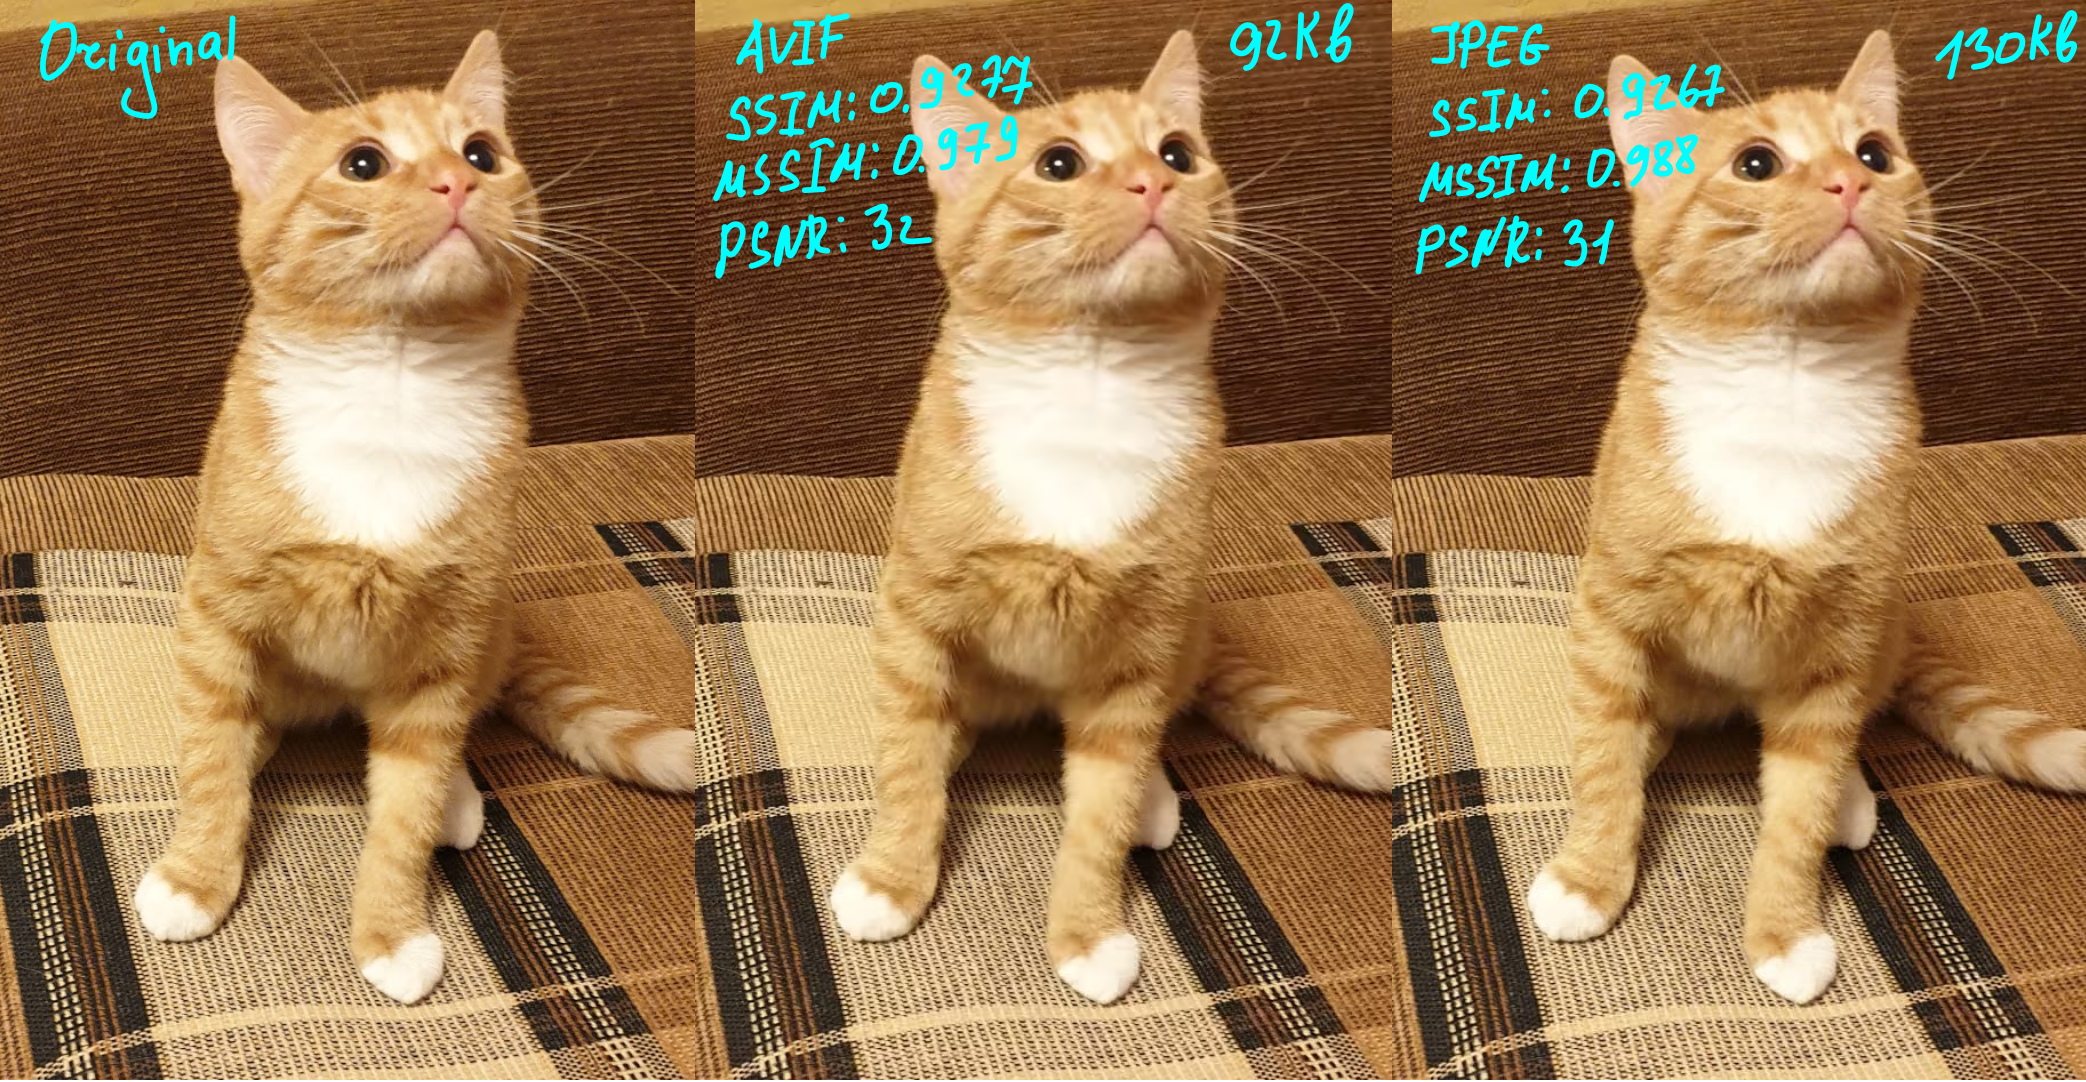
Can you see the difference above? I certainly cannot. Yes, in this particular case, AVIF is a bit smaller, but, depending on the image, that difference can be negligibly small. Where AVIF really shines is compression on low quality settings when we need to optimize for size, which is often the case for the web. What happens if we limit image size to around 20KB?
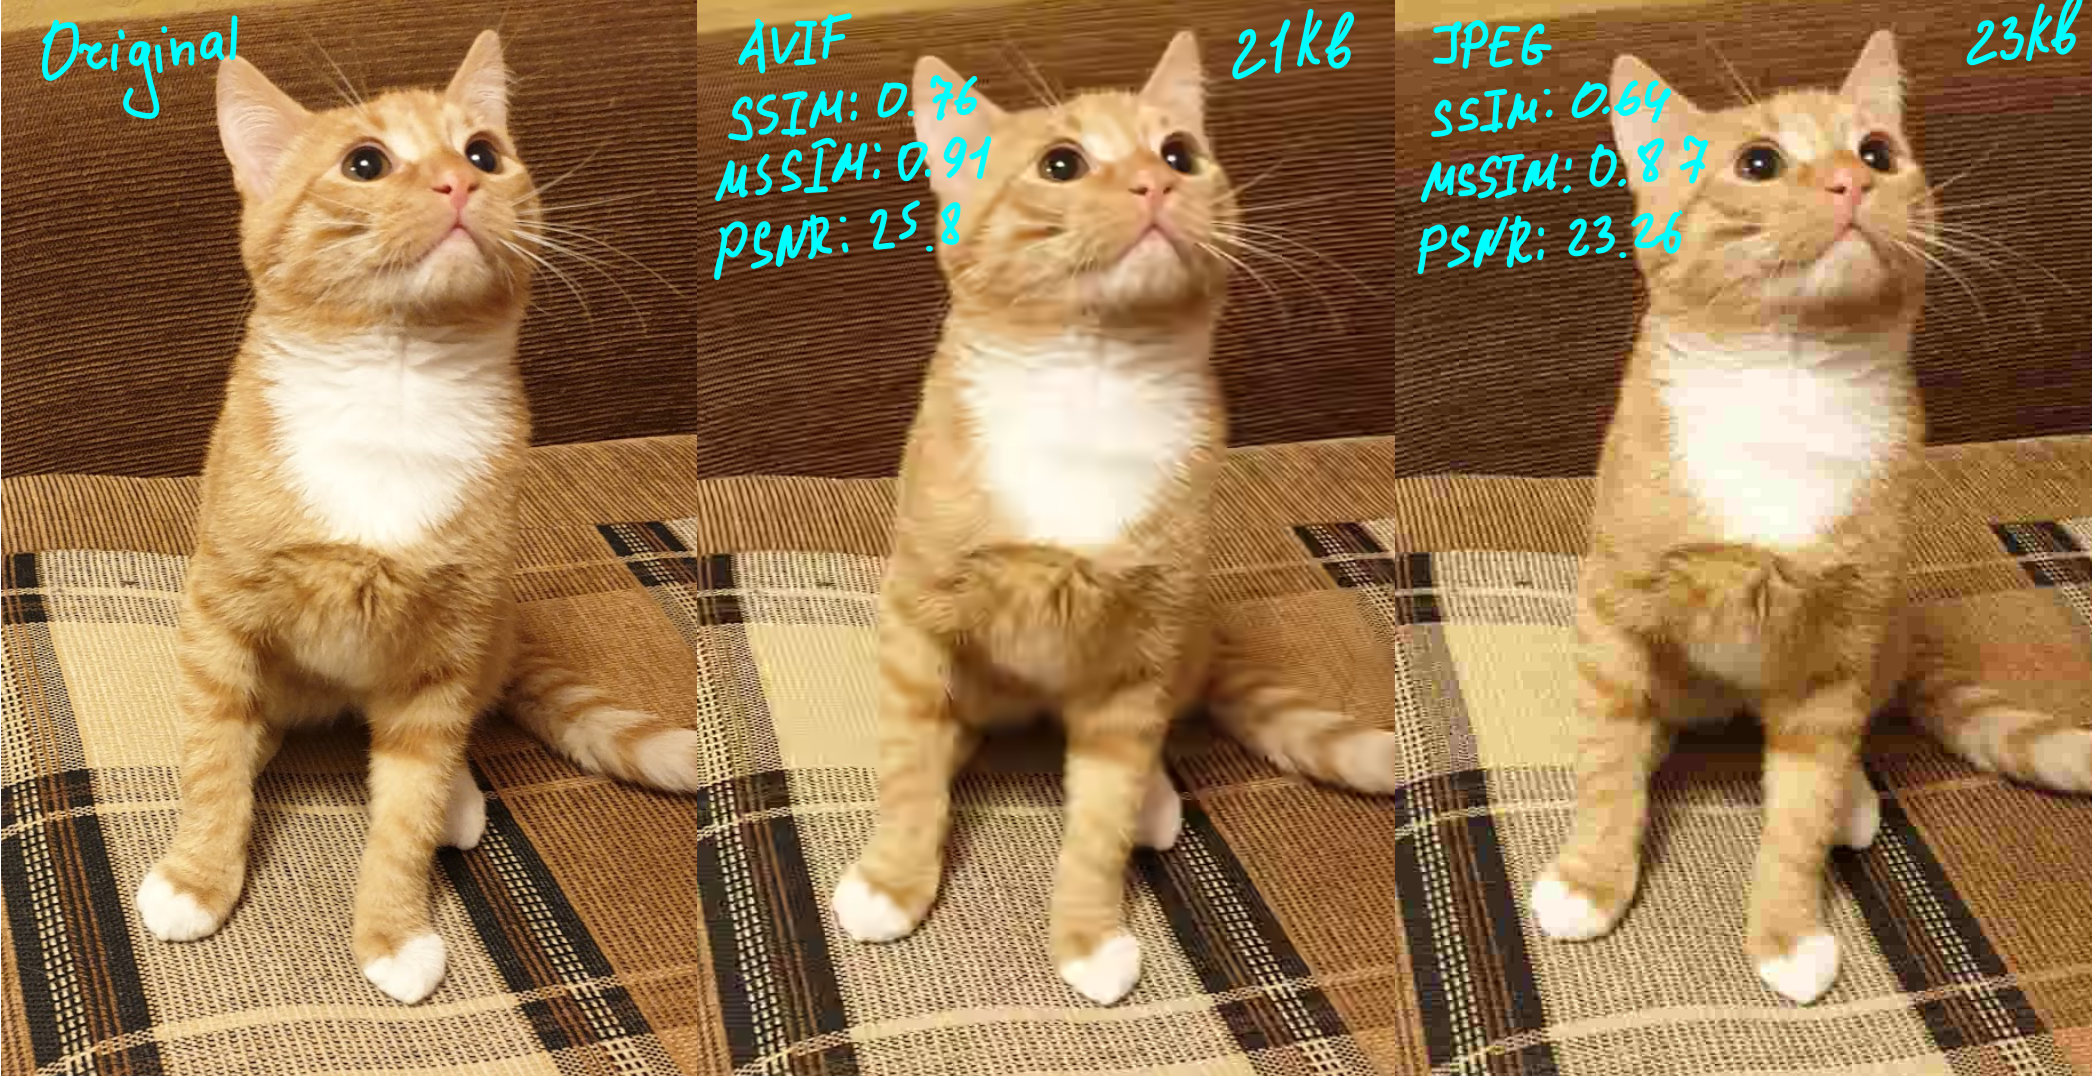
JPEG completely fell apart into blocks while AVIF is still holing up, using less space, and giving us an image that perceptually doesn’t look so different from the uncompressed original. That is the power of AV1 filters!
We can even use some hard numbers to compare images from the perceived quality point of view. The best metric to use is called SSIM (for Structural SIMilarity), and several metrics are generally combined (different types of SSIM plus PSNR).
The alternative approach is to use ML-based techniques. We could use a neural network to emulate a viewer’s perception!
Can I kick it? (Yes, you can, with imgproxy!)
The well-chosen image format can significantly improve your website performance. This became really important recently: since a new metric from Google called Core Web Vitals impacts your web page’s search rank.
In many cases, it would be super inefficent to process every picture manually. Often you need to optimize third-party images that come from users or third-party integrations. There are many solutions that can help you serve images in the best format.
We, however, recommend imgproxy. It’s an extremely performant, easy-to-use, and secure self-hosted server for processing images on the fly.
To quickly try imgproxy out, you just need to have Docker installed on your machine. If you love it (and we bet you will)—check the official website to learn about deployment options (Heroku support!) and an even more performant imgproxy Pro.


imgproxy in action


All the transformation parameters are encoded in the URL
To create AVIF images with imgproxy, all you need is to run an instance of the server and construct the right URL containing a link to the source image and the encoding options you want to use.
For more information about available options, check imgproxy documentation. Also, make sure that you use signatures in production to protect your imgproxy endpoint from unwanted requests.
However, to get a quick taste of the possibilities here is a simple DIY example for creating AVIF images with imgproxy. Fire up your terminal, start Docker Desktop, and let’s convert something to AVIF on the fly:
docker pull darthsim/imgproxy:latest
docker run -p 8080:8080 -it darthsim/imgproxy
Now imgproxy is running on localhost:8080 and is 100% ready to optimize your cats. With this, all you need is to construct a proper request for imgproxy by putting the link to the source image and the encoding options in the URL. The basic format is the following:
http(s)://%imgproxy-host/%signature/%processing_options/plain/%source_url@%extensionNow fire up your browser (we recommend Chrome, as default AVIF support might not have landed in Firefox or Safari by the time you read this) and paste the following URL into the address bar. Under the hood, imgproxy uses the fastest AVIF encoder out there: rav1e. Note that conversion is done at the time of the request; you don’t have to cook your images beforehand in any way!
# note we use /insecure/ to tell imgproxy we are not using any cryptographic signing for this simple home demo
http://localhost:8080/insecure/resize:fill:300:400:0/gravity:sm/quality:60/plain/https://www.nasa.gov/sites/default/files/thumbnails/image/pia22228.jpg@avif
There you go! You now see an AVIF picture in the wild that you just created without having to compress anything manually.
Besides rav1e, an encoder that powers imgproxy, there are other tools worth mentioning:
- SVT-AV1—an experimental encoder and decoder for AV1/AVIF;
- libaom—AV1 codec used in Chromium;
- dav1d—AV1 decoder used in Firefox;
- and, of course, ffmpeg—a swiss army knife that can encode everything.
Some CDN providers implement AVIF conversion on their side as well. Check out this post by Cloudflare.
Now you are fully equipped to save all that bandwidth and deliver those beautifully compressed images to your users!

According to the Can I Use database, more than 67% of web users are ready to reap the benefits of AVIF images today. There is no doubt that with almost unanimous industry support (and a lot of money thrown in), we can expect the format to become a de-facto standard in the next decade. If you want to become an early adopter of AVIF in your web application, you can use the combination of imgproxy URLs and a srcset HTML attribute to progressively enhance your markup while more browsers adopt the codec.
And feel free to reach out to us if you need to enlist Martian engineers and designers to help you with your digital products, whether they are built around image compression or not.
A broader picture: A guide on imgproxy for businesses

