A no-go fantasy: writing Go in Ruby with Ruby Next

Translations
- JapaneseRubyファイルにGoコードを書いてRuby Nextで動かす
Ruby is awesome. We love its readability, flexibility, and developer-centric nature. Still, here at Mars, we also love Go because it has its own sense of simplicity and magic, too. Simply put, Go holds advantages over Ruby in some aspects: it’s faster, statically typed, and comes with cool concurrency primitives out of the box. This being said, some intrepid readers might find themselves grappling with a seemingly reasonable question: if Go is so darn good, why don’t we just write everything with it?
After all, sometimes Ruby just isn’t enough to handle to the task at hand, and there have been times where we’ve had to rewrite parts of some applications with something a bit faster. Case in point: the birth of imgproxy came about via Go while we were working on a Ruby project for eBay.
So, why not just use Go? The serious answer to that question is…
…well, actually, who needs the serious answer? What’s the point in yet another article covering when to use Go versus when to use Ruby? Let’s just toss that idea out! Instead, let’s approach this article through the lens of fantasy and pretend that—because of (possibly apocalyptic) circumstances beyond our control—we need to write literally everything in Go!
Assessing the situation
So, let’s say all of our projects have already been written in Ruby, but in this fantasy world, we’ll need to abandon that language. How can we “let it Go?” (“It” being Ruby, of course). There are a few options available here:
- A complete rewrite. We could use Go and simply take the time to rewrite the entire project. But, well, this would probably be ill-advised. Let’s look at some other options.
- Write new microservices. Of course, new microservices would allow you to start new small projects using Go, but what about all the legacy Ruby code you’d be missing out on?
- The perfect fantasy solution… let’s write Go in Ruby!
Our goal is to take a new class, written in Go, and have it work right in the middle of the old Ruby codebase. That way, when it’s actually time to migrate, we’ll already be 80% ready to go. To test this idea, let’s take the “Hello World” example from A Tour of Go and change the file extension so that main.go will be main.go.rb:
# main.go.rb

package main

import "fmt"

func main() {
  fmt.Println("Hello, 世界")
}
To start, let’s just try running it:
$ ruby main.go.rb
main.go.rb:1:in `<main>': undefined local variable or method `main' for main:Object (NameError)
Well, unfortunately, it didn’t work. This means we’ll have to handwrite some code—a rare case with Ruby, but it does happen from time to time.
Implementing Go packages in Ruby
First, we are going to implement the package method. Here is how Ruby sees package main:
package main #=> package(main())

package foo #=> package(foo())
Ruby calls the main method and passes the result to the package method. But main and foo are undefined… so there is only one way to make it work.
Let’s add method_missing, which will always return the name of a method:
class << self
  def method_missing(name, *_args)
    name
  end
end
This method would be just perfect for actual, real-world production code, no? 😏
Now, let’s go over what the package method does. In Go, packages limit the visibility of variables, functions, and so on. So, packages are essentially a namespace, and they’re reminiscent of a Ruby Module:
package foo

# =>

module GoRuby
  module Foo
    # defined functions
  end
end
So, we have to take the name of the package and declare a module with that name. Let’s do this inside a GoRuby module to avoid cluttering up the global namespace:
class << self
  def package(pkg)
    mod_name = pkg.to_s.capitalize

    unless GoRuby.const_defined?(mod_name)
      GoRuby.module_eval("#{mod_name} = Module.new { extend self }")
    end

    @__go_package__ = GoRuby.const_get(mod_name)
  end
end
If the module mod_name doesn’t exist yet, we use module_eval to define a new module. Finally, we’ll save the resulting module into the @__go_package variable (we’ll need it later). That’s it for package. Let’s move on to the import method!
Making Go imports work
In Go, we import a package and then call it by name to access its methods. For example, fmt.Println("Hello, 世界"). Let’s demonstrate what we need to do to implement this:
import "fmt"

# =>

def fmt
  GoRuby::Fmt
end
It seems simple enough:
class << self
  def import(pkg)
    mod_name = pkg.split('_').collect(&:capitalize).join # String#camelize from ActiveSupport
    raise "unknown package #{pkg}" unless GoRuby.const_defined?(mod_name)

    define_method(pkg) { GoRuby.const_get(mod_name) }
  end
end
If mod_name is not defined, we raise an exception. Otherwise, we create a method with define_method.
We’ve dealt with imports. Let’s keep moving on and tackle function declarations next.
Dealing with function declarations
Here’s a little quiz: where will the block be passed?
func main() {
  # some actions
}

# => Where will the block be passed?

# 1 block goes to foo
func(main()) {
  # some actions
}

# 2 block goes to main
func(main() {
  # some actions
})
If there were a RuboCop in the room, it would have already started sounding the alert. 🚨 Without parentheses, Ruby will pass the block to the main method, which doesn’t exist. And that’s where method_missing comes into play!
class << self
  def method_missing(name, *_args, &block)
    if block
      [name, block.to_proc]
    else
      name
    end
  end
end
If a block is received, we’ll return it as the second element of the array. And here’s how we implement the func method:
class << self
  def func(attrs)
    current_package = @__go_package__
    name, block = attrs

    if current_package.respond_to? name
      raise "#{name} already defined for package #{current_package}"
    end

    current_package.module_eval { define_method(name, block) }
  end
end
This time, there’s no magic: we define a method with a name and a block from method_missing in the currently active module (@__go_package__). Now the only thing left is implementing the Go standard library.
For now, we have one method of outputting a string to stdout—that’s enough for us. We’ll just leave it as is! Take a look:
module GoRuby
  module Fmt
    class << self
      def Println(*attrs)
        str = "#{attrs.join(' ')}\n"
        $stdout << str
        [str.bytesize, nil]
      end
    end
  end
end
Go Ruby, Go!
Well, it seems like this should take care of everything! Let’s require our new library and run main.go.rb:
$ ruby -r './go_ruby.rb' main.go.rb
Well, we didn’t get any errors, but we don’t see Hello, 世界, either. The main() function from the main package is the entry point of the executable Go programs. And we have not implemented it in our library yet. Fortunately, Ruby has a callback method called at_exit, so we’ll use it:
at_exit do
  GoRuby::Main.main
end
And now let’s run the code again (here’s a gist for you to follow along at home):
$ ruby -r './go_ruby.rb' main.go.rb
Hello, 世界
You know how Go-developers have an obsession with build time? Well, there’s 0 build time here 😉 Awesome, it’s even better than Go.
Let’s dress up things a little further, shall we?
Go deeper
What about the := method? That should be easy to implement, right? We expect the No method ':=' is found error to be raised. To solve it, we’ll simply define the method on the Object, and that will be it:
$ ruby -e 'a := "Hello, 世界"'
-e:1: syntax error, unexpected '=', expecting literal content or terminator or tSTRING_DBEG or tSTRING_DVAR
a := "Hello, 世界"
We were half right. There is indeed an error, but a slightly different one. It’s happening as a result of the parser. Here is what happens:
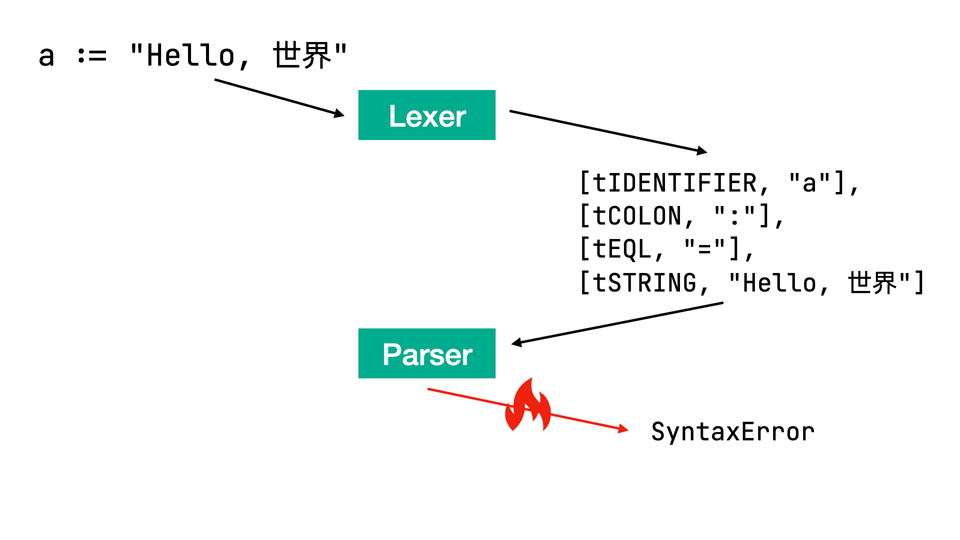
First, our code goes to the lexer. It splits the text into tokens, then the array of tokens goes to the parser, and it raises an error because it’s an illegal operation to put an equal sign after a colon. How can we fix this? Let’s explore some realistic options:
- Persuade the Ruby team to add
:=. You could spend a couple of years mastering Japanese, gain the trust of the core team, find a way to attend one of their meetings, and simply propose to add:=. - Fork Ruby. You can make and maintain your fork of Ruby. Most people have Docker anyway, so businesses won’t even notice you made the swap.
- Wave our hands in the air and transpile like we just don’t care. We could write Go and transpile it in Ruby! If only we had something like Babel for JavaScript/TypeScript, but for Ruby instead… 🤔
When DSL is not enough
Well, actually, we already have a tool to transpile our code: Ruby Next which was written by the one and only Vladimir Dementyev, so why not use it?
To transpile our code, Ruby Next hijacks the code loading process, parsing it with its own updated lexer and parser. Next, the resulting AST nodes are modified with Ruby Next rewriters. The Ruby Next rewriter marks the AST nodes which require attention and modify them accordingly. Finally, Ruby Next rewrites the code with unparser, taking the marked AST nodes into account.
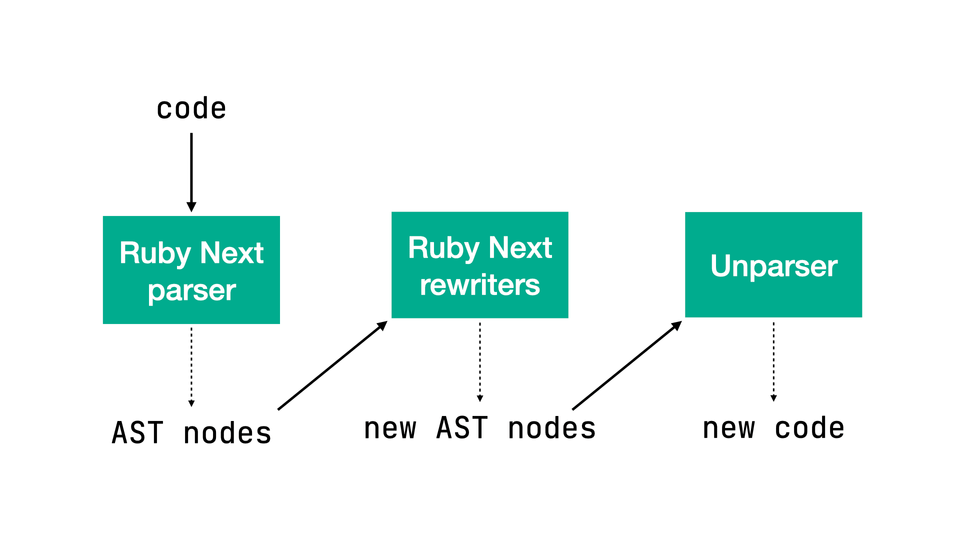
But enough talk! Let’s actually formulate an actionable plan to bring := to Ruby:
- First, we’ll modify the Ruby Next lexer.
- Likewise, we’ll modify the Ruby Next parser.
- Next, we’ll write the Ruby Next rewriter.
- Finally, we’ll be able to actually use
:=inside our code.
Rolling up our sleeves: modifying the lexer
So, let’s start with the lexer. We want the lexer to treat := as a single token and for the parser to return the same AST node that is returned when we use the simple = method:
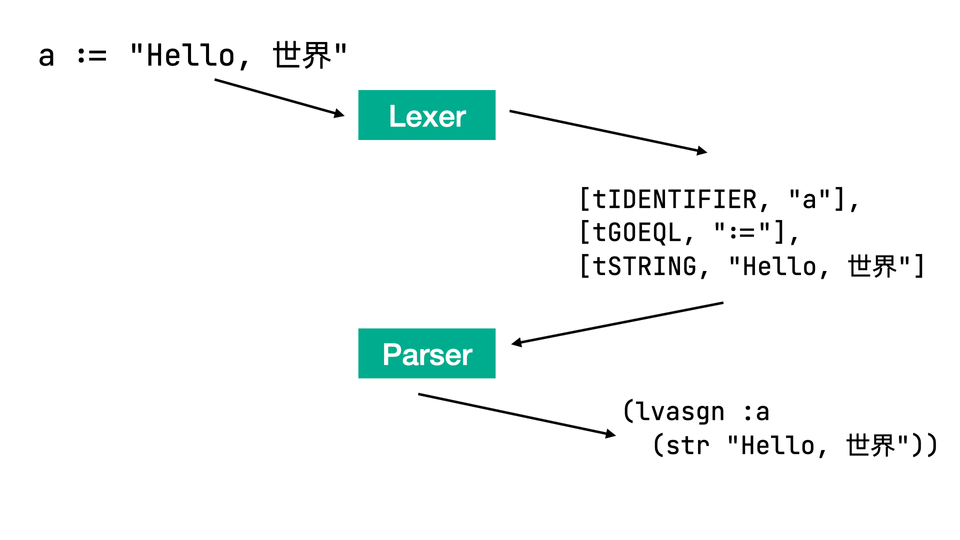
After that, we’ll be able to read our main.go.rb file, get AST, and rewrite the original code before executing it with Ruby.
The lexer in the parser gem was written using Ragel. Ragel State Machine Compiler is a finite-state machine compiler and a parser generator. It receives some code with regex expressions and various logical rules and outputs an optimized state machine in the target language, e.g., C++, Java, Ruby, Go, etc.
By the way, our lexer ends up with 2.5 thousand lines. And if we run Ragel, we’ll get an optimized Ruby class with almost 24 thousand lines:
$ wc -l lib/parser/lexer.rl
    2556 lib/parser/lexer.rl

$ ragel -F1 -R lib/parser/lexer.rl -o lib/parser/lexer.rb

$ wc -l lib/parser/lexer.rb
   23780 lib/parser/lexer.rb
Let’s just make a quick diversion and take a brisk look through the source code!
Just kidding! Instead, let’s write our own simple lexer for arithmetic operations.
Creating a simple lexer
We want to create a simple lexer for arithmetic operations. In this case, a string will go into the lexer and it should be transformed into an array of tokens:
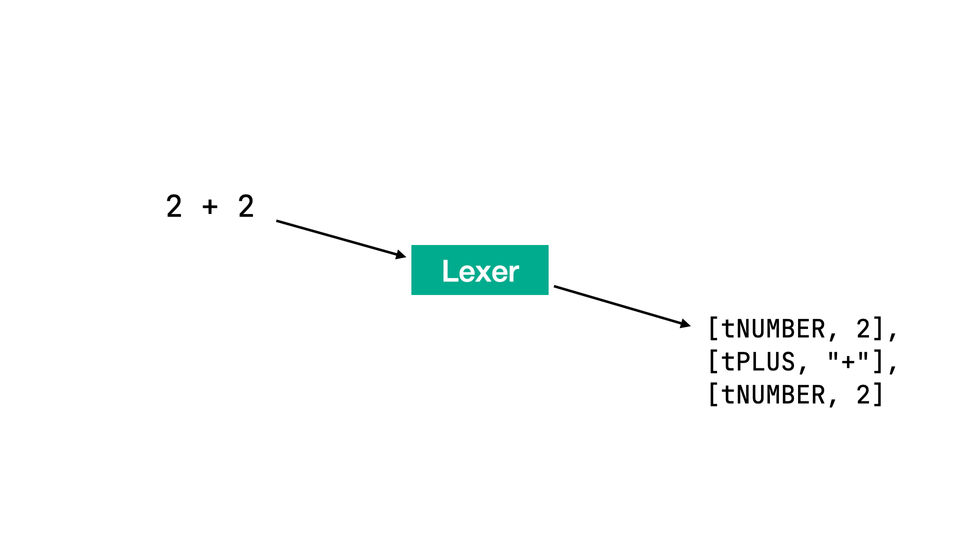
We’ll start by defining our Ruby class, let’s call it Lexer:
class Lexer
  def initialize
    @data = nil # array of input symbols
    @ts = nil # token start index
    @te = nil # token end index
    @eof = nil # EOF index
    @tokens = [] # resulting array of tokens
  end
end
Ragel will work in the context of this class object, and it assumes that data, ts, and te are defined. To go to the final state, we need the EOF index eof. tokens is an array of tokens that we will return to the user.
Let’s move on to the state machine. The Ragel code is located between %%{ ... }%%:
class Lexer
  %%{ # fix highlighting %
    # name state machine
    machine ultimate_math_machine;

    # tell Ragel how to access variables defined earlier
    access @;
    variable eof @eof;

    # regexp-like rules
    number   = ('-'?[0-9]+('.'[0-9]+)?);

    # main rule for the state machine
    main := |*
      # when number is passed, print indices of parsed number
      number => { puts "number [#{@ts},#{@te}]" };
      # any is a predefined Ragel state machine for any symbol,
      # just ignore everything for now
      any;
    *|;
  }%% # fix highlighting %
end
In the code above, we defined a state machine called ultimate_math_machine, and we’ve told Ragel how to access the variables we defined earlier. Next, we defined a regexp-like rule for numbers. Finally, we declared the state machine itself.
If we come across a number, we execute the Ruby code inside braces. In our case, it’s the output of the token type and its indices. Also, for now, we’ll use the predefined state machine any to skip over all other symbols.
Now, the only thing left is to add the Lexer#run method to prepare input data, initialize the Ragel state machine and execute it:
class Lexer
  def run(input)
    @data = input.unpack("c*")
    @eof = @data.size
    %%{ # fix highlighting %
      write data;
      write init;
      write exec;
    }%% # fix highlighting %
  end
end
We unpack the input string and calculate the EOF index, write data and write init initializes the Ragel state machine, write exec runs it. It’s time to compile and run this simple machine:
$ ragel -R lexer.rl -o lexer.rb

$ ruby -r './lexer.rb' -e 'Lexer.new.run("40 + 2")'
number [0,2]
number [5,6]
It works! Now we need to populate the @tokens array with our tokens and add some operator rules. Here is the Ruby portion of the code:
class Lexer
  # list of all symbols in our calculator with token names
  PUNCTUATION = {
    '+' => :tPLUS,   '-' => :tMINUS,
    '*' => :tSTAR,   '/' => :tDIVIDE,
    '(' => :tLPAREN, ')' => :tRPAREN
  }

  def run(input)
    @data = input.unpack("c*") if input.is_a?(String)
    @eof = input.length

    %%{ # fix highlighting %
      write data;
      write init;
      write exec;
    }%% # fix highlighting %

    # return tokens as a result
    @tokens
  end

  # rebuild substring from input array and current indices
  def current_token
    @data[@ts...@te].pack("c*")
  end

  # push current token to the resulting array
  def emit(type, tok = current_token)
    @tokens.push([type, tok])
  end

  # use passed hash `table` to define type of the token and call `emit`
  def emit_table(table)
    token = current_token
    emit(table[token], token)
  end
end
Here we have a new Lexer#emit method, which adds a token to the resulting @tokens array, and a fancy Lexer#emit_table(table) method, which will use the PUNCTUATION hash to define the token type and then add it to the resulting array. Also, we will return @tokens at the end of the Lexer#run method. It’s time to trick out our state machine block:
class Lexer
  %%{ # fix highlighting %
    machine ultimate_math_machine;
    access @;
    variable eof @eof;

    # regexp-like rules
    number   = ('-'?[0-9]+('.'[0-9]+)?);
    operator = "+" | "-" | "/" | "*";
    paren    = "(" | ")";

    main := |*
      # when number is passed, call emmit with token type :tNUMBER
      number           => { emit(:tNUMBER) };
      # when an operator or a parenthesis is passed,
      # call emmit_table to use PUNCTUATION to choose token
      operator | paren => { emit_table(PUNCTUATION) };
      # space is a predefined Ragel state machine for whitespaces
      space;
    *|;
  }%% # fix highlighting %
end
When the state machine encounters a number, we call the Lexer#emit method. When it encounters an operator or a parenthesis, we call Lexer#emit_table. Also, we swapped the any and space state machines to skip all the whitespaces. Here is a full gist of our lexer. Let’s compile it and run it once again!
$ ragel -R lexer.rl -o lexer.rb

$ ruby -r './lexer.rb' -e 'p Lexer.new.run("2 + (8 * 5)")'
[[:tNUMBER, "2"], [:tPLUS, "+"], [:tLPAREN, "("], [:tNUMBER, "8"], [:tSTAR, "*"], [:tNUMBER, "5"], [:tRPAREN, ")"]]
There are our tokens, awesome!
Ruby Next lexer
Now we are ready to tweak the lexer from the gem parser. Let’s start by adding a new token to the PUNCTUATION hash:
PUNCTUATION = {
  '='  => :tEQL, '&' => :tAMPER2, '|' => :tPIPE,
  ':=' => :tGOEQL, # other tokens
}
Add := to the punctuation_end rule:
# A list of all punctuation except punctuation_begin.
punctuation_end = ','  | '='  | ':='  | '->' | '('  | '['  |
                  ']'  | '::' | '?'   | ':'  | '.'  | '..' | '...' ;
Finally, add := to one of the state machines, expr_fname, just before the colon:
'::'
=> { fhold; fhold; fgoto expr_end; };

':='
=> { fhold; fhold; fgoto expr_end; };

':'
=> { fhold; fgoto expr_beg; };
fhold and fgoto are Ragel functions: one manages indices, and the other calls the next state machine.
Our journey through the lexer is almost complete. Let’s check it out by writing a test:
# test/ruby-next/test_lexer.rb

def test_go_eql
  setup_lexer "next"

  assert_scanned(
    'foo := 42',
    :tIDENTIFIER, 'foo', [0, 3],
    :tGOEQL,      ':=',  [4, 6],
    :tINTEGER,    42,    [7, 9]
  )
end
After running it, everything is working correctly, so let’s push onward to the parser!
Hey, more pushing? This is a lot of pushing! Well, this is a hardcore technical article on the Evil Martians blog—what did you expect? No worries, we’re almost there—so hang on! 💪
Keep rolling: modifying the parser
The parser inside the parser gem is Rake Rack Racc—YACC in Ruby, for Ruby. Just like Ragel, Racc takes a file as an input and compiles it into a Ruby-class parser.
For Racc to work, we must create a grammar file with a rules block and a parser class with the #next_token method defined. To understand how the parser gem works, we will write our own parser from scratch. Let’s take the output from our lexer, pass it to the parser, and we’ll get AST nodes as an output:
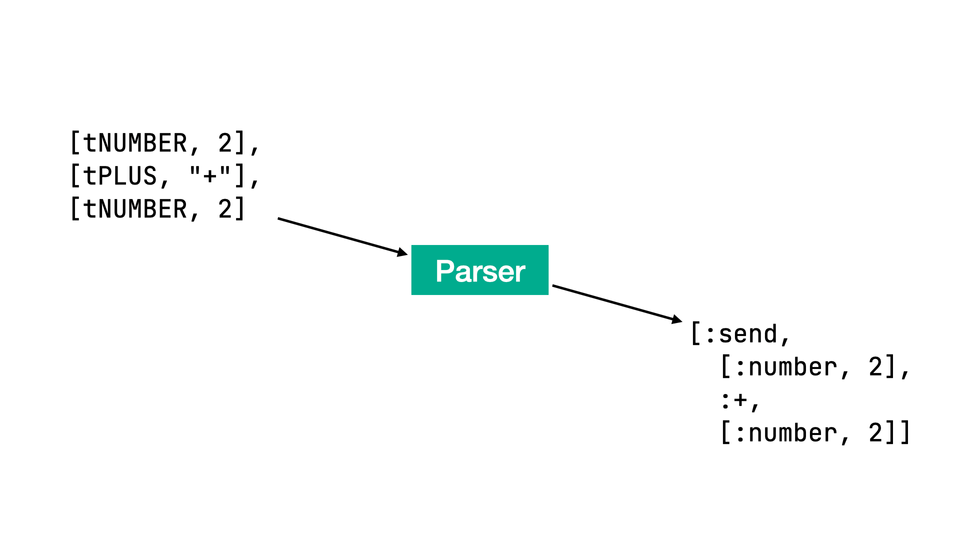
By the way, if you’re wondering why we need both a lexer and a parser, imagine this math problem: 2 + (1 + 7) * 5. The lexer doesn’t know anything with regards to parentheses and operator priorities. The lexer just returns a stream of tokens; the parser is responsible for grouping AST nodes.
Creating a simple parser
Let’s start writing our parser by defining the MatchParser class:
class MathParser
  # Token types from our lexer
  token tPLUS   tMINUS  tSTAR
        tDIVIDE tLPAREN tRPAREN
        tNUMBER

  # operator precedence
  prechigh
    left tSTAR tDIVIDE
    left tPLUS tMINUS
  preclow

  rule
    # exp is one of the other rules
    exp: operation
       | paren
       | number

    # return :number node
    number: tNUMBER { result = [:number, val[0]] }

    # return result between parentheses
    paren: tLPAREN exp tRPAREN { result = val[1] }

    # return :send node for all operations
    operation: exp tPLUS exp   { result = [:send, val[0], val[1].to_sym, val[2]] }
             | exp tMINUS exp  { result = [:send, val[0], val[1].to_sym, val[2]] }
             | exp tSTAR exp   { result = [:send, val[0], val[1].to_sym, val[2]] }
             | exp tDIVIDE exp { result = [:send, val[0], val[1].to_sym, val[2]] }
end
We listed the token types from our lexer in the token block and defined operator precedence in the prechigh block. Finally, in the rule block, we defined the following rules:
number—when the parser gets a number, we’ll add an AST node to the special variableresult.paren—when the parser gets an expression inside parentheses, return AST node of expression.operation—when the parser gets a binary operation, return AST node:sendwith an operator and resulting AST nodes of two expressions.
Below the MathParser class, we can define two special blocks, ---- header and ---- inner:
# class MathParser ... end

---- header
require_relative "./lexer.rb"

---- inner

def parse(arg)
  @tokens = Lexer.new.run(arg)
  do_parse
end

def next_token
  @tokens.shift
end
Within the ---- header block, we can define imports. Here, we’ve imported our lexer.
And in the ---- inner block, we can define the methods of the parser class. The main method MathParser#parse gets tokens from the lexer and calls do_parse to start parsing. The MathParser#next_token method fetches tokens from the array one by one. Here is a full gist of our parser.
Let’s build and run it! Like so:
$ racc parser.y -o parser.rb

$ ruby -r './parser.rb' -e 'pp MathParser.new.parse("5 * (4 + 3) + 2");'
[:send,
 [:send, [:number, "5"], :*, [:send, [:number, "4"], :+, [:number, "3"]]],
 :+,
 [:number, "2"]]
Ruby Next parser
Great, we wrote our parser, complied it to a Ruby parser, and now we can finally move on to the parser from the gem parser!
Let’s take a look at how a common assignment from the gem works:
arg: lhs tEQL arg_rhs
       {
         result = @builder.assign(val[0], val[1], val[2])
       }
   #...
When the parser gets a tEQL token, it calls the Parser::Builders::Default#assign method:
def assign(lhs, eql_t, rhs)
  (lhs << rhs).updated(
    nil, nil,
    location => lhs.loc
      .with_operator(loc(eql_t))
      .with_expression(join_exprs(lhs, rhs))
  )
end
Upon closer inspection, it’s clear that the eql_t token is used here only to calculate the operator location in the input text. What does this mean? We can simply reuse this method with our new token, and it will do the work for us!
Let’s add our new token:
token kCLASS kMODULE kDEF kUNDEF kBEGIN kRESCUE kENSURE kEND kIF kUNLESS
      # ...
      tRATIONAL tIMAGINARY tLABEL_END tANDDOT tMETHREF tBDOT2 tBDOT3
      tGOEQL
Next, we’ll locate the rules for the assignment with tEQL token and copy them, replacing the token with tGOEQL :
command_asgn: lhs tEQL command_rhs
                {
                  result = @builder.assign(val[0], val[1], val[2])
                }
            | lhs tGOEQL command_rhs
                {
                  result = @builder.go_assign(val[0], val[1], val[2])
                }
             #...
          arg: lhs tEQL arg_rhs
                 {
                   result = @builder.assign(val[0], val[1], val[2])
                 }
             | lhs tGOEQL arg_rhs
                 {
                   result = @builder.go_assign(val[0], val[1], val[2])
                 }
             #...
That’s that! Now let’s add a test:
# test/ruby-next/test_parser.rb
def test_go_eql
  assert_parses(
    s(:lvasgn, :foo, s(:int, 42)),
    %q{foo := 42},
    %q{    ^^ operator
      |~~~~~~~~~ expression},
    SINCE_NEXT
  )
end
After running the test, we see everything is working properly, and the parser gem is now ready to handle :=.
What’s next?
Coming next, Ruby Next
Ruby Next has multiple modes. In transpiler mode, we feed the files into Ruby Next and get rewritten code as output (yep, just like with Racc and Ragel!). In runtime mode, Ruby Next simply patches the files on the go.
It doesn’t matter which mode we choose because, in any case, the source code will be run through the lexer, the parser, and finally through the available Ruby Next rewriters.
Let’s look at our case—the only way our new AST node differs from the common assignment AST node is the operator:
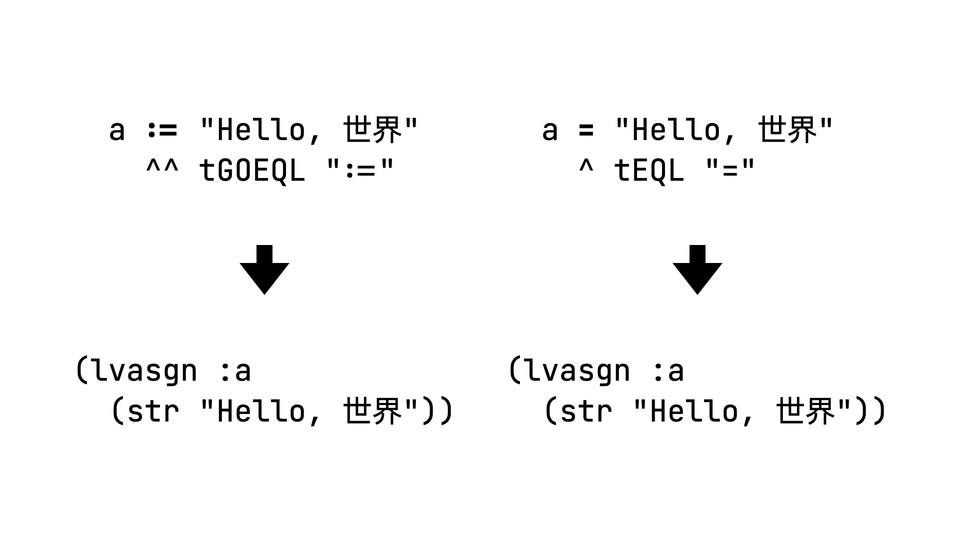
So let’s write a Ruby Next rewriter to replace it!
To catch our AST node, we need to define a method called "on_#{ast_type}". In our case, the AST node type is lvasgn, so the method name will be #on_lvasgn:
# lib/ruby-next/language/rewriters/go_assign.rb

module RubyNext
  module Language
    module Rewriters
      class GoAssign < Base
        NAME = "go-assign".freeze
        SYNTAX_PROBE = "foo := 42".freeze
        MIN_SUPPORTED_VERSION = Gem::Version.new(RubyNext::NEXT_VERSION)

        def on_lvasgn(node)
          # skip if operator is already '='
          return if node.loc.operator == "="

          # mark ast-node requiring rewriting
          context.track! self

          # change the operator to '='
          replace(node.loc.operator, "=")
        end
      end
    end
  end
end
Inside the on_lvasgn method, we check the node’s operator, and if it’s not =, we mark the node as requiring a rewrite to change the operator from := to =.
Next, we need to register our new rewriter by adding it to RubyNext::Language.rewriters. Let’s register it as a proposed feature by modifying lib/ruby-next/language/proposed.rb:
# lib/ruby-next/language/proposed.rb

# ...

require "ruby-next/language/rewriters/go_assign"
RubyNext::Language.rewriters << RubyNext::Language::Rewriters::GoAssign
And with that, here’s our Go code:
# main.go.rb

package main

import "fmt"

func main() {
  s := "Hello, 世界"
  fmt.Println(s)
}
Finally, let’s require uby-next.rb and run it:
$ ruby -ruby-next -r './go_ruby.rb' main.go.rb
Hello, 世界
Hooray! Let’s take a second to celebrate our awesome accomplishment with an emoji! Unfortunately, there isn’t one which encapsulates exactly what we’ve done here, so this cup with a straw will have to be enough this time: 🥤
A serious conclusion
Ok, Go, perhaps we got a little sidetracked with you and writing this Ruby Go-berg Machine experiment of ours. But let’s go back, the original question was: if Go is so darned good, why do we still use Ruby at all?
Well, in this article, we used Ruby’s DSL superpowers to replicate the functionality of Go. Then we ran into a problem, and to solve it, we learned how ruby-next uses the ruby-next-parser gem. We wrote our own lexer and parser. And finally, we modified ruby-next-parser and added a new rewriter to ruby-next.
So, could you do all this beautiful madness with the same ease with Go? Yeah, no way.
Ruby is so powerful that we can do literally everything with it—for example, waste everyone’s time by using it to run Go 🤪—while in Go itself, we would need to write our own implementation of Ruby VM to run Ruby, or use C-bindings and mruby, and it wouldn’t be as easy as writing Ruby DSL, or tweaking a couple of lines in the parser.
That being said, there’s really no practical reason to write Go in Ruby—but guess what? That doesn��’t matter! That’s because you now have a great new trick in your toolkit: you can modify Ruby exactly how you want. So, do it! Play around, test your implementations in the real world, and try proposing your best ideas to the community by opening an issue in Ruby Tracker. With great power comes great Ruby ability! (Or something like that).

