Circuit breakers and Ruby in 2025: don't break your launch


Translations
- Japanese外部サービス接続障害に「サーキットブレーカー」で対応する(翻訳)
It’s 4 AM. Your team calls …the app is down. Time to wake up, grab a coffee, and investigate. You uncover a trail of fails: the payment processor you integrate with started responding slowly → your checkout requests began timing out → users started frantically refreshing → and now your entire Rails app is unresponsive. This is a cascading failure, something more common than you might think. In this post, we’ll explore circuit breakers in Ruby, how they can prevent these cascading failures, and share a battle-tested open source Ruby solution so you can focus less on circuit breaker configs and more on business logic!
In the past, cascading failures were a concern reserved for large engineering teams managing dozens or hundreds of services. They had the time and resources to explore solutions like the circuit breaker pattern and implement or adapt tools as needed.
But today, with the rise of AI, even early-stage projects often involve multiple services that could benefit from using circuit breakers from the outset of their projects.
A common setup includes a Rails monolith and one or more services hosting ML models, like OCR engines or LLMs. Since these models can respond slowly or unpredictably, calls to them are ideal candidates for circuit breakers.
The challenge? Most circuit breaker gems are not startup-friendly. They often lack monitoring and real-time management capabilities, require extensive configuration, and don’t work well out of the box. But there is a solution… and we’ll get to that in just a bit!

Hire Evil Martians
From idea to launch, when it comes to Rails and beyond, Evil Martians helps startups ship faster, scale smarter, and stay ahead. Reach out and let's get started!
What are cascading failures?
First, some context for why turning to circuit breakers makes sense: in the world of software development, a cascading failure (also known as a domino effect) is a chain reaction where the failure of one component leads to the breakdown of others. Consider the following system:
- The monolith, i.e. our main application
- A payment service extracted from the monolith for scalability
- A payment processor, which is an external service that handles the actual payments
Imagine the payment processor becomes unavailable. A typical user scenario could unfold like this:
- A user attempts to complete a purchase. Our monolith forwards the request to the payment service.
- The payment service tries to contact the payment processor, but the request times out.
- The payment service returns a
408(Request Timeout) to the monolith.
From here, the user is likely to retry. If this all happened once, no big deal. But what if it’s a launch day or you’re running a flash sale?
In a scenario like this, requests begin to pile up, each waiting for the payment processor to respond. Threads are blocked, memory is consumed, and eventually, the system just collapses under the load, affecting the payment service, the monolith, and even unrelated parts of your application. Things can really grind to a halt here!
Circuit breakers to the rescue!
Thankfully, cascading failures can be contained, and a time-tested way to do this is via the circuit breaker pattern, popularized by Martin Fowler’s “Circuit Breaker” article. If you’d like to read that original post alongside this Ruby-focused guide, it’s still worth your time.
To get the basics of this approach, let’s think about physical circuit breakers commonly found in apartments, houses, and buildings of all sorts. When there’s too much current flowing (like from too many appliances running at once or a short circuit), it trips and cuts off the electricity. This action prevents damage to your devices, wiring, or worse.
Flipping back to the world of software, instead of monitoring electrical current, a circuit breaker watches for errors, typically in calls to external services. If too many errors occur, the breaker trips and further calls to the protected service are temporarily blocked. This protects your system from wasting resources and getting overwhelmed while waiting for a failing service to respond.
Digging into circuit breakers
Let’s talk about two of the possible states a circuit breaker can have
(and we’ll touch on a third later):
- 🟢 Closed - Everything is working normally and requests flow as expected.
- 🔴 Opened - Further calls are blocked. There have been too many failures, so the breaker has tripped, preserving system resources.
In terms of the code itself, a circuit breaker is an object which wraps a method you want to protect, counting any errors. Once the error count reaches a certain error threshold (also called a failure threshold), we trip the circuit breaker, moving to the Opened state. This means subsequent method calls return an error before calling the external service, thus exhausting far fewer resources.
Then, after a certain period of time (usually called “Cool-Off Time”), the circuit breaker enters a recovery state. It then checks if the external service is available, resets the error counter, and enters the Closed state, allowing method calls to happen and reach the external service.
Let’s write a simplified version of a Circuit Breaker to illustrate how it works.
# Simplified circuit breaker implementation with only `Opened` and `Closed` states
require 'net/http'

class CircuitBreaker
  class CircuitBreakerOpened < StandardError; end

  def initialize(error_threshold:, cool_off_time:)
    # Number of errors tolerated before tripping circuit breaker
    @error_threshold = error_threshold
    # Time waited before checking if external service is available
    @cool_off_time = cool_off_time
    # Initial errors count is 0
    @errors_count = 0
    # Initial state for the circuit breaker is `Closed`
    @state = :closed
  end

  def run(&block)
    # Open the circuit breaker after Cool-Off Time period ends
    if (@state == :opened) && (Time.now > @transition_time + @cool_off_time)
      @errors_count = 0
      @state = :closed
    end

    # Terminate connection on our side if circuit breaker is open to avoid exhausting our resources
    raise CircuitBreakerOpened if @state == :opened

    # Actual connection happens here
    block.call
  rescue StandardError => error
    # Skip state changes for circuit breaker errors
    raise if error.is_a? CircuitBreakerOpened

    # Increment error counter
    @errors_count += 1

    # Check if errors count reached the threshold for tripping the circuit breaker
    if @errors_count >= @error_threshold
      @transition_time = Time.now
      # Tripping the circuit breaker
      @state = :opened
    end

    raise
  end
end

url = URI('https://www.google.com')

# We allow 3 network errors, after which we trip the circuit breaker for 10 seconds
circuit_breaker = CircuitBreaker.new(error_threshold: 3, cool_off_time: 10)
circuit_breaker.run { Net::HTTP.get(url) }
The 🟡 “Half-Opened” state
Software circuit breakers also need an intermediate Half-Opened state to test recovery. After Cool-Off Time has passed, the circuit breaker allows limited traffic to probe the external service.
- If the request succeeds, the breaker resets to Closed.
- If it fails again, the breaker returns to Opened.
This recovery phase helps avoid uselessly restoring traffic to an unstable service.
# Simplified circuit breaker implementation with `Opened`, `Closed` and `Half-Open` states
require 'net/http'

class CircuitBreaker
  class CircuitBreakerOpened < StandardError; end

  def initialize(error_threshold:, cool_off_time:)
    # Number of errors tolerated before tripping circuit breaker
    @error_threshold = error_threshold
    # Time waited before checking if external service is available
    @cool_off_time = cool_off_time
    # Initial errors count is 0
    @errors_count = 0
    # Initial state for the circuit breaker is `Closed`
    @state = :closed
  end

  def run(&block)
    # Switch circuit breaker state to `Half-Opened` after Cool-Off Time ends
    if (@state == :opened) && (Time.now > @transition_time + @cool_off_time)
      @state = :half_opened    end

    # Terminate connection on our side if circuit breaker to avoid exhausting our resources
    raise CircuitBreakerOpened if @state == :opened

    # Actual connection happens here
    call_result = block.call

    # Switch circuit breaker state to `Closed` after a successful request
    if @state == :half_opened      @state = :closed      @errors_count = 0    end
    # Return result of the protected code
    call_result
  rescue StandardError => error
    # Skip state changes for Circuit Breaker errors
    raise if error.is_a? CircuitBreakerOpened

    # Increment error counter
    @errors_count += 1

    # Check if error count reached the threshold for tripping the circuit breaker
    if @errors_count >= @error_threshold
      @transition_time = Time.now
      # Tripping the circuit breaker
      @state = :opened
    end

    raise
  end
end

url = URI('https://www.google.com')

# We allow 3 network errors, then we trip the circuit breaker for 10 seconds
circuit_breaker = CircuitBreaker.new(error_threshold: 3, cool_off_time: 10)
circuit_breaker.run { Net::HTTP.get(url) }
Note: circuit breakers can be used for more than network calls
So far, our examples have focused on protecting network calls, which is how circuit breakers are most commonly used, but you can wrap any unstable or resource-heavy operation:
# Example of using circuit breaker unrelated to network
circuit_breaker = CircuitBreaker.new(error_threshold: 5, cool_off_time: 3)
circuit_breaker.run { unstable_method_call }
If the logic is unpredictable or prone to failure under load, a breaker can help keep the rest of your system stable.
Stoplight: the circuit breaker gem with simplicity in mind
Now we come to the solution teased back at the beginning of this post. After Martin Fowler’s well-known piece on circuit breakers, engineers across the world began implementing their own circuit breakers. In the Ruby galaxy, one of the most popular solutions is Stoplight.
Built for performance and simplicity, Stoplight lets engineers spend less time fiddling with circuit breaker configs and more time building business logic.
Stoplight’s Admin Panel is a powerful control interface that lets you monitor and manage circuit breakers in real time. Whether embedded in your Rails app or deployed as a standalone service, it gives you full visibility and manual override capabilities for every circuit breaker in your system.
From here on, let’s discuss how you can implement Stoplight in your project, whether you’re an early-stage startup or feel it meets your use case.
Getting Stoplight ready is simple. First, just add Stoplight to your Gemfile:
bundle add stoplightThen, configure Stoplight to work with your Redis configuration:
rake stoplight:install# config/initializers/stoplight.rb
require 'redis'
Stoplight.configure do |config|
# Change Redis.new to your Redis configuration
config.data_store = Stoplight::DataStore::Redis.new(Redis.new)
endAnd now you’re ready to send network requests:
require 'net/http'
require 'stoplight'

light = Stoplight('Highway to Mars')
light.run do
  Net::HTTP.get(URI('https://evilmartians-mars-base.com/'))
end
The “lights” in Stoplight make things easier
Traditional circuit breakers use states like Closed, Opened, and Half-Opened. These terms are easy to confuse and often feel counterintuitive. For example, “Closed” means everything is working, while “Opened” means everything is broken. And “Half-Opened”? Sounds more like a bug than a recovery mode.
That’s why Stoplight adopts a better abstraction inspired by something we all understand: traffic lights.
In Stoplight, circuit breakers are reimagined as
lights, each with a clear and familiarcolorstatus.
So, instead of wrestling with ambiguous terms like Half-Opened, you get a system that intuitively monitors routes, signals readiness, and prevents cascading failures.
Each light governs a specific “route” (why not Earth to Mars, for example?) and uses color to indicate whether it’s safe to proceed:
🟢 Green – Closed: Everything is operational. Stoplight allows traffic to flow normally. All systems are go.
🔴 Red – Opened: The destination is currently failing so Stoplight blocks all outgoing requests to avoid wasting resources and overwhelming your system.
🟡 Yellow – Half-Opened: After a cool-off period, Stoplight cautiously reopens the route. It allows a few requests through to test if the external service has recovered.
- If the tests succeed, the Light turns Green again.
- If they fail, it goes back to Red.
Naming your lights
In Stoplight, each light represents a control system for a specific outbound route, and each of these routes must have a unique name. This name is important because it determines how errors are tracked and how traffic is managed.
For instance, if two lights share the same name, they also share their error history and state. So when one route fails, all traffic associated with that name is treated as failing-even if it points to different destinations:
require 'net/http'
require 'stoplight'

light = Stoplight('Earth to Mars Mission corridor')
light.run do
  Net::HTTP.get(URI('https://evilmartians-mars-base.com/'))
end

light = Stoplight('Earth to Mars Mission corridor') # Same name = shared error tracking
light.run do
  Net::HTTP.get(URI('https://evilmartians-moon-base.com/'))
end
In this example, both routes are labeled “Earth to Mars Mission corridor”, so if one light turns red, both are grounded, even if they target different services.
Mission Planning best practices and Stoplight’s defaults
Keeping on with the space theme, just as real space agencies don’t build separate launch towers for every individual launch, you shouldn’t create a new light for every individual API call.
Instead, group your lights by service, not by HTTP method or function. For example, if you have a payment service, use the same light name for all of the requests to it—whether it’s GET, POST, or DELETE. The light should govern the entire route, not each command sent along it.
Once your lights have been named and aligned to their proper routes, your network requests are cleared for launch. Fortunately, Stoplight comes with mission-ready defaults—no complex setup required!
Just install the gem, connect Stoplight to Redis, and you’re equipped with a well-calibrated traffic control system that’s prepared to manage outages from day one:
- A Cool-Off Time of 60 seconds:
After a light turns 🔴 red, it blocks traffic for 60 seconds before entering recovery mode (🟡). This pause gives the system time to stabilize before attempting a test launch. - The error threshold is 3 consecutive failures:
A light flips from 🟢 green to 🔴 red after detecting 3 failed launches in a row-enough to avoid false positives, but quick enough to respond to real issues. - Window Size is unlimited (
nil):
By default, Stoplight counts all failures from the beginning of time (or at least since a light was created). You can customize this later if you want a shorter telemetry window. - Tracked Errors are all
StandardErrors:
Stoplight monitors all standard Ruby exceptions, including common network issues likeErrno::ECONNREFUSED, ensuring that communication breakdowns are quickly caught.
Tuning your lights with custom configurations
While Stoplight’s defaults are well-calibrated for most missions, there are still times when you’ll need to fine-tune your lights.
Here’s one common scenario: you may want to ignore certain types of errors that aren’t relevant to error tracking. For instance, if a missing database record (that will produce the ActiveRecord::RecordNotFound exception) is a normal part of your mission’s behavior, there’s no need to trigger a full system lockdown.
Up next, let’s run through some of these.
Configuring the global control system
You can configure Stoplight at the global level, adjusting how all of the lights behave. This is typically done in your initializer (config/initializers/stoplight.rb):
# config/initializers/stoplight.rb

require 'redis'

Stoplight.configure do |config|
  config.data_store = Stoplight::DataStore::Redis.new(Redis.new)
  config.skipped_errors = [ActiveRecord::RecordNotFound]
end
Individual light adjustments
Need special rules for one specific route? (Perhaps a Mars freight lane that handles failures differently from your lunar missions?) You can configure each light individually:
light = Stoplight(
  "Mars freight lane",
  skipped_errors: [ActiveRecord::RecordNotFound]
)
light.run do
  Net::HTTP.get(URI('https://evilmartians-mars-base.com/'))
end
This gives you flexibility to define local exceptions without disrupting your entire system.
Calibrating error detection
Adjusting which errors to track is just one part of configuring your lights. To gain full control over how each route reacts to errors, you can also calibrate how each light detects and responds to errors.
These mission-specific parameters let you define how cautious or aggressive each Light should be when facing instability. Let’s note that although these names may be familiar since we mentioned them in the earlier bit on the traffic control system that Stoplight gives you, these next items are specific to error detection calibration:
threshold– The number of consecutive failures required to switch a light to 🔴 red. A lower value means the light reacts faster to issues.cool_off_time– The time the light should stay 🔴 red before attempting recovery (thus switching to 🟡 yellow).window_size– The timeframe for counting failures. Setting this helps prevent old, irrelevant errors from affecting new decisions.
You can set these values globally, applying them to all lights:
# config/initializers/stoplight.rb

Stoplight.configure do |config|
  config.cool_off_time = 30
  config.threshold = 10
  config.window_size = 60
end
Or you can define them per light, tailoring behavior to the needs of each route:
fast_light = Stoplight(
  "Highway to Mars",
  threshold: 10,
  window_size: 60
)
slow_light = Stoplight(
  "Country Road to Mars",
  threshold: 5,
)

fast_light.run do
  Net::HTTP.get(URI('https://evilmartians-mars-base.com/'))
end
slow_light.run do
  Net::HTTP.get(URI('https://evilmartians-jupiter-base.com/'))
end
These controls let you manage the risk tolerance of each light individually, so that lights for high-volume, high-risk services can react quickly, while slower or more tolerant ones can accumulate more errors before shutting things down.
The Stoplight Admin Panel
The Stoplight Admin Panel delivers exactly what every interstellar mission needs: a command deck with a real-time view of all systems, routes, and launchpads.
You can mount the Admin Panel directly into your Rails app:
Rails.application.routes.draw do
  # ...
  mount Stoplight::Admin => '/stoplights'
  # ...
end
Or deploy it as a standalone control station using the official Stoplight Docker image. Just make sure it connects to the same Redis instance your lights use.
As of Stoplight version 5, you can equip your system with a modern and powerful Mission Dashboard, a control center that gives you full visibility and manual control over all of your lights.

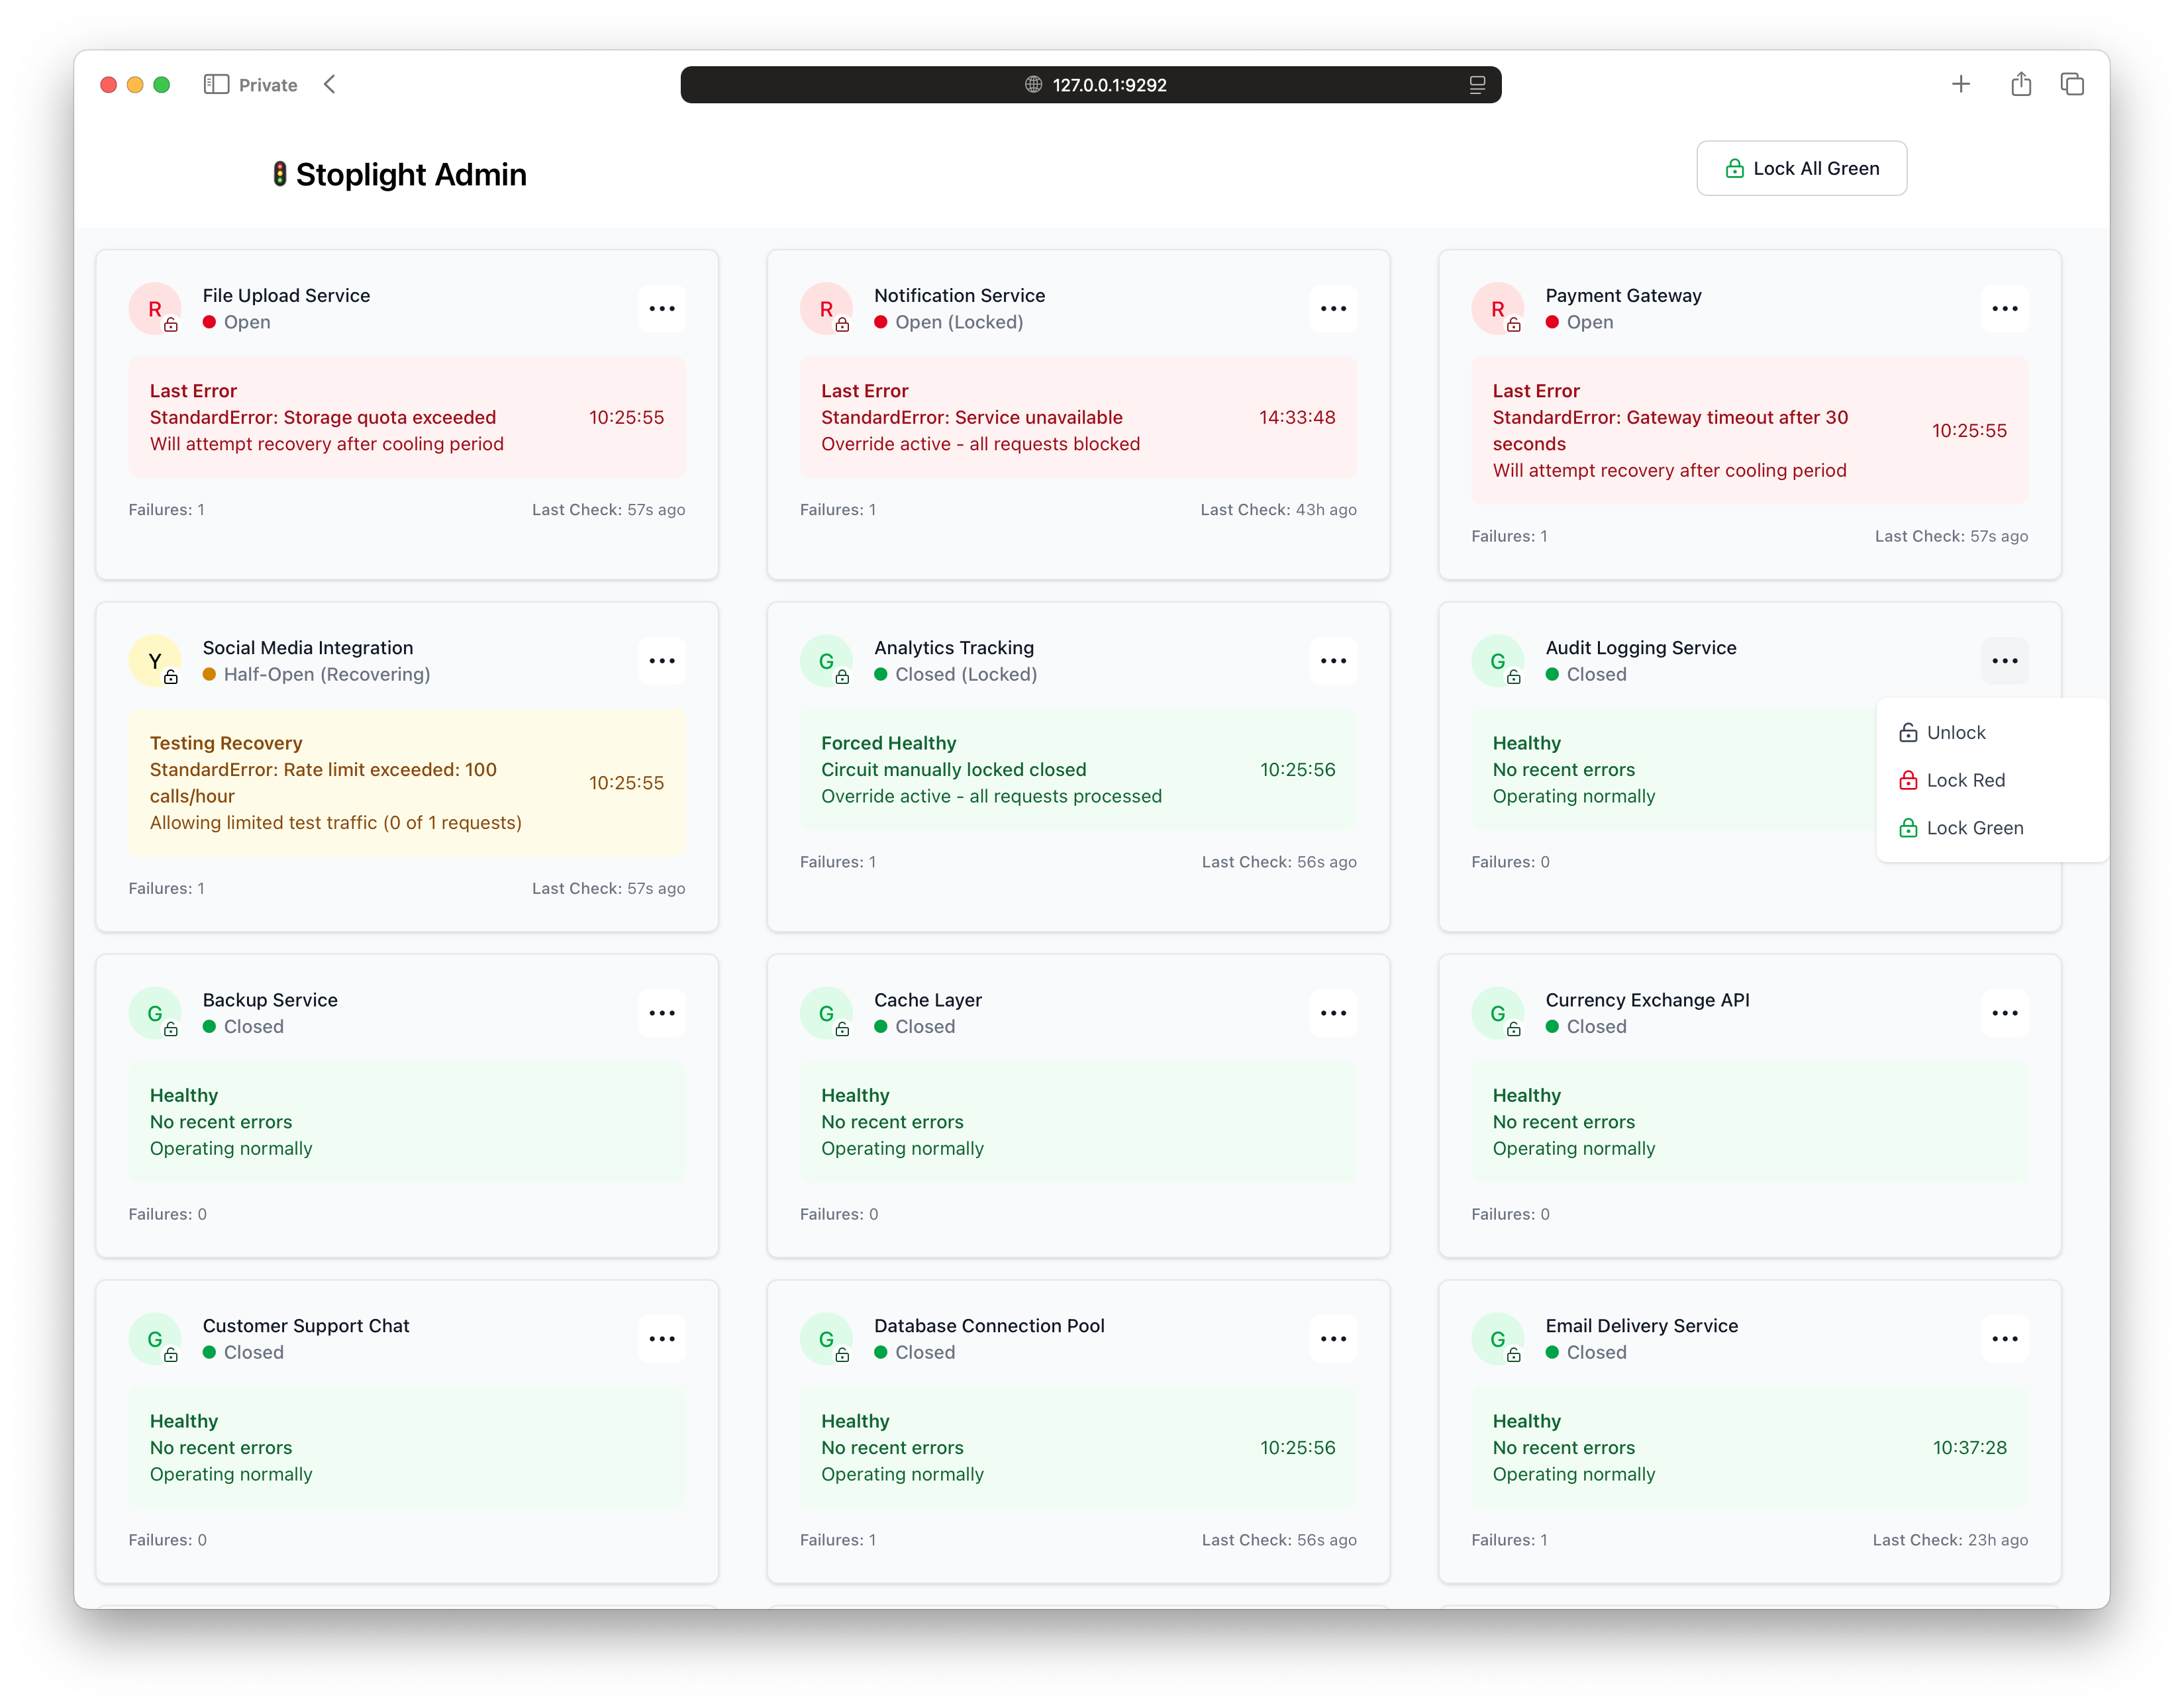
Stoplight Admin Panel-Mission Control Dashboard for your lights
Before we wrap up here, let’s take a look at what the dashboard allows you to monitor.
Live Light Status
As you might have guessed, you can monitor all the lights in your system and instantly see their current state: 🟢, 🟡, or 🔴. So, you’ll know at a glance which routes are active, recovering, or in lockdown.
Manual Overrides
From the Admin Panel, you can lock any light into a specific state, bypassing automatic behavior. For instance, locking 🟢 green is useful for testing or temporarily enabling all traffic during development. On the other hand, locking 🔴 red will manually suspend a route, even before the threshold is reached.
This feature is especially useful for:
- E2E test environments
- Local debugging and override scenarios
- Live incident response
- Gracefully shutting down parts of your system
Lights out
This post started with a 4 AM wake-up call. Without protection in place, that’s the kind of crisis that can wipe out a launch, derail a sale, or burn through engineering time you can’t afford to lose.
Stoplight turns that “all hands on deck” moment into a non-event: a few retries fail, breaker trips, and the rest of your system stays healthy while you fix the problem. Plus, it’s something that even fresh startups can easily have in place from the early stages.
Failures are inevitable, but downtime doesn’t have to be. So, light up the skies and launch with confidence!