Hands-on WebAssembly: Try the basics


Translations
- ChineseWebAssembly上手:基础指南
- JapaneseWebAssemblyハンズオン: 実際に動かして基礎を学ぶ
Get started with WebAssembly through our simple hands-on tutorial that assumes only general knowledge in web development. The only tools you’ll need to get a taste of Wasm through runnable code examples are a code editor, any modern browser, and a Docker container with toolchains for C and Rust that comes with the article.
WebAssembly has been around for three years. It works in all modern browsers, and some companies are brave enough to use it in production (hats off, Figma). There is serious brainpower behind it: Mozilla, Microsoft, Google, Apple, Intel, Red Hat—some of the best engineers from these companies, and others, keep contributing to WebAssembly. It is universally considered the Next Big Thing in web technologies, yet the wider frontend community doesn’t rush to adopt it. We all know HTML, CSS, and JavaScript, as the three big elephants that the web stands upon, and it takes more than three years to change a world view. Especially when a quick googling yields something like that:
WebAssembly is a virtual instruction set architecture and a binary instruction format for a stack-based virtual machine.
If you can’t immediately relate to the statement above—it is too easy to give up.
The goal of this post is to explain WebAssembly in a more accessible way and walk you through concrete examples of using it on a web page. If you are a developer who’s been curious about WebAssembly and never had a chance to try it out—this text is for you. Especially if you like dragons.
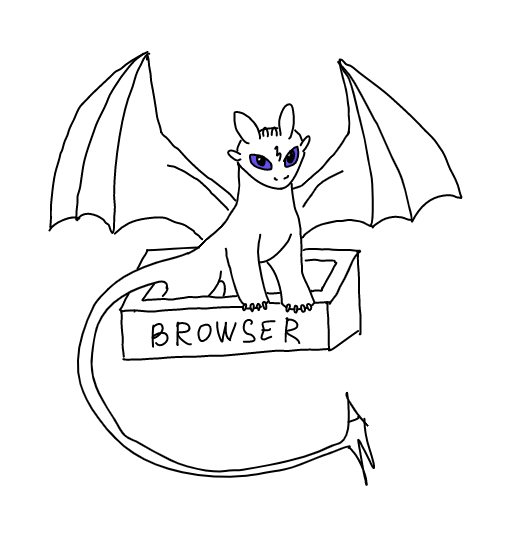
Hic sunt dracones
Before diving into the topic myself, the mental model of WebAssembly I had was the one of the dragon: something strong, fast, and dangerously attractive, but also mystical and, probably, deadly. And on my mental map of web technologies, WebAssembly also fell into the “here be dragons” categories:
- go exploring at your own risk.

Those fears turned out to be unfounded. The main metaphor of frontend development still stands. WebAssembly still belongs to the realm of the client-side applications, so it still runs in the sandbox that is your browser. It still relies on familiar JavaScript APIs. It also drastically expands the limits of what can be done on the client by allowing you to serve binaries directly.
Tune in to see how it all works, how you can compile code to Wasm, and when it makes sense to use it WebAssembly in your projects.
Code for humans vs. code for machines
Before WebAssembly came into play, JavaScript enjoyed its monopoly as the only full-featured programming language executed by browsers. Humans who code for the web know how to express themselves in JS and trust the client machines to run their code.
Anyone with little-to-none programming experience will understand the meaning of the following lines of JavaScript. Even though the task this code “solves” is pretty meaningless: divide a random number by two and add it to the array of numbers 11 088 times.
function div() {
  return Math.random() / 2;
}

const arr = [];

for (let i = 0; i < 11088; i++) {
  arr[i] = div();
}
This code is perfectly readable by humans, but it means nothing to the CPU of the client machine that received this snippet over the web and now has to run it. CPUs understand machine instructions that encode a (rather dull) sequence of steps that the processor has to take to produce a result.
To run our little snippet of code, my CPU (Intel x86-64) needs 516 instructions. Here are how those instructions look when displayed in assembly language, a textual representation of machine code. The instruction names are cryptic, and to make sense of them, you need a thick manual that comes with a processor.

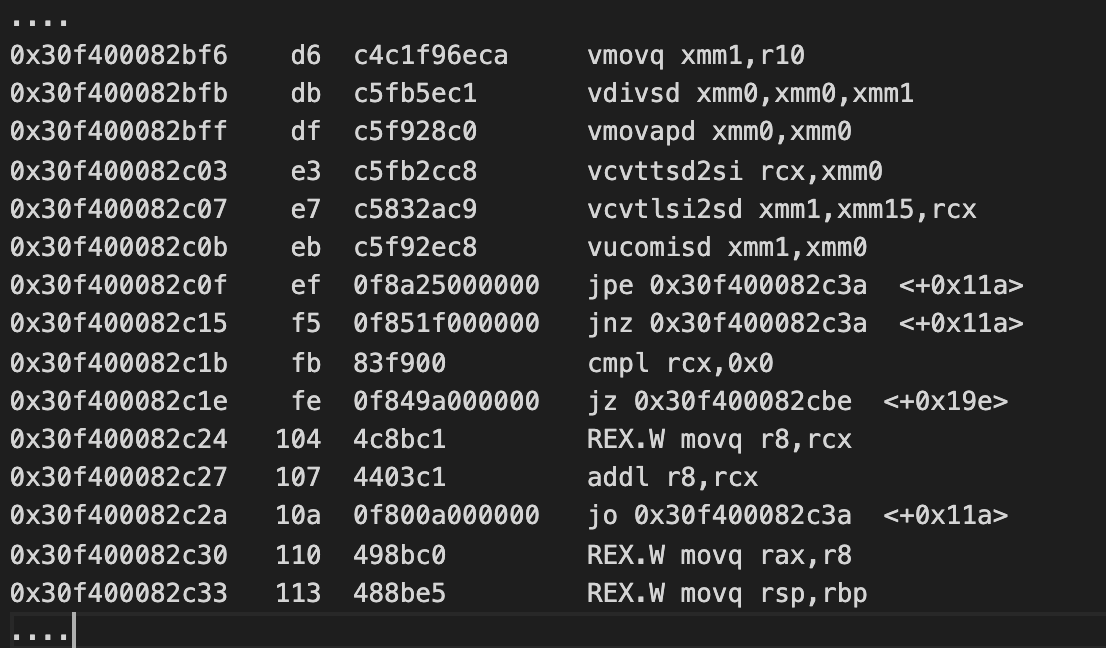
Several instructions of x86_64 assembly
On every clock cycle (2 GHz means two billion cycles per second), a processor will try to fetch one or more instructions and execute them. Typically, there are many instructions carried simultaneously (it is called instruction-level parallelism).
To run your code as fast as possible, processors employ tricks like pipelining, branch prediction, speculative execution, prefetching, and so on. Processors have a complex system of caches to fetch the data for the instructions (and instructions itself) as fast as possible. Getting data from the main memory is dozens of times slower than getting data from the caches.
Different CPUs implement different Instruction Set Architectures (ISA), so the one in your PC (most likely, based on Intel x86) will not understand the machine code for the one in your smartphone (most likely, one of the Arm architectures).
The good news is—if you write code for the web, you don’t have to mind the difference between processor architectures. Modern browsers are efficient compilers that will happily turn your code into something that the CPU of the client machine will understand.
Compilers 101
To understand how WebAssembly comes into play, we have to talk about compilers a bit. The compiler’s job is to take the human-readable source code (JavaScript, C, Rust, you name it) and turn it into a set of instructions for a target processor to understand. Before emitting the machine code, the compiler will first translate your code into an intermediate representation (IR)—an accurate “rewrite” of your program independent of both the source and the target languages.
A compiler will look at the IR and see how to optimize it, probably generating another IR, and then another—until it decides that no further optimizations can occur. As a result, the code you write in your editor can be very different from what a computer will execute.
To show you what it means, here’s a little snippet of C code that adds and multiplies numbers.
#include <stdio.h>

int main()
{
    int result = 0;
    for (int i = 0; i < 100; ++i) {
        if (i > 10) {
            result += i * 2;
        } else {
            result += i * 11;
        }
    }

    printf("%d\n", result);

    return 0;
}
And here’s its internal representation in the widely used LLVM IR format, generated by a compiler.
define hidden i32 @main() local_unnamed_addr #0 {
entry:
  %0 = tail call i32 (i8*, ...) @iprintf(…), i32 10395)
  ret i32 0
}
The point here is that while performing optimizations compiler arrived at the result of the computation—instead of letting processor do the math at the runtime. Hence the i32 10395 part, which is precisely the number that C code above will ultimately output.
A compiler has a whole bag of magic tricks up its sleeve: to avoid executing your “non-efficient” human code at runtime and replace it with a more optimized machine version.


How compilers work
A compiler pipeline is a complex beast, but we can split it into two distinct parts: the frontend and the backend. The compiler frontend parses the source code, analyzes it, and transforms into the IR, and the compiler backend optimizes the IR for the target and generates target code.
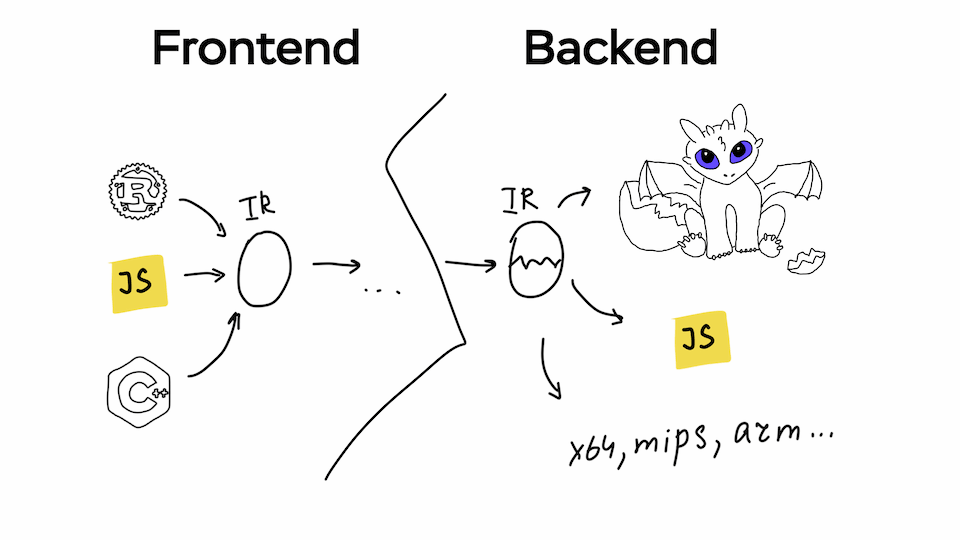
Frontend and Backend
Now let’s get back to the web.
What if we could have an intermediate representation that all browsers will understand?
Then we can use it as a target for program compilation without having to worry about the compatibility with the client’s system. We can now also write our program in any language; we are not married exclusively to JavaScript anymore. The browser will then fetch the intermediate representation of our code and do its backend magic: transform the IR into machine instructions for the client architecture.
That’s what WebAssembly is all about!

WebAssembly: The IR for the web
To fulfill a dream of a single format for exchanging code written in any language, developers of WebAssembly had to make some strategic architectural choices.
For browsers to fetch the code in the shortest amount of time possible, the format needs to be compact. Binary is the most compact you can get.
For compilation to be efficient, we need something as close to machine instructions as possible, without sacrificing portability. As all Instruction Set Architectures depend on hardware, and it is impossible to tailor to all systems that the browsers can run on, the creators of WebAssembly opted for a virtual ISA: a set of instructions for an abstract machine. It does not correspond to any real-world CPU but can be processed efficiently in software.
Virtual ISA is low-level enough to be easily translated into specific machine instructions. Unlike real-world CPUs, an abstract machine for WebAssembly does not rely on registers—locations where modern processors put data before operating on it. Instead, it uses a stack data structure: an add instruction, for instance, will pop two uppermost numbers from the stack, add them together, and push the result back on the top of the stack.
Now, as we finally understand what the “virtual instruction set architecture and a binary format for a stack-based virtual machine” means, it is time to unleash the power of WebAssembly!
Release the dragon!
Now it is time to learn by doing. We are going to implement a simple algorithm for drawing a simple fractal curve called a Dragon curve. The source code is not the most important part here: we will show you what it takes to create a WebAssembly module and run it in a browser.
Instead of diving straight into advanced tools like emscripten that can make our life easier, we will start with the direct usage of a Clang compiler with the LLVM WebAssembly backend.
In the end, our browser will be able to draw this picture:

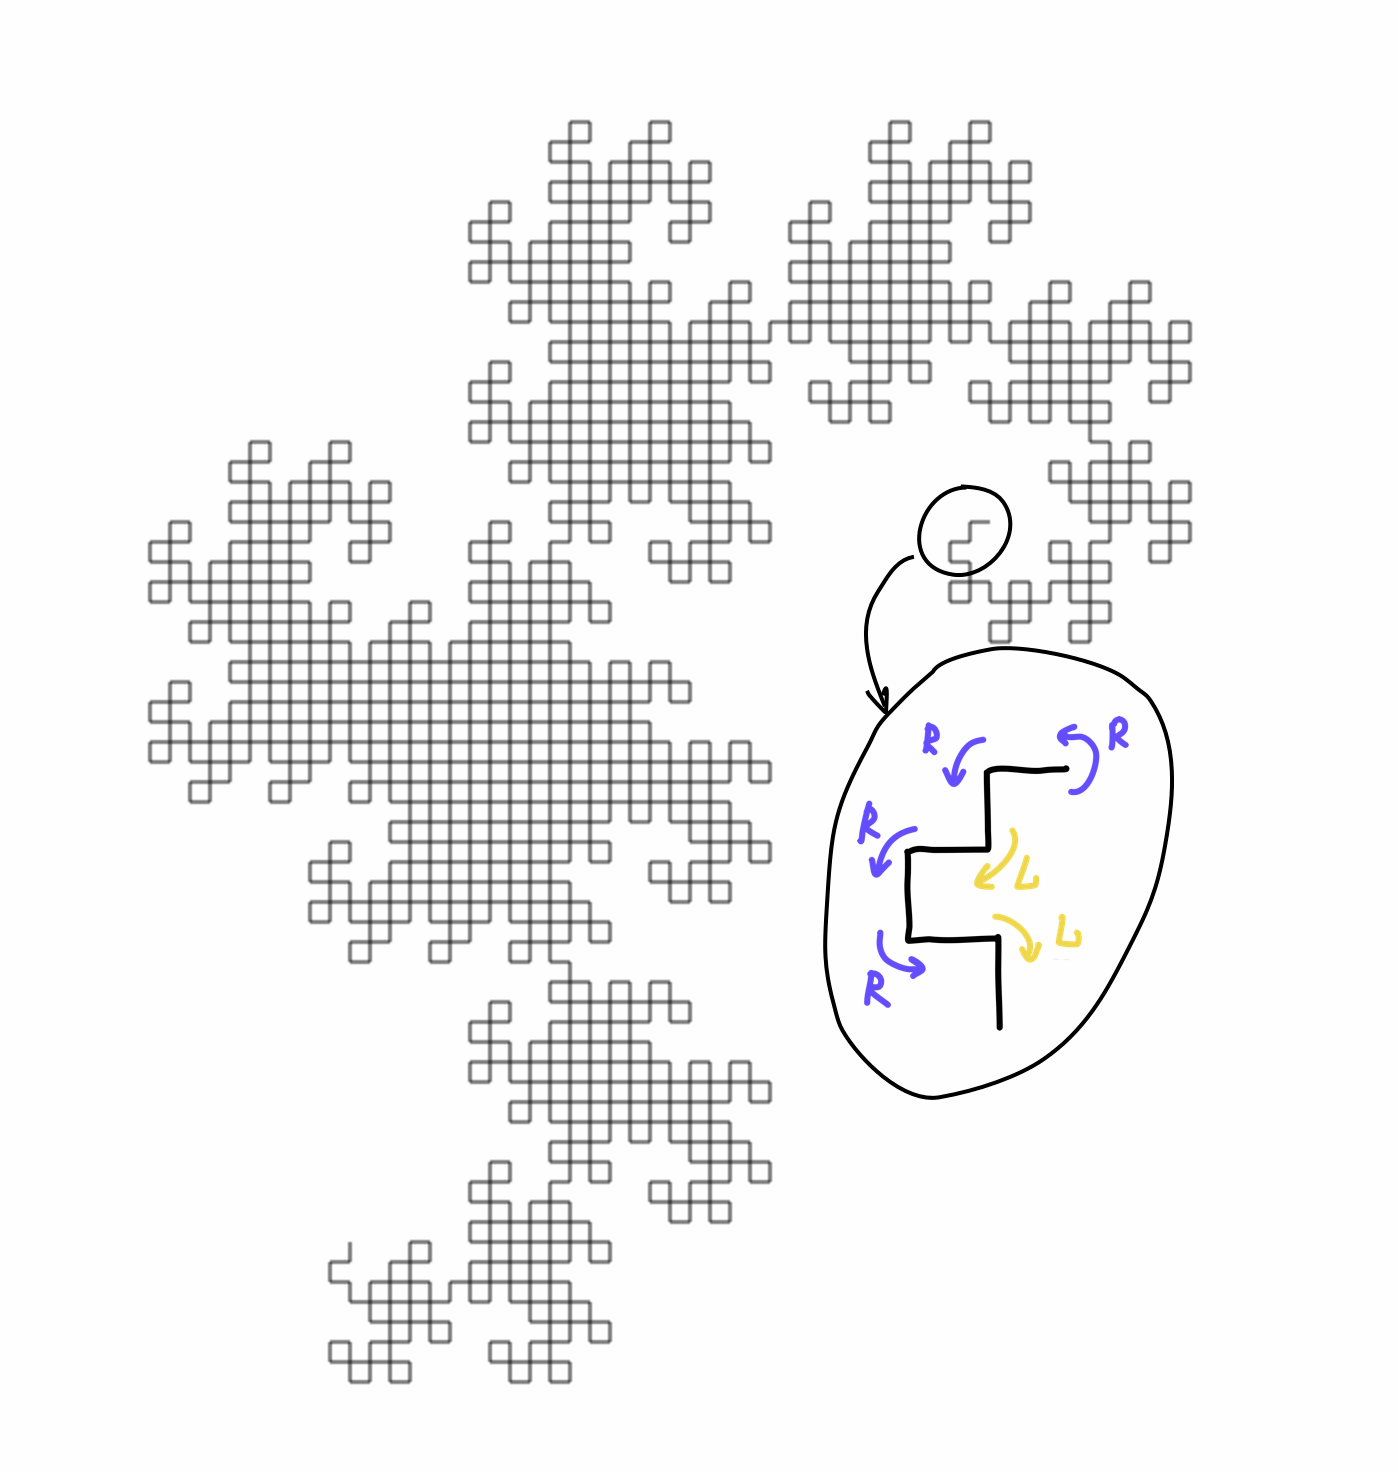
Dragon curve and turns
We will draw a line from a starting point on canvas and perform a sequence of left and right turns to achieve the desired fractal shape.
The goal of the program is to generate an array of coordinates for our line to follow. It will be the JavaScript’s job to turn this into a picture. The code that does the generation is written in good old C.
Don’t worry; you will not have to spend hours setting up the development environment as we have baked all the tools you might need into a Docker image. The only thing you need on your computer is Docker itself, so if you haven’t used it before—now is the time to install it, just follow the steps for your preferred operating system.
A word of warning: command line examples assume you are on Linux or Mac. To make it work on Windows, you can either use WSL (we recommend upgrading to WSL2) or change the syntax to support Power Shell: use backticks instead of \ for line breaks and ${pwd}:/temp instead of $(pwd):$(pwd).
Fire up your terminal and create a folder where we will put our example:
mkdir dragon-curve-llvm && cd dragon-curve-llvm
touch dragon-curve.c
Now open your favorite text editor and put the following code inside the freshly created file:
// dragon-curve-llvm/dragon-curve.c
#ifndef DRAGON_CURVE
#define DRAGON_CURVE

// Helper function for generating x,y coordinates from "turns"
int sign(int x) { return (x % 2) * (2 - (x % 4)); }

// Helper function to generate "turns"
// Adapted from https://en.wikipedia.org/wiki/Dragon_curve#[Un]folding_the_dragon
int getTurn(int n)
{
  int turnFlag = (((n + 1) & -(n + 1)) << 1) & (n + 1);
  return turnFlag != 0 ? -1 : 1; // -1 for left turn, 1 for right
}

// fills source with x and y points [x0, y0, x1, y1,...]
// first argument is a pointer to the first element of the array
// that will be provided at runtime.
void dragonCurve(double source[], int size, int len, double x0, double y0)
{
  int angle = 0;
  double x = x0, y = y0;
  for (int i = 0; i < size; i++)
  {
    int turn = getTurn(i);
    angle = angle + turn;
    x = x - len * sign(angle);
    y = y - len * sign(angle + 1);
    source[2 * i] = x;
    source[2 * i + 1] = y;
  }
}
#endif
Now we need to compile it into WebAssembly using LLVM’s Clang and its WebAssembly backend and linker. Run this command to make our Docker container do the work. It’s just a call to clang binary with a set of flags.
docker run --rm -v $(pwd):$(pwd) -w $(pwd) zloymult/wasm-build-kit \
clang --target=wasm32 -O3 -nostdlib -Wl,--no-entry -Wl,--export-all -o dragon-curve.wasm dragon-curve.c--target=wasm32tells a compiler to use WebAssembly as a target for compilation.-O3applies a maximum amount of optimizations.-nostdlibtells not to use system libraries, as they are useless in the context of a browser.-Wl,--no-entry -Wl,--export-allare flags that tell the linker to export all the C functions we defined from the WebAssembly module and ignore the absence ofmain().
As a result, you will see a dragon-curve.wasm file appearing in your folder. As expected, it is a binary file containing all of 530 bytes of our program! You can inspect it like so:
docker run --rm -v $(pwd):$(pwd) -w $(pwd) zloymult/wasm-build-kit \
wasm-objdump dragon-curve.wasm -s
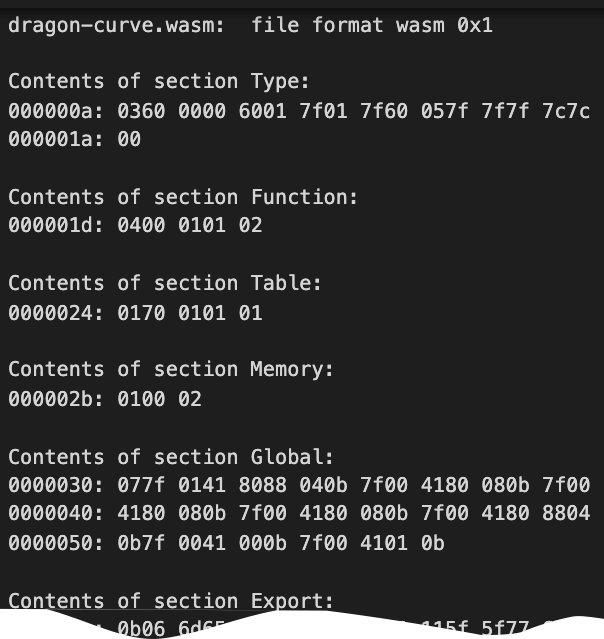
wasm-objdump dragon-curve.wasm
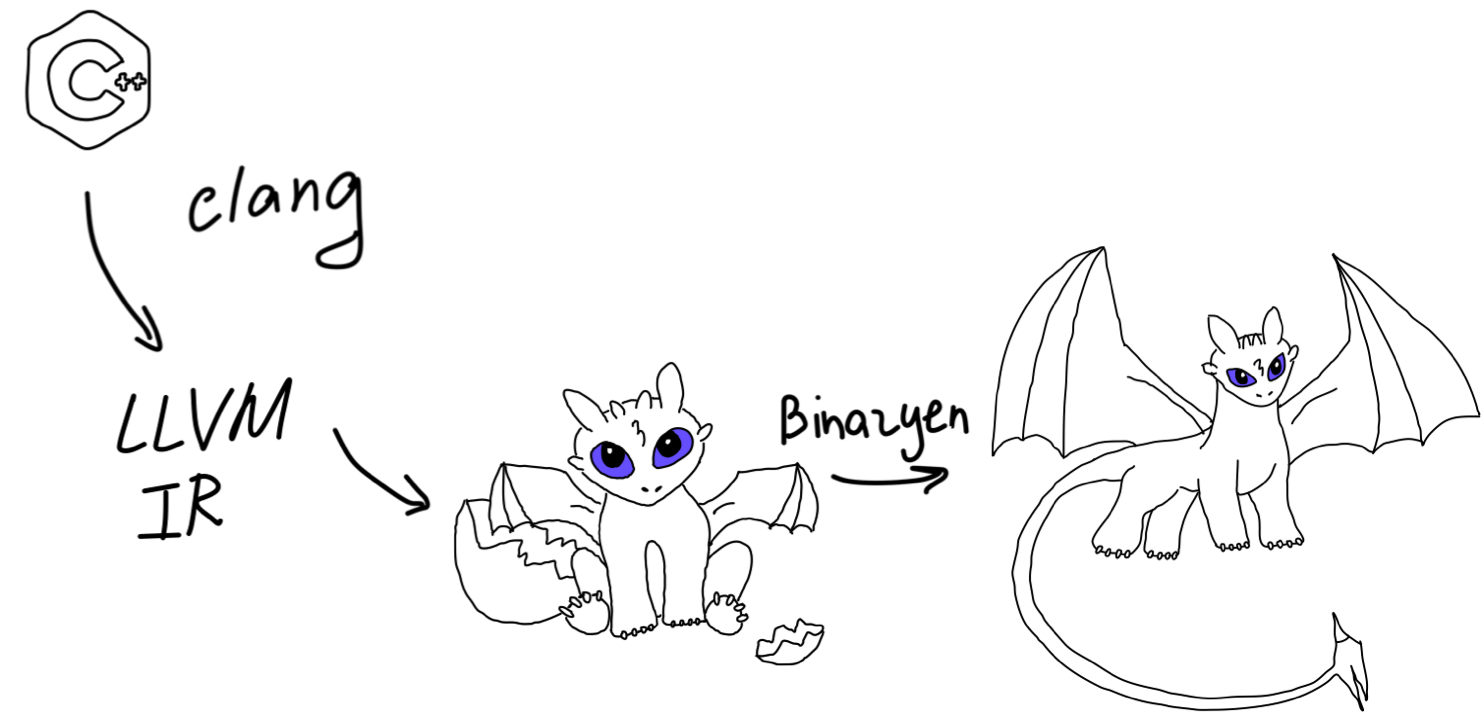
We can reduce the size of our binary with an awesome tool called Bynarien that is a part of the WebAssembly toolchain.
docker run --rm -v $(pwd):$(pwd) -w $(pwd) zloymult/wasm-build-kit \
wasm-opt -Os dragon-curve.wasm -o dragon-curve-opt.wasm
That allows us to shave off a hundred or so bytes from the resulting file.
Dragon guts
A frustrating thing about binaries is that they are not readable by humans. Luckily, WebAssembly has two formats: binary and text. And you can use the WebAssembly Binary toolkit to translate between the two. Try running:
docker run --rm -v $(pwd):$(pwd) -w $(pwd) zloymult/wasm-build-kit \
wasm2wat dragon-curve-opt.wasm > dragon-curve-opt.wat
Now let’s inspect the resulting dragon-curve-opt.wat file in our text editor.

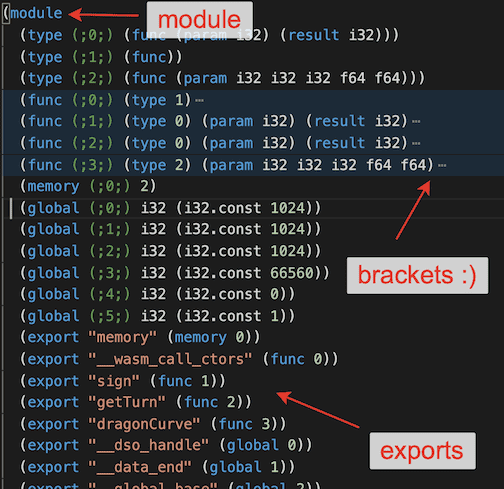
.wat contents
These funny brackets are called s-expressions (like in good old Lisp). They are used to represent tree-like structures. So our Wasm file is a tree. The root of the tree is a module. It works a lot like JavaScript modules that you know. It has its imports and exports.
The basic building blocks of WebAssembly are instructions that operate on the stack.

Wasm instructions
Instructions are combined into functions that can be exported from the module.

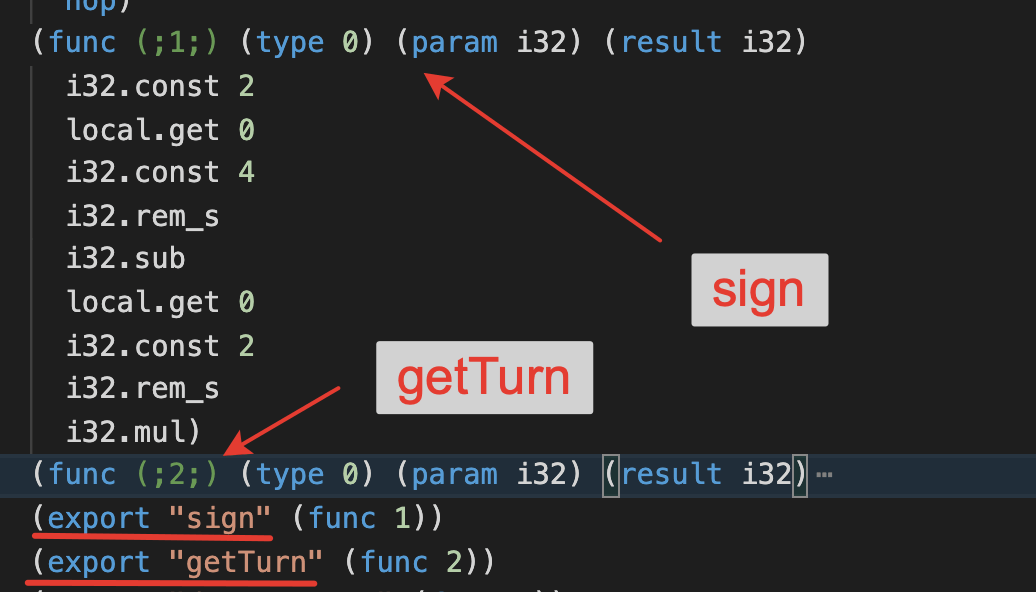
Exported sign and getTurn
You may see if, else, and loop statements sprinkled around the code, and this one of the most noticeable features of WebAssembly: by using the so-called structured control flow, like the high-level languages, it avoids GOTO jumps and allows to parse the source in one pass.

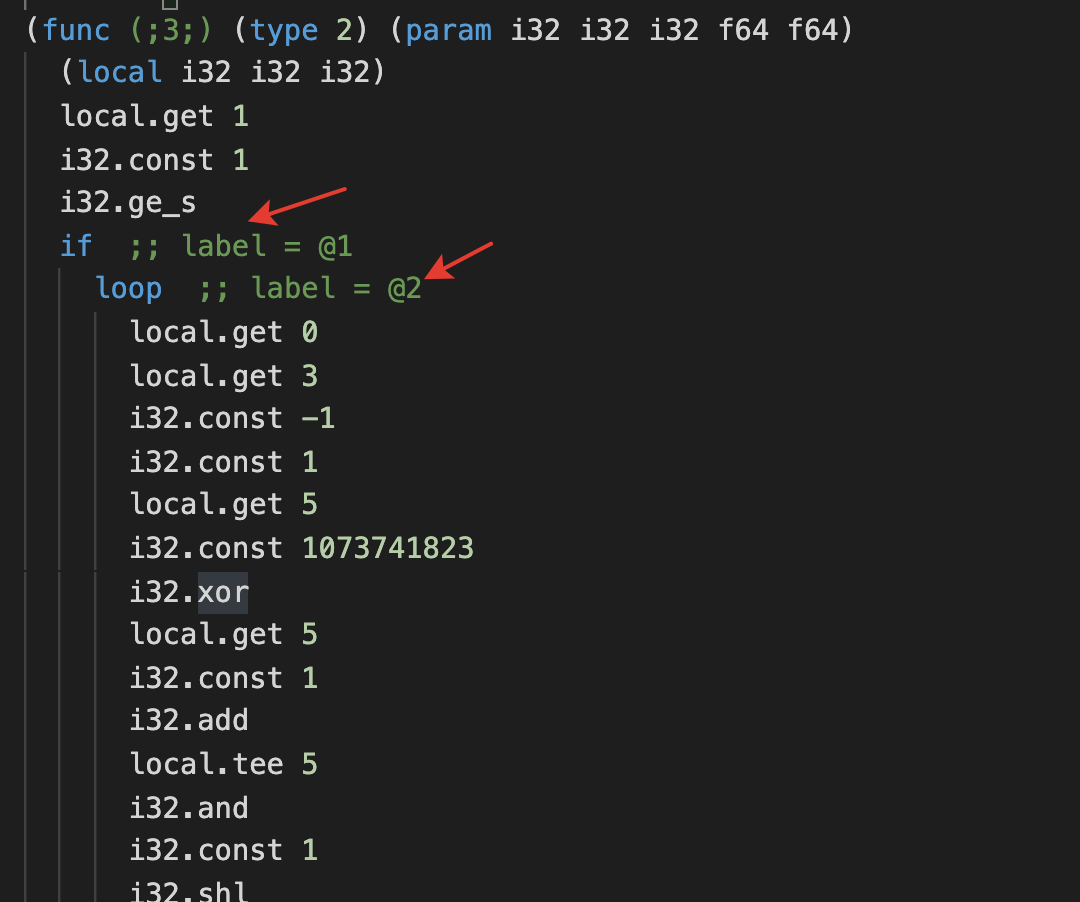
Structured control flow
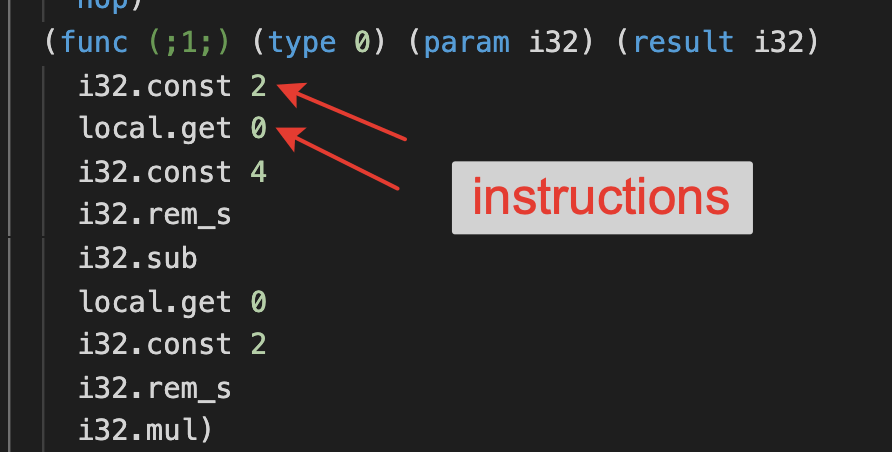
Now let’s take a look at the exported function sign and see how the stack-based virtual ISA works.

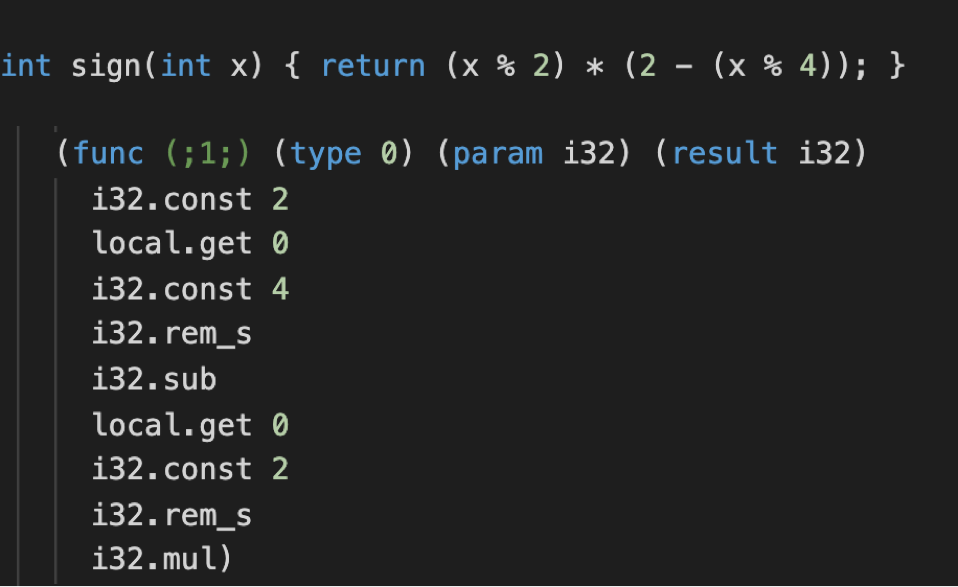
sign function
Our function takes one integer parameter (param i32) and returns an integer result (result i32). Everything is done on the stack. First, we push values: integer 2, followed by the first parameter of the function (local.get 0), followed by integer 4. Then we apply the i32.rem_s instruction that removes two values from the stack (first function parameter and the integer 4), divides the first value by the second, and pushes the remainder back on the stack. Now the topmost values are the remainder and the number 2. i32.sub pops them from the stack, subtracts one from another, and pushes the result. These first five instructions are the equivalent of (2 - (x % 4)).
Wasm uses a simple linear memory model: you can treat WebAssembly memory as a simple byte array.
In our .wat file, it is exported from the module with (export memory (memory 0)). That means we can operate on the memory of the WebAssembly program from the outside, and this is what we are going to do below.
Lights, camera, action!
To make our browser draw a Dragon curve, we will need an HTML file.
touch index.htmlLet’s put in some boilerplate with an empty canvas tag, and initialize our initial values: size is the amount of the steps for our curve, len is a length of a single step, and x0 with y0 set the starting coordinates.
<!-- dragon-curve-llvm/index.html -->

<!DOCTYPE html>
<html>
  <head>
    <title>Dragon Curve from WebAssembly</title>
  </head>
  <body>
    <canvas id="canvas" width="1920" height="1080"></canvas>
    <script>
      const size = 2000;
      const len = 10;
      const x0 = 500;
      const y0 = 500;
    </script>
  </body>
</html>
Now we need to load our .wasm file and instantiate a WebAssembly module. Unlike JavaScript, we don’t need to wait for the whole module to load to be able to use it—WebAssembly is compiled and executed on the fly, as the bytes stream in.
We use the standard fetch API to load our module, and the built-in WebAssembly JavaScript API to instantiate it. WebAssembly.instantiateStreaming returns a promise that resolves with a module object, containing an instance of our module. Our C functions are now available as the instance’s exports, and we can use them from JavaScript however we please.
<!-- dragon-curve-llvm/index.html -->

<!DOCTYPE html>
<html>
  <head>
    <title>Dragon Curve from WebAssembly</title>
  </head>
  <body>
    <canvas id="canvas" width="1920" height="1080"></canvas>
    <script>
      const size = 2000;
      const len = 10;
      const x0 = 500;
      const y0 = 500;
      WebAssembly.instantiateStreaming(fetch("/dragon-curve.wasm"), {
        // for this example, we don't import anything
        imports: {},
      }).then((obj) => {
        const { memory, __heap_base, dragonCurve } = obj.instance.exports;
        dragonCurve(__heap_base, size, len, x0, y0);
        const coords = new Float64Array(memory.buffer, __heap_base, size);
        const canvas = document.querySelector("canvas");
        const ctx = canvas.getContext("2d");
        ctx.beginPath();
        ctx.moveTo(x0, y0);
        [...Array(size)].forEach((_, i) => {
          ctx.lineTo(coords[2 * i], coords[2 * i + 1]);
        });
        ctx.stroke();

        // If you want to animate your curve, change the last four lines to
        // [...Array(size)].forEach((_, i) => {
        //   setTimeout(() => {
        //     requestAnimationFrame(() => {
        //       ctx.lineTo(coords[2 * i], coords[2 * i + 1]);
        //       ctx.stroke();
        //     });
        //   }, 100 * i);
        // });
      });
    </script>
  </body>
</html>
Now let’s take a closer look at our instance.exports. Besides the dragonCurve C function that generates our coordinates, we also get back a memory object representing the linear memory of our WebAssembly module. We need to be careful with it, as it can contain important things like our stack of instructions for the virtual machine.
Technically, we need a memory allocator not to mess things up. Still, for this simple example, we are going to read the internal __heap_base property that gives us an offset into a memory region that is safe for us to use (the heap).
We give the offset into the “good” memory to our dragonCurve function, call it, and extract the contents of the heap populated with coordinates as a Float64Array.
The rest is just drawing a line on the canvas based on the coordinates extracted from our Wasm module. Now, all we have to do is to serve our HTML locally. We need a basic web server; otherwise, we won’t be able to fetch the Wasm module from the client. Luckily, our Docker image has everything set up:
docker run --rm -v $(pwd):$(pwd) -w $(pwd) -p 8000:8000 zloymult/wasm-build-kit \
python -m http.server
Navigate to http://localhost:8000 and behold the dragon curve!
Training wheels come off
The “pure LLVM” approach from above is minimalistic on purpose; we compiled our program without system libraries. We also manage memory in the most atrocious of possible ways: by calculating an offset to the heap. That allowed us to demystify WebAssembly’s memory model. In real-world applications, we want to allocate memory properly and use system libraries, where “system” is our browser: WebAssembly still runs in the sandbox and has no direct access to your operating system.
All of that can be done with the help of the emscripten: a toolchain for compiling WebAssembly that takes care of simulating many system’s capabilities inside the browser: working with STDIN, STDOUT, and filesystem, and even OpenGL graphics that gets automatically translated into WebGL. It also integrates Bynarien that we used to slim down our binary, so we don’t have to worry about additional optimizations anymore.

Emscripten
Time to do WebAssembly properly! Our C code will remain the same. Let’s create a separate folder, so you can compare the code later, and copy over our source.
cd .. && mkdir dragon-curve-emscripten && cd dragon-curve-emscripten
cp ../dragon-curve-llvm/dragon-curve.c .
We went to the trouble of packaging ecmsripten into the Docker image for you, so you don’t have to install anything on your system to run the command below:
docker run --rm -v $(pwd):$(pwd) -w $(pwd) zloymult/wasm-build-kit \
emcc dragon-curve.c -Os -o dragon-curve.js \
-s EXPORTED_FUNCTIONS='["_dragonCurve", "_malloc", "_free"]' \
-s EXPORTED_RUNTIME_METHODS='["ccall"]' \
-s MODULARIZE=1
If the command succeeds, you will see two new files: a lean dragon-curve-em.wasm, and a 15KB monster dragon-curve-em.js (minified) containing instantiation logic for the WebAssembly module and various browser polyfills. That is the current price of running Wasm in the browser: we still need lots of JavaScript glue to hold things together.
Here’s what we did:
-Ostells emscripten to optimize for size: both for Wasm and JS- Note that we only need to specify the
.jsfile name as the output,.wasmis generated automatically. - We can also choose which function we want to export from the resulting Wasm module, note that it requires an underscore before the name, hence
-s EXPORTED_FUNCTIONS='["_dragonCurve", "_malloc", "_free"]'. The last two functions will help us work with memory. - As our source code is C, we also have to export the
ccallfunction that emscripten generates for us. MODULARIZE=1allows us to use a globalModulefunction that returns a Promise with an instance of our wasm module.
Now we can create the HTML file, and paste the new contents:
touch index.html<!DOCTYPE html>
<html>
<head>
<title>Dragon Curve from WebAssembly</title>
</head>
<script type="text/javascript" src="./dragon-curve.js"></script>
<body>
<canvas id="canvas" width="1920" height="1080">
Your browser does not support the canvas element.
</canvas>
<script>
Module().then((instance) => {
const size = 2000;
const len = 10;
const x0 = 500;
const y0 = 500;
const canvas = document.querySelector("canvas");
const ctx = canvas.getContext("2d");
const memoryBuffer = instance._malloc(2 * size * 8);
instance.ccall(
"dragonCurve",
null,
["number", "number", "number", "number"],
[memoryBuffer, size, len, x0, y0]
);
const coords = instance.HEAPF64.subarray(
memoryBuffer / 8,
2 * size + memoryBuffer / 8
);
ctx.beginPath();
ctx.moveTo(x0, y0);
[...Array(size)].forEach((_, i) => {
ctx.lineTo(coords[2 * i], coords[2 * i + 1]);
});
ctx.stroke();
instance._free(memoryBuffer);
});
</script>
</body>
</html>With ecmscripten, we don’t have to use the browser API for instantiating WebAssembly directly, as we did in our previous example with WebAssembly.instantiateStreaming.
Instead, we work with the Module function that emscripten provides us. Module returns a promise with all the exports we defined when we compiled our program. When this promise resolves, we can use the _malloc function to reserve a place in memory for our coordinates. It returns an integer with an offset, and we save it to the memoryBuffer variable. It is much more secure than the unsafe heap_base approach from the previous example.
The argument 2 * size * 8 means that we are going to allocate an array long enough to store two coordinates (x, y) for each step, each coordinate taking 8 bytes of space (float64).
Emscripten has a special method for calling C functions—ccall. We use this method to call the dragonCurve function that fills the memory at an offset provided by memoryBuffer. The canvas code is the same as in the previous example. We also make use of the emscripten instance._free method to clean up the memory after use.
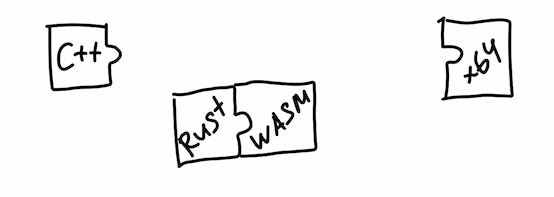
Rust, and running other people’s code
One of the reasons C translates to WebAssembly so well is that it uses a simple memory model and does not rely on a garbage collector. Otherwise, we would have to bake the whole language runtime into our Wasm module. That is technically possible, but it will bloat our binaries considerably and impact both loading and execution times.
Of course, C and C++ are not the only languages you can compile to WebAssembly. Best candidates are the languages that have LLVM frontends. Rust is the one that stands out.
The cool thing about Rust is that it has a wonderful built-in package manager called Cargo, which makes discovering and reusing existing libraries easy, compared to good old C.
We will show how easy it is to turn an existing Rust library into a WebAssembly module—we will do it with the help of the amazing wasm-pack toolchain that allows us to bootstrap Wasm projects in no time.
Let’s start a new project with the help of our Docker image that has wasm-pack built-in. If you are still in the dragon-curve-ecmscripten folder from the previous example—make sure to navigate one level up. Wasm-pack uses the same approach for generating projects as rails new or create-react-app:
docker run --rm -v $(pwd):$(pwd) -w $(pwd) -e "USER=$(whoami)" zloymult/wasm-build-kit wasm-pack new rust-exampleNow you can cd into the rust-example folder and open it in your editor. We already translated the C code for the dragon curve into Rust and packaged as a Cargo crate.
All dependencies in Rust projects are managed in a Cargo.toml file, it behaves a lot like your package.json or Gemfile. Open it in our editor, find the [dependencies] section that currently contains just the wasm-bindgen, and add our external crate
# Cargo.toml
[dependencies]
# ...
dragon_curve = {git = "https://github.com/HellSquirrel/dragon-curve"}
The source code for the project is located inside src/lib.rs, and all we need is to define a function that calls the dragon_curve from the imported crate. Insert this code at the end of the file:
// src/lib.rs
#[wasm_bindgen]
pub fn dragon_curve(size: u32, len: f64, x0: f64, y0: f64) -> Vec<f64>
{
  dragon_curve::dragon_curve(size, len, x0, y0)
}
Time to compile the result. Notice that the flags look much more human-friendly. Wasm-pack has the built-in Webpack support for bundling JavaScript and can even generate HTML if we want, but we are going to take the most minimal approach and set --target web. That will just compile a Wasm module and a JS wrapper as a native ES module.
This step can take a bit of time, depending on your machine and internet connection:
docker run --rm -v $(pwd):$(pwd) -w $(pwd)/rust-example -e "USER=$(whoami)" zloymult/wasm-build-kit wasm-pack build --release --target webYou can find the result inside the pkg folder in your project. Time to create the HTML file in the project root. The code here is the simplest we’ve seen between all our examples: we just natively use dragon_curve function as a JavaScript import. Behind the scenes this is our Wasm binary doing the heavy lifting, and we don’t have to manually deal with memory anymore like we did in previous examples.
Another thing to mention is the async init function that allows us to wait for the Wasm module to finish initializing.
<!-- index.html -->
<!DOCTYPE html>
<html lang="en">
  <head>
    <meta charset="UTF-8" />
    <meta name="viewport" content="width=device-width, initial-scale=1.0" />
    <title>Document</title>
  </head>
  <body>
    <canvas id="canvas" width="1920" height="1080"></canvas>
    <script type="module">
      import init, { dragon_curve } from "/pkg/rust_example.js";
      (async function run() {
        await init();
        const size = 2000;
        const len = 10;
        const x0 = 500;
        const y0 = 500;
        const coords = dragon_curve(size, len, x0, y0);
        const canvas = document.querySelector("canvas");
        const ctx = canvas.getContext("2d");
        ctx.beginPath();
        ctx.moveTo(x0, y0);
        [...Array(size)].forEach((_, i) => {
          ctx.lineTo(coords[2 * i], coords[2 * i + 1]);
        });
        ctx.stroke();
      })();
    </script>
  </body>
</html>
Now serve the HTML and enjoy the result!
docker run --rm -v $(pwd):$(pwd) -w $(pwd) -p 8000:8000 zloymult/wasm-build-kit \
python -m http.server
Obviosuly, from the point of view of developer experience Rust and wasm-pack win hands-down. Of course, we just scratched the basics: there’s so much more you can do with emscripten or wasm-pack, like manipulating the DOM directly.
Check out “DOM hello world”, “Single Page Applications using Rust” and Emscripten documentation.
Meanwhile, in a browser far far away…
WebAssembly is not only about portability, source-independence, and code reuse. It also promises performance benefits that have to do with how browsers run Wasm code. To understand the advantages (and disadvantages) of re-writing the logic of our web applications in WebAssembly, we have to understand what goes on under the hood on the client, and how it is different from executing JavaScript.
In the last couple of decades, browsers became very good at running JS, even though it is not that easy to translate JavaScript into effective machine code. All rocket science happens inside browser engines, and this is where the brightest minds of the web compete in compilation techniques.
We cannot possibly cover all engines’ inner workings, so let’s just talk about V8, the JS runtime for Chromium and NodeJS that currently dominates both the browser market and the backend environments for JavaScript.
V8 compiles and executes both JS and Wasm, but the approaches are slightly different. In both cases, the pipeline is similar: fetch the source, parse it, compile, and execute. The user has to wait for all the steps to complete before seeing the result on its machine.
For JavaScript, the main trade-off is between the time of compilation and the time of execution: we can either produce the unoptimized machine code very fast, but then it will take longer to run, or we can spend more time compiling and ensure that the resulting machine instructions are the most efficient.
Here is how V8 attempts to solve this problem:
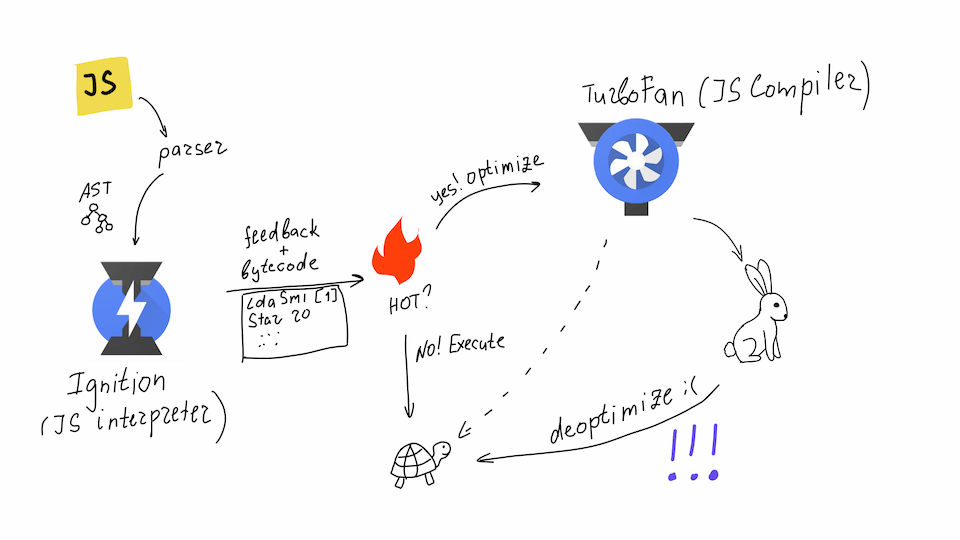
How V8 works (JS)
First, V8 parses JavaScript and feeds the resulting abstract syntax tree to the interpreter called Ignition that translates it into an internal representation based on a register-based virtual machine. We don’t have to take this step when dealing with WebAssembly, as Wasm source is already a set of virtual instructions.
While interpreting JS into bytecode, Ignition collects some additional information (feedback) that will help decide whether to optimize it further or not. The function marked for optimization is considered “hot.”
Generated bytecode ends up in another component of an engine called TurboFan. Its job is to turn the internal represention into the optimized machine code for the target architecture.
To achieve the optimal performance, TurboFan has to speculate based on the feedback from Ignition. For example, it can “guess” types of arguments for the function. If these speculations stop making sense as the new code keeps coming, the engine just throws away all the optimizations and starts from scratch. This mechanism makes the execution time of your code unpredictable.
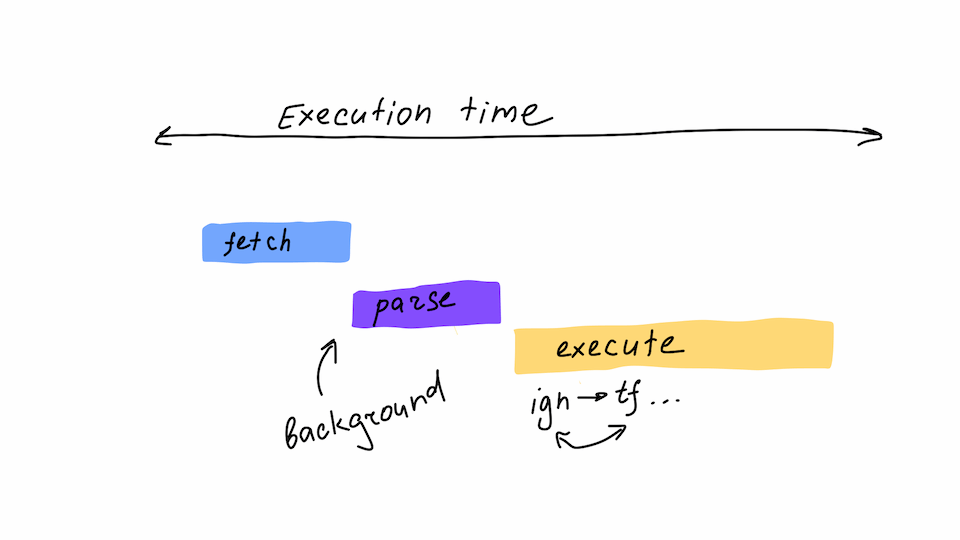
JS execution time
Wasm makes browser engine’s job much easier: the code already comes in the form of internal representation designed for easy multi-threaded parsing, thanks to the .wasm format. Plus, some optimizations were already baked into a WebAssembly file when we compiled it on a developer’s machine. That means that V8 can compile and execute code immediately without going back and forth with optimizations and deoptimizations as it does for JavaScript.
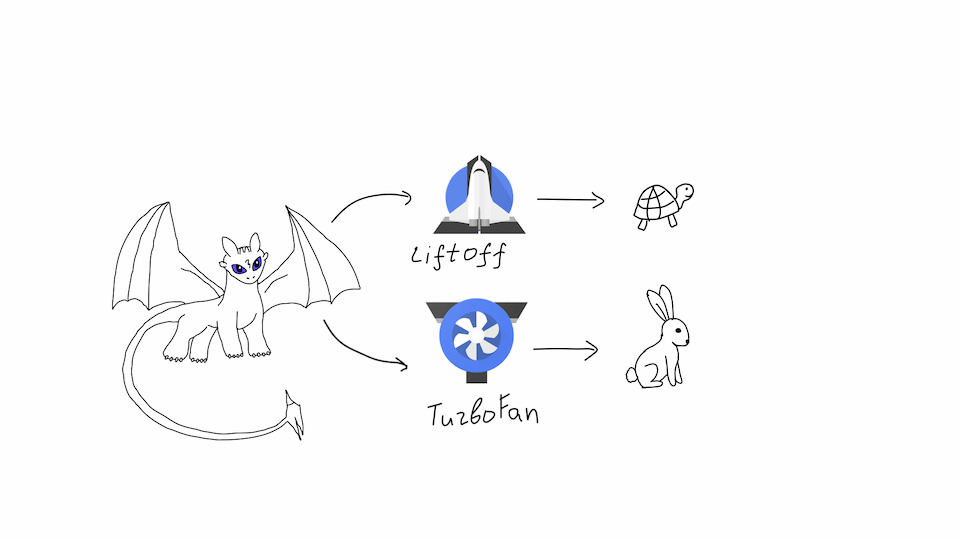
How V8 works (Wasm)
The Liftoff baseline compiler provides the “fast start” functionality in V8. TurboFan, with its fancy optimizations, still comes into play, only this time it does not have to guess anything as source code already has all the necessary type information. The concept of “hot” functions does not apply anymore, which makes our execution time deterministic: we are sure in advance how long it will take to execute the program.
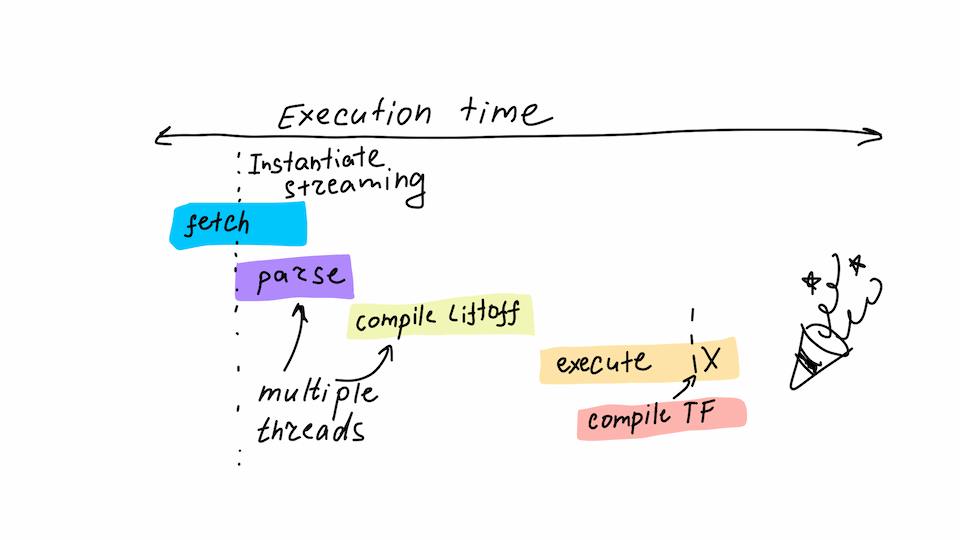
Wasm execution time
Of course, you can run WebAssembly outside the browser too. There are many projects that allow you to run any code on any client with Wasm: Wasm3, Wasmtime, WAMR, Wasmer, and others. As you can see, WebAssembly ambition is to eventually go beyond browser and into all sort of systems and appliances.
When to use WebAssembly
WebAssembly was created to complement the existing web ecosystem: it is not a replacement for JavaScript by any means. With modern browsers, JS is fast as it is, and for most common web tasks, like DOM manipulation, WebAssembly does not give us any performance benefits.
One of the promises of WebAssembly is to remove the boundaries between web applications and all other software: mature code-bases developed in different languages can be brought inside the browser with minimal effort. Many projects have already been ported into Wasm, including games, image codecs, machine learning libraries, and even language runtimes.
Figma, the indispensable tool for modern designers, uses WebAssembly in production since its earliest days.
At the current state of affairs, there is simply no way to use pure Wasm without JavaScript: you will still need that “glue” code, whether you write it yourself or rely on tools to generate it.
If you expect to remove your performance bottlenecks with Wasm—we recommend you to think twice, as probably the same bottleneck can be solved without the full rewrite. Definitely, you should not rely on benchmarks that compare WebAssembly and JS performance for a single task, as in the real-world application Wasm and JS will always be interconnected.
Even though WebAssembly is still officially in the MVP phase, now is the perfect time to get started with it: with the right tools that we tried to demonstrate in our article, you are ready to get up and running.

If you want to dig deeper into WebAssembly, check out the reading list that we compiled for ourselves while doing the research for this article. We’ve also created a repository that contains all code examples from this post.
And don’t hesitate to drop us a line if you want to discover and fix bottlenecks in your application—we are happy to work with both backend and frontend code, Webassembly or not.
Special thanks to whitequark for a review of this article.