Our slice of the metaverse: 7 key AR features for iOS devs

Augmented and virtual worlds are expanding, and someday soon, people will do many of the things they currently do in real life inside of them. It’s easy to imagine all the exciting possibilities for entertainment, commerce, industrial applications, gaming, self-driving cars, just to name a few. Our mobile devices can certainly act as a personal plug-in to these augmented worlds, so let’s dive into Apple’s iOS AR frameworks and find out some of the awesome options that engineers have at their fingertips.
But before we get too augmented with our realities, let’s zoom back out a bit and look at the big picture of where tech is headed in general. All of these technologies—like the aforementioned AR, as well as VR, Machine Learning, and blockchain—promise, not only to provide entertainment and to make our everyday lives more convenient, but also to make available more equitable access to opportunities, regardless of physical location. And indeed, the Evil Martian team is ready to dive headfirst into this brave new “metaverse”, and we always have this stack of solutions in our back pocket, frequently making use of them in our projects.
So where do Apple and AR fit into things? Well, on multiple occasions, Apple CEO Tim Cook has stated that augmented reality “is the next big thing”, and that it will “pervade our entire lives.” And indeed, Apple has been particularly focused on Augmented Reality and Machine Learning since it released ARKit and CoreML in 2017. With every subsequent release of iOS, Apple has consistently laid the groundwork in this sphere, developing ever-evolving tools and frameworks for future AR experiences.
This article will outline some of the most useful AR frameworks from Apple, such as ARKit, RealityKit, and Vision. It will also cover valuable features, including LiDAR, Motion Capture, People Occlusion RealityKit’s support for 3D Object Capture. So let’s dive in.
ARKit 5 and RealityKit 2: what’s it all about?
ARKit 5 is the main framework of Apple’s AR platform. It utilizes a technique called visual-inertial odometry to create an AR illusion showing virtual objects placed in a real-world space. To make these objects appear as if they actually exist in the real world, ARKit utilizes a device’s motion-sensing hardware alongside computer vision analysis, and thus, we can overlay interactive 2D and 3D animated objects onto any tangible surface visible through the camera on the device. Further, it does all of this in real-time. Here’s an example using an asset from Apple’s sample project:
This bug is spreading pollen… or something. The important thing is that it looks like it’s doing it on that table!
Additionally, engineers also have access to RealityKit 2, which is designed to help create AR experiences as easily and quickly as possible. This framework comes with a simple API for developers and some powerful but easy-to-use AR Creation Tools for AR artists, such as Reality Composer and Reality Converter.
The Evil Martians team likes to utilize both of these, and we’re well familiar with the results these tools are capable of delivering. It offers some great benefits: it’s free, powerful, rapidly-evolving, easy-to-use, and it’s highly optimized for Apple’s mobile hardware. But it seems nothing is perfect no matter what reality you’re in because all this being said, one of the significant drawbacks is that ARKit is currently limited to iOS and iPadOS. Still, if you have the necessary tools at hand, there’s no reason you can’t start augmentin’ those realities—so, let’s take a closer look at what they can do.
Face and Body Motion Capture
RealityKit’s Motion Capture feature allows us to track a person’s body and facial movements within a space. The process starts by running an ARSession along with a corresponding configuration, such as ARBodyTrackingConfiguration or ARFaceTrackingConfiguration.
The Body Motion Capture feature allows us to track full-body skeleton motion as a series of joints and bones. This is used when building apps that analyze people’s athletic performance and might have applications like tracking a golf swing, dance moves, correct posture, or when creating an app that requires users to wildly flail their arms for no apparent reason.
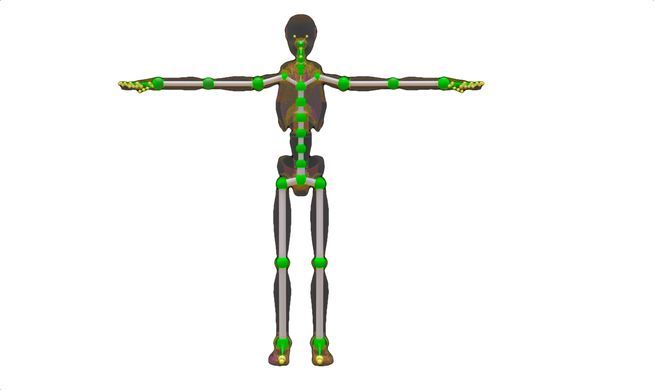
Try not to fear the skeleton.
RealityKit performs the puppeteering of a skeleton model automatically in real-time. It captures a person’s body movements through the device camera and then it animates an on-screen virtual character with the same set of movements based on that data.
Onlookers might’ve been confused about this man’s behavior, but Body Motion Tracker was not. Source
To ensure that the custom character’s proportions, joint hierarchy, and naming conventions don’t significantly differ from the RealityKit’s understanding of the skeleton, Apple recommends configuring and rigging a model for puppeteering by using their sample skeleton model as a basis. The FBX 3D model of the sample robot character (clicking this link will download the file) is available at the Apple Developer portal.
Moving on, let’s look at a really “in your face” feature. Face Motion Tracking provides a face mesh using the user’s front-facing camera. Further, this feature can even detect specific facial expressions, such as smirks, smiles, winks, open mouths, or even tongues sticking out. Check out Apple’s docs on ARBlendShapeLocation for additional info and to find the complete list of facial features and expressions it’s possible to identify.
Face Motion Tracking is a convenient mechanism to use when creating face-based AR experiences. To illustrate this idea, one common use-case might be face masks that are overlaid on the user’s real face, like these from Apple’s sample material:
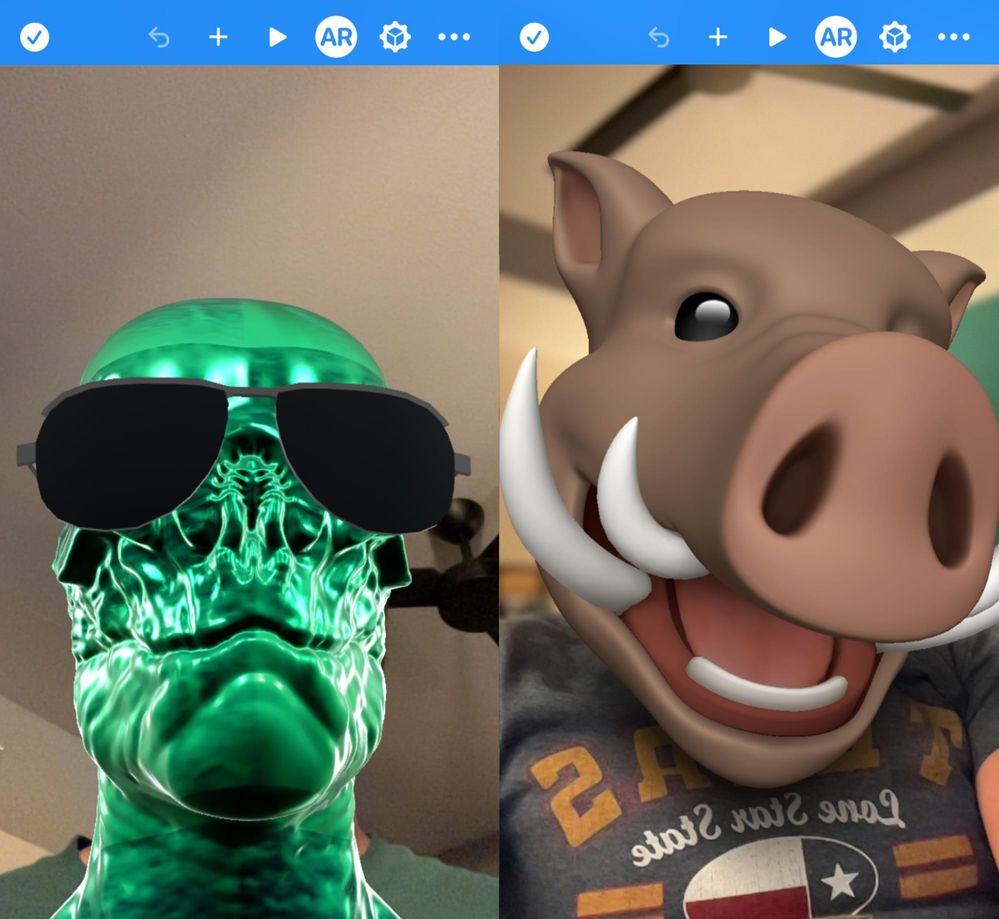
Masks let users live out dreams—like being a reptoid with sunglasses, or a silly warthog. This is the real metaverse, folks!
Motion capture features are available on devices with A12 processors and later; these first started appearing inside iPhones back in 2018.
Interestingly, at first, Face Motion Tracking only worked on devices equipped with TrueDepth cameras. However, later on, Apple would bring Face Motion Tracking to all devices running A12 or later processors, such as the 2nd generation iPhone SE.
People Occlusion
Our next topic: augmenting real-life situations which contain virtual objects together in a scene alongside humans.
When rendering an AR scene, it’s often desirable to make virtual objects appear behind humans in the scene in such a way so that the person’s body will realistically cover these virtual objects partially or even completely. That’s where the People Occlusion feature truly shines, like in the image on the right:
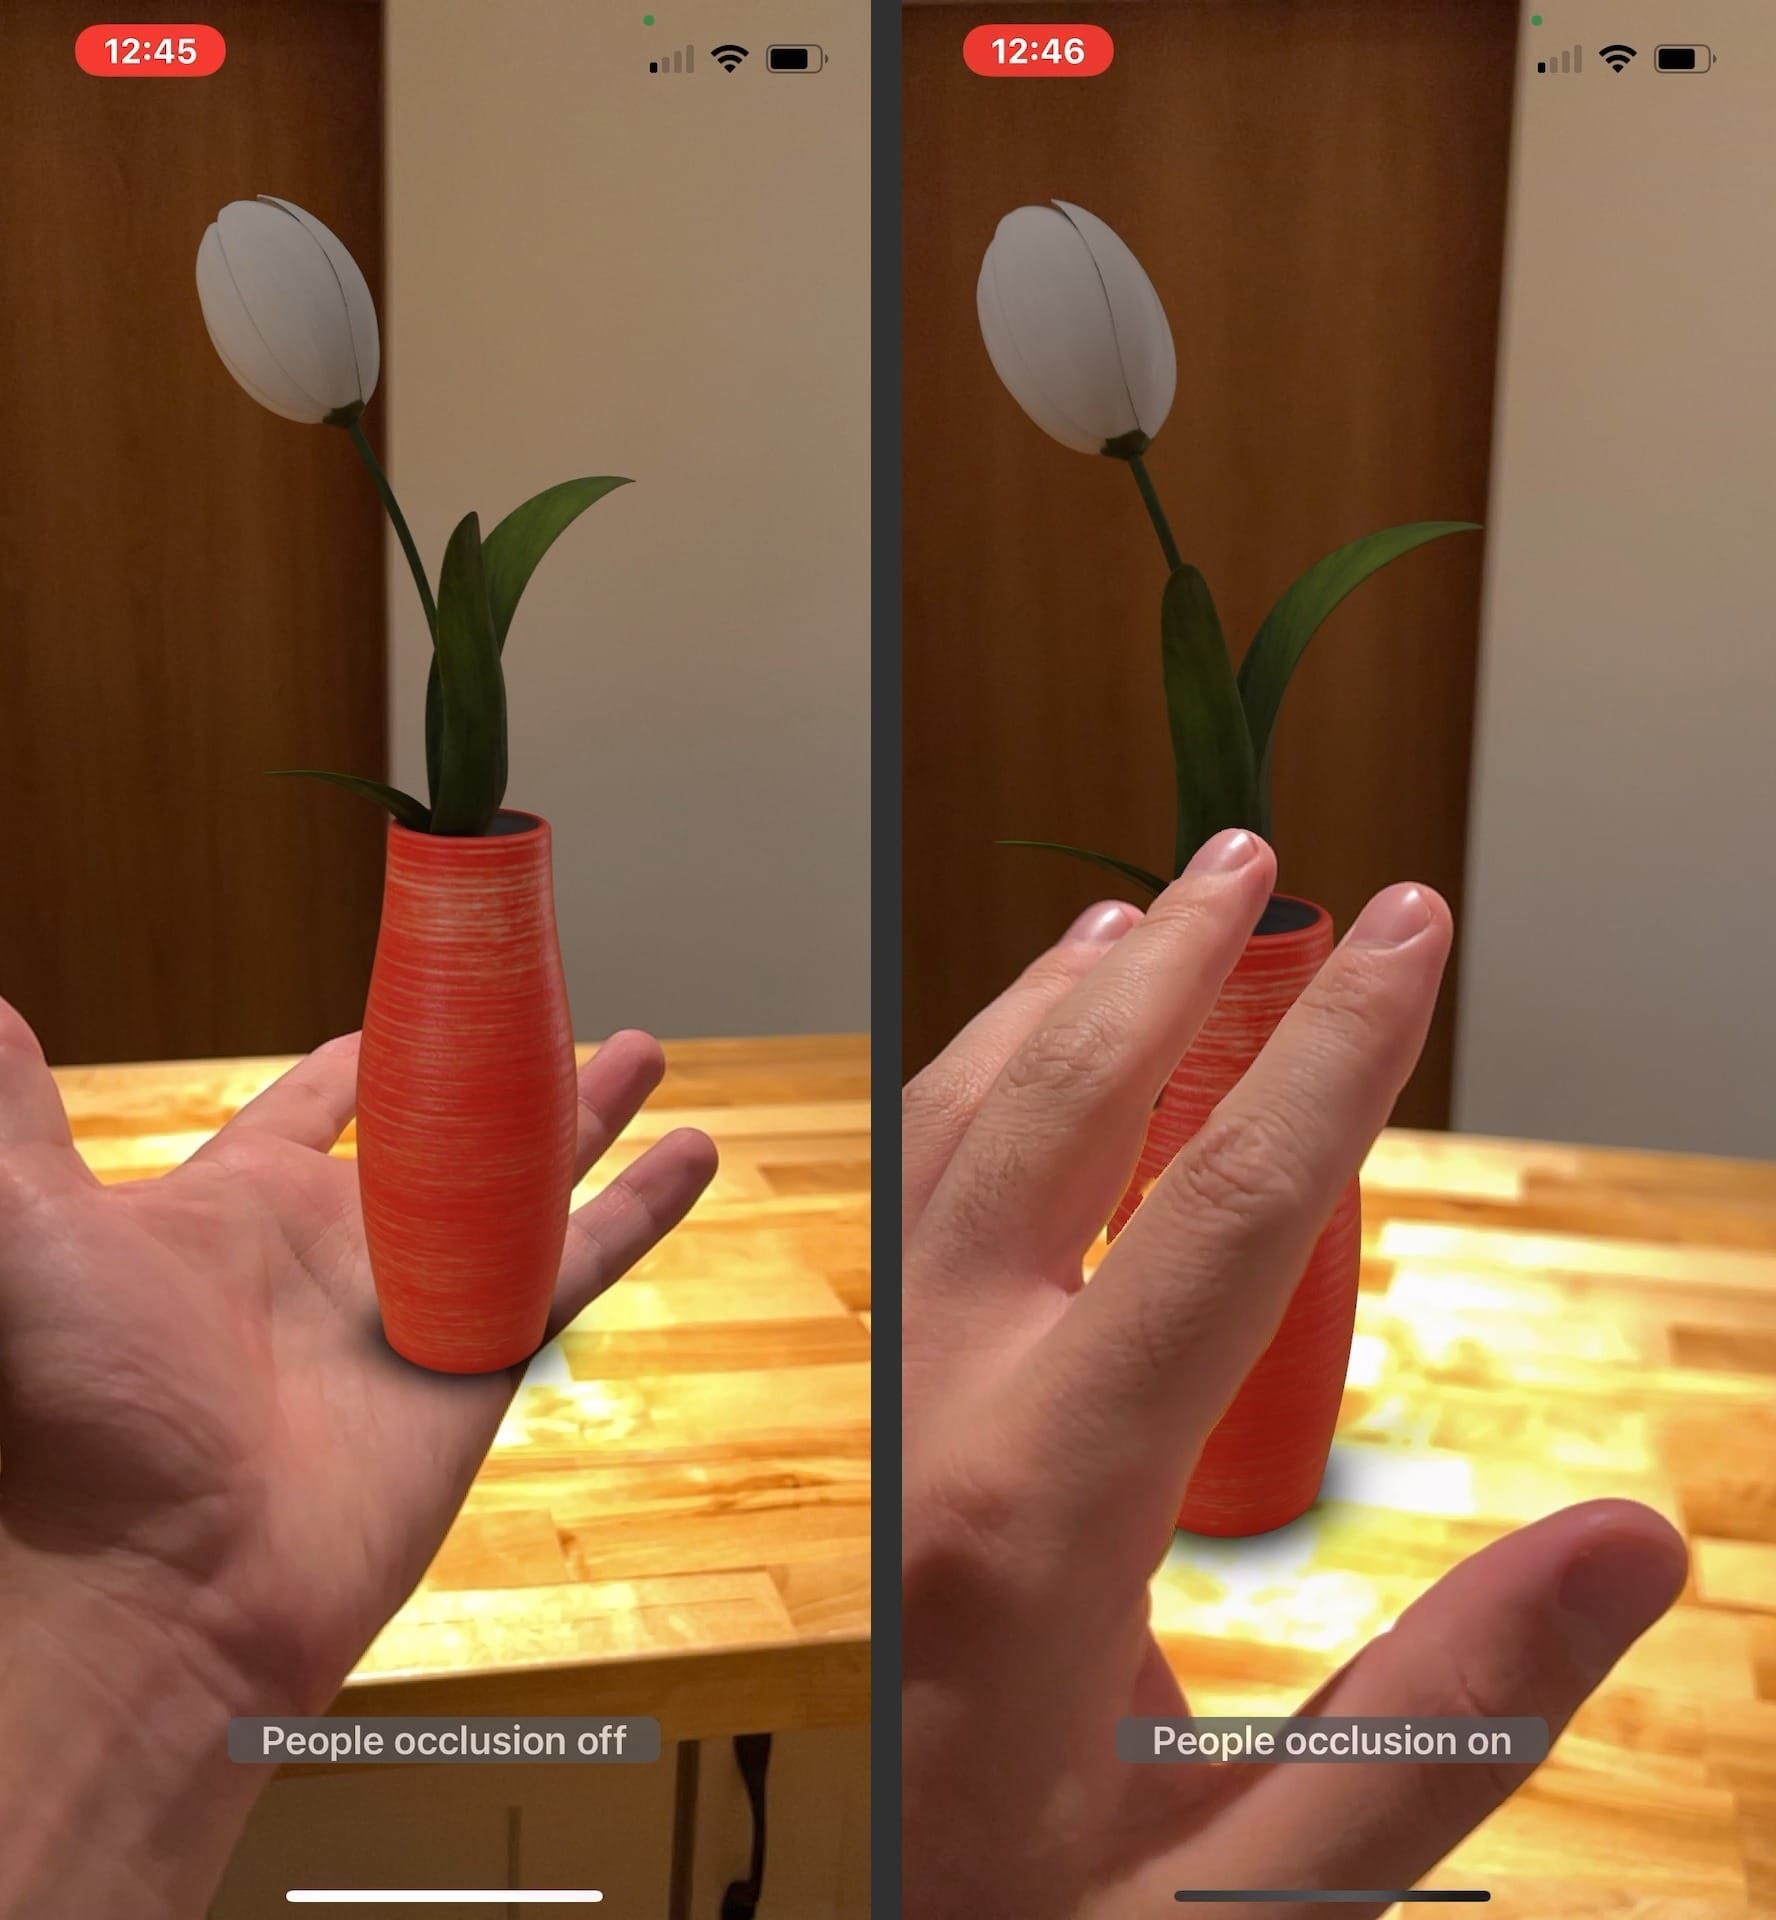
Without people occlusion, the left image looks unrealistic. But the right image shows me waving to a flower, realistically rendering an everyday occurrence.
ARKit’s People Occlusion can recognize multiple humans in an environment, including their hands and feet. Using the camera feed as its source, ARKit achieves the desired occlusion effect by identifying areas where the people are located in the shot and, accordingly, it prevents any virtual objects from being drawn onto that region’s pixels.
There are several options available to render AR scenes:
- ARView: we can use this to render inside RealityKit; it’s the fastest and easiest way to create AR on iOS.
- ARSCNView with SceneKit: we can also render AR inside of these.
- MTKView: developers can also utilize the full power of the Metal framework with ARKit to create a Custom Render that will draw 3D content inside of MTKView. This is the most advanced, low-level approach.
To enable People Occlusion inside ARView or ARSCNView we’ll need to pass the PersonSegmentation or PersonSegmentationWithDepth frame semantic options when running an ARConfiguration.
🚨 Take note that not every iOS device can support occlusion, so the responsibility falls on the developer to verify device support for these frame semantic options.
It’s also possible to use People Occlusion when using Custom Renders. Metal has a special class called ARMatteGenerator that allows us to generate mattes for every AR frame that can be used to render our desired compositions.
Person Segmentation with the Vision framework
Vision is another excellent framework which helps developers harness the power of computer vision and image processing on Apple platforms. Vision can be used to detect people, text and barcodes, and both faces and facial landmark detection (a set of easy-to-find points on a face).
Further, when combined with CoreML models, Vision can also be used for image classification—and yes, there’s a sample project for implementing that feature available on Apple’s developer site, but let’s get back to Person Segmentation—let’s not get segmented from the topic at hand!
Think about your own online experience: did you ever see anyone using a virtual background during a video call? The Vision framework can help us implement this exact feature on many Apple platforms. Plus, unlike ARKit, Vision isn’t just limited to iOS and iPadOS. Plus, its API enables both live-processing and post-processing for single-frame images and this feature makes a big difference in cases where real-time processing is not necessary.
Moving on still, VNGeneratePersonSegmentationRequest is a new addition added to mobile devices with iOS 15, and which also appeared with the release of Monterey on macOS. Using it allows us to easily separate a person from their surroundings in our final images and videos.
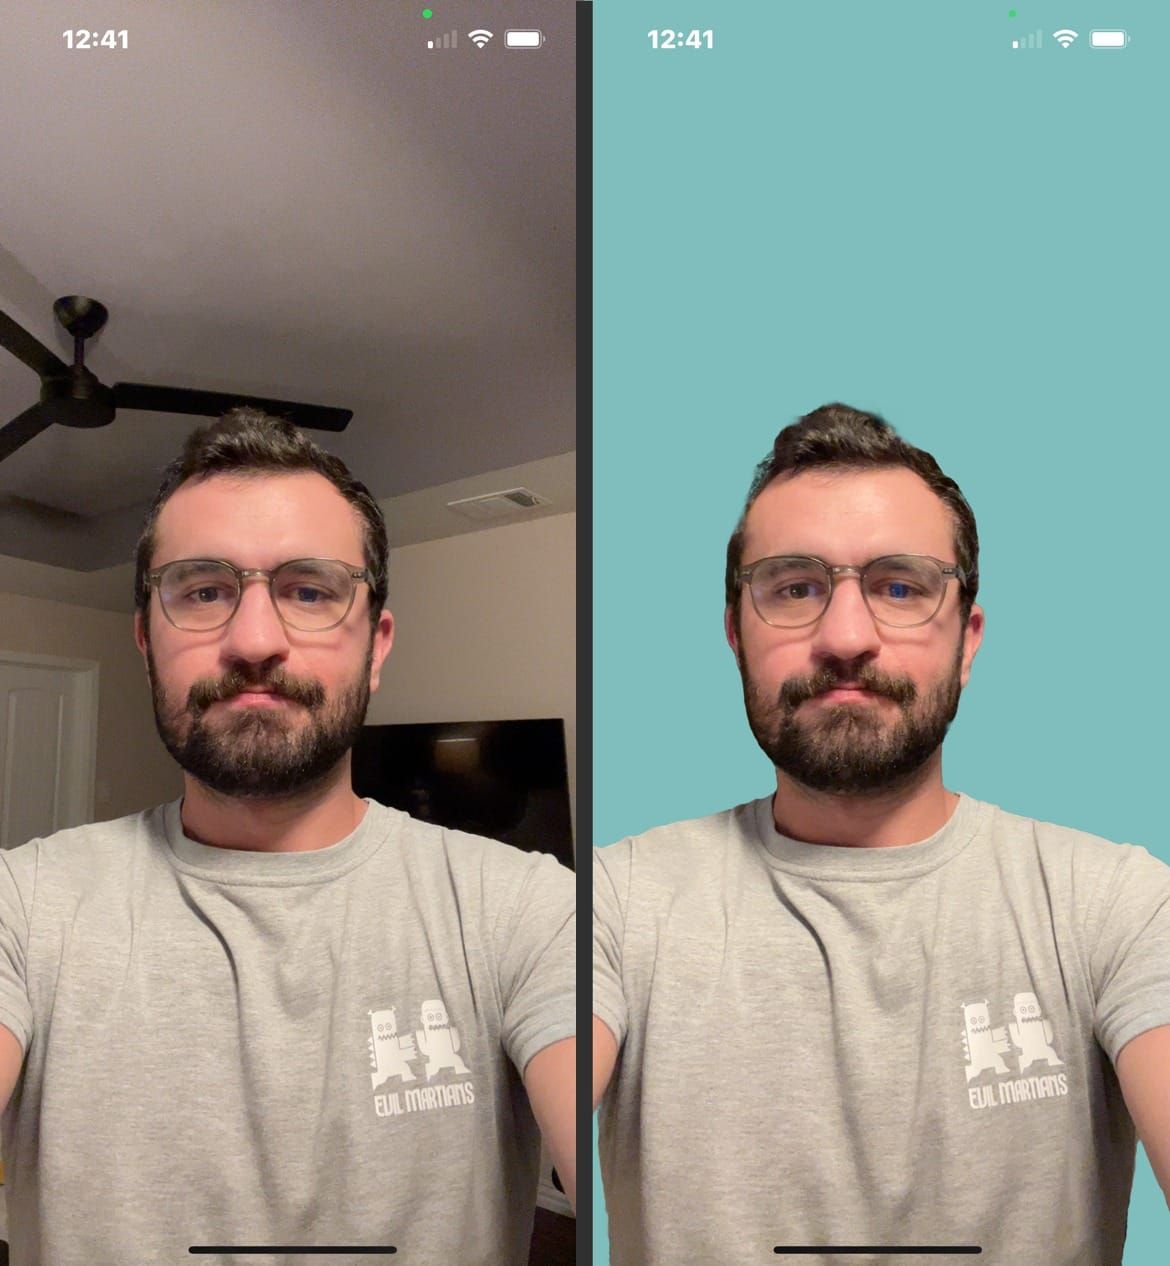
AR allows us to observe the ultimate form of social distancing: moving ourselves into extradimensional, infinite, light-blue voids.
This API comes equipped with a number of settings for accuracy level. For optimization, the “fast” or “balanced” levels are recommended for use with video frames, while we can apply the “accurate” setting when we need high-quality photography.
With CVPixelBuffer, we also have three available options for setting the output’s pixel format. Most of the time, this will be set to the unsigned 8-bit integer format, but you can use kCVPixelFormatType_OneComponent16Half if you want to use Metal and offload additional processing to the GP
Reality Composer and Reality Converter
We’ve already discussed several AR options for working with humans, so before any introverted readers looking at this article start thinking, “enough with people already,” let’s switch gears and take a look at Reality Composer.
Reality Composer makes it easy to create, edit, test, and share our AR and 3D experiences. Even if you’re not familiar with AR, this is a great place to start as it doesn’t actually require you to write any code. Reality Composer was developed by Apple and is available for free on the App Store.
AR experiences that were created using Reality Composer can be imported into your Xcode projects and then run inside ARView—this displays augmented reality experiences and incorporates content from RealityKit.
Alternatively, the entire AR experience can be previewed inside the Reality Composer app itself using your iPhone or iPad. Taking advantage of this handy feature means there’s no need for developers to build and run projects every single time they need to make a change.
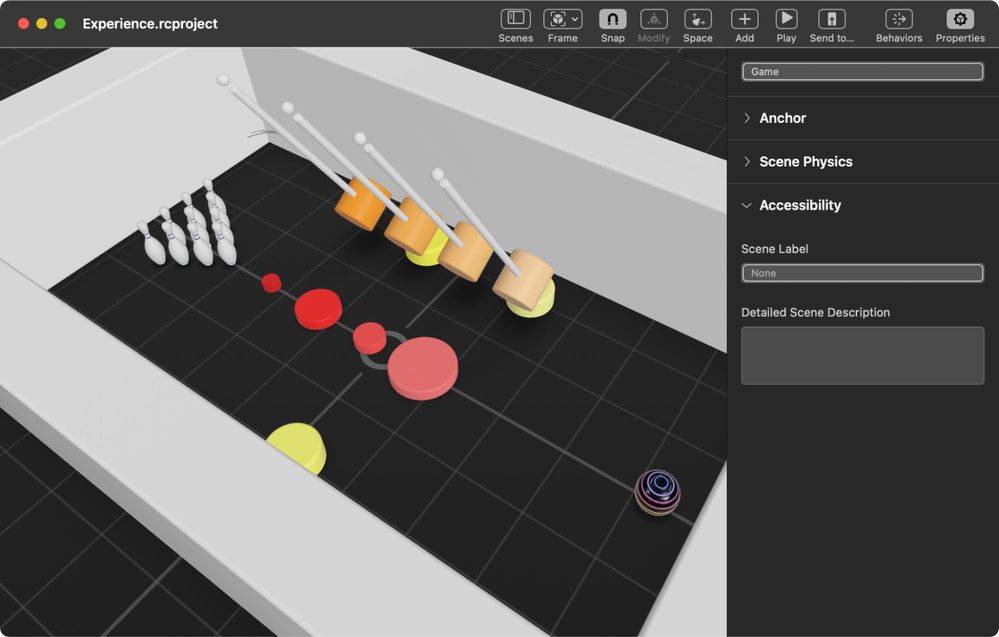
An AR scene built inside Reality Composer.
It’s important to note that Reality Composer only allows us to import files that have the USDZ format. Here’s a cool detail: USDZ was created by the Disney animation studio Pixar, and it’s the 3D and AR content format that Apple uses to display that type of content.
Still, this could present a problem because the USDZ format hasn’t been widely adopted. That’s where another tool called Reality Converter comes to the rescue. This tool allows us to convert FBX, OBJ, USD, and GLTF files into valid USDZ files for use in our reality scenes within Reality Composer.
3D Model Creation with Object Capture
As mentioned above, the option to import 3D objects that have been created by a professional 3D designer directly into a scene via Reality Composer does exist. But that’s not the only option—in 2021, Apple introduced the Object Capture feature in RealityKit.
Object Capture allows developers to convert picture sequences of real-world objects into 3D models. It uses a computer vision technology called “photogrammetry.”
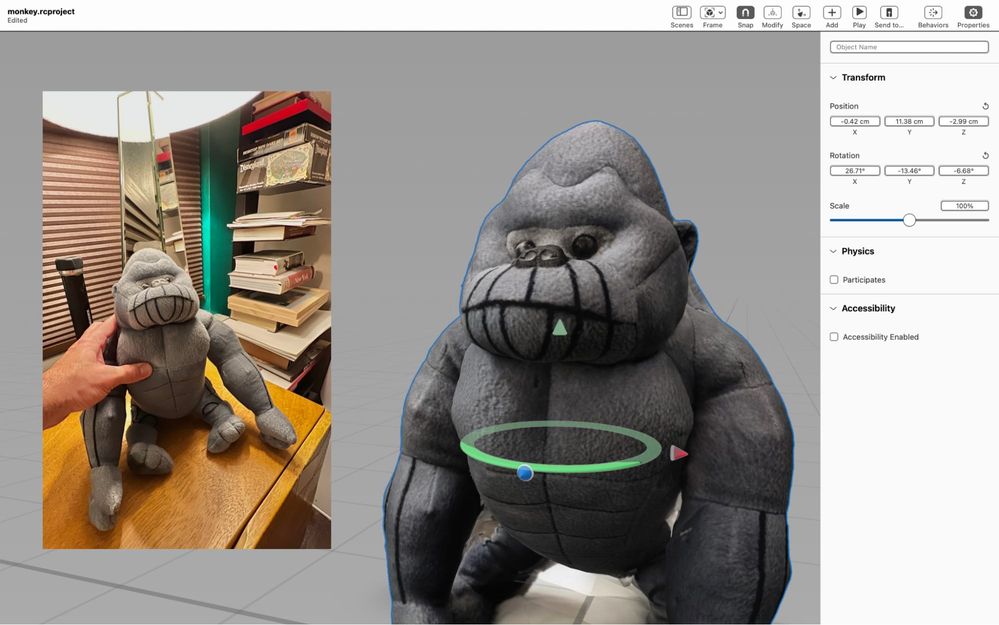
It was beauty, converted the beast.
Here’s how a typical object capture process works:
First, we need to “capture” between 20 to 200 images of the object taken from all angles around the object. These images could be taken on an iPhone, iPad or a DSLR. Additionally, depth data from supported devices can be added to improve some properties of the final model, such as actual size and the gravity vector. We also need to make sure that our object is solid and opaque, and to ensure that the lighting is defused and isn’t creating shadows or reflections. The easiest way to jump-start a capture session is to build and run the Apple-provided sample project for capturing images with an iPhone.
Once we’ve finished taking images, we’ll then need to convert that stack of images into a 3D object using the Object Capture APIs on your Mac—and here, there is still no need for code because there’s a second sample project, a time-saving command-line utility. The Photogrammetry APIs are only available on Macs with GPUs that support ray tracing. This means, for instance, you can generate 3D objects from images in just minutes using any Silicon-equipped Apple machine. It’s worth mentioning that some recent Intel-based Macs support Object Capture APIs too, but the process can take significantly longer without the Apple Neural Engine to speed up the computer vision algorithms.
After conversion, the resultant USDZ object can be easily dropped in your Reality Composer scene or previewed using Quick Look. The output model also includes mesh geometry and material maps of the photographed object.
LiDAR
ARKit also makes it possible to do some pretty neat tricks, like, for instance, the ability to perform almost instantaneous plane detection and AR placement when ARKit is utilized on devices with LiDAR scanners. This feature is currently limited to only a handful of Pro devices that offer LiDAR. The good news is that these features are automatically enabled on these supported devices without the need to change any code.
Luckily, not all advanced ARKit features require Pro hardware. Indeed, most of the ARKit features have better compatibility scores and will work on many popular iPhones today.
Where to go from here?
Apple’s AR frameworks are capable of a lot more than we’ve covered here. The feature list keeps growing, and it’s clear that ARKit and RealityKit are going to occupy a significant part of Apple’s future going forward. It’s even more exciting to imagine the practical applications that will arise, as well as the future effect on everyday life for users around the globe.
We’ve outlined the most valuable features we’ve come across in our experience, but there is a lot more terrain just waiting to be traversed. If you’re eager to learn more, be sure to visit the ARKit section of the Apple Developer website to see more about AR on iOS.
And whether or not it’s AR-related—if you’ve got a project, talk to us! Evil Martians are primed and ready to supercharge or kick off your digital products.

