Build images on GitHub Actions with Docker layer caching

Topics

Translations
Save hours of googling and learn how to build images on GitHub Actions with proper Docker layer caching. With Docker’s BuildKit capabilities (now easy to set up on GitHub’s CI runners) you can use the native caching mechanism of Actions to keep your image layers neatly tucked in between the builds. We’ve got examples of a run-of-the-mill Rails application with single and multi-stage production Dockerfiles and an example of a matrix build for a single image destined for many platforms. Be warned: a lof of YAML is coming your way.
I know all about caching and CI, take me directly to sweet, sweet YAMLs
Whether or not you choose to use Docker in local development (and we won’t pick sides between fervent believers of Docker and its sworn enemies), when it comes to deployments in the modern age of the cloud, containers are essential for running scalable applications in production.
This means there is always some building and pushing happening, whether it’s done by hand, if it relies on highly automated DevOps pipelines for deploying your containers to Kubernetes clusters, or utilizes one of the numerous PaaS engines that abstract out orchestration for you. AWS Fargate, Google Cloud Run, and even Heroku (which now supports Docker deploys) will be happy to run your containers. And with so much competition in the cloud hosting market, it makes no sense to stick to the old way of deploying applications to a virtual machine.
Docker caching 101 in 2021
Docker images, as they now teach us in every elementary school, are like layered cakes. Every RUN, COPY, or ADD instruction in your Dockerfile creates a read-only layer (essentially, just a bunch of files). A Docker host stacks these layers on top of each other in order to use less space, then it adds a thin writable container layer on top, once you want to run your image. Files from different layers are combined to form a filesystem for your container. The main reason for this Union filesystem magic is to ensure that the parts of the final system that will change the least can be safely cached, re-used for subsequent builds, or even shared between different final containers. It also saves bandwidth, since you don’t have to pull all the layers over the network once a new version of the image you rely on comes out—only those layers that actually changed.
Thus, to make the most out of caching, a well-written, custom Dockerfile should respect layering. Whatever changes the least should be on the top of the Dockerfile; what changes the most—on the bottom.
System dependencies usually go first, with application code the last to be copied in a final container before deployment—as this bit is the most malleable.
If you’re a DevOps specialist, you’ve probably heard of BuildKit: it was announced back in 2017 and has matured enough to be included with every Docker Engine distribution since version 18.09. It also features a standalone CLI plugin for Docker called buildx, which has been included in Docker CE since version 19.03 (albeit in experimental mode only) and which can be set as a default builder for docker build.
If you’re a casual Docker user, you can set the DOCKER_BUILDKIT=1 environment variable before running a docker build command to see a cool new blueish CLI that employs some TTY tricks to fit the entire output of a build onto one terminal screen. That’s BuildKit/buildx in action. It also makes it very easy to spot where Docker has used the cache and where it had to build a layer from scratch.

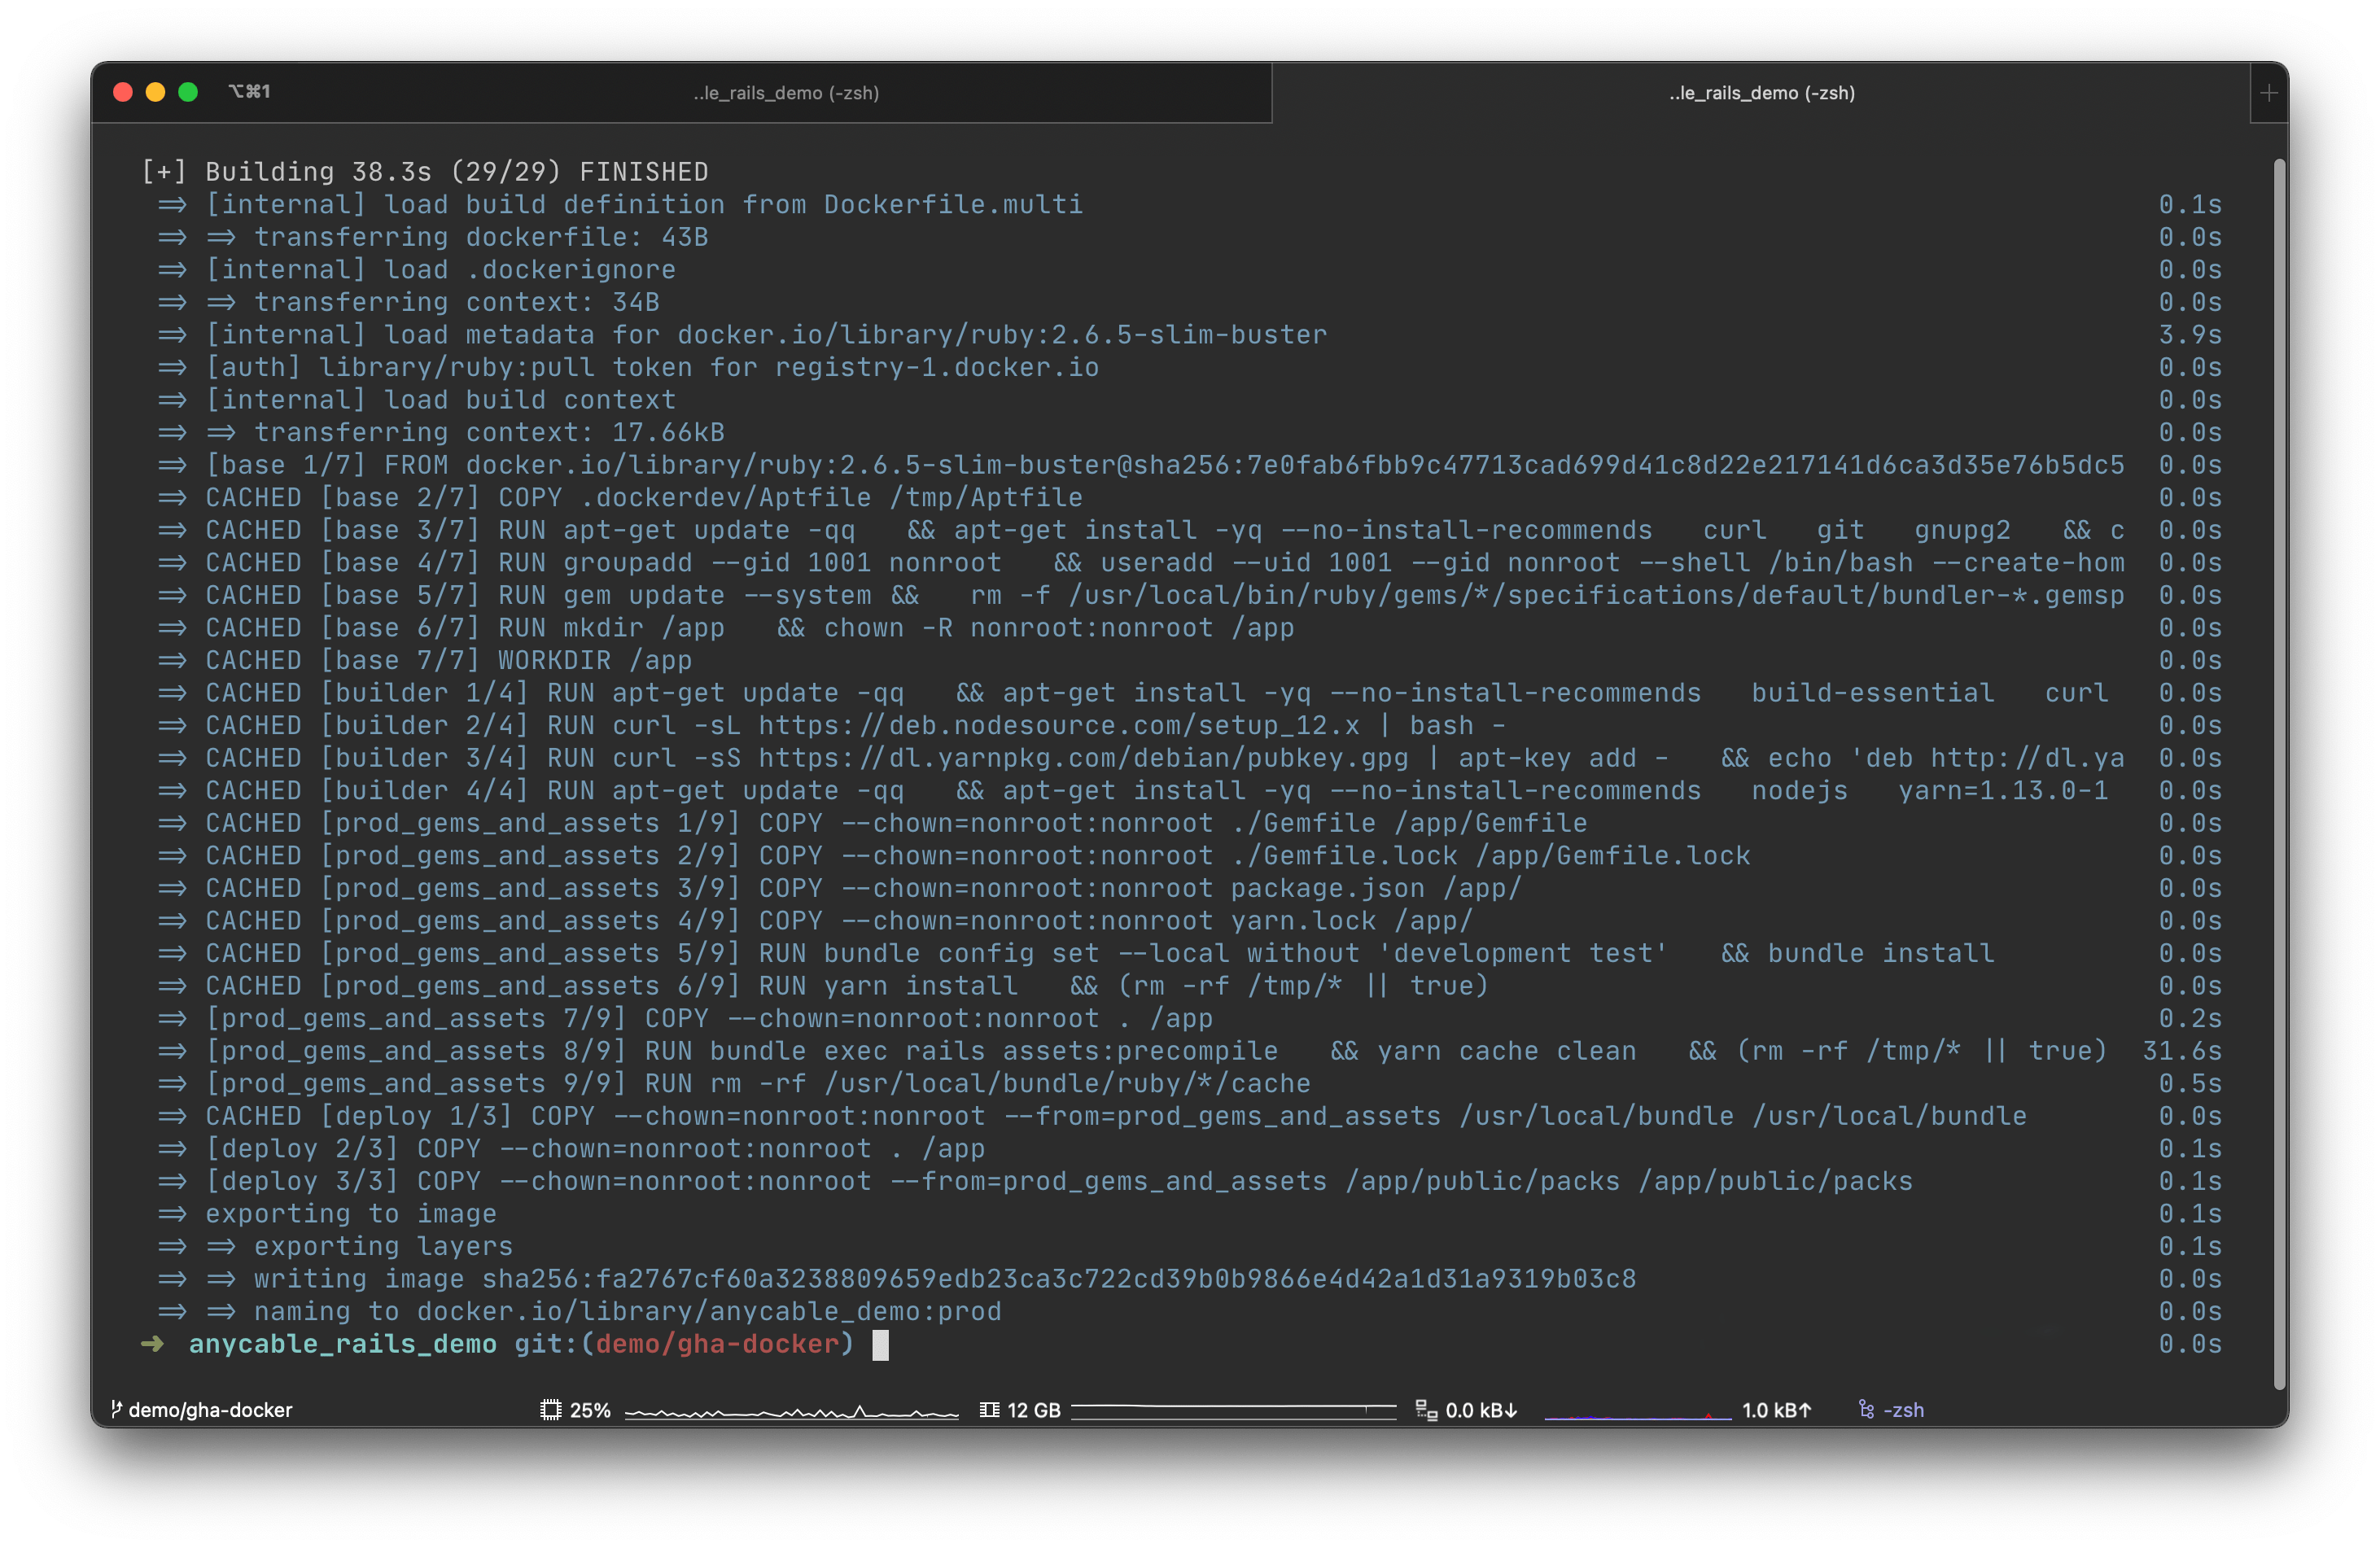
The output of DOCKER_BUILDKIT=1 docker build -t myimage:mytag.
In the screenshot above, you can see that while building an image for a demo application for AnyCable, Docker was able to resolve every layer as CACHED. Every layer that is, except for the one that does rails assets:precompile, as Rails is primed to re-run asset compilation every time the source code of application has changed.
Compilation took only 30 seconds; otherwise, we would have to wait for the entire build, which takes around 3 minutes on my local machine, but can take much longer (or finish much quicker) depending on the builder system or the size of the the application in the container.
Without caching, the life of an average Docker user will be much harder (and believe us, we know, as many of us are running Docker on Macs).
The coolest thing about BuildKit, however, is that it allows storing Docker layers as artifacts in an arbitrary folder, thus making it super easy to export and import: either from local storage or from a remote registry.
Of course, normally, a developer who works on a containerized application will not run a production Docker build on their local machine. Continuous integration providers make our life easier by removing the need to perform any of this grunt work building images from the comfort of our homes, and offloading it instead into the efficient data centers powering the cloud.
However, once you start building your images on a virtual machine that gets destroyed after every run, you lose all the advantages of caching.
CI providers will be happy to run your workloads for as long as possible, as most of them bill by the minute.
You, however, might be annoyed by the fact that your builds take longer, get queued up, cost you extra, and increase the incident response time when you need to quickly roll out a fix.
Of course, CI providers aren’t evil and don’t want to annoy clients, so most of them implement at least some sort of caching, especially if their primary business is building containers (hello, Quay). If you use a dedicated container build service, you might not even notice any problem, but the key to sanity is using fewer services, not more. Enter GitHub Actions.
Drinking the “GitHub-Actions-aide”
GitHub Actions are a relatively new addition to the CI family, but it has immediately become the elephant—or should we say, the thousand-pound gorilla—in the room. GitHub Actions’ main purpose is to absorb your entire operations pipeline: from collaborating on code, to automatic code checking, to deployments. End-to-end developer happiness. GitLab has had the “pipelines” feature for years (and, arguably, with better implementation), but the standalone providers for CI/CD only started feeling the heat once the biggest player on the git remote market entered the ring (we’ll miss you, Travis CI).
All of GitHub’s Ubuntu and Windows runners (although, weirdly, not macOS) come with Docker preinstalled, so it’s a no-brainer to set up Docker builds for some meaningful events in your repository: like merging a PR into the main branch, or rolling out a new release. All you need is this well-known sequence of steps somewhere in your workflow file:
# Your mileage may vary
docker login
docker build -t myimage:mytag -f Dockerfile.prod .
docker push myimage:mytag
# You don't even need to logout as the VM will be destroyed anyway
Unfortunately, every time you run this on GitHub Actions, all your builds will run from scratch.
Although GitHub introduced caching for workflow dependencies a while ago, they didn’t provide any official way to leverage it for Docker layers, which is surprising, as you can create your custom actions as Docker containers.
Several third-party solutions are built, either around the docker save command, or around pulling the previous version of an image before building a new one (so Docker can re-use layers). This is a nice tutorial explaining all the approaches, but they all seem quite contrived, especially when the task is to implement the default Docker functionality.
Frankly, it made more sense to create your own runner on a Digital Ocean droplet and ensuring that it keeps the cache between runs. This approach, while absolutely viable, requires some effort, as now you have to maintain your personal runner outside of GitHub’s ecosystem.
Finally, getting some action
The killer feature of GitHub Actions (even though it was not so apparent at the time of rollout) are… actions themselves. They’re reusable, self-contained sequences of steps that can be publicly shared and used inside arbitrary workflows. As a company, Docker maintains several actions of its own, and one of them has quite a self-explanatory name: build-push-action.
GitHub even mentions it in their own documentation:
name: Publish Docker image
on:
  release:
    types: [published]
jobs:
  push_to_registry:
    name: Push Docker image to Docker Hub
    runs-on: ubuntu-latest
    steps:
      - name: Check out the repo
        uses: actions/checkout@v2
      - name: Push to Docker Hub
        uses: docker/build-push-action@v1
        with:
          username: ${{ secrets.DOCKER_USERNAME }}
          password: ${{ secrets.DOCKER_PASSWORD }}
          repository: my-docker-hub-namespace/my-docker-hub-repository
          tag_with_ref: true
Sadly, what the documentation does not mention is that there exists a very simple way to set up a buildx/BuildKit runner in the context of the VM. This will make our Docker cache exportable and thus properly cacheable!
Here’s the official example from the docker/build-push-action repository:
name: ci

on:
  push:
    branches:
      - "master"

jobs:
  docker:
    runs-on: ubuntu-latest
    steps:
      # Check out code
      - name: Checkout
        uses: actions/checkout@v2
      # This is a separate action that sets up buildx runner
      - name: Set up Docker Buildx
        uses: docker/setup-buildx-action@v1
      # So now you can use Actions' own caching!
      - name: Cache Docker layers
        uses: actions/cache@v2
        with:
          path: /tmp/.buildx-cache
          key: ${{ runner.os }}-buildx-${{ github.sha }}
          restore-keys: |
            ${{ runner.os }}-buildx-
      - name: Login to DockerHub
        uses: docker/login-action@v1
        with:
          username: ${{ secrets.DOCKERHUB_USERNAME }}
          password: ${{ secrets.DOCKERHUB_TOKEN }}
      # And make it available for builds
      - name: Build and push
        uses: docker/build-push-action@v2
        with:
          context: .
          push: false
          tags: user/app:latest
          cache-from: type=local,src=/tmp/.buildx-cache
          cache-to: type=local,dest=/tmp/.buildx-cache-new
        # This ugly bit is necessary if you don't want your cache to grow forever
        # until it hits GitHub's limit of 5GB.
        # Temp fix
        # https://github.com/docker/build-push-action/issues/252
        # https://github.com/moby/buildkit/issues/1896
      - name: Move cache
        run: |
          rm -rf /tmp/.buildx-cache
          mv /tmp/.buildx-cache-new /tmp/.buildx-cache
Wow! The answer was staring at us for so long, yet no one really noticed. Should we check if this approach works for deploying real-world applications?
The cache dance-off
To test our caching approach in action, we will use a demo Rails application (source) by our colleague Vladimir Dementyev, a principal backend engineer at Evil Martians. This isn’t yet another “Hello Rails” example, but a functioning demo of a modern real-time application that uses the super-fast and memory-efficient AnyCable as a drop-in extension for Rails’ native Action Cable.
It’s decently-sized and, as anything that Vladimir does, is been incredibly well-tested. Here are the rails stats:

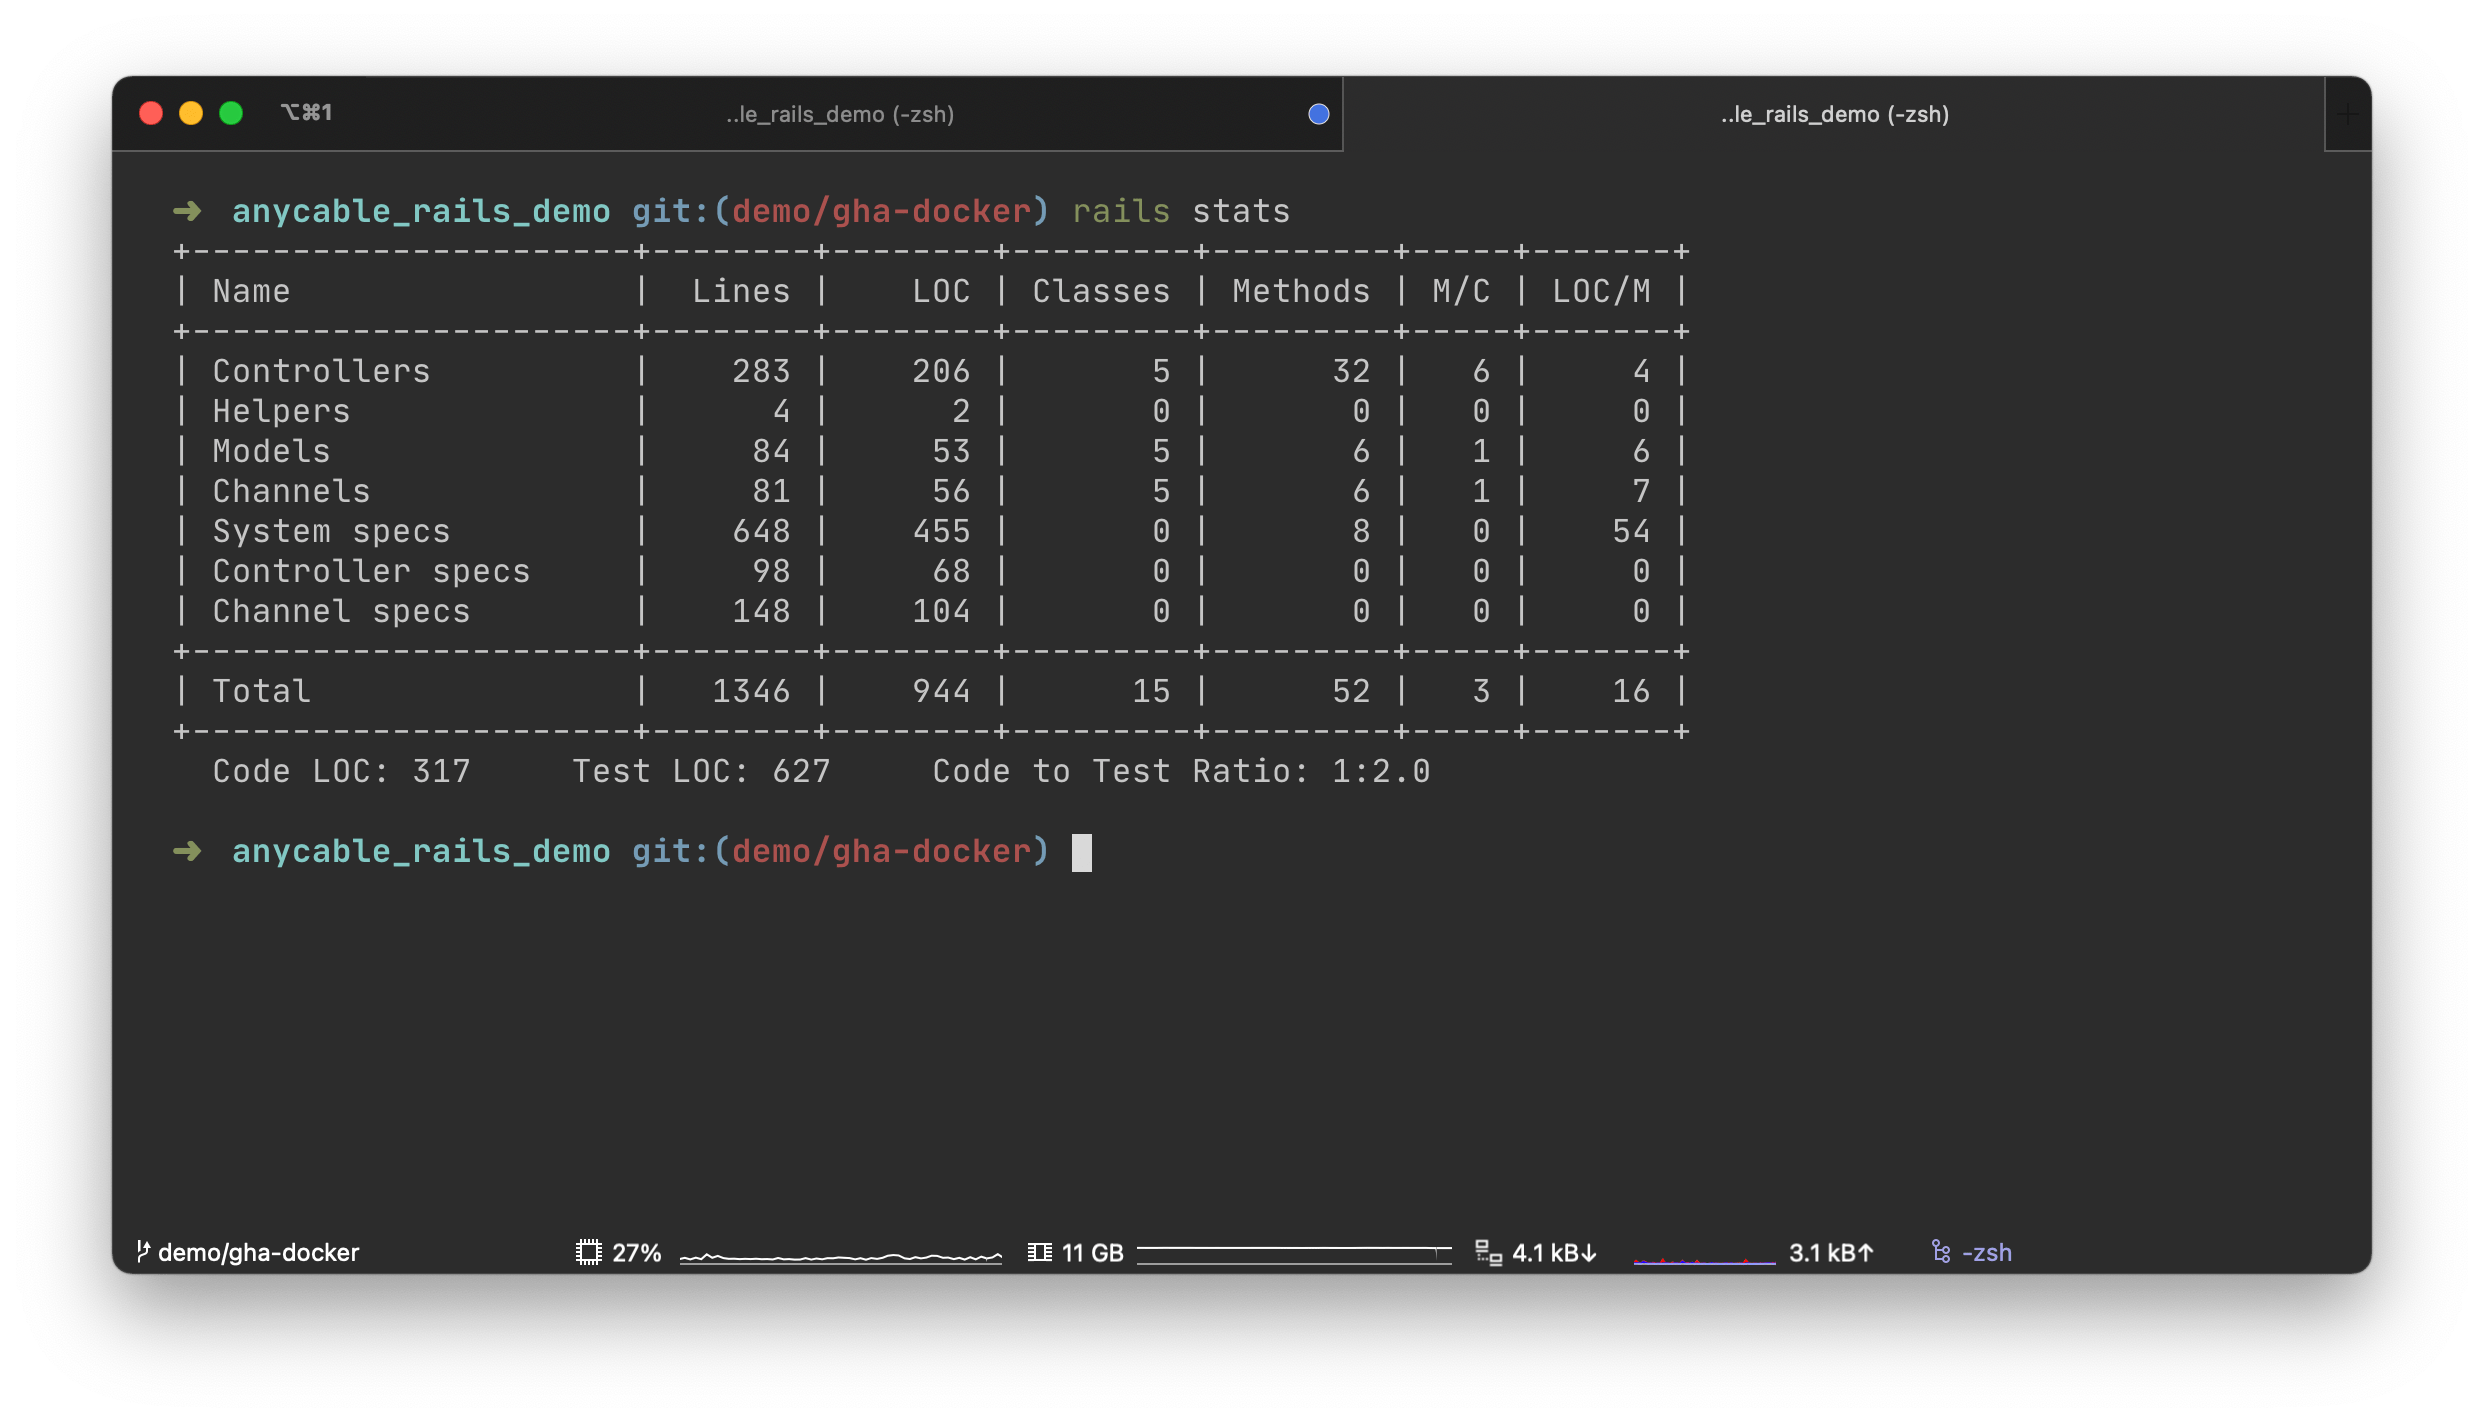
The rails stats for our app
We’re going to fork it and add some “fake” production Dockerfiles:
-
Dockerfile.prod: a standard “production” Dockerfile that adds all the common build dependencies, sets up a PostgreSQL client and Node.js, installs Yarn and Bundler, builds all the Ruby and JS dependencies, copies the source code to the image, and, finally, compiles static assets (scripts and styles).
-
Dockerfile.multi: a more evolved Dockerfile that uses a multi-stage build to reduce the size of the final image by more than half (only code, assets, and gems are included in the final stage).
It’s worth nothing that these Dockerfiles are “fake” only in the sense that an image built with them won’t run on its own; that is, we’ll need some orchestration in place to make all the parts of the app click in a real production environment (like say, a Kubernetes cluster). However, setting up orchestration is outside of the scope of this tutorial, as we’re mostly interested in approximating and benchmarking real-world build times, so this brief explanation will be good enough for now.
Building a single-stage Dockerfile
Let’s create a fake_deploy_singlestage.yml workflow that simulates deployment: it checks out the application code and builds an image.
In the real world, you would want to push the resulting image in some registry and then update your Kubernetes manifests or trigger a new Helm deploy. We’ll put two jobs inside the workflow. One uses caching, and the other does not. By default, Jobs inside a GitHub Actions workflow run in parallel, so this will create a healthy spirit of competition between the two jobs: whichever finishes first, wins our dance-off!
name: Fake deploy with normal Dockerfile
on: [push]

jobs:
  # This job uses buildx layer caching
  fake_deploy_cache_single:
    runs-on: ubuntu-latest
    steps:
      - uses: actions/checkout@v2

      - name: Prepare
        id: prep
        run: |
          TAG=$(echo $GITHUB_SHA | head -c7)
          IMAGE="my.docker.registry/progapangist/anycable_demo"
          echo ::set-output name=tagged_image::${IMAGE}:${TAG}
          echo ::set-output name=tag::${TAG}
      - name: Set up Docker Buildx
        id: buildx
        uses: docker/setup-buildx-action@master

      # Registry login step intentionally missing

      - name: Cache Docker layers
        uses: actions/cache@v2
        with:
          path: /tmp/.buildx-cache
          key: ${{ runner.os }}-single-buildx-${{ github.sha }}
          restore-keys: |
            ${{ runner.os }}-single-buildx

      - name: Build production image
        uses: docker/build-push-action@v2
        with:
          context: .
          builder: ${{ steps.buildx.outputs.name }}
          file: .dockerdev/Dockerfile.prod
          push: false # This would be set to true in a real world deployment scenario.
          tags: ${{ steps.prep.outputs.tagged_image }}
          cache-from: type=local,src=/tmp/.buildx-cache
          cache-to: type=local,dest=/tmp/.buildx-cache-new

        # Temp fix
        # https://github.com/docker/build-push-action/issues/252
        # https://github.com/moby/buildkit/issues/1896
      - name: Move cache
        run: |
          rm -rf /tmp/.buildx-cache
          mv /tmp/.buildx-cache-new /tmp/.buildx-cache

  # This job builds an image from scratch every time without cache
  fake_deploy_no_cache_single:
    runs-on: ubuntu-latest
    steps:
      - uses: actions/checkout@v2

      - name: Prepare
        id: prep
        run: |
          TAG=$(echo $GITHUB_SHA | head -c7)
          IMAGE="my.docker.registry/progapangist/anycable_demo"
          echo ::set-output name=tagged_image::${IMAGE}:${TAG}
          echo ::set-output name=tag::${TAG}

      - name: Build production image
        id: docker_build
        uses: docker/build-push-action@v2
        with:
          context: .
          file: .dockerdev/Dockerfile.prod
          push: false
          tags: ${{ steps.prep.outputs.tagged_image }}
Now, commit and push. Here are the results for the cold cache.

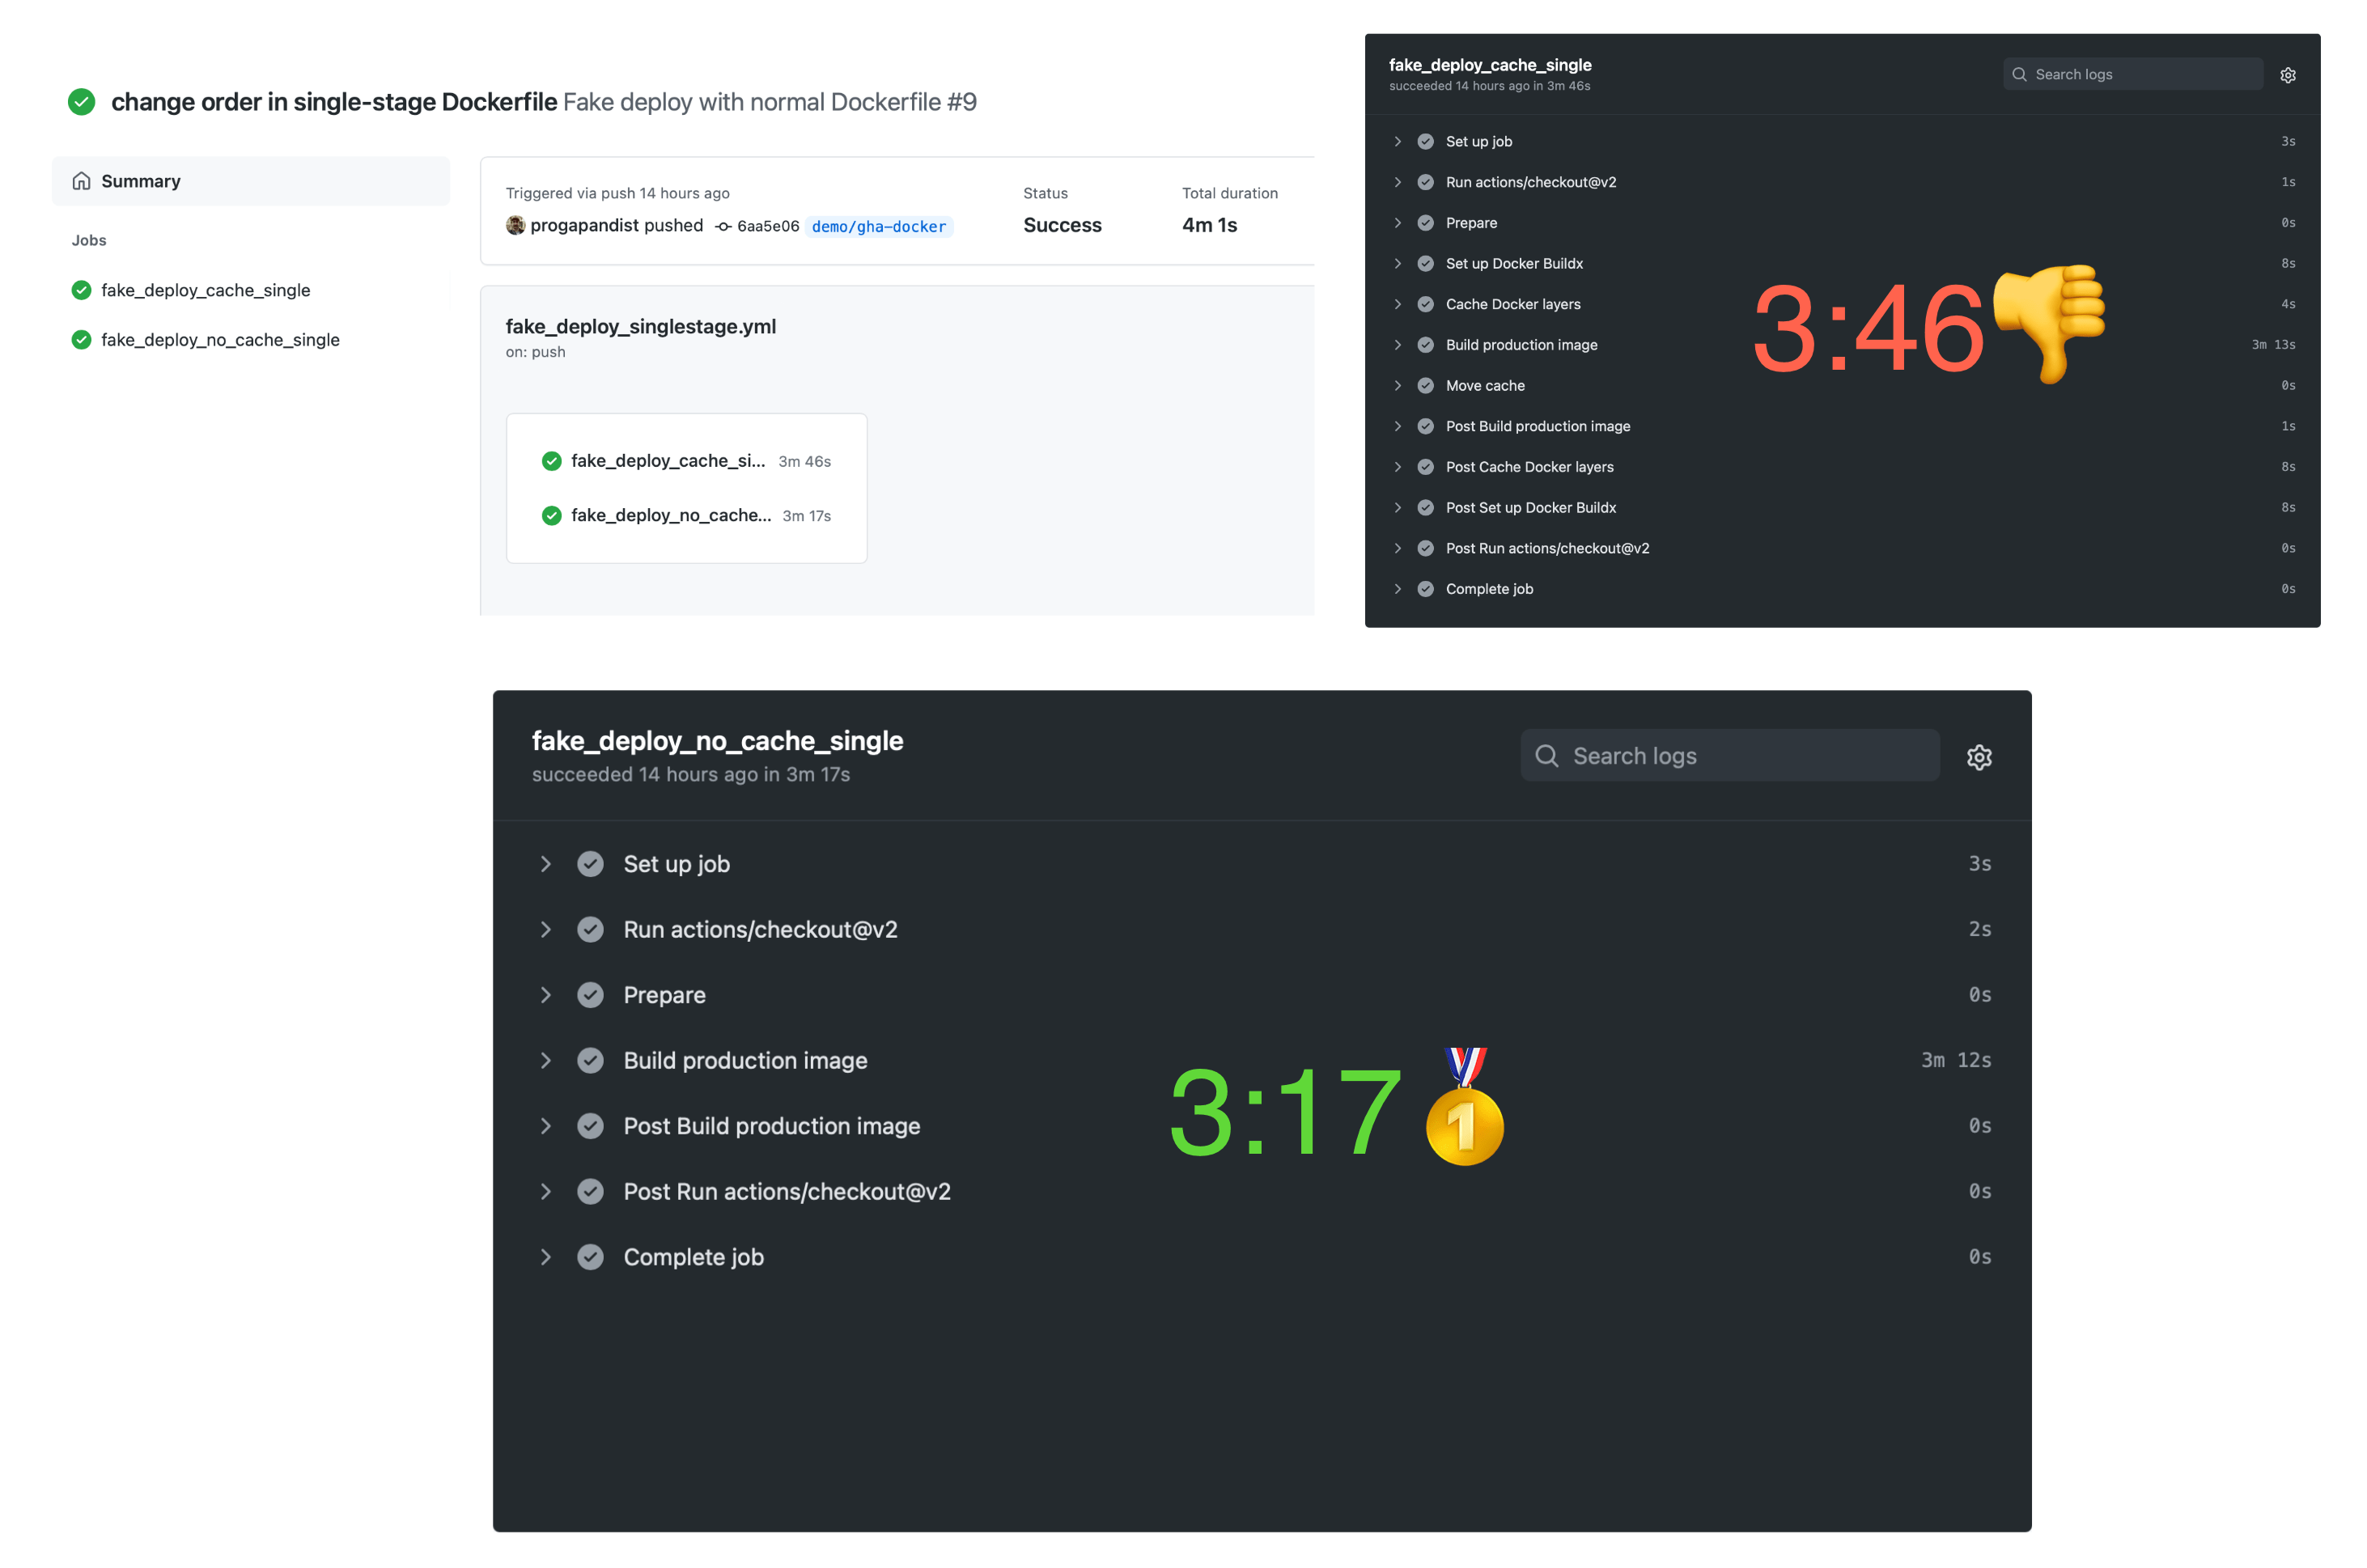
Building with cold cache
Expectedly, the cache action takes more time, as there are more steps involved. Let’s push an empty commit to see if the cache worked:
git commit --allow-empty -m "testing cache speed"
git push
Drumroll, please…
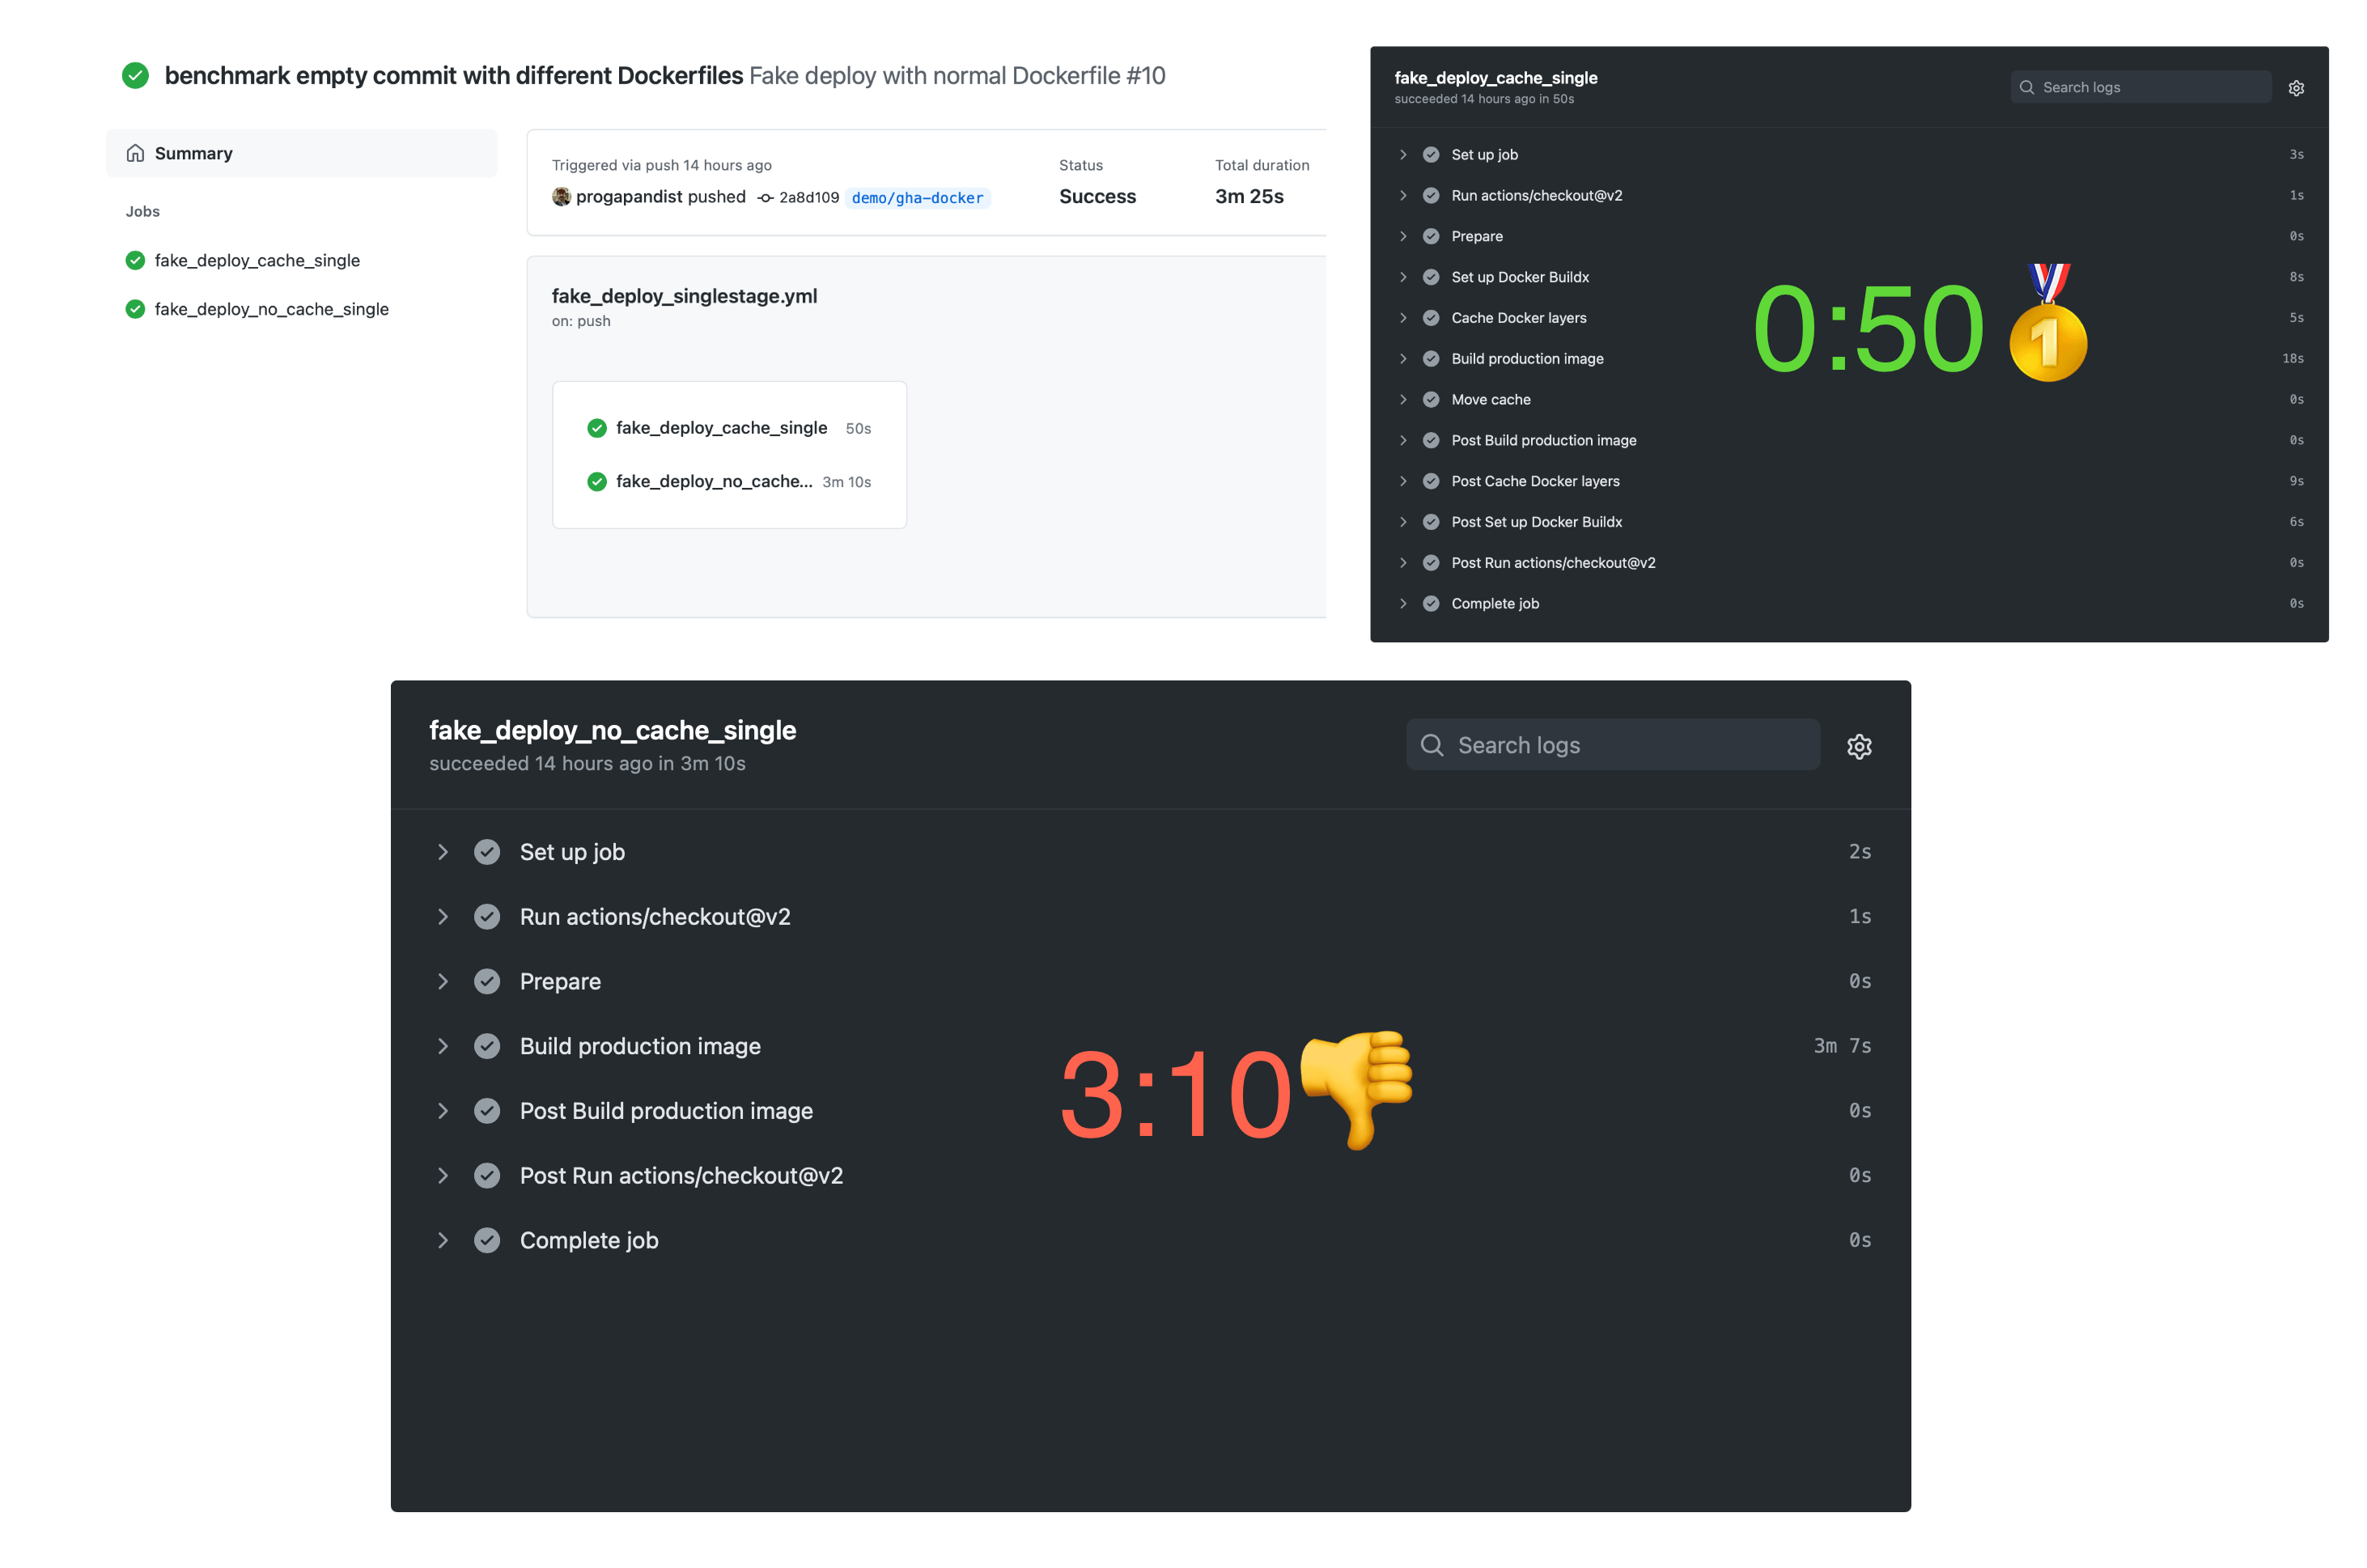
Building with a warm cache
That’s more like it! Of course, empty commits are quite rare in real-world project repositories. The only use case we can think of is triggering a re-deploy with the same code. However, this also happens, and the Docker cache will save you about two and a half minutes, which is nothing to complain about.
Let’s check for something more real. We’ll change some code (you can add a comment to a class or something) and push again:
git add . && git commit -m "changing some code..."
git push
Whenever we change our application code in any way, the RUN bundle exec rails assets:precompile step from the Dockerfile will run anew, as we might have changed some code that requires new assets.
If your cache works properly, only a single layer should be re-built in our cached workflow. The most time-hungry
bundle installandyarn installsteps should hit the cache.
Let’s see for ourselves!
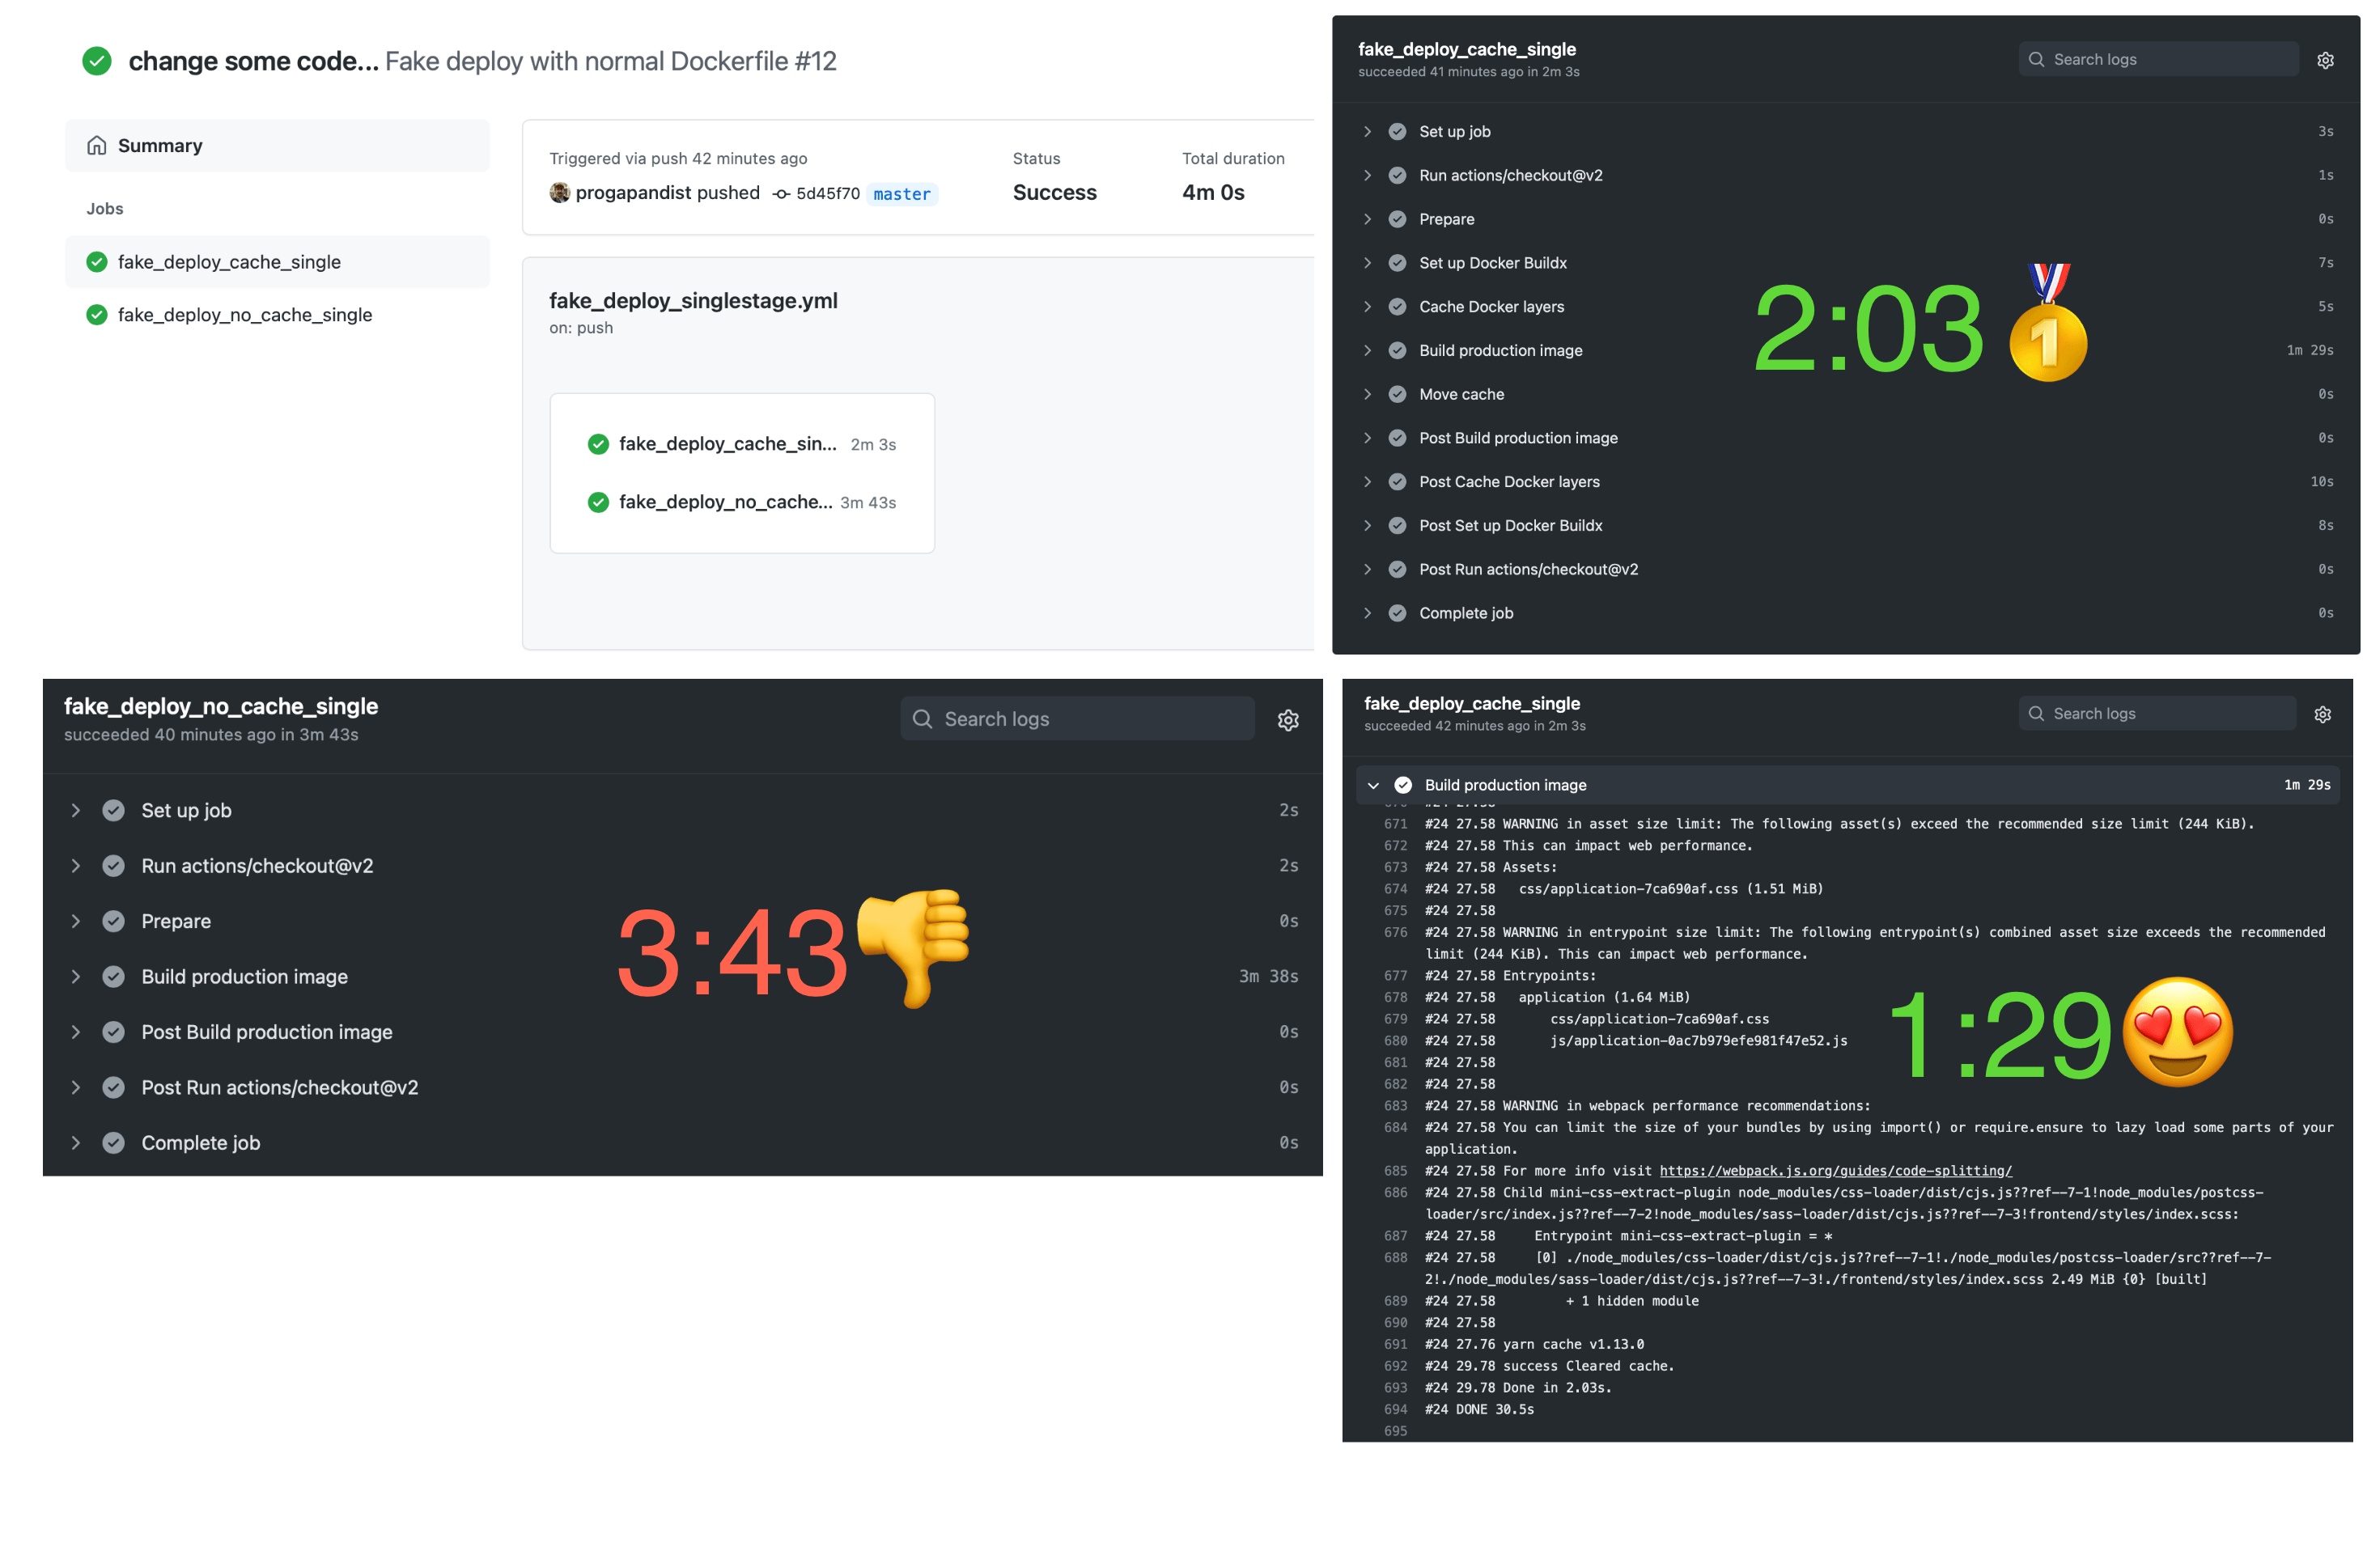
Only the assets layer changed during the Docker build. A single Build production image step in the workflow triggers a cache miss.
As we can see in the screenshots above, the uncached workflow took 3 minutes 38 seconds (3:43 in total) to build the Docker image, while the one using a cache built the image in 1 minute 29 seconds (2:03 in total).
This is still a reduction of almost half!
Building with a multi-stage Dockerfile
If you’re worried (and you should!) about your image sizes, it pays to wrap your head around Docker’s multi-stage builds. This technique allows us to only have deployable code inside the final image and to strip away all the noise like common build dependencies or (in the case of Rails)—the entire Node.js runtime. The resulting image of our demo app weighs 391MB when using a multi-stage build versus 967MB without it. This represents a considerable economy of space and bandwidth! (As the images fly over the web between CI and production servers.)
Take another look at a sample Dockerfile.multi to see how we do it. The idea is to target only the deploy stage in our production build. The workflow for caching multi-stage builds is almost identical to a single-stage one, with few notable differences. Omitting them can drive you mad when things don’t go as planned, so please be careful.
If you squint hard, you can see that pesky mode=max option in the cache-to key of docker/build-push-action@v2 step.
name: Fake deploy with multi-stage Dockerfile
on: [push]
jobs:
fake_deploy_cache_multi:
runs-on: ubuntu-latest
steps:
- uses: actions/checkout@v2
- name: Prepare
id: prep
run: |
TAG=$(echo $GITHUB_SHA | head -c7)
IMAGE="my.docker.registry/progapangist/anycable_demo"
echo ::set-output name=tagged_image::${IMAGE}:${TAG}
echo ::set-output name=tag::${TAG}
- name: Set up Docker Buildx
id: buildx
# Use the action from the master, as we've seen some inconsistencies with @v1
# Issue: https://github.com/docker/build-push-action/issues/286
uses: docker/setup-buildx-action@master
# It only worked for us with this option on 🤷♂️
with:
install: true
- name: Cache Docker layers
uses: actions/cache@v2
with:
path: /tmp/.buildx-cache
# Key is named differently to avoid collision
key: ${{ runner.os }}-multi-buildx-${{ github.sha }}
restore-keys: |
${{ runner.os }}-multi-buildx
- name: Build production image
uses: docker/build-push-action@v2
with:
context: .
builder: ${{ steps.buildx.outputs.name }}
file: .dockerdev/Dockerfile.multi
# Set the desired build target here
target: deploy
push: false
tags: ${{ steps.prep.outputs.tagged_image }}
cache-from: type=local,src=/tmp/.buildx-cache
# Note the mode=max here
# More: https://github.com/moby/buildkit#--export-cache-options
# And: https://github.com/docker/buildx#--cache-tonametypetypekeyvalue
cache-to: type=local,mode=max,dest=/tmp/.buildx-cache-new
- name: Move cache
run: |
rm -rf /tmp/.buildx-cache
mv /tmp/.buildx-cache-new /tmp/.buildx-cacheThe benchmark results are roughly the same:
- Deploy with cold cache (4:22/3:11).
- Deploy with warm cache and empty commit (00:30/3:09).
- Deploy with assets compilation (2:06/3:09).
All in all, our little caching experiment has proven to be a success!
We can cut our deployment times by half in the most common scenario—when only application code has changed on commit, but none of the dependencies.
Of course, if the Gemfile.lock or yarn.lock files have changed between deploys, it will invalidate the bundle install and yarn install cache layers, and the build process will take more time. However, this rarely happens in a mature application, except when you need to update your dependencies.
Bonus: Matrix builds for vendor images (or libraries!)
At Evil Martians, we love Fullstaq Ruby—an optimized Ruby distribution with Jemalloc and malloc_trim patches that allows your applications to use 30% to 50% less memory.
While the folks at Fulllstaq Ruby are still working on the official container edition of the platform, our backend engineers and external contributors are maintaining a set of Docker images for Ruby versions 3.0.0, 2.7.2, and 2.6.6 running on Debian 9 (stretch and stretch-slim) and Debian 10 (buster and buster-slim).
We’ve recently set up a GitHub Action that uses a build matrix strategy to build 24 (slightly) different images simultaneously.
Take a look at the build-push workflow in the repo to see how our approach plays with matrix builds.
With the layer caching enabled, builds only take from 16 to 60 seconds for each image.
And with that, we’ve reached the end of our caching journey. Thank you for reading!
You can grab the complete workflows from this article in our repo, and feel free to use them for your own gain.
This article would not have been possible without the folks at Docker, who wrote a super-clear blog post describing the caching mechanism and set up a repository with examples.
Further reading
-
If you want to see how we set up Docker for our local development environments, check out the seminal post by Vladimir Dementyev, the author of AnyCable and TestProf: “Ruby on Whales: Dockerizing Ruby and Rails development”. It also introduces Dip—a Martian tool by Mikhail Merkushin that makes working with Docker Compose a breeze.
-
For even more Docker and Dip magic, this time in a framework and language-agnostic context, read “Reusable development containers with Docker Compose and Dip”.
-
If you are a Gopher, learn how to achieve “Speeding up Go Modules for Docker and CI”.


If your organization needs any help with “terraforming” Rails applications, setting up robust deployment pipelines for the cloud, or building internal engineering culture around containers, feel free to give us a shout. Our engineers and DevOps specialists will be happy to help your digital product achieve maximum efficiency.