Evil Front Part 3: Modern Frontend in Rails

Topics

Translations
An opinionated guide to modern, modular, component-based approach to handling your presentation logic in Rails that does not depend on any frontend framework. Follow this three-part tutorial to learn the bare minimum of up-to-date frontend techniques by example and finally make sense of it all.
Other parts:
- Evil Front Part 1: Modern Frontend in Rails
- Evil Front Part 2: Modern Frontend in Rails
- Evil Front Part 3: Modern Frontend in Rails
New! This article was updated in July 2019 to follow the latest developments in frontend and support most recent versions of Rails, Webpacker, and other libraries.
Previously, on Evil Front Part 2…
By the end of Part 2, we have built a scaffolding for our chat using a component approach. Each component is represented by a folder inside the frontend part of our application. It consists of three files: an .erb partial, a .pcss stylesheet and a .js script.
For now, our javascripts contain only import statements for nested components and stylesheets—that is how we ensure all pieces make their way into an application.js entry point so Webpacker gem can put them together and build CSS and JS bundles for us.
In the last chapter of our tutorial, we are going to work with JavaScript to make our chat usable. We will show how to use Action Cable from ES6 modules, as the official Rails documentation is still based on Sprockets and CoffeeScript.
Once we are done, we will deploy our “sprocketless” application to Heroku.
Admittedly, Action Cable is not the easiest thing to wrap your head around, so we will try to be as explicit possible in describing what happens at each step. We hope not to insult the intelligence of our more experienced readers. If you happen to know Action Cable inside out, scroll through explanations and focus on code snippets, as they are different from the usual Sprockets implementation and examples from Rails Guides will not work with Webpack.
Action Cable, Ruby Part
First, we need to generate a channel for our chat:
$ bin/rails g channel chatIt will create a file named chat_channel.rb inside app/channels/.
Action Cable integrates WebSockets in Rails, allowing you to write server-side logic in Ruby and client-side—in JavaScript. The cool part is that you can call your Ruby methods on the server from JavaScript running in the browser. Our chat_channel.rb is where we define those methods for our chat. It is also responsible for streaming data (in our case, bits of HTML to update DOM with a new message) for all subscribed users.
Before we deal with our channel-specific functionality, we need to make sure that Action Cable only broadcasts to authenticated users. Inside the app/channels/application_cable folder that was generated when you created your application, you can find a connection.rb file that is responsible for WebSocket authentication. You remember from Part 2 that our authentication is very simple: we just create a username key in the session hash with whatever username our visitor provides. Here is the code we need:
# app/channels/application_cable/connection.rb
module ApplicationCable
  class Connection < ActionCable::Connection::Base
    identified_by :current_user

    def connect
      self.current_user = request.session.fetch("username", nil)
      reject_unauthorized_connection unless current_user
    end
  end
end
Here we try to fetch the username from a session, and if it’s not there, we deny the connection. In practice, that means that new visitors will not receive any Action Cable broadcasts until they are past the “log in” screen.
Now it’s time to handle our chat_channel.rb:
# app/channels/chat_channel.rb
class ChatChannel < ApplicationCable::Channel
  def subscribed
    stream_from "chat"
  end

  # Called when message-form contents are received by the server
  def send_message(payload)
    message = Message.new(author: current_user, text: payload["message"])

    ActionCable.server.broadcast "chat", message: render(message) if message.save
  end

  private

  def render(message)
    ApplicationController.new.helpers.c("message", message: message)
  end
end
A subscribed method will be called once the connection is authenticated; stream_from means that whatever message that is broadcasted over the “chat” channel will make its way to the client.
The send_message method is the most interesting part here. As we are inside the Ruby part of our application, we can directly communicate with ActiveRecord. In our simplified example “sending a message” means creating a new instance of Message model, saving it to the database, rendering our message partial with the right author and text fields, and broadcasting the resulting HTML over our “chat” channel.
Note that from inside app/channels we don’t have direct access neither to ApplicationController’s render method, nor to our custom c helper to render components. So we create another definition of render that will call our helper indirectly, by creating an instance of ApplicationController and accessing helpers that we defined in ApplicationHelper module. We are interested in c helper, so we get to it through ApplicationController.new.helpers.c.
Action Cable, JavaScript part
In a vanilla rails new-generated Rails 5.1 application a client part of Action Cable (written in JavaScript) comes included in the Asset Pipeline. When we removed our app/assets, we effectively got rid of standard implementation too, so we need to install Action Cable’s JS library again—this time from npm through Yarn:
$ yarn add actioncableSo, what’s so special about using Action Cable (or any other JavaScript library) with Webpack?
With Sprockets, you are dealing with JavaScript files sharing the common scope after being concatenated, so anything declared in this.js can be accessed from that.js provided that the former is loaded earlier. Webpack gives us different, more disciplined approach. Here’s an excellent explanation by Ross Kaffenberger:
“It helps to understand that Sprockets and Webpack are two completely different paradigms of bundling JavaScript for the browser. The differences get to the heart of how Webpack works. Instead of concatenating all your JavaScript into the global scope, as Sprockets does, Webpack provides a runtime that compartmentalizes each JavaScript module into separate scopes via closures so that access between modules must be declared via imports. By default, none of these modules are exposed to the global scope.”
We will have to use ES6 export and import statements quite a lot. But first, create a client folder inside frontend—this is where we will keep our Action Cable client:
$ mkdir frontend/client
$ touch frontend/client/cable.js
cable.js will be used to create a consumer instance of “cable” connection. In standard Rails examples (written for Sprockets), it is usually created as a part of global App object. Here is the code you will find in the official Action Cable documentation and in numerous tutorials out there:
// don’t cut and paste this!
(function() {
  this.App || (this.App = {});

  App.cable = ActionCable.createConsumer();
}.call(this));
We need to adapt this example to our module-based system. We also want to reuse an existing connection and avoid calling the createConsumer function again if we have already created a consumer. We don’t want to use a global window variable for that so we will take a different approach. Our cable.js module will hold a connection instance in the consumer internal variable and export the createChannel function that will either subscribe an existing consumer to our chat channel or create a new consumer instance. Go ahead and put this in your cable.js:
// frontend/client/cable.js
import { createConsumer } from "@rails/actioncable"

let consumer;

const createChannel = (...args) => {
  if (!consumer) {
    consumer = createConsumer();
  }

  return consumer.subscriptions.create(...args);
};

export default createChannel;NOTE: For Rails 5 the code would look a bit differently:
// frontend/client/cable.js
import cable from "actioncable";

let consumer;

const createChannel = (...args) => {
  if (!consumer) {
    consumer = cable.createConsumer();
  }

  return consumer.subscriptions.create(...args);
};

export default createChannel;
Our createChannel function is generic—we can use it with right arguments from wherever we want to subscribe a consumer to a specific channel. So, we need another file that will become a client-side JavaScript counterpart to the server-side Ruby chat_channel.rb. Let’s call this file chat.js:
$ touch frontend/client/chat.jsAnd here is the code:
// frontend/client/chat.js
import createChannel from "client/cable";

let callback; // declaring a variable that will hold a function later

const chat = createChannel("ChatChannel", {
  received({ message }) {
    if (callback) callback.call(null, message);
  }
});

// Sending a message: "perform" method calls a respective Ruby method
// defined in chat_channel.rb. That's your bridge between JS and Ruby!
const sendMessage = message => chat.perform("send_message", { message });

// Getting a message: this callback will be invoked once we receive
// something over ChatChannel
const setCallback = fn => {
  callback = fn;
};

export { sendMessage, setCallback };
That is not the easiest piece of code to understand, so let’s take it slow. Below is the rundown of what is happening.
- We import our
createChannelfunction from thecable.jsmodule. - We are calling it with two arguments: the name of our channel (note that what is
some_channelin Ruby should beSomeChannelin JavaScript, you have to respect this convention for things to work) and an object that defines Action Cable standard callbacks:connected,disconnectedorreceived. We only needreceivedthat will be called once the consumer receives a channel broadcast with the broadcasted data as an argument in the form of a JavaScript object (Rails handles conversion between Ruby and JS objects all on itself). - Then things get a little tricky: once we receive a
messageobject, we need to invoke some function. We don’t want to define this function here, as it will be the responsibility of our component that should know how to handle DOM according to its needs. So we create a generic functionsetCallbackthat, once invoked from a right component, will change thecallbackvariable to store whatever component-specific function we want to call once the message received. sendMessagecalls aperformmethod on our connection instance which is the most magical part of Action Cable: invoking Ruby methods from JavaScript. This will triggersend_messagemethod from ourchat_channel.rband pass it amessageobject as an argument. The{ message }notation is an ES6 shorthand for{ message: message }, as we expect our payload to be under themessagekey. A “message” in this context is just a text that visitor types into the message form.- Finally, we export both
sendMessageandsetCallbackfrom a module to be used from our components later.
Sending a clear message
Let’s handle message sending first. What component should be responsible for that? Remember, we have a message component for an individual message, a messages component for a list of messages and a message-form to submit text. A big blue “Send” button is inside the message-form, so that answers our question! Go ahead and modify the code in frontend/components/message-form/message-form.js:
// frontend/components/message-form/message-form.js
/* eslint no-param-reassign: off */

// we need to import sendMessage from our client/chat.js
import { sendMessage } from "client/chat";
import "./message-form.pcss";

const isMac = navigator.platform.match(/Mac/) != null;

const handleLineBreak = input => {
  input.value = `${input.value}\n`;
};

const handleSubmit = input => {
  const { value } = input;

  if (value.length === 0) {
    return;
  }

  // Invokes sendMessage, that, in turn, invokes Ruby send_message method
  // that will create a Message instance with ActiveRecord
  sendMessage(input.value);

  input.value = "";
  input.focus();
};

const form = document.querySelector(".js-message-form");

if (form) {
  const input = form.querySelector(".js-message-form--input");
  const submit = form.querySelector(".js-message-form--submit");

  // You can send a message with [Enter] or [Cmd/Ctrl + Enter]
  input.addEventListener("keydown", event => {
    if (event.code !== "Enter") {
      return;
    }

    event.preventDefault();

    const { altKey, ctrlKey, metaKey, shiftKey } = event;
    const withModifier = altKey || shiftKey || (isMac ? ctrlKey : metaKey);

    if (withModifier) {
      handleLineBreak(input);
    } else {
      handleSubmit(input);
    }
  });

  // Or by cicking a button
  submit.addEventListener("click", event => {
    event.preventDefault();
    handleSubmit(input);
  });
}
Now you can start your server again, authenticate, put some text in a message box, hit Cmd+Enter and examine your Rails logs:

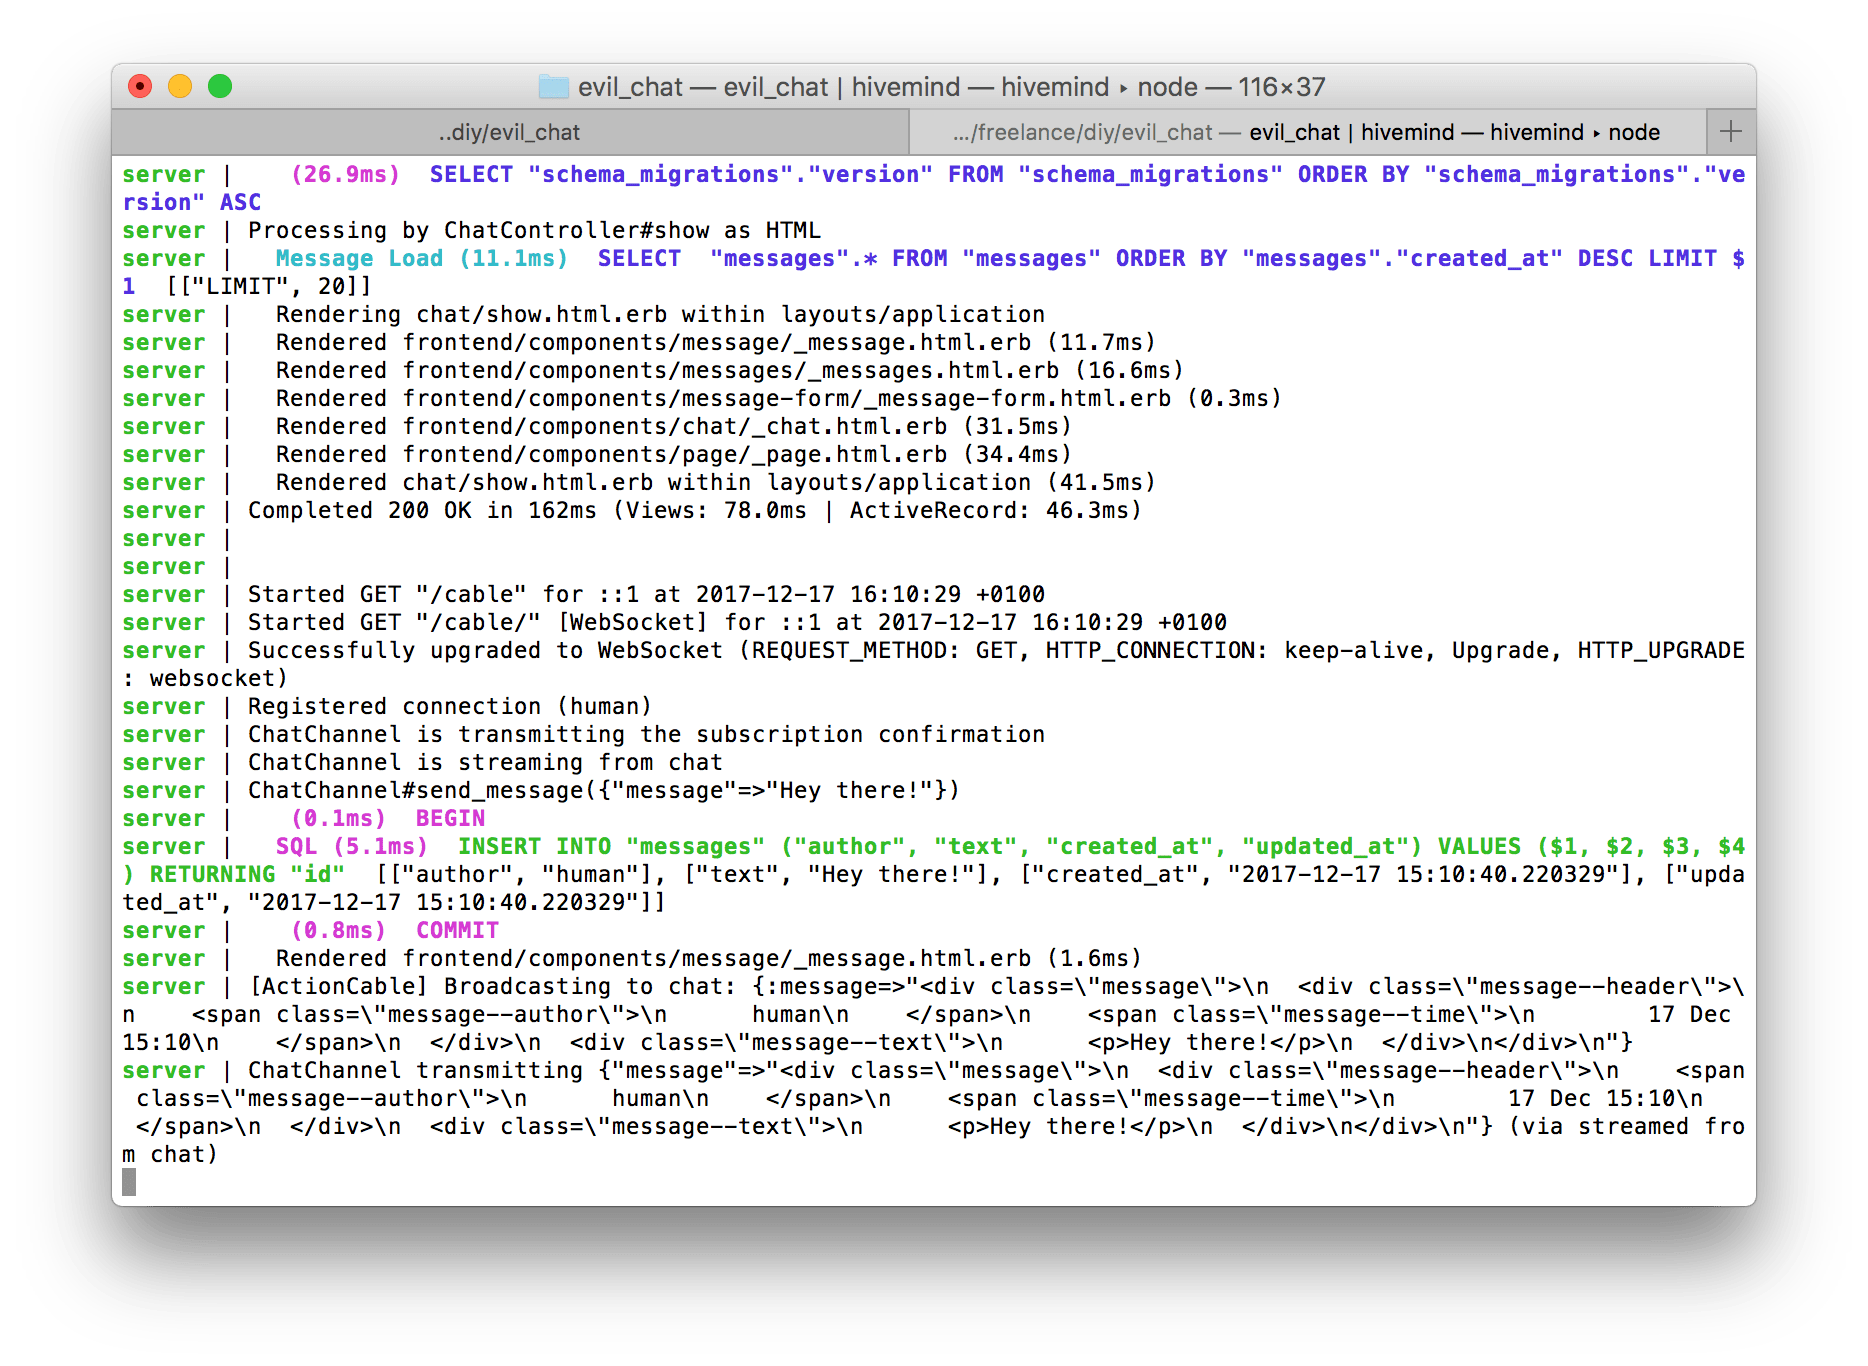
First broadcast!
So, now we can submit a form, create a new Message instance in our backend, generate a message partial and broadcast it over Action Cable to all subscribed users. Now all is left is to insert a received string of HTML into the DOM so it can be seen on a page.
Message received
The component responsible for dynamically inserting each new message into the page will be our messages, as it is already responsible for rendering all the messages we have in our database.
All we need to do is to call setCallback function that comes from our chat.js module and pass it another function that will take a broadcasted message as an argument. To recap: our chat.js module is ready to do something on the received event whenever something is broadcasted over the chat channel, but it doesn’t know what exactly to do until we explicitly say so. We do it by passing a function that we want to be executed to setCallback.
Here’s our new code for messages.js:
// frontend/components/messages/messages.js
import { setCallback } from "client/chat";
import "components/message/message"; // message is nested, so we import it here
import "./messages.pcss";

const scrollToBottom = element => {
  // eslint-disable-next-line
  element.scrollTop = element.scrollHeight;
};

const messages = document.querySelector(".js-messages");

if (messages) {
  const content = messages.querySelector(".js-messages--content");

  scrollToBottom(content);

  // Telling `chat.js` to call this piece of code whenever a new message is received
  // over ActionCable
  setCallback(message => {
    content.insertAdjacentHTML("beforeend", message);

    scrollToBottom(content);
  });
}
The function we are passing into chat.js module is simple: it just scrolls the list of messages up and appends an HTML for the new message to the bottom. Now you can run two different browsers, log in with different nicknames and have a nice chat with yourself to see that it all works:

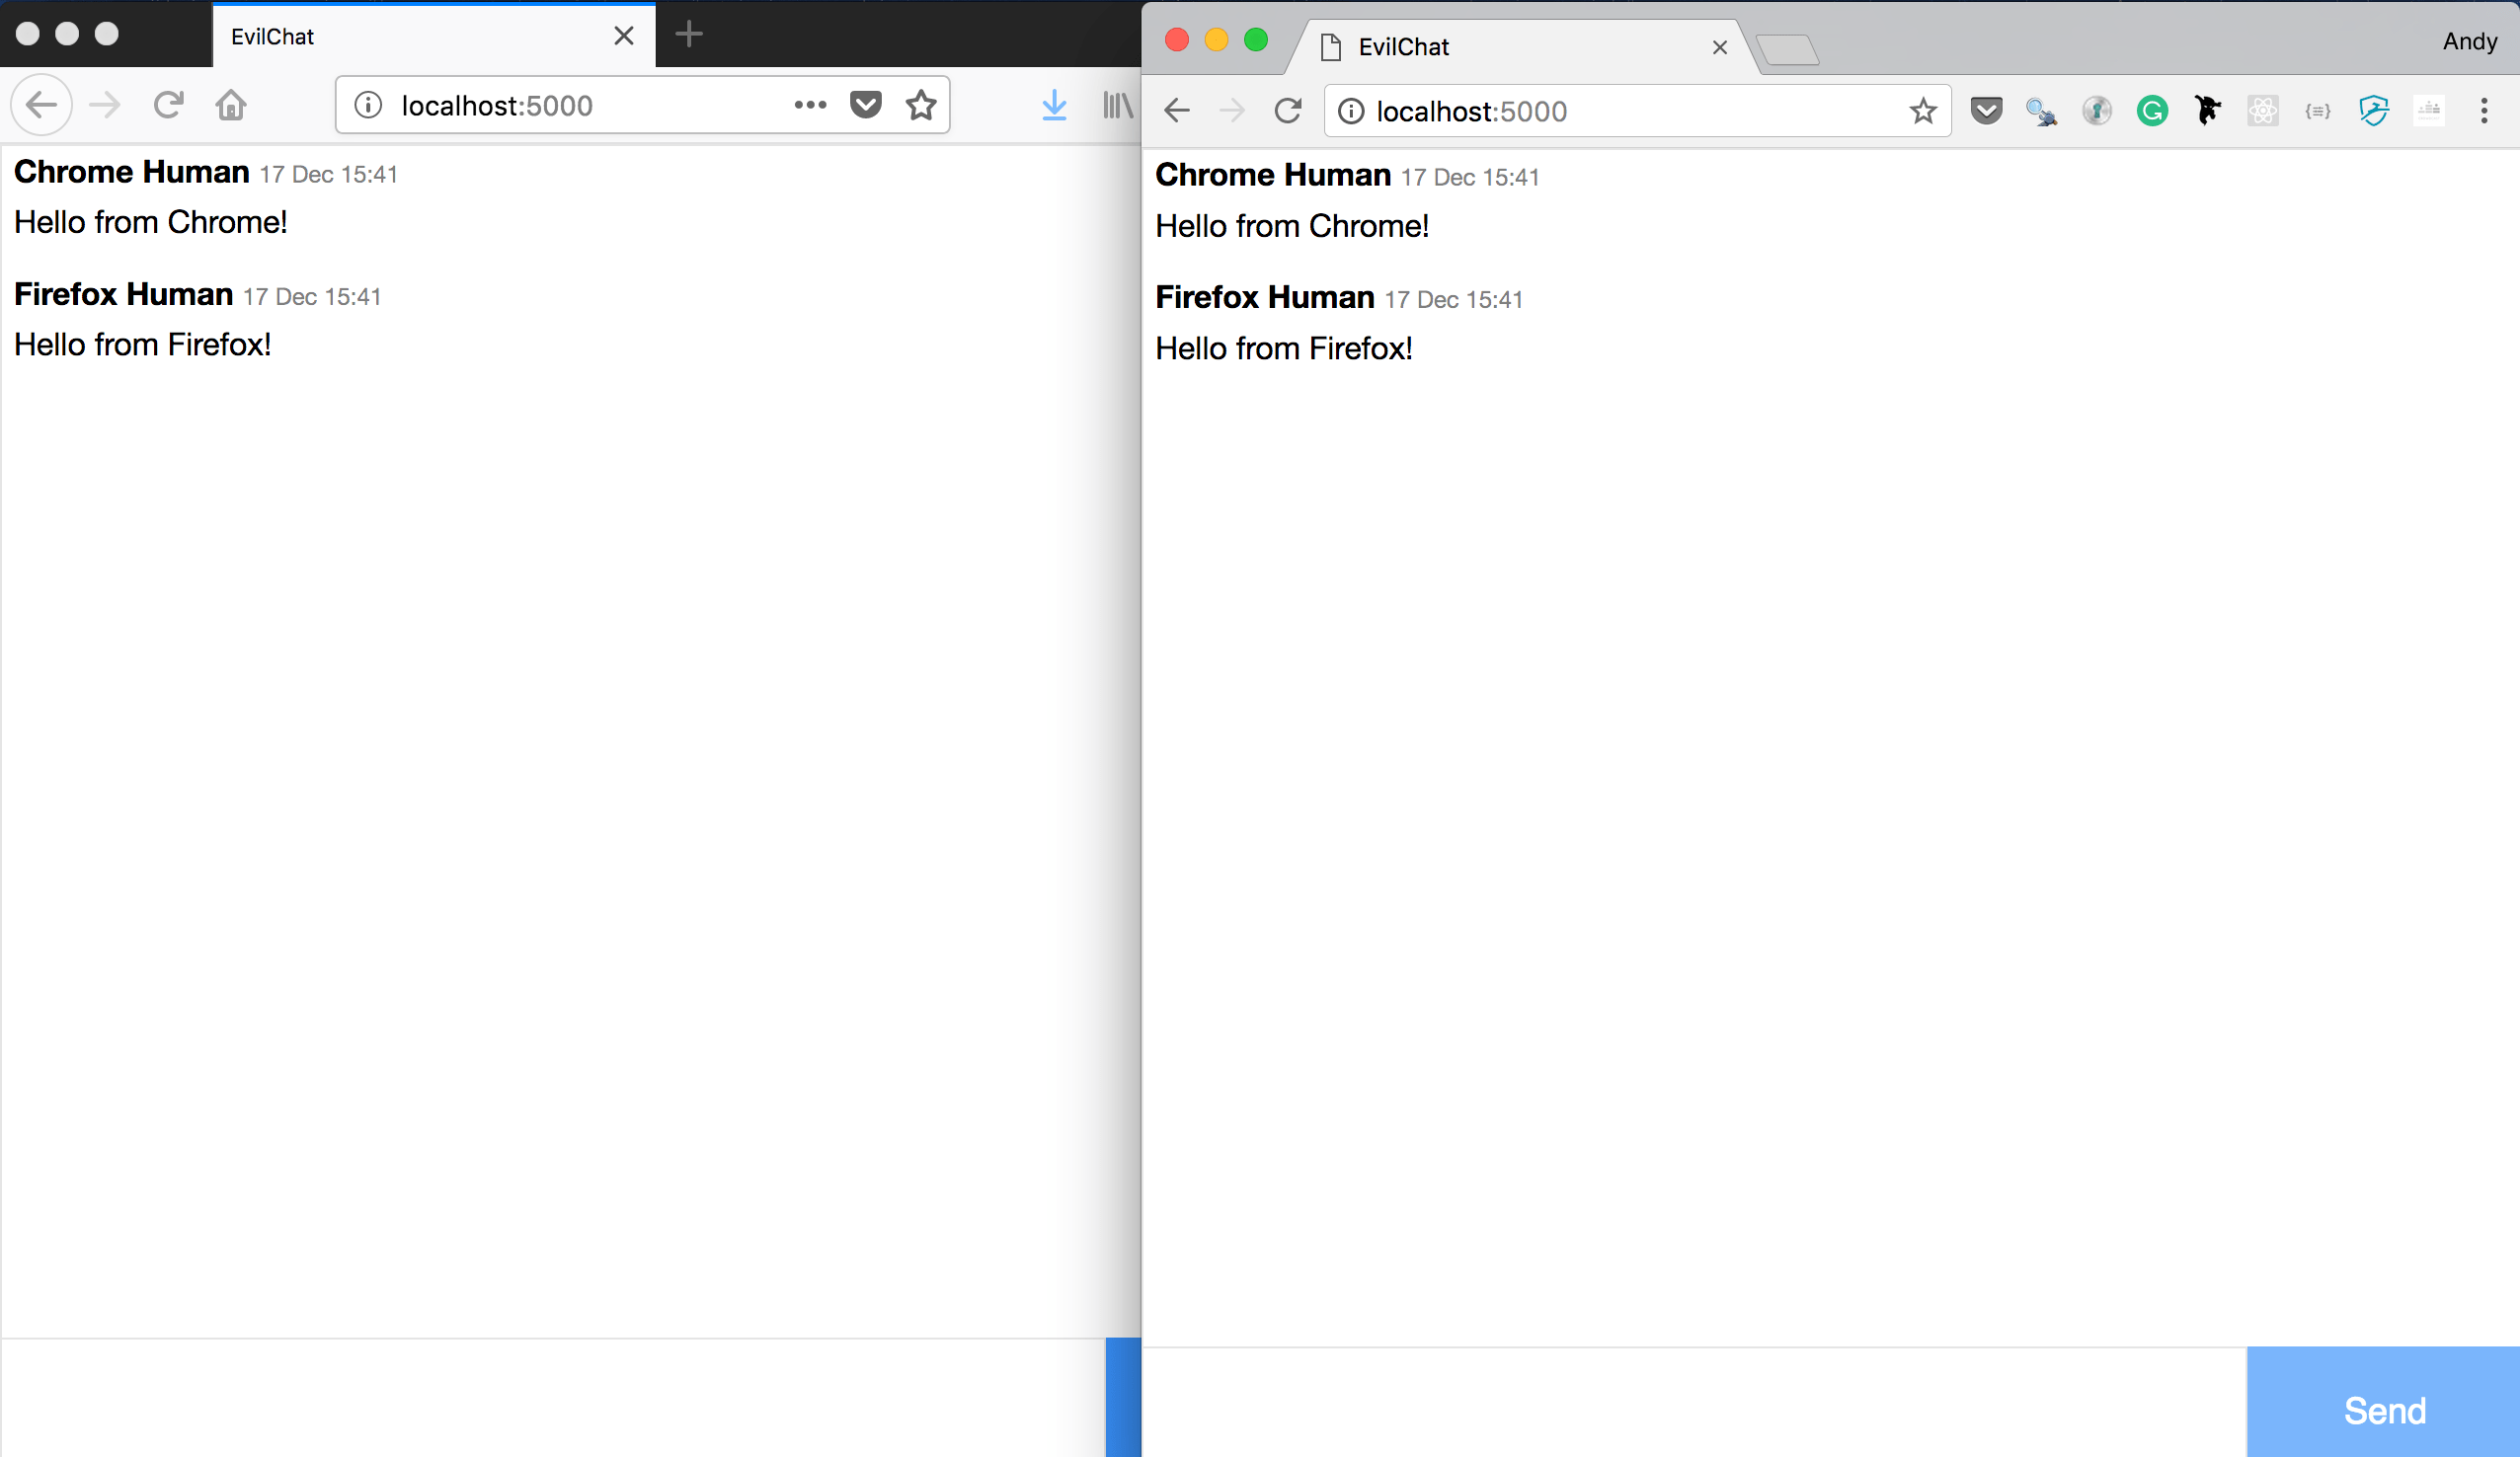
Talking to ourselves
Deploying to Heroku
Now let’s try deploying our application to Heroku to make sure our little chat can also work in production environment. First, make sure you have a Heroku account, and Heroku CLI is installed on your machine, so you can use heroku commands in the Terminal.
There are few things we need to do to prepare our app for deployment.
First, we need to rename our existing Procfile that helps us run rails server and webpack-dev-server side-by-side to Procfile.dev. Procfile (without dev) will now be used by Heroku, and we don’t want to run webpack-dev-server in production.
So, our Procfile.dev now looks like this:
server: bin/rails server
assets: bin/webpack-dev-server
And in the main Procfile we leave only the server part:
server: bin/rails serverNote: after you have performed this manipulation, if you still want to run your application on localhost, you will need to start it with hivemind Procfile.dev (or overmind s -f Procfile.dev, or foreman run -f Procfile.dev, depending on your choice of process manager).
Secondly, we need to help Heroku figure out its build tasks.
Once Heroku determines that we are pushing a Ruby app, it will try to launch assets:precompile that is historically used to build assets from Asset Pipeline. In case with Webpacker, though, different tasks need to be called: yarn:install and webpacker:compile.
Latests versions of Rails and Webpacker (3.2.0) know to launch them on assets:precompile even if Sprockets are disabled (you can try running bundle exec rails assets:precompile locally to see that your packs are built and placed in the public folder).
We also need to enable Redis in production in order for Action Cable to work on Heroku. Uncomment the line gem 'redis', '~> 4.0' in the Gemfile.
Note that your project already has an auto-generated config/cable.yml file that fetches the URL of Redis instance from the ENV in production.
We will use Heroku Redis add-on that will put the correct Redis server URL into the REDIS_URL environment variable.
One last thing: uncomment config.require_master_key = true in config/environments/production.rb.
Finally, we are ready to deploy:
$ heroku create YOUR_APP_NAME
$ heroku config:set RAILS_MASTER_KEY=YOUR_MASTER_KEY -a YOUR_APP_NAME
$ heroku addons:create heroku-redis:hobby-dev -a YOUR_APP_NAME
Once your Heroku Redis add-on is created in a couple of minutes (verify its status with heroku addons:info), you can push:
$ git add . && git commit -m "prepare for deploy"
$ git push heroku master
And, after our app is built, execute heroku run rails db:migrate to prepare your production database. If all went well, heroku open will take your browser to the deployed application.
Congratulations, you are live!
A word about static assets
The application we have just built together does not use static assets, but it’s worth mentioning how to handle them with Webpacker. Suppose, you want to handle images. First, you need to decide where to put them: either group them in the images folder under your frontend or place each image under the component responsible for putting it on screen. Whatever you decide, all your images need to find their way into Webpack manifest by being import’ed into javascripts that are ultimately included in your application.js entry point.
If you have too many images and you don’t want to overcrowd your bundle with helper modules (Webpack’s file-loader generates a module for each file with the only responsibility to return a path to it), you can create a separate entry point under your packs and call it, for instance, static.js.
Then you can use asset_pack_path helper in combination with image_tag to generate a proper <img src="">.
Here’s how it looks when you keep the image together with the component.
Folder structure:
frontend/components/header
├── _header.html.erb
├── header.pcss
├── header.js
└── static
    └── logo.png
Then in the header.js you will have:
import "./header.pcss";
import "./static/logo.png";
And then in your ERB partial you can use:
<%= image_tag asset_pack_path('components/header/static/logo.png') %>Another option will be to forgo image_tag altogether and load your images directly from CSS with an url helper included into your project by default along with Webpack’s css-loader. Then you can assign your image as the background CSS property to some element like so:
.header {
  &--logo {
    width: 100px;
    height: 100px;
    margin-bottom: 25px;
    background-image: url("./static/logo.png");
    background-size: 100%;
  }
}
In this case, you don’t even need to import the image in the JS file. Note that you can use url() for fonts too.
The project’s repo contains examples of using SVG icons from CSS. If you want to inline SVGs, you can do it with postcss-inline-svg module.
”Sprocketless” gotchas
Exactly as it was the case with Action Cable, here are some other parts of Rails that need to be reinstalled from npm once you disable Sprockets:
- Turbolinks
In order to re-enable Turbolinks in your project:
$ yarn add turbolinks// frontend/packs/application.js
import Turbolinks from "turbolinks";
Turbolinks.start();- UJS
Without Sprockets, Rails would not understand Unobtrusive JavaScript (that includes setting method: :delete on link_to) unless you reinstall rails-ujs from npm:
$ yarn add rails-ujs// frontend/packs/application.js
import Rails from "rails-ujs";
Rails.start();Projects inspired by this tutorial
- Komponent is a gem that helps to adapt your Rails project to the component-based approach described in this articles. It includes generators to create
frontendfolder, modify Webpacker config and create components with a single command. It detects your preferred templating engine for partials and expands components with an.rbfile that can be used to set “properties” and helpers for each component.
Komponent is created and maintained by French developers at Ouvrages and Etamin Studio independently from Evil Martians.

Thank you for reading!
In this three-part tutorial we learned how to fully embrace Webpacker, move away from Asset Pipeline and organize Rails frontend code around the idea of “components” using mostly built-in tools, without having to learn a frontend framework like React. We have built a simple chat application that is ready to be deployed using a set of practices that are actively used by Evil Martians in real-world projects.
If you had any problems while following this tutorial—feel free to open an issue in the project’s repo on GitHub. Also feel free to compare our final version of the code with yours.