

A hitchhiker’s guide to developing GraphQL applications with Rails on the backend side and React/Apollo on the frontend side. The second part of this tutorial will cover mutations (the way to update data) and advanced topics about client caching.
Other parts:
- GraphQL on Rails: From zero to the first query
- GraphQL on Rails: Updating the data
- GraphQL on Rails: On the way to perfection
In the first part of the guide we learned about what GraphQL is, and created a very first version of the Martian Library application. If you haven’t read the article yet, now’s the perfect time to take a look.
We have already configured graphql-ruby gem and Apollo framework to make sure they play well together and battle-tested this configuration by adding the very first query node to our schema. Now it’s time to move on and add more!
Introducing mutations
As we know, there are three basic operations in GraphQL—queries, mutations, and subscriptions. In this article, we’re going to introduce mutations—a data-modification mechanism from GraphQL.
From the client perspective, mutations look like queries, with one subtle difference—they start with the “mutation” node:
mutation SignInUser($email: String) {
  signIn(email: $email) {
    id
  }
}
The main difference, though, is semantic: first of all, mutations are responsible for changing (or mutating) data. Also, there is a difference in the way the execution engine handles them: according to the specification, a GraphQL server must guarantee that mutations are executed consecutively, while queries can be executed in parallel.
In the example mutation above, we are asking a server to authenticate the user via their email address in this way:
- We start with defining a mutation with an operation name
SignInUserand a variable named$email(all variables in GraphQL start with$). - We have a list of mutations we want to execute inside the curly braces (this list is called a selection set)—in our case we only have one field called
signIn. - As with queries, we can have nested selection sets inside the root one (i.e., select specific fields from the mutation return value).

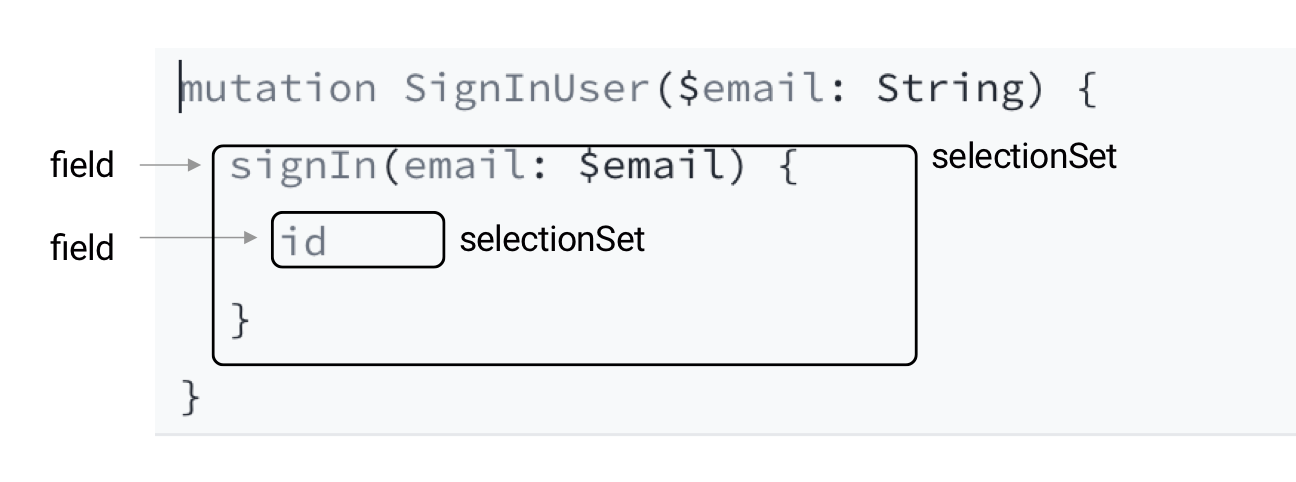
Mutation syntax
That’s all we need to know about mutations from the theory side. The rest of the article is devoted to practice: we will add mutations to authenticate users and allow them to add new items to the Martian library.
Housekeeping
Let’s take a quick look at what’s on our plate after completing the previous part of the tutorial. You can find the source code here—don’t forget to run bundle install && yarn install before the first run. master branch represents a current state of the project.
We use graphql-tag library to execute queries, and keep them near the component in the same file:
// app/javascript/components/Library/index.js

import React from "react";
import { Query } from "react-apollo";
import gql from "graphql-tag";

const LibraryQuery = gql`
  {
    items {
      id
      title
      user {
        email
      }
    }
  }
`;

export default () => (
  <Query query={LibraryQuery}>
    {({ data, loading }) => (
      <div>
        {loading
          ? "loading..."
          : data.items.map(({ title, id, user }) => (
              <div key={id}>
                <b>{title}</b> {user ? `added by ${user.email}` : null}
              </div>
            ))}
      </div>
    )}
  </Query>
);
Alternatively, you can keep operations in separate files with a .graphql (or .gql) extensions stored in the same folder as the component definition. This approach is especially useful when working with medium- to large-scale applications and provides clearer project structure. We will use it for all the new operations in this tutorial.
To make Webpack “understand” .gql files we need to configure a specific loader in /config/webpack/environment.js:
// config/webpack/environment.js
const { environment } = require("@rails/webpacker");

environment.loaders.append("graphql", {
  test: /\.(graphql|gql)$/,
  exclude: /node_modules/,
  loader: "graphql-tag/loader"
});

module.exports = environment;
Don’t forget to restart the server after applying these changes.
Now we are ready to implement the authentication logic.
Implementing authentication
GraphQL specification doesn’t tell you how to implement the authentication logic and doesn’t even require you to have one—it’s up to the developer. However, you can hardly imagine a real-life application without it, and our Martian Library is no exception—we need a way to track the owners of all items added to the collection.
We are going to keep things simple and authenticate our users using email addresses, without passwords, SMS, any other confirmations.
Here is the overview of our authentication mechanism:
- the user performs the authentication request providing the email address
- the server verifies that the user exists and responds with an authentication token
- the user sends this token with every subsequent request (e.g., via an HTTP header) to prove their identity
We’re going to use a GraphQL mutation, signIn, to perform authentication, a base64-encoded email address as the authentication token, and an “Authorization” header to pass the token. Note that it’s not necessary to authenticate users using GraphQL API: it could be done “outside”, e.g., via the good old REST. This is especially useful when you only allow authenticated users to access the GraphQL API.
We also want to indicate in the app UI whether our user is authenticated or not. For that, we’re going to add a panel showing a user’s name if he is logged in and “Sign In” button otherwise:

UserInfo component
Crafting authentication schema
Let’s add an API for fetching the current user’s info first.
We want to keep it simple: add a me field to the query root returning the current user from the execution context:
# app/graphql/types/query_type.rb

module Types
  class QueryType < Types::BaseObject
    # ...
    field :me, Types::UserType, null: true

    def me
      context[:current_user]
    end
  end
end
How to get this :current_user? Let’s add a ApplicationController#current_user method implementing our authentication logic described above:
# app/controllers/application_controller.rb

class ApplicationController < ActionController::Base
  private

  def current_user
    token = request.headers["Authorization"].to_s
    email = Base64.decode64(token)
    User.find_by(email: email)
  end
end
Finally, let’s update the GraphqlController#execute method to pass the current_user within a context:
# app/controllers/graphql_controller.rb

class GraphqlController < ApplicationController
  def execute
    result = MartianLibrarySchema.execute(
      params[:query],
      variables: ensure_hash(params[:variables]),
      # Only this line has chagned
      context: { current_user: current_user },
      operation_name: params[:operationName]
    )
    render json: result
  end

  # ...
end
Great! Now our client application can get information about the current user. Unfortunately, it will always return null—we haven’t added a way to tell who is currently using the app. Let’s fix it!
Let’s open up a Mutations::BaseMutation class and paste the following code in (the default generator inherits from the more complex GraphQL::Schema::RelayClassicMutation class):
# app/graphql/mutations/base_mutation.rb

module Mutations
  class BaseMutation < GraphQL::Schema::Mutation
  end
end
We will use this class as a superclass for our SignInMutation:
# app/graphql/mutations/sign_in_mutation.rb

module Mutations
  class SignInMutation < Mutations::BaseMutation
    argument :email, String, required: true

    field :token, String, null: true
    field :user, Types::UserType, null: true

    def resolve(email:)
      user = User.find_by!(email: email)
      return {} unless user

      token = Base64.encode64(user.email)
      {
        token: token,
        user: user
      }
    end
  end
end
As you can see, we specify that the mutation can return a token along with a current user, and the only accepted argument is email. Inside the #resolve method, we look up the user and, if we found it, we respond with a base64-encoded email as a token, otherwise we return null.
From the first look, the mutation class looks like a regular Rails controller, but it has one significant advantage: it’s strongly typed and validates input data according to its schema for us.
Finally, we need to expose our first mutation in the MutationType:
# app/graphql/types/mutation_type.rb

module Types
  class MutationType < Types::BaseObject
    field :sign_in, mutation: Mutations::SignInMutation
  end
end
To sum up, in order to add a new mutation you need to complete the following steps:
- Add a class implementing the mutation logic, which includes:
- the input type definition (arguments);
- the return type definition;
- the
#resolvemethod. - Add a new entry to
MutationType.
Note, that we didn’t mention specs at all: feel free to add them yourself using the same technique we used for writing query specs. Or check the ones we wrote in the example repo!
Adding user info panel
Let’s forget about Ruby for a few minutes and move our attention to the frontend application.
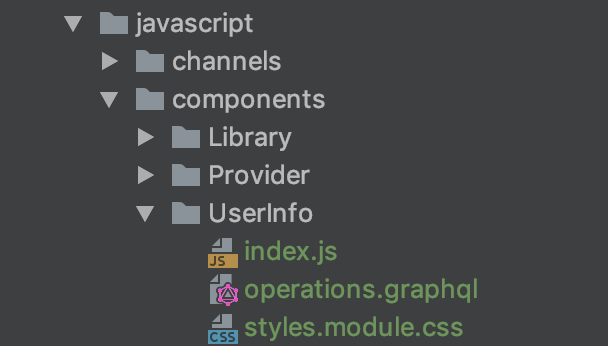
Since our codebase is growing, we need to think about a better code organization. We propose the following structure for UI components:
- each component is stored in a separate folder (e.g.,
app/javascript/components/MyComponent) index.jscontains the implementation- queries are defined in
operations.graphql - styles are kept in
styles.module.css(as the filename suggests we’re using css modules to stop worrying about style clashes)
To avoid the chore of creating all these files manually for each component, we wrote a handy gql-component generator. Let’s use it to create a component called UserInfo:
$ npx @hellsquirrel/create-gql-component create app/javascript/components/UserInfoNote: Styles are omitted from the article to keep it short, but you can find all the styles in the GitHub repo. Styles will be added automatically if you use our generator.
Тhis is what your file structure should look like:

Component structure
UserInfo component is responsible for the “Sign In” functionality and showing the current user name when authenticated. Let’s first add the API queries we need for these features to operations.graphql:
query Me {
  me {
    id
    fullName
  }
}

mutation SignMeIn($email: String!) {
  signIn(email: $email) {
    token
    user {
      id
      fullName
    }
  }
}
We define SignMeIn operation with the required $email argument of a String type, which
“performs” the signIn mutation and returns an authentication token and the current user’s info when it succeeds. You might have noticed some repetition in Me and SignMeIn operations—don’t worry, we will show you how to get rid of it later!
Let’s open index.js and define our component using the operations defined above. We want to load user info first, and show the “Sign In” form only if the user is not authenticated:
<Query query={Me}>
  {({ data, loading }) => {
    if (loading) return "...Loading";
    if (!data.me) {
      // Show login form
      return;
    }

    const { fullName } = data.me;
    return <div className={cs.info}>😈 {fullName}</div>;
  }}
</Query>
To display the form we should use the Mutation component and pass SignMeIn operation as a mutation property:
<Mutation mutation={SignMeIn}>
  {(signIn, { loading: authenticating }) =>
    authenticating ? (
      "..."
    ) : (
      <form onSubmit={() => signIn(/* email here */)}>
        <input type="email" />
        <input type="submit" value="Sign In" />
      </form>
    )
  }
</Mutation>
Don’t forget to import useRef hook, Query and Mutation components as well as queries we’re using in this component:
import React, { useRef } from 'react';
import { Query, Mutation } from "react-apollo";
import { Me, SignMeIn } from "./operations.graphql";
This code looks similar to the Library component we created earlier. The render prop of the Mutation component accepts a function performing the mutation as the first argument (signIn), while second argument is an object with the mutation result object containing return data, loading status, and more.
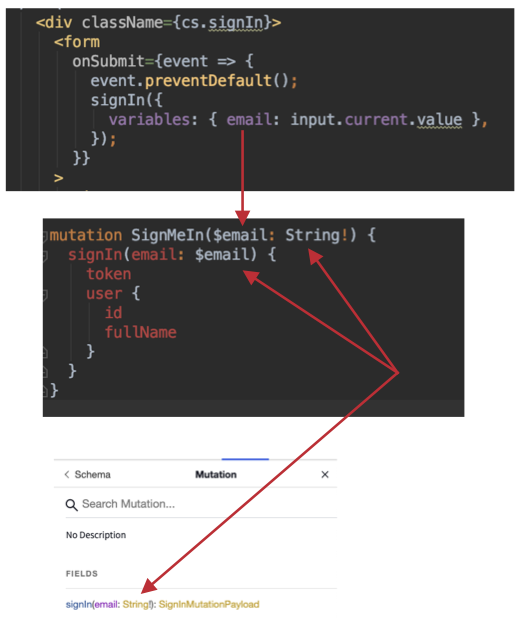
To pass an email to the mutation, we need to grab it from the input (using ref), put it into variable, and execute the mutation:
const UserInfo = () => {
  const input = useRef(null);

  // ...

  return (
    <form
      onSubmit={event => {
        event.preventDefault();
        signIn({
          variables: { email: input.current.value }
        });
      }}
    >
      <input
        ref={input}
        type="email"
        className={cs.input}
        placeholder="your email"
      />
    </form>
  );
};
When calling mutations in JavaScript, we bind values to variables in the following way by using the same name as in operations but without the $ prefix, e.g., signIn({ variables: { email: '...' } }).

Mutation variables
Let’s make sure we store the token somewhere to reuse it for subsequent requests and page reloads:
<form
  onSubmit={event => {
    event.preventDefault();
    signIn({
      variables: { email: input.current.value },
    }).then(({ data: { signIn: { token } } }) => {
      if (token) {
        localStorage.setItem('mlToken', token);
      }
    });
  }}
>
After we perform the “Sign In” action, we should update user info (via the Me query).
Dealing with cache
There are two options to do it:
- Re-fetch the
mequery (we can userefetchQueriesproperty on theMutationcomponent) when the mutation is completed—this can be useful, but we can do it better - Wait for the mutation to be completed and update the cache manually.
apollo-cache-inmemoryprovideswriteQueryfunction for that. TheMutationcomponent from thereact-apollolibrary has a special property calledupdate. It acceptscacheas the first argument and the mutation result as the second. We want to manually add a new cache entry using awriteQuerymethod. It’s like saying “Hey, Apollo! Here is some data, pretend that you received it from the server.”
<Mutation
  mutation={SignMeIn}
  update={(cache, { data: { signIn } }) => {
    cache.writeQuery({
      query: Me,
      data: { me: signIn.user },
    });
  }}
>
This is what the final UserInfo component looks like:
import React, { useRef } from "react";
import { Query, Mutation } from "react-apollo";
import { Me, SignMeIn } from "./operations.graphql";
import cs from "./styles";

const UserInfo = () => {
  const input = useRef(null);

  return (
    <div className={cs.panel}>
      <Query query={Me}>
        {({ data, loading }) => {
          if (loading) return "...Loading";
          if (!data.me) {
            return (
              <Mutation
                mutation={SignMeIn}
                update={(cache, { data: { signIn } }) => {
                  cache.writeQuery({
                    query: Me,
                    data: { me: signIn.user }
                  });
                }}
              >
                {(signIn, { loading: authenticating }) =>
                  authenticating ? (
                    "..."
                  ) : (
                    <div className={cs.signIn}>
                      <form
                        onSubmit={event => {
                          event.preventDefault();
                          signIn({
                            variables: { email: input.current.value }
                          }).then(({ data: { signIn: { token } } }) => {
                            if (token) {
                              localStorage.setItem("mlToken", token);
                            }
                          });
                        }}
                      >
                        <input
                          ref={input}
                          type="email"
                          className={cs.input}
                          placeholder="your email"
                        />
                        <input
                          type="submit"
                          className={cs.button}
                          value="Sign In"
                        />
                      </form>
                    </div>
                  )
                }
              </Mutation>
            );
          }

          const { fullName } = data.me;
          return <div className={cs.info}>😈 {fullName}</div>;
        }}
      </Query>
    </div>
  );
};

export default UserInfo;
Congratulations! We’ve just bought a ticket to a hype train called “React Hooks” by adding useRef to our component.
It’s better to split UserInfo into two separate components. The first for “Sign In” logic and the second one for the user info representation. Feel free to do it yourself!
Don’t forget to add the component to /javascript/packs/index.js:
// app/javascript/packs/index.js

import React from "react";
import { render } from "react-dom";
import Provider from "../components/Provider";
import Library from "../components/Library";
import UserInfo from "../components/UserInfo";

render(
  <Provider>
    <UserInfo />
    <Library />
  </Provider>,
  document.querySelector("#root")
);
Adding tokens to Apollo client
Let’s run our application and try to log in using a valid (i.e., existing) email address.
Everything should work fine unless you reload the page—you will see the login form again, even though we successfully logged in earlier! The explanation is pretty simple: we stored the token in the browser but didn’t “teach” Apollo to use it. Let’s fix this!
Take a look at utils/apollo.js:
// app/javascript/utils/apollo.js
// ...
const getToken = () =>
  document.querySelector('meta[name="csrf-token"]').getAttribute("content");
const token = getToken();
const setTokenForOperation = async operation =>
  operation.setContext({
    headers: {
      "X-CSRF-Token": token
    }
  });
We are already have a CSRF token sent to the server. Let’s add a new one—the “Authorization” token:
// app/javascript/utils/apollo.js
// ...
const getTokens = () => {
  const tokens = {
    "X-CSRF-Token": document
      .querySelector('meta[name="csrf-token"]')
      .getAttribute("content")
  };
  const authToken = localStorage.getItem("mlToken");
  return authToken ? { ...tokens, Authorization: authToken } : tokens;
};

const setTokenForOperation = async operation => {
  return operation.setContext({
    headers: {
      ...getTokens()
    }
  });
};
Try to log in again and reload the page—you should see the user’s name in the info panel! Our “lucky path” seems to be working. Authentication flow ✅
Mutating the library
Now we are going to add a couple more mutations—nothing new here, but we need it to make our example application look better and to get more practice.
Let’s add a mutation for adding new items to the collection. As usual, we need to define the arguments and the return type:
# app/graphql/mutations/add_item_mutation.rb

module Mutations
  class AddItemMutation < Mutations::BaseMutation
    argument :title, String, required: true
    argument :description, String, required: false
    argument :image_url, String, required: false

    field :item, Types::ItemType, null: true
    field :errors, [String], null: false

    def resolve(title:, description: nil, image_url: nil)
      if context[:current_user].nil?
        raise GraphQL::ExecutionError,
              "You need to authenticate to perform this action"
      end

      item = Item.new(
        title: title,
        description: description,
        image_url: image_url,
        user: context[:current_user]
      )

      if item.save
        { item: item }
      else
        { errors: item.errors.full_messages }
      end
    end
  end
end
There are several things to pay attention to in this code:
- We check for the presence of the
context[:current_user]and raise an exception if it’s not set. - Our return type contains two fields:
itemanderrors. Why not usesave!and raise an exception? User-input validation errors should not be considered exceptions; our frontend application should treat them as a valid response and provide feedback to the user.
Everything else looks like a good old #create action in a typical Rails controller. And the #update analogous is also very straightforward:
# app/graphql/mutations/update_item_mutation.rb

module Mutations
  class UpdateItemMutation < Mutations::BaseMutation
    argument :id, ID, required: true
    argument :title, String, required: true
    argument :description, String, required: false
    argument :image_url, String, required: false

    field :item, Types::ItemType, null: true
    field :errors, [String], null: false

    def resolve(id:, title:, description: nil, image_url: nil)
      if context[:current_user].nil?
        raise GraphQL::ExecutionError,
              "You need to authenticate to perform this action"
      end

      item = Item.find(id)

      if item.update(title: title, description: description, image_url: image_url)
        { item: item }
      else
        { errors: item.errors.full_messages }
      end
    end
  end
end
You might have noticed that we have a lot of repetition in these two classes—no worries, the third part of this series will cover refactoring techniques we can use to fix this.
Finally, register our new mutations in the MutationType:
# app/graphql/types/mutation_type.rb

module Types
  class MutationType < Types::BaseObject
    # ...
    field :add_item, mutation: Mutations::AddItemMutation
    field :update_item, mutation: Mutations::UpdateItemMutation
  end
end
Updating Library component
Before we start, let’s re-generate our library component to comply with our new architecture (extract operations, add styles):
$ npx @hellsquirrel/create-gql-component create app/javascript/components/LibraryLet’s put the following query into the operations.graphql:
query LibraryQuery {
  items {
    id
    title
    imageUrl
    description
    user {
      id
      email
    }
  }
}
And “refresh” our library component implementation:
// app/javascript/components/Library
import React, { useState } from "react";
import { Query } from "react-apollo";
import { LibraryQuery } from "./operations.graphql";
import cs from "./styles";

const Library = () => {
  const [item, setItem] = useState(null);
  return (
    <Query query={LibraryQuery}>
      {({ data, loading }) => (
        <div className={cs.library}>
          {loading || !data.items
            ? "loading..."
            : data.items.map(({ title, id, user, imageUrl, description }) => (
                <button
                  key={id}
                  className={cs.plate}
                  onClick={() => setItem({ title, imageUrl, id, description })}
                >
                  <div className={cs.title}>{title}</div>
                  <div>{description}</div>
                  {imageUrl && <img src={imageUrl} className={cs.image} />}
                  {user ? (
                    <div className={cs.user}>added by {user.email}</div>
                  ) : null}
                </button>
              ))}
        </div>
      )}
    </Query>
  );
};

export default Library;
Note that we wrap each item into the button HTML element: we want to be clickable to show the update form. Now our frontend application looks much prettier. Let’s add some new shiny things!
Adding form components
Let’s add some more components for creating and editing items. These components are so similar that we can put most of the logic into the reusable ProcessItemForm component.
$ npx @hellsquirrel/create-gql-component create app/javascript/components/ProcessItemFormThis is our component code:
// app/javascript/components/ProcessItemForm/index.js

import React, { useState } from "react";
import cs from "./styles";

const ProcessItemForm = ({
  initialTitle = "",
  initialDescription = "",
  initialImageUrl = "",
  onProcessItem,
  buttonText,
  loading
}) => {
  const [title, setTitle] = useState(initialTitle);
  const [description, setDescription] = useState(initialDescription);
  const [imageUrl, setImageUrl] = useState(initialImageUrl);
  return (
    <div className={cs.form}>
      <input
        type="text"
        placeholder="title"
        value={title}
        className={cs.input}
        onChange={e => setTitle(e.currentTarget.value)}
      />
      <input
        type="text"
        placeholder="description"
        value={description}
        className={cs.input}
        onChange={e => setDescription(e.currentTarget.value)}
      />

      <input
        type="text"
        placeholder="url"
        value={imageUrl}
        className={cs.input}
        onChange={e => setImageUrl(e.currentTarget.value)}
      />
      {loading ? (
        "...Loading"
      ) : (
        <button
          onClick={() => onProcessItem({ title, description, imageUrl })}
          className={cs.button}
        >
          {buttonText}
        </button>
      )}
    </div>
  );
};

export default ProcessItemForm;
The only thing we need to add is to create item form—let’s call it AddItemForm
$ npx @hellsquirrel/create-gql-component create app/javascript/components/AddItemFormWe should add AddItemMutation to the operations.graphql
# /app/javascript/components/AddItemForm/operations.graphql

mutation AddItemMutation(
  $title: String!
  $description: String
  $imageUrl: String
) {
  addItem(title: $title, description: $description, imageUrl: $imageUrl) {
    item {
      id
      title
      description
      imageUrl
      user {
        id
        email
      }
    }
  }
}
And use it in index.js:
import React from "react";
import { Mutation } from "react-apollo";
import { AddItemMutation } from "./operations.graphql";
import ProcessItemForm from "../ProcessItemForm";

const AddItemForm = () => (
  <Mutation mutation={AddItemMutation}>
    {(addItem, { loading }) => (
      <ProcessItemForm
        buttonText="Add Item"
        loading={loading}
        onProcessItem={({ title, description, imageUrl }) =>
          addItem({
            variables: {
              title,
              description,
              imageUrl
            }
          })
        }
      />
    )}
  </Mutation>
);

export default AddItemForm;
Don’t forget to add the form to /javascript/packs/index.js:
import React from "react";
import { render } from "react-dom";
import Provider from "../components/Provider";
import Library from "../components/Library";
import UserInfo from "../components/UserInfo";
import AddItemForm from "../components/AddItemForm";

render(
  <Provider>
    <UserInfo />
    <AddItemForm />
    <Library />
  </Provider>,
  document.querySelector("#root")
);
Now we’ve encountered the same problem as in the UserInfo component. We need to tell our application that LibraryQuery should be updated. So we have to refresh the cache by reading the whole list and setting a new list with our new item concatenated to the list.
Let’s change javascript/components/AddItemForm/index.js:
// javascript/components/AddItemForm/index.js
// ...
import { LibraryQuery } from '../Library/operations.graphql';
// ...

<ProcessItemForm
  //...
  // Update library query after Mutation will be finished
  onProcessItem={({ title, description, imageUrl }) =>
    addItem({
      variables: {
        title,
        description,
        imageUrl,
      },

      // adding the second argument to 'addItem' method
      update: (cache, { data: { addItem } }) => {
        const item = addItem.item;
        if (item) {
          const currentItems = cache.readQuery({ query: LibraryQuery });
          cache.writeQuery({
            query: LibraryQuery,
            data: {
              items: [item].concat(currentItems.items),
            },
          });
        }
      },
    })
  }
  // ...
And it’s done! Now we’ll see the new item added to the list on the page.
Let’s add one more component for updating items called UpdateItemForm. The code is very similar to the AddItemForm. Run the generator:
$ npx @hellsquirrel/create-gql-component create app/javascript/components/UpdateItemFormThis is what we have in operations file:
mutation UpdateItemMutation(
  $id: ID!
  $title: String!
  $description: String
  $imageUrl: String
) {
  updateItem(
    id: $id
    title: $title
    description: $description
    imageUrl: $imageUrl
  ) {
    item {
      id
      title
      description
      imageUrl
    }
  }
}
This is what we have in our component file:
// /app/javascript/components/UpdateItemForm

import React from "react";
import { Mutation } from "react-apollo";
import { UpdateItemMutation } from "./operations.graphql";
import ProcessItemForm from "../ProcessItemForm";
import cs from "./styles";

const UpdateItemForm = ({
  id,
  initialTitle,
  initialDescription,
  initialImageUrl,
  onClose
}) => (
  <div className={cs.overlay}>
    <div className={cs.content}>
      <Mutation mutation={UpdateItemMutation}>
        {(updateItem, { loading }) => (
          <ProcessItemForm
            initialImageUrl={initialImageUrl}
            initialTitle={initialTitle}
            initialDescription={initialDescription}
            buttonText="Update Item"
            loading={loading}
            onProcessItem={({ title, description, imageUrl }) => {
              updateItem({
                variables: {
                  id,
                  title,
                  description,
                  imageUrl
                }
              });
              onClose();
            }}
          />
        )}
      </Mutation>
      <button className={cs.close} onClick={onClose}>
        Close
      </button>
    </div>
  </div>
);

export default UpdateItemForm;
And add UpdateItemForm into our library (just after the button):
// /app/javascript/components/Library/index.js

//...
import UpdateItemForm from "../UpdateItemForm";

// ...
<button />;

{
  item !== null && (
    <UpdateItemForm
      id={item.id}
      initialTitle={item.title}
      initialDescription={item.description}
      initialImageUrl={item.imageUrl}
      onClose={() => setItem(null)}
    />
  )
}
// ...
Now if we click on the Item plate and change an Item it will be magically updated. Why is that?
When fetching an item list, the response was normalized and each item was added to the cache. apollo generates a key ${object__typename}:${objectId} for each entity that has __typename and id. When the mutation is completed, we get the object with the same __typename and id, apollo finds it in cache and makes changes (components are re-rendered too).
Can we do even better? Yep!
Why should we wait for the server response? If we are confident enough in our server, we can use an optimistic update. Let’s add one more argument to the updateItem function:
// /app/javascript/components/UpdateItemForm

//...
updateItem({
  variables: {
    //...
  },

  // adding the second argument to 'updateItem' method

  optimisticResponse: {
    __typename: "Mutation",
    updateItem: {
      __typename: "UpdateItemMutationPayload",
      item: {
        id,
        __typename: "Item",
        title,
        description,
        imageUrl
      }
    }
  }
});
//..
That’s all for today! We learned the difference between mutations and queries, learned how to implement them at the backend, and how to use them from the frontend. Now our application supports user sign-in and library management, so it is almost ready to be deployed to production! However, the code looks a bit cumbersome, with room for refactoring—that’s what we will do in the third part, along with adding some other improvements, such as real-time updates and better error handling. Stay tuned!