How to make an AI clone of your CEO for the world's biggest hackathon


We’re increasingly seeing people connect with AI the same way they’d talk to a real person: face-to-face, voice-to-voice, with natural expressions and gestures. AI talks, listens, looks alive, helps users, and even inspires them. In this post, we’ll share how we helped our client Bolt.new ship an AI clone of its creator, Eric Simons, to the landing page of the world’s largest hackathon. Ready to learn how to build and integrate a more human AI experience on your site?
For context, Evil Martians met the StackBlitz team in 2021, and we’ve been a core tech partner helping scale their platform ever since. Then, in 2024, they launched Bolt.new–an AI-powered agent that allows you to prompt, run, edit, and deploy full-stack applications directly from your browser.
The market response to Bolt.new was extraordinary: in 4 weeks, they went from zero to $4M in annual recurring revenue, which has grown exponentially since then.
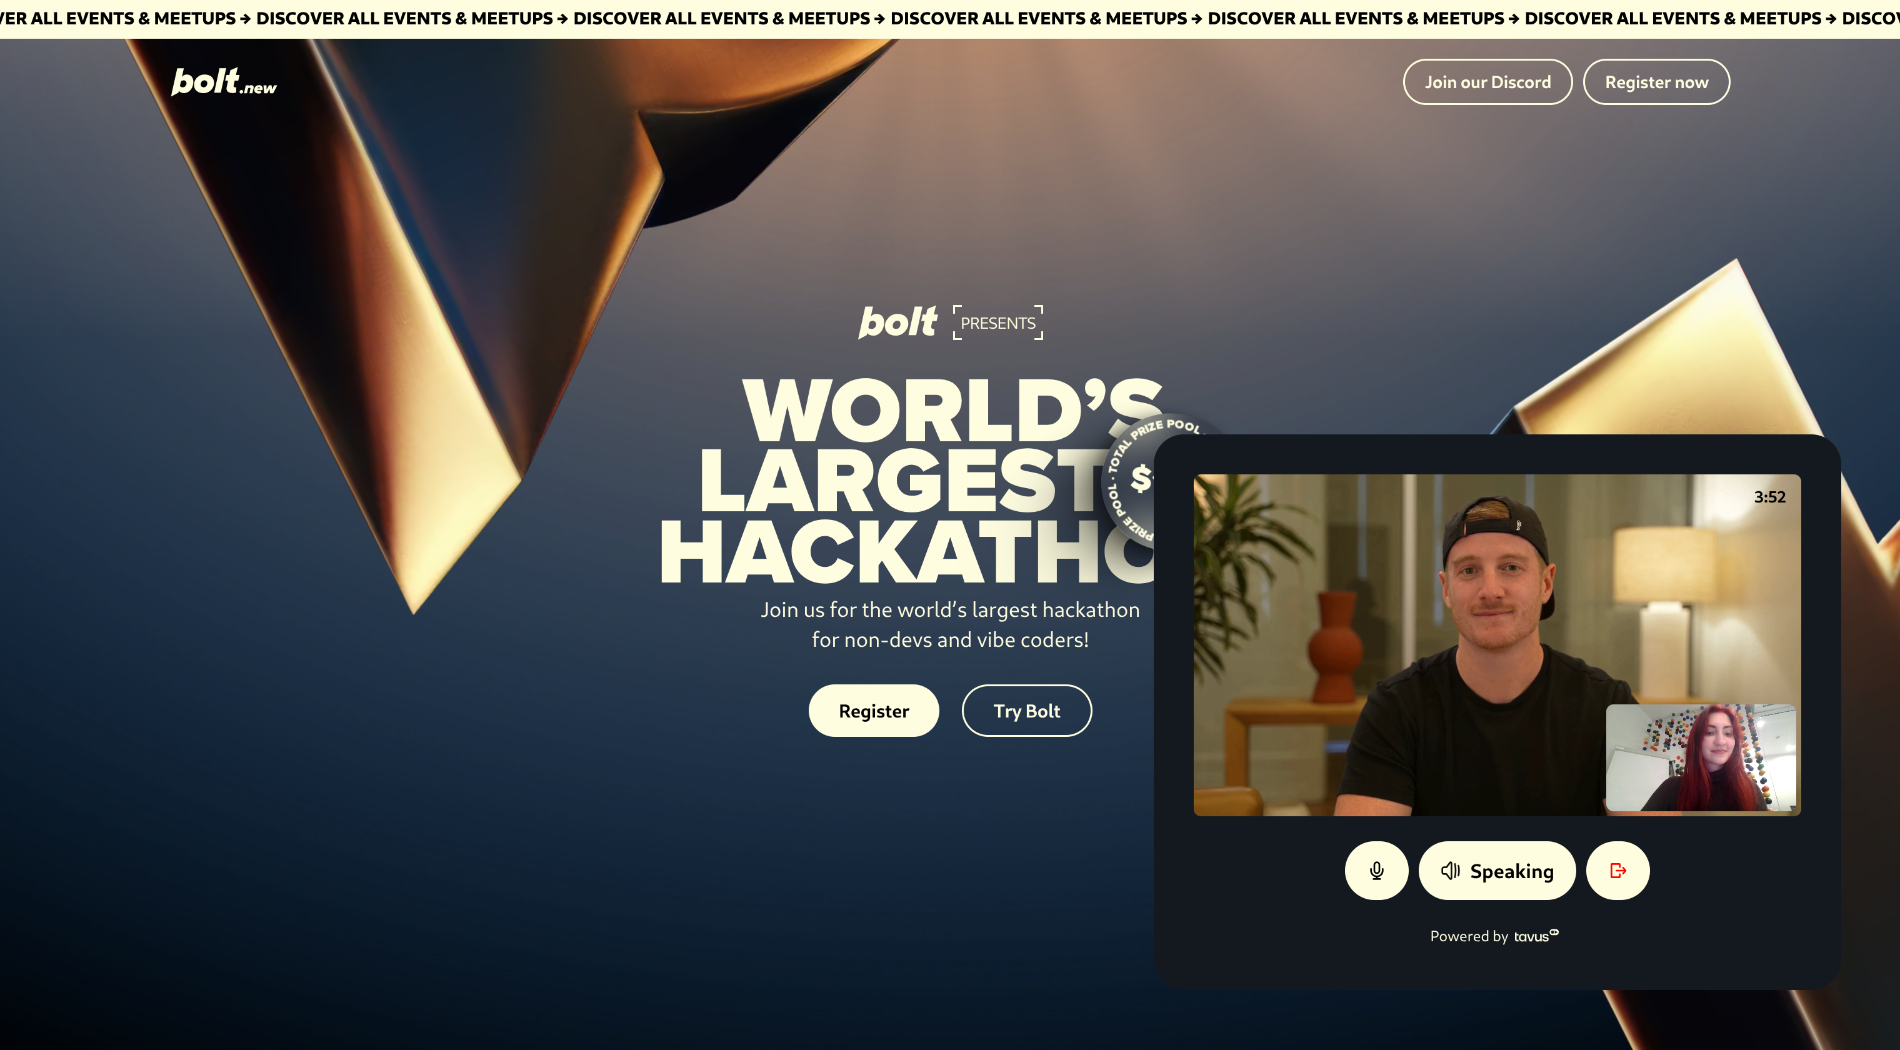
Now, pushing the boundaries even more, Bolt.new is aiming to set a Guinness World Record by kicking off the world’s largest hackathon. Starting on May 30th, this hackathon offers over $1 million in prizes, and welcomes builders and entrepreneurs of all backgrounds and skill levels. It’s not just a milestone for Bolt.new, it’s a landmark moment for the whole tech community, with thousands of participants joining in more than 75 countries.


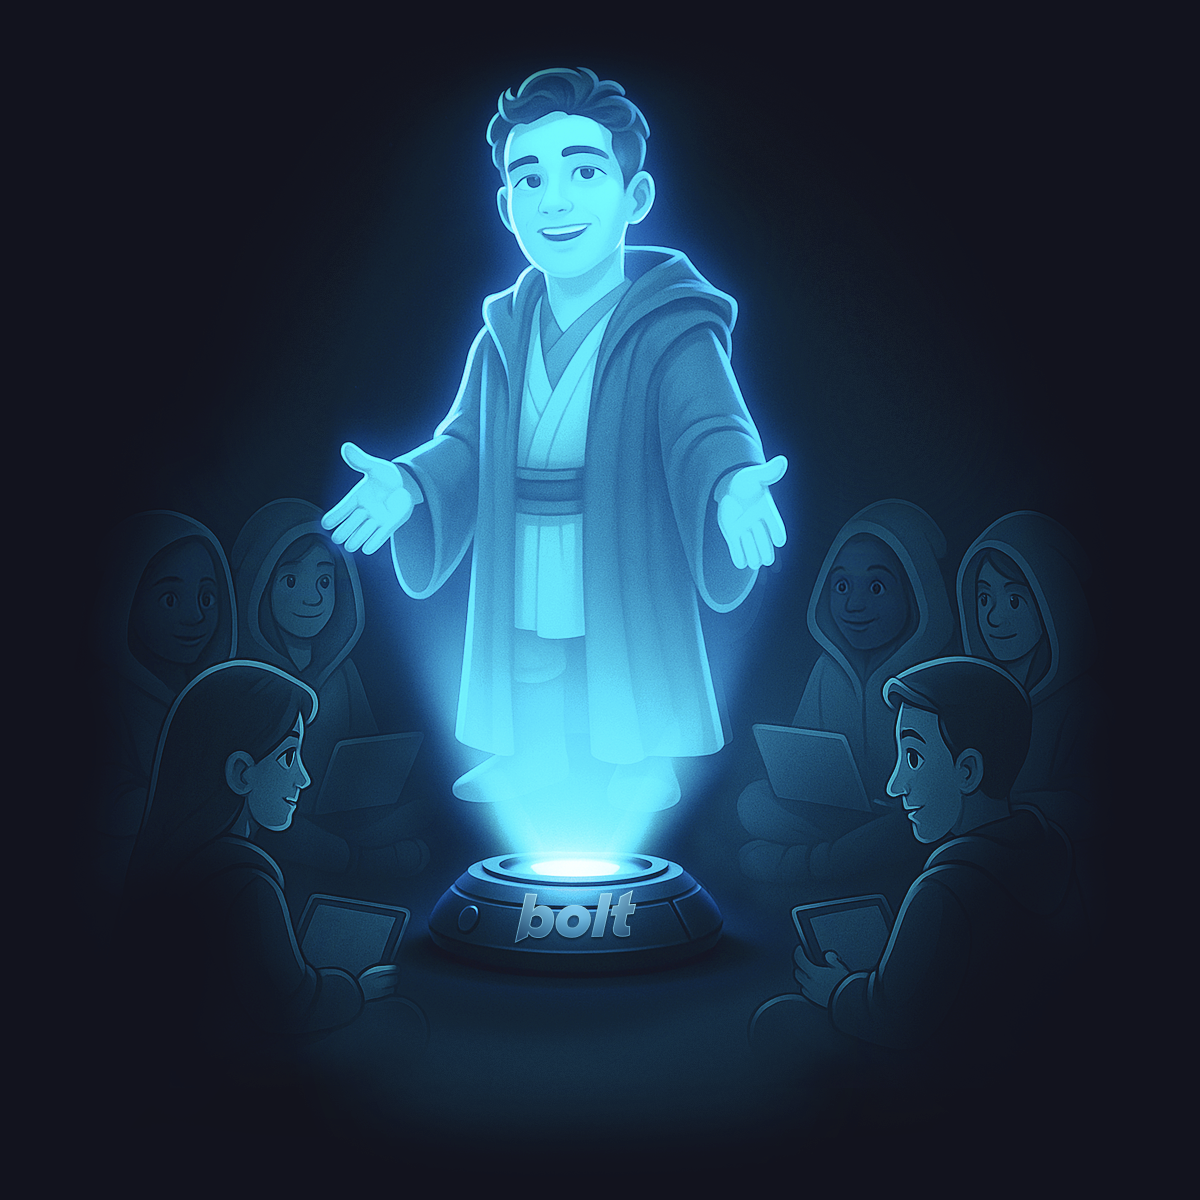
The main page of the hackathon

Hire Evil Martians
We’ve helped StackBlitz scale bolt.new from 0 to $20M ARR+ in 2 months
An extraordinary event like this can’t go on without some extraordinary features. What would be the highlight here? How about having the CEO available 24/7 to all 100K+ participants, personally discussing their hackathon ideas, and inspiring them along the way?
Of course, no human is physically capable of such a thing. We would have to clone the CEO. Well, what sounded like a joke ten years ago, is now completely possible with the help of Tavus.io, the OS for human-AI interaction.
Evil Martians helped Bolt.new implement an AI clone of Bolt.new CEO Eric with Tavus.io on the hackathon site. You can try it right now! And then sit back, we’ll tell you how we did it.
Enter Tavus
So, what is Tavus? Tavus is a leading AI video research company that allows developer teams to build AI Agents that see, hear, respond, and look human, all in real time.

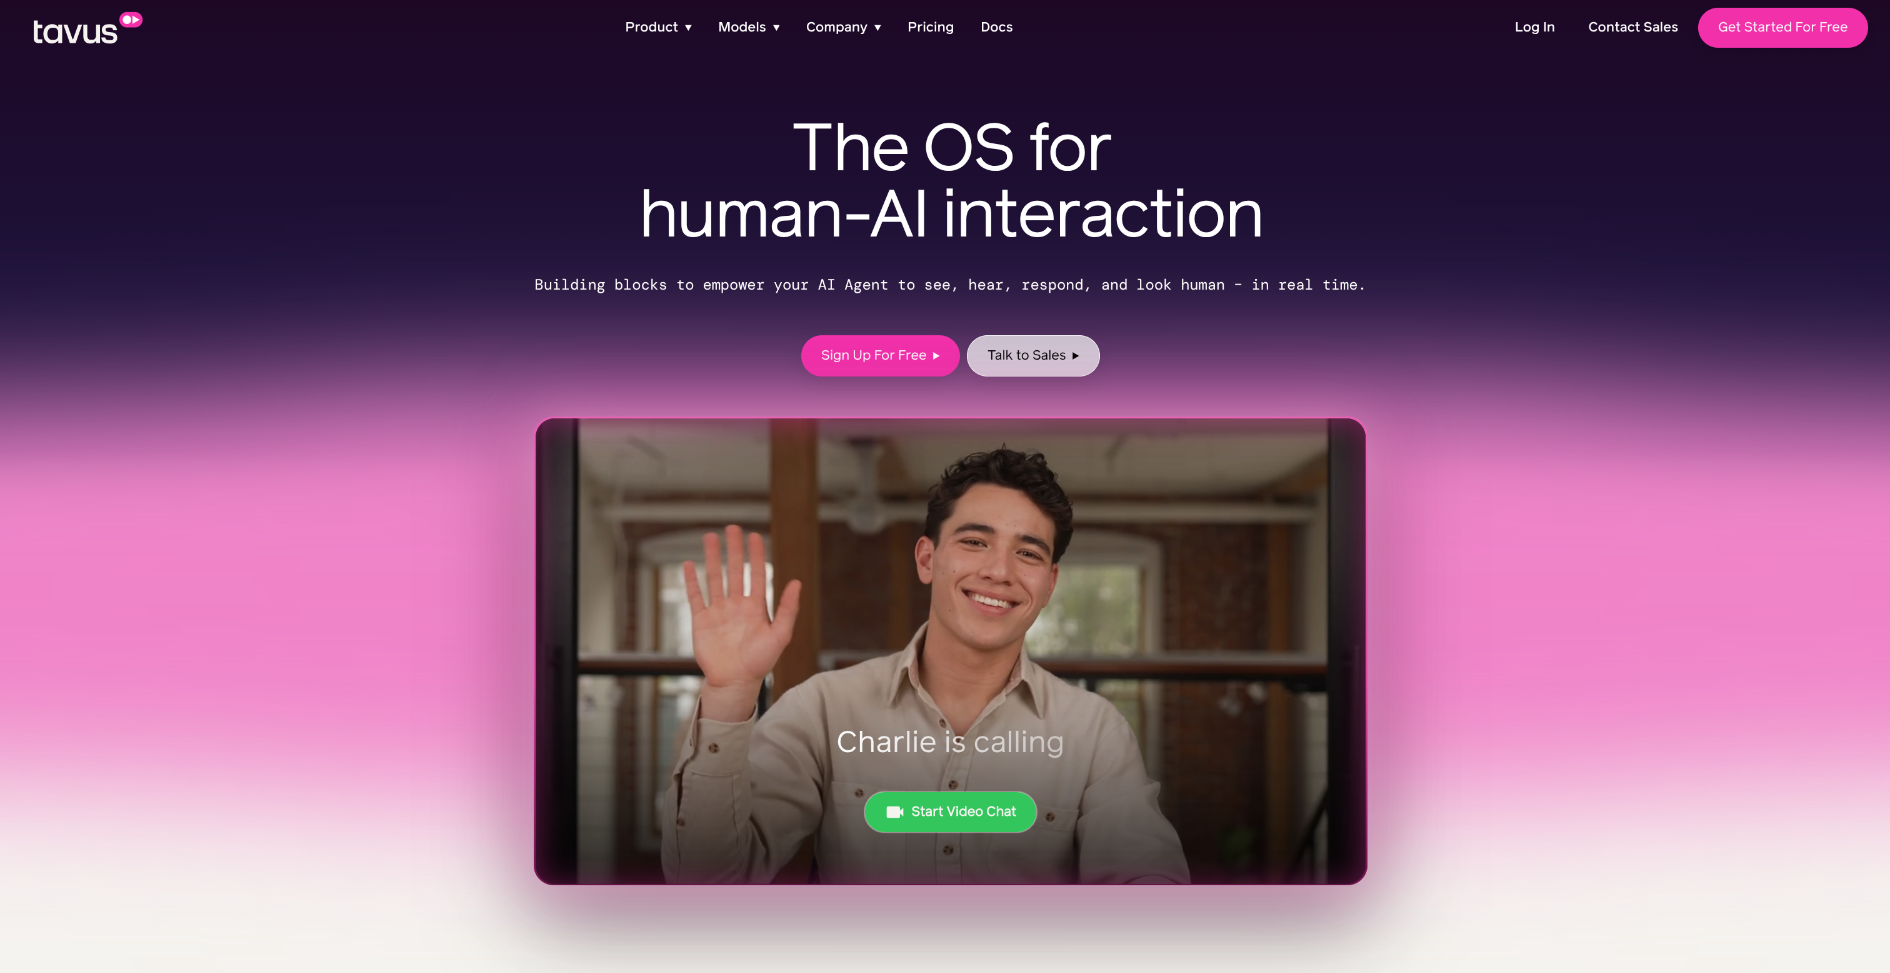
The Tavus.io landing page
Each Tavus AI agent consists of a persona and a replica.
A persona is the “character” or “personality” and contains a configuration for that agent. For example, you can create a persona for “Anna the sales agent” or “Paulo the interviewer”, or ‘Eric, creator of Bolt”. Each persona is a separate instance which runs on the Tavus servers, and you need to create a “connection” to be able to interact with it.
Learn more about creating your own persona using simple system prompts here; or, once you’ve obtained your API key, you can use one of the ready personas from the stock library.
A replica is the “appearance” of the agent: a realistic video model of a human created using the Phoenix Model. Replicas learn how someone speaks, how they look and sound, and have natural face (including lip, cheek, nose, chin) movements and expressions.
Just as you can do with personas, you can create your own replica via the API (basically, it works like you’re cloning yourself and Tavus.io even has a guide on this), or you can use a stock replica: browse available replicas from Tavus Developer Portal and take its ID for future API calls.
Essentially, you’re calling your AI agent the same way you would call a human. The Tavus persona receives your video and audio input, then generates video and audio output which you can render. All of the interactions happen in real time, so it really feels like just a regular call with your friend.
The code that makes this work
Let’s move on to show how you can integrate your own AI agent to your site. You’ll need three credentials to start: a Tavus API key, the ID of your replica, and the ID of your persona.
Once you have the necessary credentials, the first thing to do is create a conversation using the Tavus API, then join the call using the Daily API. Daily is a library that allows us to build or embed video and audio chat applications, and you can find more information on it in its documentation.
type IConversation = {
  conversation_url: string; // direct link to join the conversation
  replica_id: string | null;
  persona_id: string | null;
  custom_greeting: string | null; // optional custom greeting
  // … other properties as per Tavus documentation
};
Now, we need to install the @daily-co/daily-react library which allows us to use Daily in our React application. In the main component, we’ll import and use the DailyProvider. The DailyProvider gives the component access to the Daily call object. It stores call state and initiates a call object instance.
We also don’t want to start a call any time a user opens the page (since we don’t want to scare anyone). Instead, we’ll show a popup with a call to action:


If the user clicks on “Start AI Video Call”, we start the conversation by invoking the corresponding endpoint from Tavus API. If the user clicks “Not now”, we dismiss the popup (in this case, we transform it to a small sticky button, so users can always start the call if they change their mind).
import { DailyProvider } from "@daily-co/daily-react";
import { createConversation} from "./api";


const Main = () => {
 const [conversation, setConversation] = useState<IConversation>();


 const handleStartConversation = async () => {
   const conversation = await createConversation();
   setConversation(conversation);
   // we also handle the loading and error states here
 };


 const StartCallButton = () => (
   <Button onClick={handleStartConversation}>
     Start AI Video Call
   </Button>
 );


 const CTABlock = () => (
   <div>
     <span>Need ideas? Brainstorm with Bolt CEO Eric Simons</span>
     <div>
       <StartCallButton />
       <Button onClick={dismiss}>Not now</Button>
     </div>
   </div>
 );

return (
   <DailyProvider>
     {conversation ? (
       <Call
         conversation={conversation}
       />
     ) : <CTABlock />}
   </DailyProvider>
 );
}
createConversation invokes a corresponding Netlify function. This step was implemented in order to avoid exposing our Tavus API key directly on the frontend side.
export const createConversation = async (): Promise<IConversation> => {
 try {
   const response = await fetch("/.netlify/functions/create-conversation", {
     method: "POST",
   });
   … // handling errors and return the response
};
In the Netlify function, we invoke Tavus API like so:
fetch("https://tavusapi.com/v2/conversations", {
  method: "POST",
  headers: {
    "Content-Type": "application/json",
    "x-api-key": TAVUS_API_KEY,
  },
  body: JSON.stringify({
    persona_id: ..., // replace with a valid persona ID
    replica_id: ..., // replace with a valid replica ID
    custom_greeting: GREETINGS[Math.floor(Math.random() * GREETINGS.length)],
    // picks a random personalized hackathon welcome message from the GREETINGS array
  }),
});
Now we’ll create the Call component that we mentioned in the main component above:
import {
 DailyAudio,
 useParticipantIds,
 useDaily,
} from "@daily-co/daily-react";


export const Call = ({ conversation }: Props) => {
 const daily = useDaily(); // returns current call object instance
 const remoteParticipantIds = useParticipantIds({ filter: "remote" }); // we need this to receive the participant id of our agent


 useEffect(() => {
   if (conversation && daily) {
     const { conversation_url } = conversation;
     daily.join({
       url: conversation_url, // join a conversation by URL
     });
   }
 }, [daily, conversation]);


 const AIAgentView = () => {
   return remoteParticipantIds.length > 0 ? (
     <Video id={remoteParticipantIds[0]} />
   ) : (
     <Spinner /> // if no participants, our AI agent wasn’t connected yet
   );
 };


  return (
     <>
       <AIAgentView />
       <DailyAudio /> // when enabled and call is configured, DailyAudio will automatically subscribe to the active speaker's audio track
     </>
   );
}
We also need to implement the feature for ending the conversation using its ID:
 const handleEndConversation = async () => {
   await endConversation(conversation.conversation_id);
   // handle the loading and error states here
 };


const ExitCallButton = () => (
   <Button onClick={handleEndConversation}>
     <div className="icon-exit" />
   </Button>
 );
The endConversation function invokes the corresponding Netlify function:
const endConversation = async (conversationId: string) => {
 try {
   const response = await fetch(`/.netlify/functions/end-conversation`, {
     method: "POST",
     headers: {
       "Content-Type": "application/json",
     },
     body: JSON.stringify({ conversationId }),
   });


   … // handling errors and return the response
};
In the Netlify function, we invoke the finish conversation method this way:
fetch(
   `https://tavusapi.com/v2/conversations/${conversationId}/end`,
   {
     method: "POST",
     headers: { "x-api-key": TAVUS_API_KEY },
   }
);
We also wanted to add a “self” view users can see themselves. In the Call component, we import the useLocalSessionId hook, and use it like this:
import { useLocalSessionId } from "@daily-co/daily-react";

const localSessionId = useLocalSessionId();


const SelfieView = () => {
   return remoteParticipantIds.length > 0 && localSessionId ? (
     <Video
       id={localSessionId}
     />
   ) : null; // don’t display anything until AI agent joins the call
 };
We want to show the selfie view near the AI agent view in the Call component:

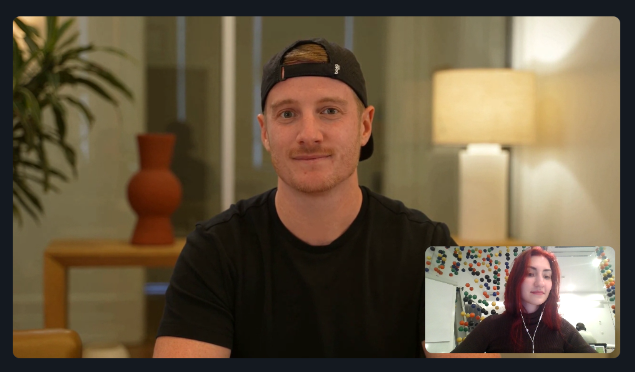
return (
   <>
     <AIAgentView />
     <SelfieView /> // add selfie view
     <DailyAudio />
   </>
 );
Now AI Eric can see us, and we can see AI Eric. That’s something already!
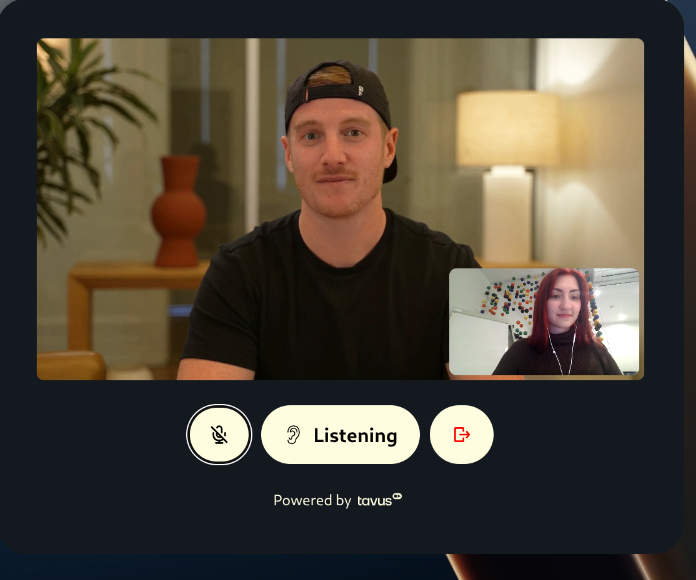
Let’s now implement a simple (but awesome) feature to enhance the user experience: we’ll add a button to enable or disable the microphone, and also an indicator if a user is currently speaking or listening. In our Call component:
import {
 ...,
 useLocalSessionId,
 useAudioTrack,
 useActiveSpeakerId,
} from "@daily-co/daily-react";


const localSessionId = useLocalSessionId(); // need to track a user’s activity on their local device
const activeSpeakerId = useActiveSpeakerId(); // subscribe to the active speaker change event
const localAudio = useAudioTrack(localSessionId); // subscribe to information about the user’s audio track
const isMicEnabled = !localAudio.isOff;
The indicator:
<div onClick={toggleAudio}>
  {localSessionId === activeSpeakerId ?
    <span>Speaking</span>
    :
    <span>Listening</span>
  }
</div>
For the mic toggle:
const toggleAudio = useCallback(() => {
  daily.setLocalAudio(!isMicEnabled); // updates the local mic state
}, [isMicEnabled]);

<Button onClick={toggleAudio}>
  {isMicEnabled ? (
    <div className="icon-mic-on" />
  ) : (
    <div className="icon-mic-off" />
  )}
</Button>
We now see an indicator if you’re listening or speaking, plus a button to switch the mic on/off:

The first challenge
Now, it’s time to talk about our first challenge. As there can be thousands of users chatting with AI Eric simultaneously, in order to avoid concurrency problems, we had to implement some conversational limits. Tavus recommends a conversation limit of 2-5 minutes and a basic IP-based limit of 1-4 sessions per day.
So, we implemented both. Below, we’ll provide you with an example of how we implemented a conversational limit. We also decided to add a visual counter in the corner that counts down the conversation duration, which also helps users get an idea of how long they can talk to our AI and structure their conversations accordingly.
const Timer = () => {
  const [timeLeft, setTimeLeft] = useState(() => {
    const sessionTime = getSessionTime();
    return TIME_LIMIT - sessionTime;
  }); // how much time is left for the current session

  useEffect(() => {
    const interval = setInterval(() => {
      const sessionTime = getSessionTime();
      setTimeLeft(TIME_LIMIT - sessionTime);
    }, 1000); // we update the time counter every second
    return () => clearInterval(interval);
  }, []);

  return (
    <span>
      {formatTime(timeLeft)} // display formatted
    </span>
  );
};

// we store session times in cookies
import Cookies from "js-cookie";

const getSessionTime = () => {
  const sessionTime = Cookies.get("sessionTime");

  if (sessionTime) {
    const totalTimeInSeconds = Math.floor(
      JSON.parse(sessionTime).reduce(
        (total: number, session: { start: number; end: number }) =>
          total + (session.end - session.start) / 1000,
        0
      )
    );
    return totalTimeInSeconds;
  }

  return 0;
};
In our Call component, we’ll add the functionality to update the session end time. We also make our AI say a conversation-ending phrase 10 seconds before the call ends to make the end of the conversation look smooth for the user. After the defined time limit, the conversation ends automatically:
useEffect(() => {
   const interval = setInterval(() => {
     const time = getSessionTime();
     if (time === TIME_LIMIT - 10) {
       initTimeLimitPhrase();
     }
     if (time >= TIME_LIMIT) {
       endConversation();
       clearInterval(interval);
     } else {
       updateSessionEndTime(); // here we update "sessionTime" cookie with the current time
     }
   }, 1000);
   return () => clearInterval(interval);
 }, [remoteParticipantIds, start]);


const initTimeLimitPhrase = () => {
   daily?.sendAppMessage({
     message_type: "conversation",
     event_type: "conversation.echo",
     conversation_id: conversation?.conversation_id,
     properties: {
       modality: "text",
       text: TIME_LIMIT_MESSAGE,
     },
   }); // after invoking this method, our AI will say the phrase that we defined in TIME_LIMIT_MESSAGE
};
In our main component, we’ll start session time after the successful invocation of the start conversation endpoint:
const handleStartConversation = async () => {
    const conversation = await createConversation();
    setConversation(conversation);
    setSessionStartTime();
    // ...
};


const setSessionStartTime = () => {
 const sessionTime = Cookies.get("sessionTime");
 const arr = sessionTime ? JSON.parse(sessionTime) : [];
 const currentTime = Date.now();
 const expirationMinutes = 60 * 6;
 arr.push({
   start: currentTime,
   end: currentTime,
   exp: (1 / 24 / 60) * expirationMinutes,
 });
 const exp = arr[0].exp;


 Cookies.set("sessionTime", JSON.stringify(arr), {
   expires: exp,
 });
}
And, we want to clear session time after the call ends:
const handleEndConversation = async () => {
    await endConversation(conversation.conversation_id);
    setConversation(undefined);
    Cookies.remove("sessionTime");
};
Finally, we render the newly created Timer component right inside our Call component:
return (
   <>
    <Timer />
    <AIAgentView />
    <SelfieView />
    <DailyAudio />
   </>
);
Now, we can see a timer in the top-right corner of the call:

Insights and wrap up
We’re excited about helping Bolt launch the hackathon website along with this human-AI integration: check it out for yourself.
Integrating a human AI experience is a great way of bringing freshness to your product, while also increasing its value. And beyond the 24/7 benefits that users get, this is a feature that is sure to have a “wow-effect”!
If you have ideas on your own human AI and you want to integrate it, don’t hesitate to reach out to us!