Object Detection with Create ML: images and dataset

Object detection is awesome, and these days, it’s utilized in many diverse areas: facial detection, self-driving cars, or even tracking the ball during a football game. Happily, for iOS developers, the only limit is our creativity because Apple’s ecosystem provides great native tools that allow us to implement object detection. In the first part of this series, we’ll learn about those, and we’ll put the foundation in place to build a full demo application from scratch! Read on!
Other parts:
- Object Detection with Create ML: images and dataset
- Object Detection with Create ML: training and demo app
So, what exactly is object detection? Object detection analyzes photos and identifies meaningful objects within those pictures. This almost always utilizes ML technologies, and Apple gives developers the tools to create and train models that allow us to use ML in our applications.
We’ll do that ourselves, as we create and train our model for use with a demo iOS application. This app will be able to identify and mark the location of a license plate within a photo. Then, for instance, if we have a video of a car parked on the street, our app will be able to draw a box around the license plate within that video. In this part, we collect raw data, mark it up, and prepare our dataset for model creation. And in part 2, we train the model and build our demo app.
But, before we get too far ahead of ourselves, it’s important to first better understand the ML capabilities that Apple provides developers, and how to use them. These next two sections provide valuable background info, but if you already know about it (or want to come back later), feel free to skip them and dive into data collection.
Table of contents:
- Behind Core ML and Create ML
- Introducing our demo app
- What does the object detection method require?
- Finding data to train our model
- Preparing the data
- Preprocessing, augmenting, and generating the dataset
- Exporting the dataset for import into Create ML
Getting to the core of Core ML
At WWDC 2017, Apple presented the new A11 Bionic chip featuring the “Neural Engine” core, and it also showed off the Core ML framework—the core (ha) of all of Apple’s ML tools.
Core ML makes it possible to run machine learning algorithms directly on Apple devices. It optimizes performance using the CPU, GPU, and the Neural Engine core. Calculations are performed almost instantaneously, and further, since there is no need to connect to the network, we’re able to preserve user data confidentiality.
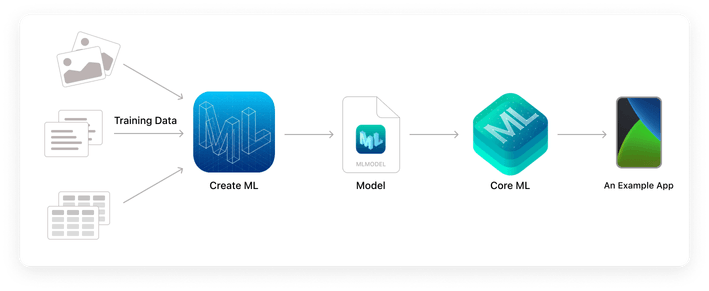
The entire flow from training data to app implementation
The framework utilizes Vision for computer vision (more on this later in this article!), Natural Language for text processing, Speech for converting audio to text, and Sound Analysis for recognizing sounds in audio.
Core ML itself is based on two frameworks:
- The BNNS library of the Accelerate tool—a set of functions used to create and train neural networks. This ensures high performance and low CPU power consumption.
- Metal Performance Shaders—these optimize the operation and performance of device GPUs.
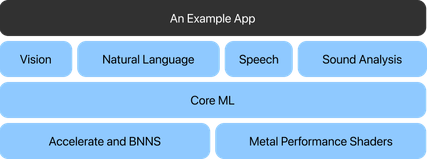
The fundamental frameworks behind our demo application
A brief intro to Create ML
Next, let’s move on to Create ML, the native Apple tool for creating and training models. Create ML actually allows us to train our models without using code, and it’s included as part of Xcode instruments. Several model templates are available for working with different resources: images, video, sound, text, movements, poses, and tables.
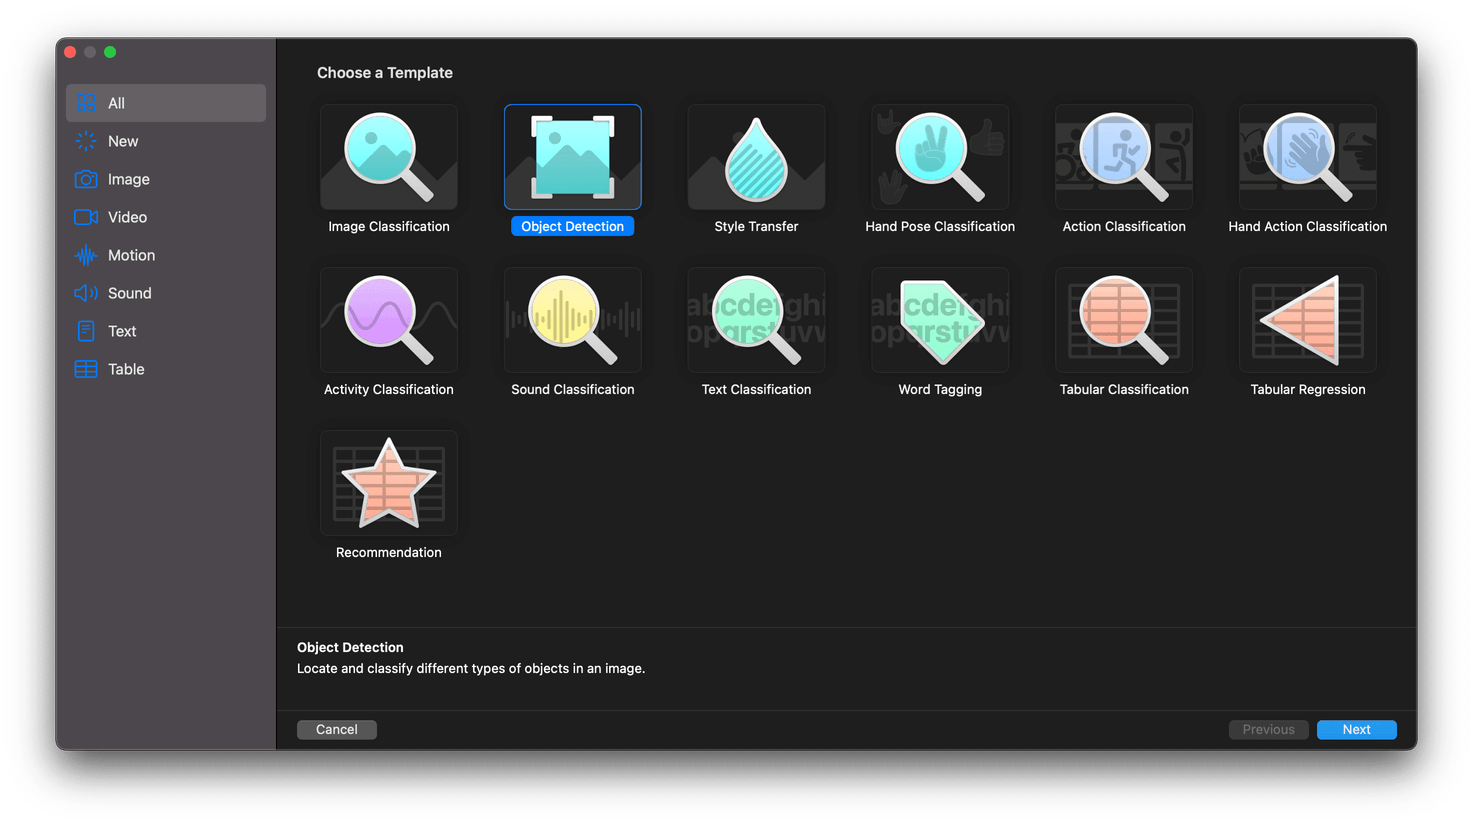
For our demo, we’ll be using the Object Detection template
Our demo app: a license plate detector
With that bit of background out of the way, let’s move on to our demo project, and we’ll try implementing some of these features as we go. Our ultimate goal is to set up a mobile app that will detect license plates appearing in a video and then highlight them within the frame.
To achieve this, we’ll progress through several stages:
- Finding and preparing data for model training
- Annotating the data and exporting a dataset
- Actually training the model
- Building a custom camera app
- Integrating the model using the Vision framework
Understanding the object detection model’s requirements
The object detection model recognizes the location and class of one or more objects in an image. In our case, we expect the algorithm results to return: a rectangular area highlighting the identified object, the corresponding coordinates for that object, an object classification (label), and an accuracy forecast.
So, how can we actually train the model? First, we’ll need a suitable dataset. In our case, this should be a set of images depicting cars with visible license plates. The recommended minimum dataset size is 30, but this is quite small, so, for our example, we’ll use a set of 100 images.
But before we get to work gathering up our data, let’s take a moment to introduce the annotation file.
What is an annotation file?
To create and train models, we’ll need an annotation file—this will specify the data that will be used to train the model. These can generally be formatted as JSON, XML, or CSV files.
In this case, Create ML requires an annotation file formatted as a JSON file to create an object detection model. This takes the following structure:
[
  {
    "image": "image1.jpg",
    "annotations": [
      {
        "label": "car-license-plate",
        "coordinates": {
          "x": 160, "y": 108, "width": 190, "height": 200
        }
      }
    ]
  },
  {
    "image": "image2.jpg",
    "annotations": [
      {
        "label": "car-license-plate",
        "coordinates": {
          "x": 250, "y": 150, "width": 100, "height": 98
        }
      }
    ]
  }
]
The JSON is composed of an array of objects, including image (the name of an image file), and annotations (an array of objects). It’s quite important to understand the the makeup of the annotation file because we’ll use it to specify the objects we want to find in our data set.
Let’s break it down. Each annotation object contains the following:
label: a classifier name, in this case we’re usingcar-license-platebecause that’s the class of objects we’re going to identify.coordinates: We usexandycoordinates (this corresponds to the center of the bounding box) along withwidthandheightto specify where exactly in the image our desired object is located.
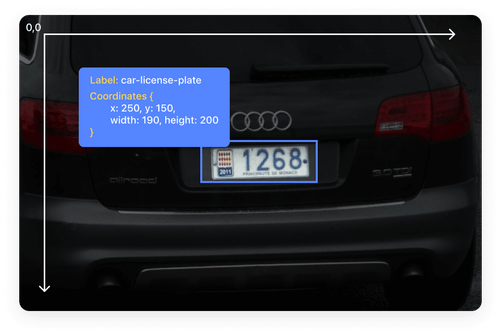
Here’s an illustration of how these JSON values correspond to an example annotated image
Hopefully, it’s clear by now which data Create ML requires when training an object detection model. Of course, creating these JSON structures by hand can be quite time consuming and, well, boring. Fortunately, some services exist that will help us mark up our datasets. We’ll discuss those in just a bit; now it’s time to find the data we need.
Finding data to train our model
We’ve covered a lot of background: object detection, Core ML, Create ML, and the annotation file—now it’s time to truly begin!
There are a number of approaches we could take to find the data we need for training our models. For instance, we could search via Google or simply gather the necessary photos ourselves by using a smartphone. That being said, many advanced data scientists use open sources to find data. I would like to recommend two resources to find almost any kind of data: Papers With Code and Kaggle.
But, a word of caution when using such dataset resources: pay attention to the license type, as some datasets are prohibited for commercial use.
For our demo, I’ve settled on 100 car images. If you want to use the same source to assemble yours, open this dataset on Kaggle, and register at the site (if you haven’t already). Once you’re in, by navigating to the ‘images’ folder here, you’ll be able to preview the selections. Still, probably the most efficient way to assemble the photos we need is by download the entire archive and then extracting the necessary images into a separate folder.
Once that’s in place, before you begin assembling your images, make sure to read the section below.
Key points to consider when gathering a dataset
When preparing a dataset, two key points should be considered: balancing the image selection so that different types of objects are equally represented, and the uniqueness of the images themselves.
To explain that a bit more, let’s say, for example, that you want to train a model to recognize cats and dogs. Accordingly, to achieve the best results, the ratio of cat and dog images should be 1:1. Of course, getting such an exact balance can be difficult to achieve in the real world.
So how is this relevant to us now? Well, when selecting our images for our demo, we’ll need to pay attention so that elongated, narrow plates and square plates are represented equally well—again, ideally this would be as a 1:1 ratio.
Similarly, we want to take care not to include two or more identical images. They should all be unique.
Both of these nuances—balancing image selection and image uniqueness—affect the accuracy of the model.
Once you’re finished, you’ll be able to gather up your dataset as I have done here:
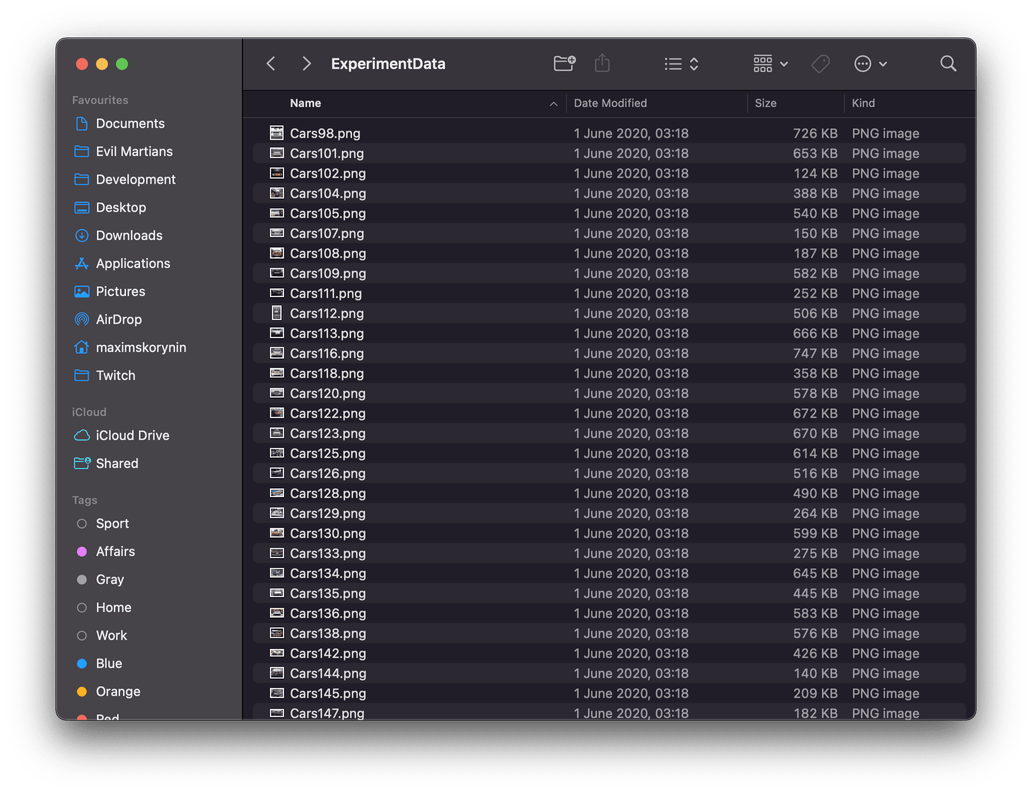
That’s a lot of cars…
Alternatively, if you’d prefer, I’ve also prepared my selection of 100 car images for your convenience—simply click Download to grab it.
Uploading our data on Roboflow
For this stage of data preparation, we’ll use a service called Roboflow which offers a wide array of tools for preprocessing, exporting, and for converting annotations. The public plan allows users to process up to 1000 images—make sure you choose this if prompted, or you won’t be able to export your dataset for this experiement.
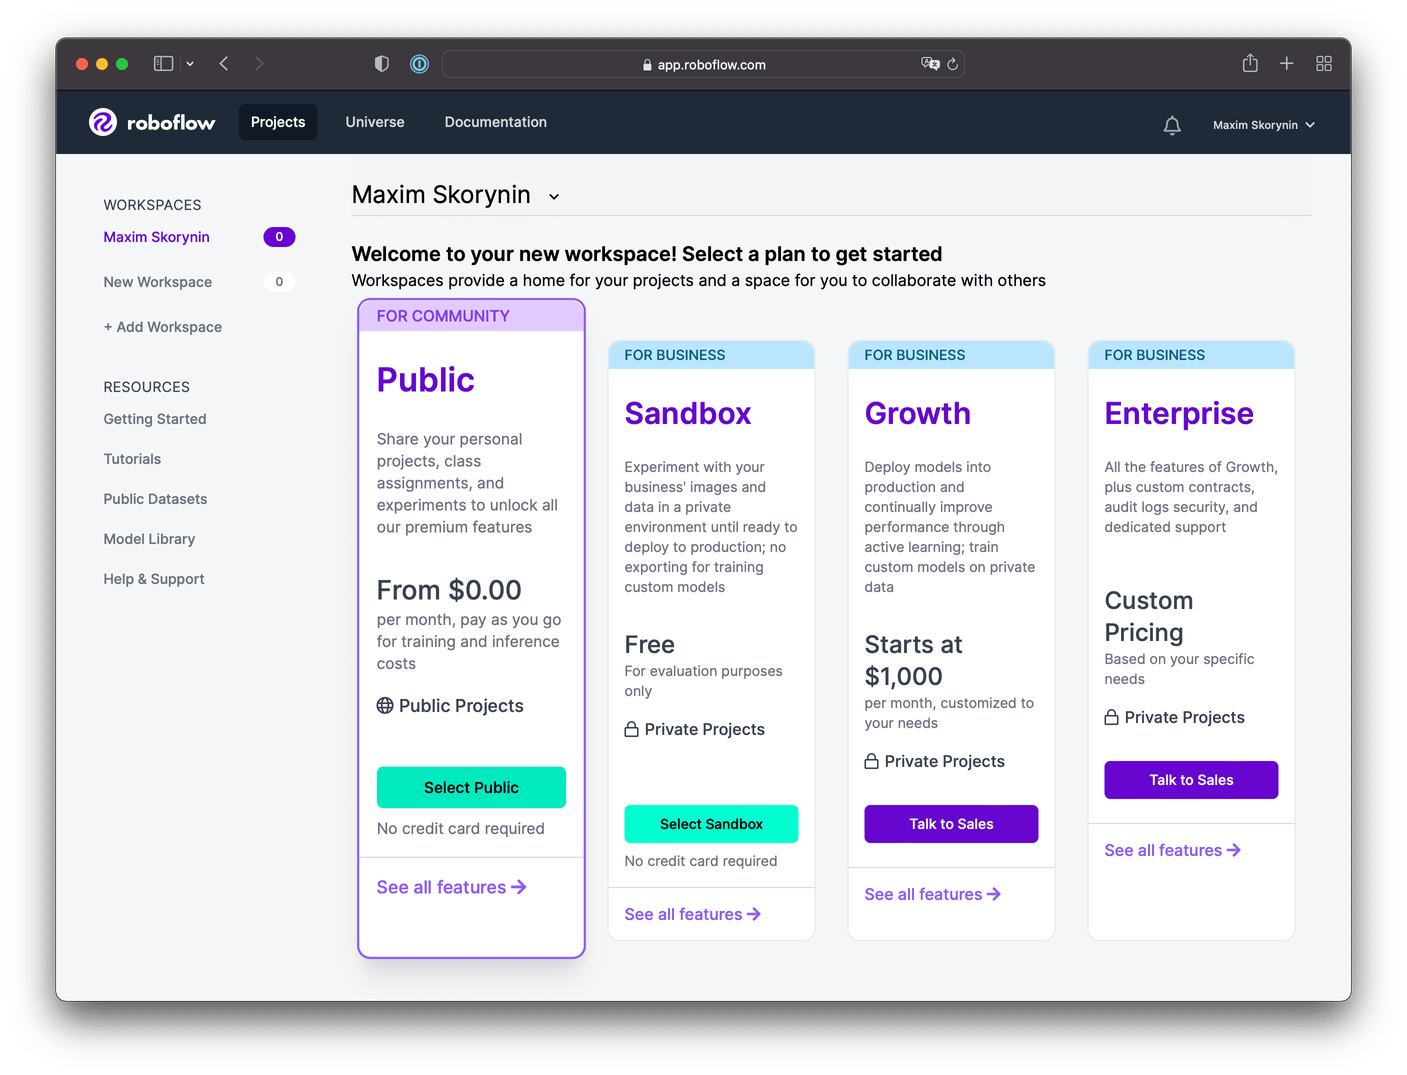
To get started, sign up, make your way to the new project screen, then select Create New Project:
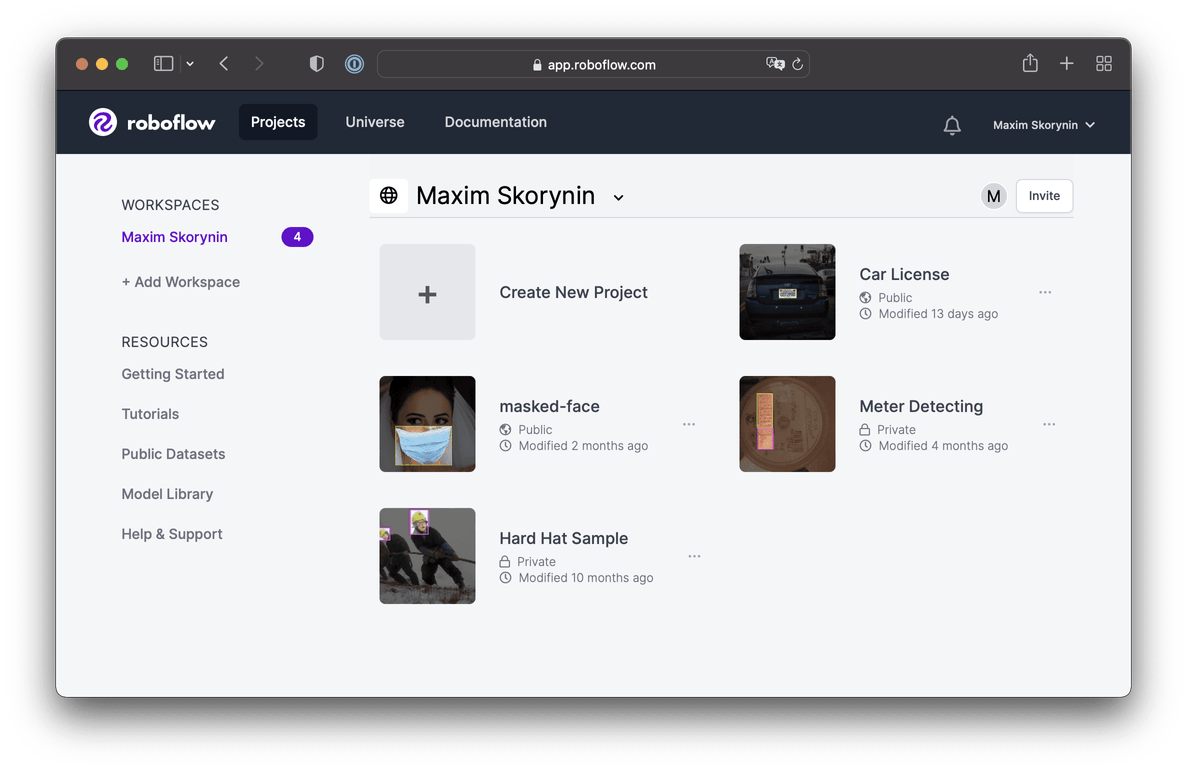
⚠️ Important note for first-time Roboflow users: you’ll be prompted to go through a tutorial. Make sure to select Upload Your Own Data since we don’t want to use ours. Additionally, although the actual screens may appear slightly different than as illustrated in this article—Roboflow will visually highlight what you need to select—the steps will reamin the same.
Next, a modal window will appear, and we’ll need to fill in some data:
- Project Name: We’ll give our project a name here.
- License: Here we’ll specify license type—we’ll go with Public Domain.
- Project Type: Since this is the primary goal of our demo, let’s select Object Detection.
- Annotation Group: This field specifies a name for the group of objects you’ll be looking for in an image. This name can be changed if required.
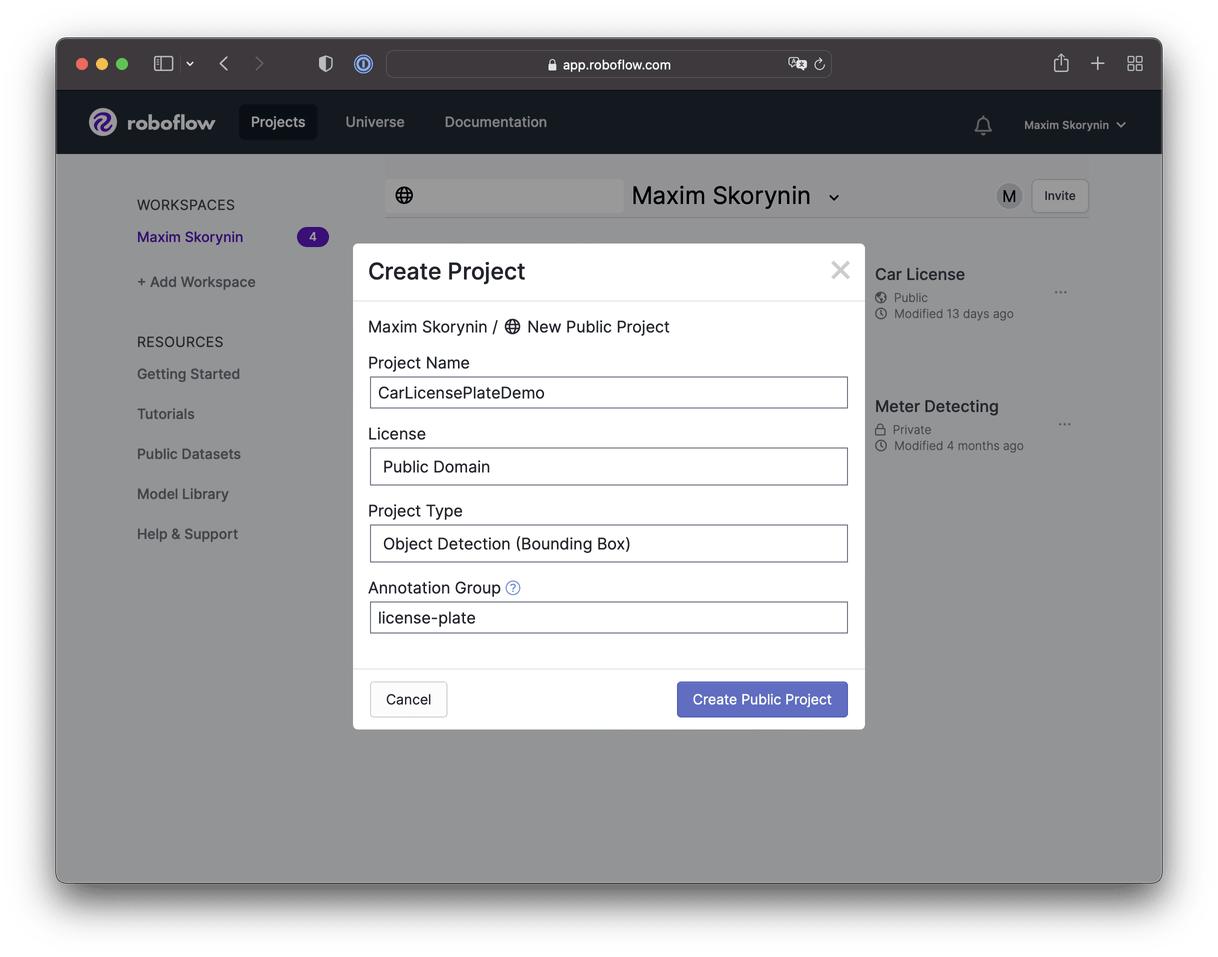
The project creation form is ready to go!
After you’ve filled in the form, go ahead and click Create Public Project.
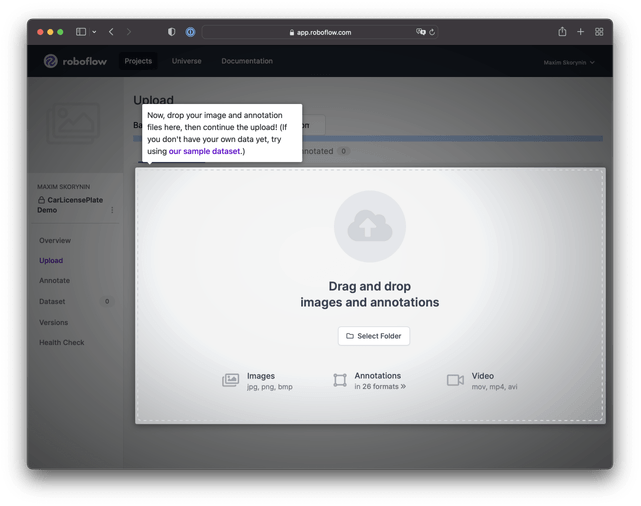
We can select our files for upload on the next screen. While it’s also possible to immediately upload ready-made annotations here, one of the main goals of this article is to show how to mark up a dataset from scratch, so go ahead and add your selections:
After adding data to the project, the system will filter out any identical images. In my case, only 91 were left. So, if All Images shows a number lower than you anticapted, this is probably why:
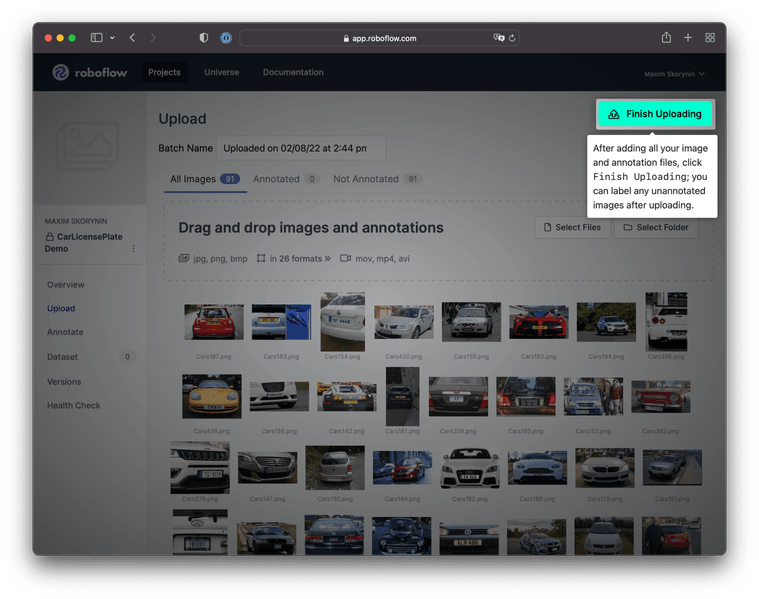
Next, click the Finish Uploading button. After that, the upload process make take a little time to complete.
Marking up the data
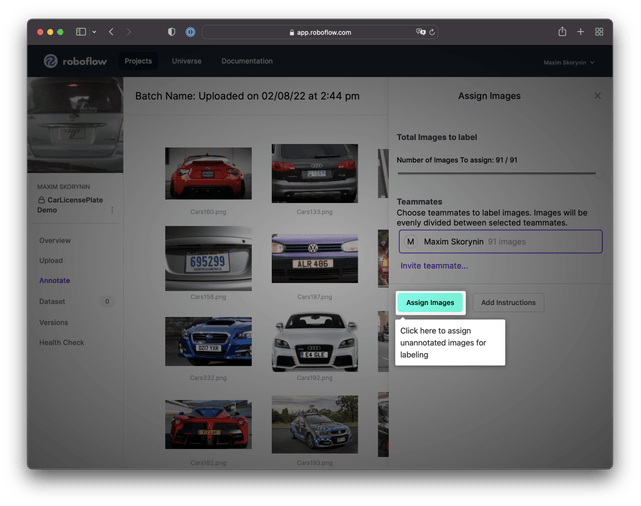
From here, you’ll need to click Assign Images:
Then, click on the highlighted image to begin annotating:
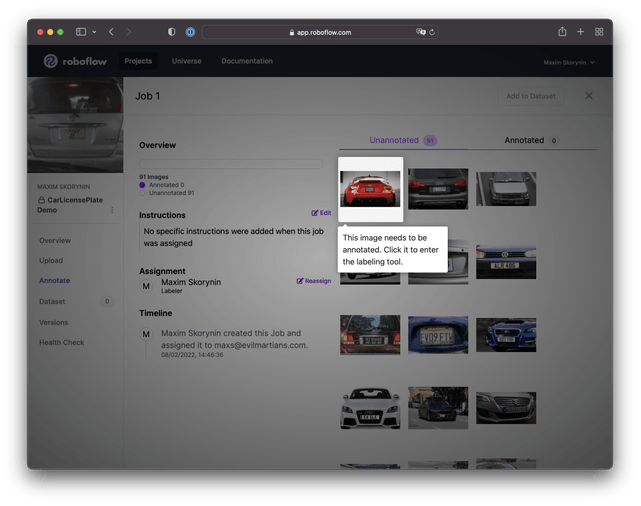
By clicking the image, we’ll switch to a full screen view of the labeling tool:
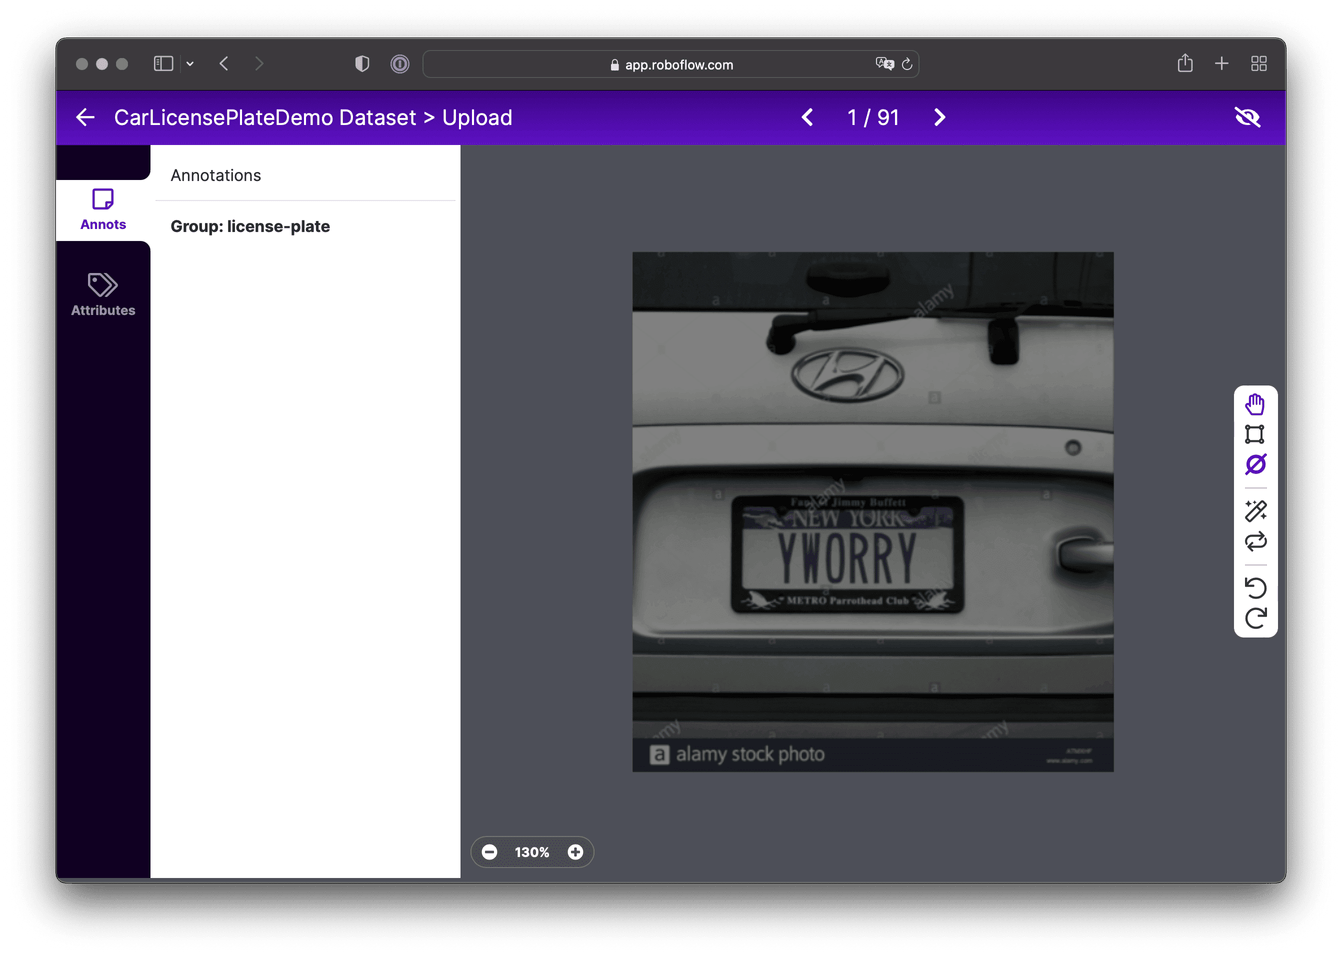
Choose the Create Tool (C or Command key) and select the area containing the car’s license plate, as shown in the picture below. After making your selection, you’ll need to enter a name for the group of objects. By default, this is set to the Annotation Group Name, which we specified when creating the project, but you can change this. Save the result.
On the left side, in the Annotations tab, you can see the groups of objects you’ve placed in the image. These will also be included in the final annotations file.
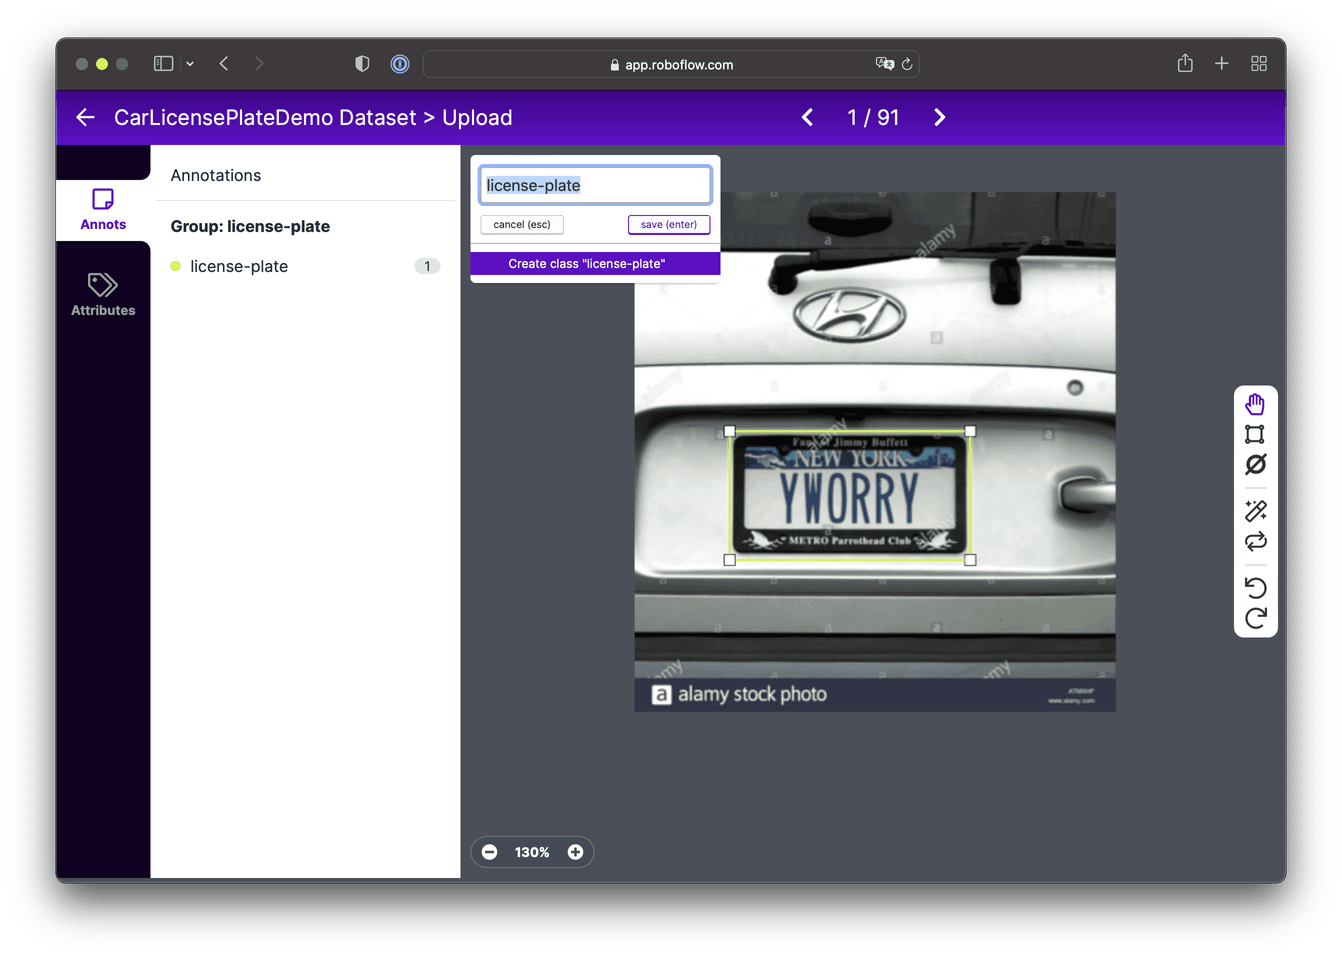
Now, let’s mark up the remaining images. At first blush, this process might seem difficult and time-consuming. Here’s a little tip: for each image, do this: Select Object → Press Enter → Press Right Arrow. Though this process will still take a bit of time, things will go much, much faster!
Once finished, you can click the project name in the top left corner to continue.
From here, we’ll need to click Add 91 Images to Dataset in the top corner and the system will prompt you to split the marked-up data into categories: Train, Valid, and Test.
This will be used later when we train the model in Create ML. The test set can be omitted or compiled separately, and it shouldn’t include images from the Training set.
The Validation set is very important and it also contains unique images. Create ML will show us the forecast accuracy using the validation data.
Apple recommends having at least 50 objects for the Validation and Testing sets. For our project, the system prompted values—as shown in the picture, Train: 70%, Valid: 20%, Test: 10%—are enough to get our desired results, continue onwards and click Add Images:
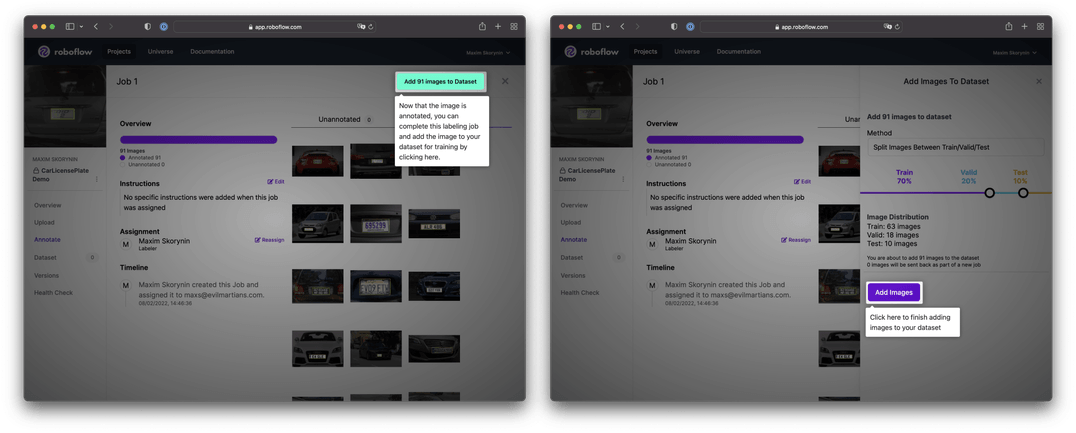
At this stage, you’ll see 3 panels marked UNASSIGNED, ANNOTATING, and DATASET, as well as the the Generate New Version button in the top corner.
If everything is already in the DATASET panel, you can go ahead and click Generate New Version. Otherwise, you should open up the job, reannotate the images, and add them to the training set:
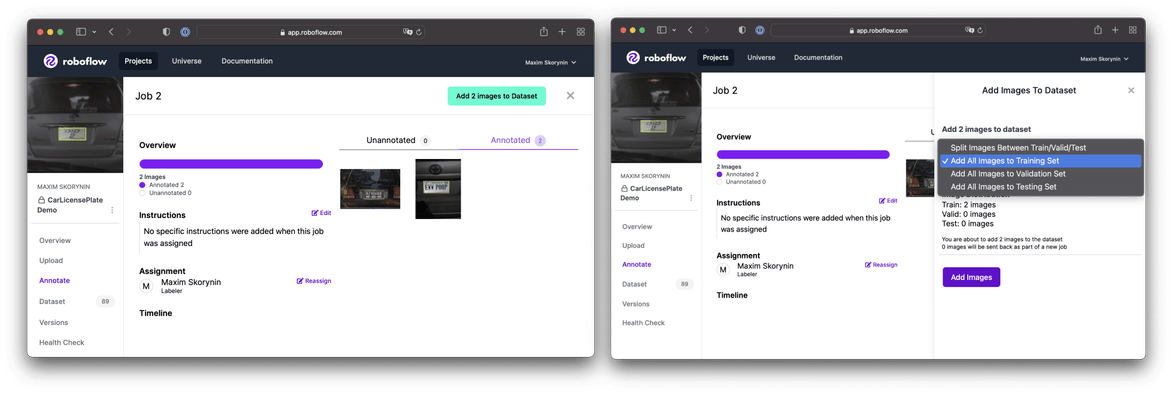
Once everything is sorted into the DATASET panel, it’s time to click Generate New Version.
Preprocessing the dataset
Next, we move on to formatting and generating the ready-made dataset.
⚠️ Note: If you get lost in Roboflow, you can navigate back to these steps by selecting Versions from the sidebar.
The Preprocessing section allows you to apply one or several effects to all objects in a set. This is done in order to increase the model’s efficiency or its training speed. By default, two effects are applied: auto orientation and size fit. With the Resize step, the learning algorithm will automatically fit the images to the 416×416 size, if necessary.
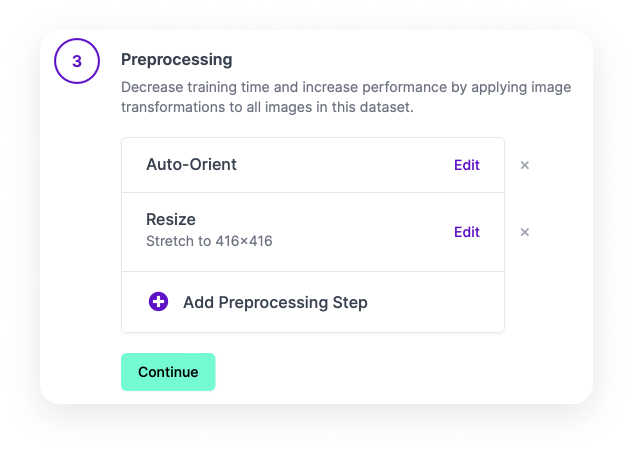
If you click on Add Preprocessing Step, you’ll see some more available functions (under Preprocessing Options):
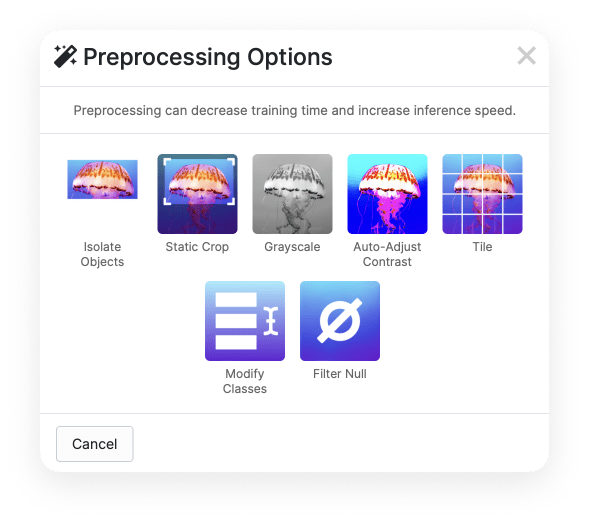
For our implementation, we’ll leave everything as is.
Dealing with Augmentation options
This section allows you to expand the current dataset based on the original objects.
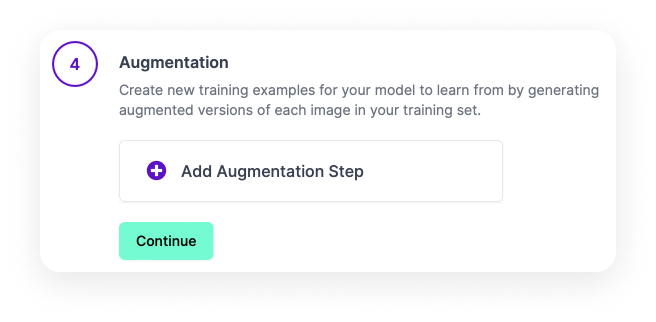
To get started, select Add Augmentation Step. The Augmentation Options section (seen in the image below) offers an array of effects:
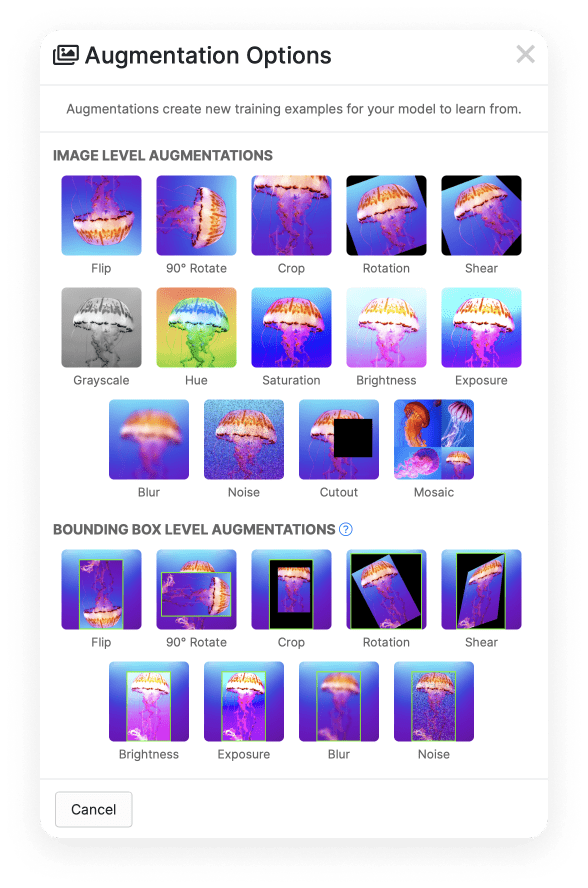
Let’s select one of them. The system will then add new sample images to the current dataset with this effect applied. Recall, the number of instances in a set affects the accuracy. In addition, the variability of instances affects the accuracy, too. You can read about this more in Apple’s article on improving model accuracy.
Let’s add additional instances with a Rotation effect with +20 and -20 degrees values. To do this, select the Rotation effect from the list, specify the desired value, and press Apply:
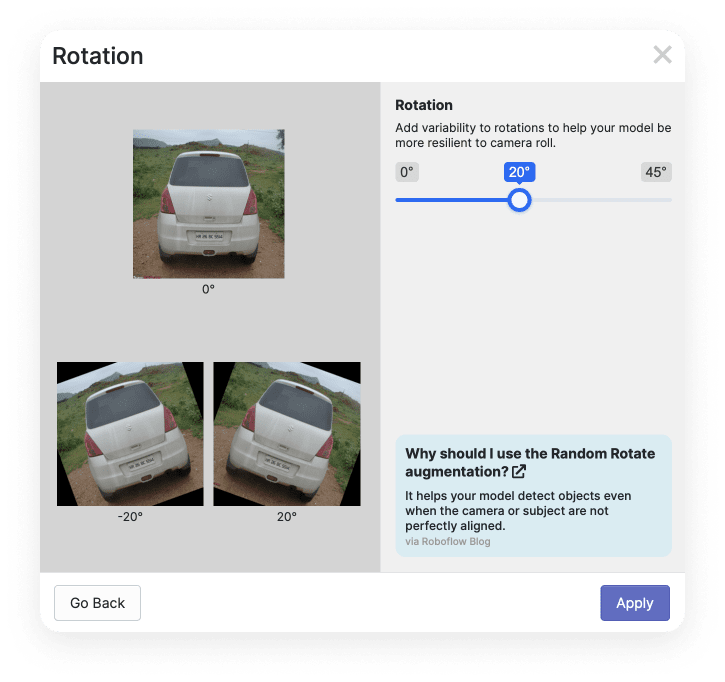
You can add other processing methods. Tip: If the image stops being realistic after applying the effect, you shouldn’t add these images to the dataset because this can reduce the recognition accuracy.
Generating the dataset
The final stage is generating the dataset. Here you are asked to select the size of the final set. Select the maximum available value and click Generate. This will take some time.
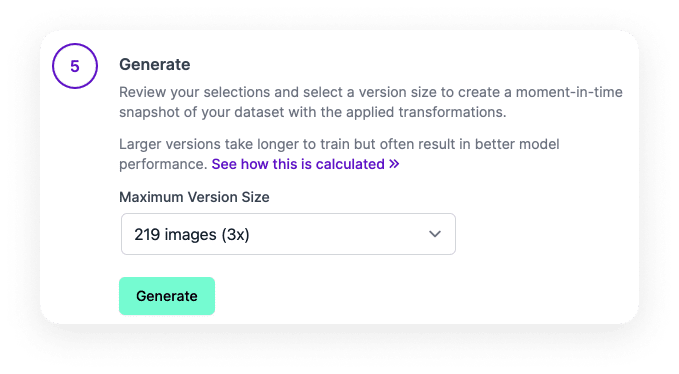
When the set is generated, you can enter a version name.
Also, as you might have noticed, you can create multiple versions of the same set, which allows you to experiment with different types of Preprocessing and Augmentation effects.
In the same section, you can see the generation result and export the prepared data:
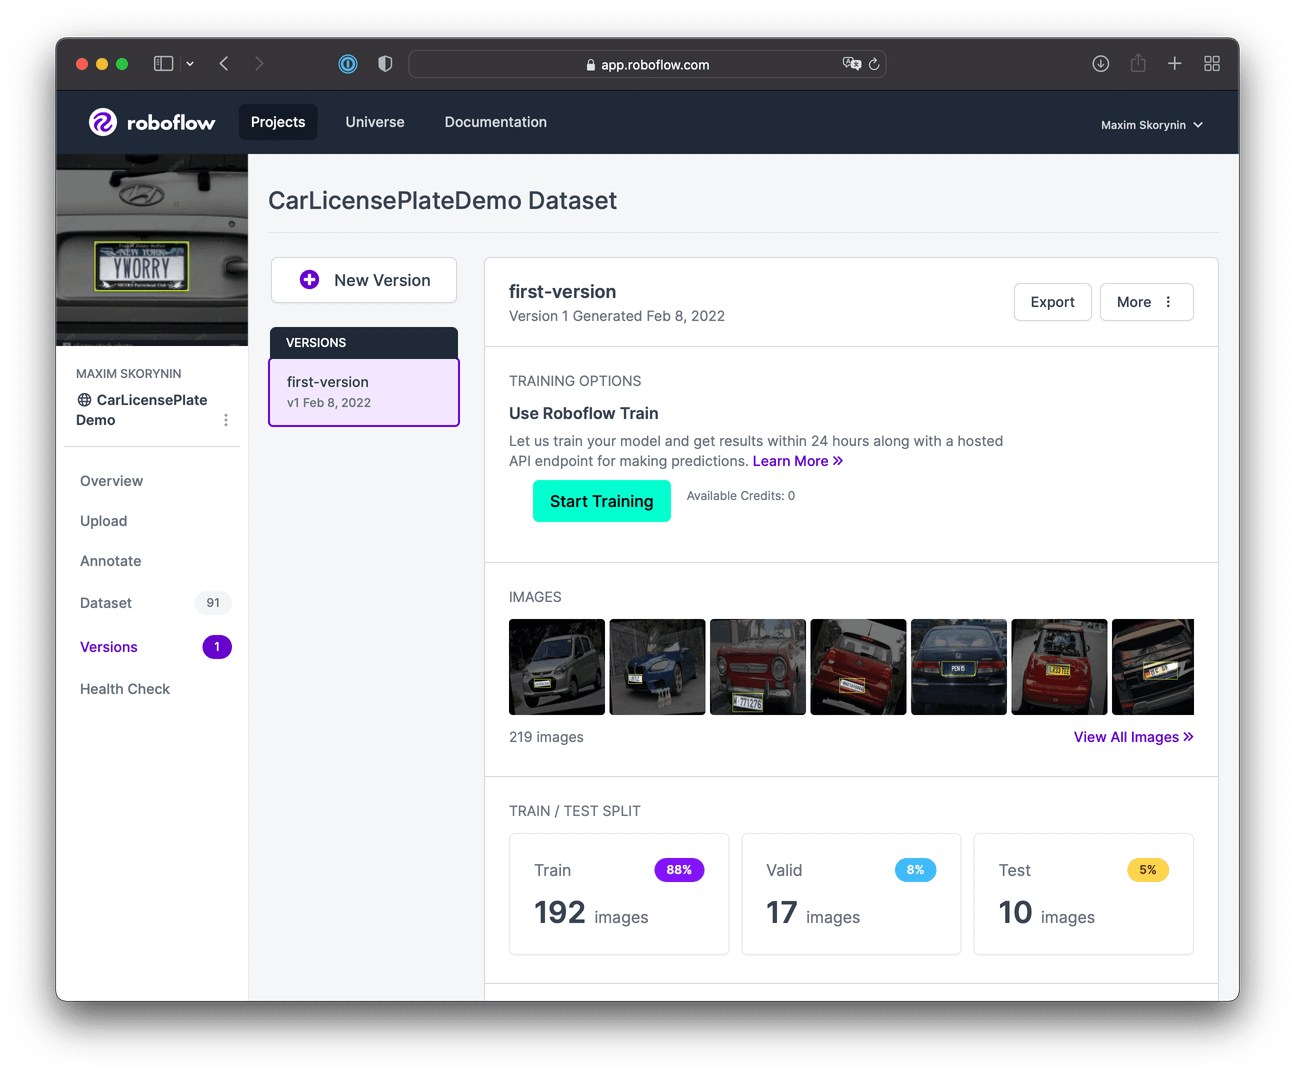
Exporting the dataset
It’s time to download our dataset and to use it in Create ML. First up, press the Export button. Make sure “download zip to computer” is checked.
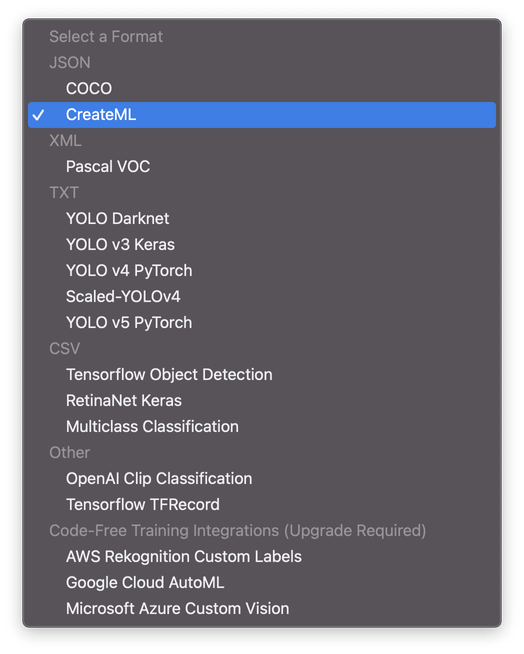
You’ll see the Format drop-down menu, which offers many export formats to choose from.
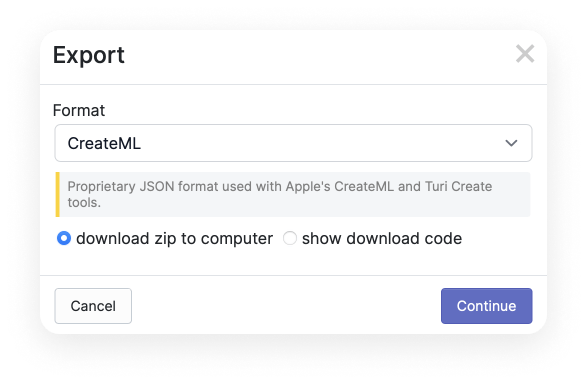
For our project, select the “CreateML” format. After doing this, click Continue.
After unzipping the downloaded archive, we end up with 3 folders of images on our local machine—the Train, Valid, and Test sets, and their corresponding annotation files:
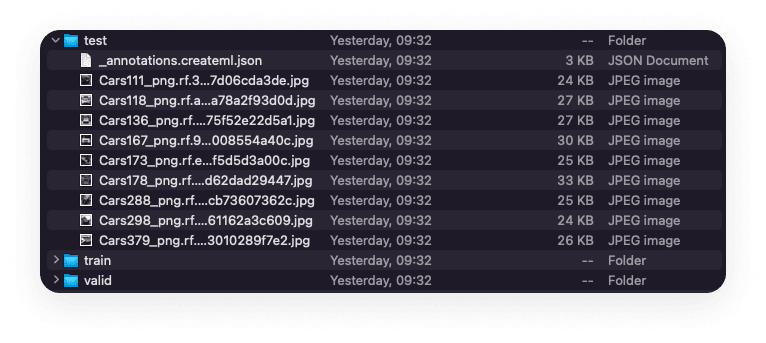
That’s all for this time! We’ve made a lot of progres so far. We learned about Apple’s native ML tools, prepared our data from scratch, annotated that data, and now we’ve got our three datasets ready to export and use in Create ML.
In the next part of this article, we’ll learn how to use this data to create a model, train it, and use it in an application. Plus, we’ll take a look at two Create ML training approaches: full network, and Transfer Learning—and we’ll compare their performance.
By the way, if you’ve got a problem, (ML-related or not) Evil Martians are ready to help detect it, analyze it, and to zap it out of existence! Drop us a line!
Object Detection with Create ML: training and demo app


