System of a test: Proper browser testing in Ruby on Rails


Translations
- Chinese2020时代的Rails系统测试
- JapaneseRailsでブラウザテストを「正しく」行う方法
Discover a collection of best practices for end-to-end browser testing of Ruby on Rails applications and adopt them in your projects. See how to ditch Java-based Selenium in favor of a leaner, meaner Ferrum-Cuprite combo that uses Chrome DevTools Protocol directly through pure Ruby. And if you use Docker for development—we’ve got you covered too!
Other parts:
- System of a test: Proper browser testing in Ruby on Rails
- System of a test II: Robust Rails browser testing with SitePrism
Disclaimer: This article is regularly updated with the best recommendations, take a look at a Changelog section.
The Ruby community is passionate about testing. We have plenty of testing libraries, there are hundreds of blog posts on the topic, we even had a dedicated podcast. Hell, the top 3 most downloaded gems are parts of the RSpec testing framework!
Rails, I believe, is one of the reasons behind the rise of Ruby testing. The framework makes writing tests as enjoyable as possible. In most situations, following the comprehensive Rails testing guide is good enough (at least, in the beginning). But there is always an exception, and, in our case, it is system testing.
To see how we decouple our tests from page markup—check out the next part of the Rails system testing series: Robust Rails browser testing with SitePrism.
Writing and maintaining system tests for Rails applications could hardly be called “enjoyable”. My approach to handling this problem has evolved a lot since my first Cucumber-driven test suite back in 2013. And today, in 2020, I’ve finally reached the point when I’m ready to share my current setup with everyone. In this post, I’m going to cover the following topics:
- System tests in a nutshell
- Modern system tests with Cuprite
- Configuration example
- Dockerizing system tests
System tests in a nutshell
”System tests” is the common name given for automated end-to-end tests in the Rails world. Before Rails adopted this name, we used such variations as feature tests, browser tests, and even acceptance tests (though the latter are ideologically different).
If we recall the testing pyramid (or diamond), system tests live on the very top: they treat the whole program as a black box, usually emulating end-users activities and expectations. And that is why, in case of web applications, we need a browser to run such tests (or at least an emulation like Rack Test).
Let’s take a look at the typical system tests architecture:

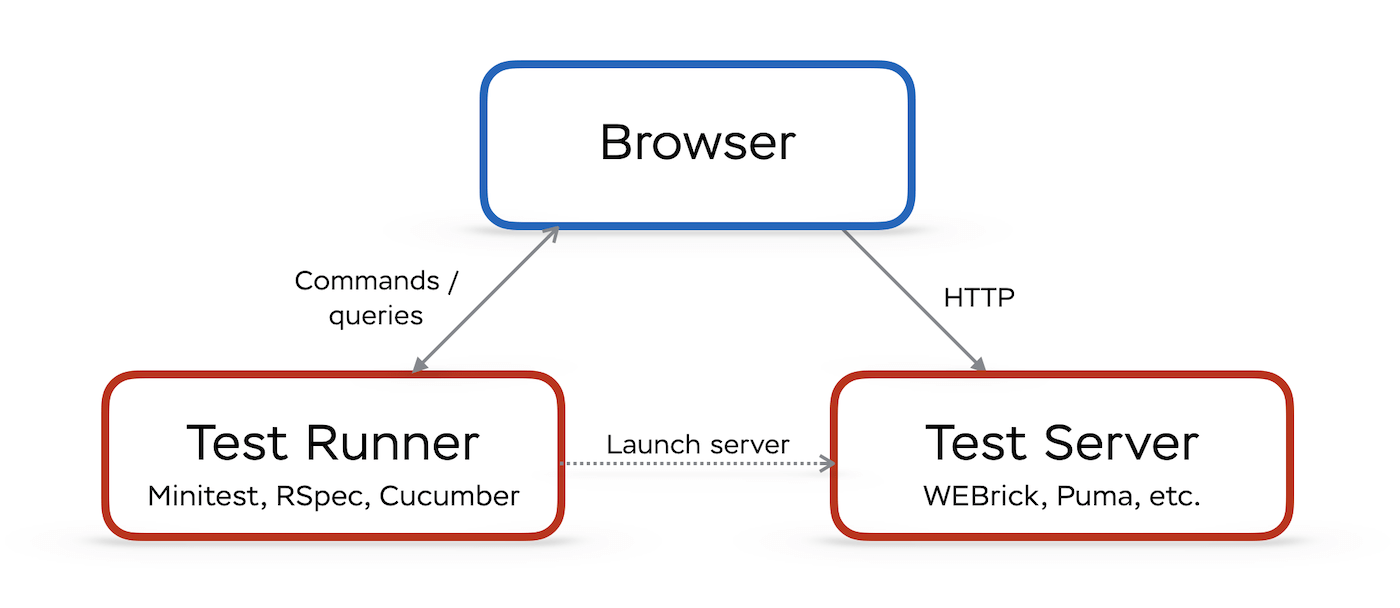
System tests architecture
We need to manage at least three “processes” (some of them could be Ruby threads): a web server running our application, a browser, and the test runner itself. That’s the bare minimum. In practice, we usually also need another tool to provide an API to control the browser (e.g., ChromeDriver). There were attempts to simplify this setup by building specific browsers (such as capybara-webkit and PhantomJS) providing such APIs out-of-box, but none of them survived the compatibility race with real browsers.
And, of course, we need to add a handful of Ruby gems to our test dependencies—to glue all the pieces together. More dependencies—more problems. For example, Database Cleaner for a long time was a must-have add-on: we couldn’t use transactions to automatically rollback the database state, because each thread used its own connection; we had to use TRUNCATE ... or DELETE FROM ... for each table instead, which is much slower. We solved this problem by using a shared connection in all threads (via the TestProf extension). Rails 5.1 was released with a similar functionality out-of-the-box.
Thus, by adding system tests, we increase the maintenance costs for development and CI environments and introduce potential points of failures or instability: due to the complex setup, flakiness is the most common problem with end-to-end testing. And most of this flakiness comes from communication with a browser.
Although introducing system tests in 5.1 Rails simplified keeping browser tests, they still require some configuration efforts to work smoothly:
- You need to deal with web drivers (Rails assumes that you use Selenium).
- You’re on your own with configuring system tests in a containerized environment (i.e., when using Docker for development).
- The configuration is not flexible enough (e.g., screenshots path).
Let’s move closer to the code and see how you can make system testing more fun in 2020!
Modern system tests with Cuprite
By default, Rails assumes that you will be running system tests with Selenium. Selenium is a battle-proven software for web browser automation. It aims to provide a universal API for all browsers, as well as the most realistic experience—only real humans made of meat and bones could do better in terms of emulating user-browser interactions.
This power doesn’t come for free: you need to install browser-specific drivers, and the overhead of realistic interactions is noticeable at scale (i.e., Selenium tests are usually pretty slow).
Selenium was created a while ago, at a time when browsers didn’t provide any built-in automation capabilities. Several years ago, this situation changed with the introduction of CDP protocol for Chrome. Using CDP, you can manipulate browser sessions directly, with no need for intermediate abstraction layers and tools.
A lot of projects leveraging CDP have appeared since then, including the most well-known, Puppeteer, which is a browser automation library for Node.js. And what about the Ruby world? Ferrum, a CDP library for Ruby, although pretty young, provides an experience comparable to Puppeteer. And, more importantly for us, it ships with a companion project called Cuprite—a pure Ruby Capybara driver using CDP.
I started actively using Cuprite only at the beginning of 2020 (I tried it a year before but had some problems with the Docker environment) and I never regret it. Setting up system tests became bloody simple (all you need is loveChrome), and the execution is so fast that after migrating from Selenium some of my tests failed: they lacked proper async expectations and passed in Selenium only because it was much slower.
Let’s take a look at the most recent system test configuration with Cuprite that I worked on.
Annotated configuration example
This example borrows from my recent open-source Ruby on Rails project-AnyCable Rails Demo. It aims to demonstrate how to use the just released AnyCable 1.0 with Rails apps, but we can also use it for this post—it has a decent system tests coverage.
The project uses RSpec and its system testing wrapper. Most of the ideas could be applied to Minitest as well (check out the evil_systems library, for example).
Let’s start with a minimal example, enough to run tests on a local machine. This code lives in the demo/dockerless branch of AnyCable Rails Demo.
Let’s take a quick look at the Gemfile first:
group :test do
  gem 'capybara'
  gem 'cuprite'
end
I keep the configuration for system tests in multiple files in the spec/system/support folder and use a dedicated system_helper.rb to load them:
spec/
  system/
    support/
      better_rails_system_tests.rb
      capybara_setup.rb
      cuprite_setup.rb
      precompile_assets.rb
      ...
  system_helper.rb
Let’s take a look at each file from the list above and examine the role of each.
system_helper.rb
The system_helper.rb file may contain some general RSpec configuration for system tests, but, usually, it’s as simple as the following:
# Load general RSpec Rails configuration
require "rails_helper.rb"

# Load configuration files and helpers
Dir[File.join(__dir__, "system/support/**/*.rb")].sort.each { |file| require file }
Then, in your system specs, you use require "system_helper" to activate this configuration.
We use a separate helper file and a support folder for system tests to avoid all the excess configuration in the case when we only need to run a single unit test.
capybara_setup.rb
This file contains configuration for Capybara framework:
# spec/system/support/capybara_setup.rb

# Usually, especially when using Selenium, developers tend to increase the max wait time.
# With Cuprite, there is no need for that.
# We use a Capybara default value here explicitly.
Capybara.default_max_wait_time = 2

# Normalize whitespaces when using `has_text?` and similar matchers,
# i.e., ignore newlines, trailing spaces, etc.
# That makes tests less dependent on slightly UI changes.
Capybara.default_normalize_ws = true

# Where to store system tests artifacts (e.g. screenshots, downloaded files, etc.).
# It could be useful to be able to configure this path from the outside (e.g., on CI).
Capybara.save_path = ENV.fetch("CAPYBARA_ARTIFACTS", "./tmp/capybara")
This file also contains a useful patch for Capybara, the purpose of which we will reveal later:
# spec/system/support/capybara_setup.rb

Capybara.singleton_class.prepend(Module.new do
  attr_accessor :last_used_session

  def using_session(name, &block)
    self.last_used_session = name
    super
  ensure
    self.last_used_session = nil
  end
end)
The Capybara.using_session allows you to manipulate a different browser session, and thus, multiple independent sessions within a single test scenario. That’s especially useful for testing real-time features, e.g., something with WebSocket.
This patch tracks the name of the last session used. We’re going to use this information to support taking failure screenshots in multi-session tests.
cuprite_setup.rb
This file is responsible for configuring Cuprite:
# spec/system/support/cuprite_setup.rb

# First, load Cuprite Capybara integration
require "capybara/cuprite"

# Then, we need to register our driver to be able to use it later
# with #driven_by method.#
# NOTE: The name :cuprite is already registered by Rails.
# See https://github.com/rubycdp/cuprite/issues/180
Capybara.register_driver(:better_cuprite) do |app|
  Capybara::Cuprite::Driver.new(
    app,
    **{
      window_size: [1200, 800],
      # See additional options for Dockerized environment in the respective section of this article
      browser_options: {},
      # Increase Chrome startup wait time (required for stable CI builds)
      process_timeout: 10,
      # Enable debugging capabilities
      inspector: true,
      # Allow running Chrome in a headful mode by setting HEADLESS env
      # var to a falsey value
      headless: !ENV["HEADLESS"].in?(%w[n 0 no false])
    }
  )
end

# Configure Capybara to use :better_cuprite driver by default
Capybara.default_driver = Capybara.javascript_driver = :better_cuprite
We also define a few shortcuts for common Cuprite API methods:
module CupriteHelpers
  # Drop #pause anywhere in a test to stop the execution.
  # Useful when you want to checkout the contents of a web page in the middle of a test
  # running in a headful mode.
  def pause
    page.driver.pause
  end

  # Drop #debug anywhere in a test to open a Chrome inspector and pause the execution
  def debug(*args)
    page.driver.debug(*args)
  end
end

RSpec.configure do |config|
  config.include CupriteHelpers, type: :system
end
Below you can see a demonstration of how this #debug helper works:
Debugging system tests
better_rails_system_tests.rb
This file contains some patches to Rails system tests internals as well as some general configuration (see code comments for explanations):
# spec/system/support/better_rails_system_tests.rb

module BetterRailsSystemTests
  # Make failure screenshots compatible with multi-session setup.
  # That's where we use Capybara.last_used_session introduced before.
  def take_screenshot
    return super unless Capybara.last_used_session

    Capybara.using_session(Capybara.last_used_session) { super }
  end
end

RSpec.configure do |config|
  config.include BetterRailsSystemTests, type: :system

  # Make urls in mailers contain the correct server host.
  # This is required for testing links in emails (e.g., via capybara-email).
  config.around(:each, type: :system) do |ex|
    was_host = Rails.application.default_url_options[:host]
    Rails.application.default_url_options[:host] = Capybara.server_host
    ex.run
    Rails.application.default_url_options[:host] = was_host
  end

  # Make sure this hook runs before others
  config.prepend_before(:each, type: :system) do
    # Use JS driver always
    driven_by Capybara.javascript_driver
  end
end
precompile_assets.rb
This file is responsible for precompiling assets before running system tests (I’m not going to paste it here in full, just the most interesting parts):
RSpec.configure do |config|
  config.before(:suite) do
    # We can use webpack-dev-server for tests, too!
    # Useful if you are working on frontend code fixes and want to verify them via system tests
    if Webpacker.dev_server.running?
      $stdout.puts "\n⚙️  Webpack dev server is running! Skip assets compilation.\n"
      next
    else
      $stdout.puts "\n🐢  Precompiling assets.\n"

      # The code to run webpacker:compile Rake task
      # ...
    end
  end
end
Why precompile assets manually if Rails can do that automatically? The problem is that Rails precompiles assets lazily (i.e., the first time you request an asset), and this could make the first test example run much slower and even encounter random timeout exceptions.
Another thing I want to pay attention to is the ability to use a Webpack dev server for system tests. This is really useful when you’re working hard on frontend code refactoring: you can pause a test, open a browser, edit the frontend code and see it hot reloaded!
Dockerizing system tests
Let’s take our configuration to the next level and make it compatible with our Docker development environment. The dockerized version of the test setup above lives in the default branch of the AnyCable Rails Demo repository. Feel free to check that out, but we’re going to cover all the interesting bits below.
The main difference in a Docker setup is that we run a browser instance in a separate container. It’s possible to add Chrome to your base Rails image or, probably, even use a host machine browser from a container (like it can be done with Selenium and ChromeDriver). But, in my opinion, defining a dedicated browser service to docker-compose.yml is the proper Docker way of doing this.
Currently, I’m using a Chrome Docker image from browserless.io. It comes with a handy Debug Viewer, which allows you to debug headless browser sessions (there will be a short video at the end of the article):
services:
  # ...
  chrome:
    # Currently, Apple M1 is only supported in unnumbered "latest" versions.
    # See https://github.com/browserless/chrome/issues/1393
    image: browserless/chrome:latest
    ports:
      - "3333:3333"
    # Mount application source code to support file uploading
    # (otherwise Chrome won't be able to find files).
    # NOTE: Make sure you use absolute paths in `#attach_file`.
    volumes:
      - .:/app:cached
    environment:
      # By default, it uses 3000, which is typically used by Rails.
      PORT: 3333
      # Set connection timeout to avoid timeout exception during debugging
      # https://docs.browserless.io/docs/docker.html#connection-timeout
      CONNECTION_TIMEOUT: 600000
Add CHROME_URL: http://chrome:3333 to your Rails service environment and run Chrome in the background:
docker-compose up -d chromeNow we need to configure Cuprite to work with a remote browser if its URL is provided:
# cuprite_setup.rb

# Parse URL
# NOTE: REMOTE_CHROME_HOST should be added to Webmock/VCR allowlist if you use any of those.
REMOTE_CHROME_URL = ENV["CHROME_URL"]
REMOTE_CHROME_HOST, REMOTE_CHROME_PORT =
  if REMOTE_CHROME_URL
    URI.parse(REMOTE_CHROME_URL).yield_self do |uri|
      [uri.host, uri.port]
    end
  end

# Check whether the remote chrome is running.
remote_chrome =
  begin
    if REMOTE_CHROME_URL.nil?
      false
    else
      Socket.tcp(REMOTE_CHROME_HOST, REMOTE_CHROME_PORT, connect_timeout: 1).close
      true
    end
  rescue Errno::ECONNREFUSED, Errno::EHOSTUNREACH, SocketError
    false
  end

remote_options = remote_chrome ? { url: REMOTE_CHROME_URL } : {}
The configuration above assumes that a user wants to use a locally installed Chrome if CHROME_URL is not set or if the browser is not responding.
We do this to make our configuration backward-compatible with the local one (we usually don’t force everyone to use Docker for development; we let Docker deniers suffer with their unique local setups 😈).
Our driver registration now looks like this:
# spec/system/support/cuprite_setup.rb

Capybara.register_driver(:better_cuprite) do |app|
  Capybara::Cuprite::Driver.new(
    app,
    **{
      window_size: [1200, 800],
      browser_options: remote_chrome ? { "no-sandbox" => nil } : {},
      inspector: true
    }.merge(remote_options)
  )
end
We also need to update our #debug helper to print a Debug Viewer URL instead of trying to open a browser:
module CupriteHelpers
  # ...

  def debug(binding = nil)
    $stdout.puts "🔎 Open Chrome inspector at http://localhost:3333"
    return binding.break if binding

    page.driver.pause
  end
end
Since a browser is running on a different “machine”, it should know how to reach the test server (which no longer listens on localhost).
For that, we need to configure Capybara server host:
# spec/system/support/capybara_setup.rb

# Make server accessible from the outside world
Capybara.server_host = "0.0.0.0"
# Use a hostname that could be resolved in the internal Docker network
Capybara.app_host = "http://#{ENV.fetch('APP_HOST', `hostname`.strip&.downcase || '0.0.0.0')}"
Finally, let’s add a couple of tweaks to our better_rails_system_tests.rb.
First, let’s make screenshot notices clickable in VS Code 🙂 (Docker absolute paths are different from a host system):
# spec/system/support/better_rails_system_tests.rb

module BetterRailsSystemTests
  # ...

  # Use relative path in screenshot message
  def image_path
    Pathname.new(absolute_image_path).relative_path_from(Rails.root).to_s
  end
end
In too Dip
If you use Dip to manage your dockerized development environment (and I highly recommend you do, it gives you the power of containers without the overhead of remembering all Docker CLI Commands), you can avoid launching the chrome service manually by adding custom commands to your dip.yml and an additional service definition to your compose.yml:
# compose.yml

# Separate definition for system tests to add Chrome as a dependency
rspec_system:
  <<: *backend
  depends_on:
    <<: *backend_depends_on
    chrome:
      condition: service_started

# dip.yml
rspec:
  description: Run Rails unit tests
  service: rails
  environment:
    RAILS_ENV: test
  command: bundle exec rspec --exclude-pattern 'system/**/*_spec.rb'
  subcommands:
    system:
      description: Run Rails system tests
      service: rspec_system
      command: bundle exec rspec --pattern 'system/**/*_spec.rb'
Now, to run system tests I use the following command:
dip rspec systemAnd that’s it!
As a final note, let me show you how debugging with the Debug Viewer from Browserless.io Docker image looks:
Debugging system tests running in Docker
Move on to the next part of our Rails system testing series, System of a test II: Robust Rails browser testing with SitePrism. We’ll show how we decouple our Capybara code from the page markup to make end-to-end testing less error-prone.


If you want to set up rock-solid development practices in your engineering team—regardless of the technical stack—feel free to drop us a line. Helping companies to improve their engineering culture is one of the favorite things we do!
Changelog
1.1.0 (2022-03-22)
-
Upgraded to Rails 7.
-
Added an Apple M1 compatible Chrome image to Docker config.
1.0.3 (2021-04-08)
-
Removed
selenium-webdriver(Rails 6.1 has been released a while ago). -
Added a link to evil_systems.
1.0.2 (2020-09-02)
- Added a link to the PR with improved precompilation logic.
1.0.1 (2020-07-30)
- Added volumes configuration to
chromeservice in a dockerized setup.