Tutorialkit.rb: interactive Ruby tutorials entirely in the browser


Topics

TutorialKit.rb, a toolkit for building interactive Ruby and Rails tutorials that run entirely in the browser, has reached the release candidate stage and is ready for general use. In this post, we want to quickly walk through the final DX for building tutorials, share some real-world examples, and the research behind the project.
Note: This is the final Ruby Association Grant 2025 report on the TutorialKit.rb project. For the background, motivation, and initial research, see Part 1: the ruby.wasm journey goes onward.
In our intermediate report, we explained how our prior experience working with ruby.wasm and related technologies (such as WebContainers and PGLite) shaped the idea of TutorialKit.rb, a framework that brings zero-install interactive tutorials to the Ruby ecosystem.
We demonstrated a working prototype, shared research on dependency management strategies and HTTP support, and outlined the future work ahead.
That future work is now complete. Here’s what we’ve accomplished in recent months:
- A full-featured installer that scaffolds a ready-to-customize tutorial project with a demo Rails app, starter lessons, and deployment pipelines.
- Agent-friendly development setup with Claude Code skills that help coding agents understand the structure and constraints of TutorialKit.rb.
- Deployment workflows for Netlify and Fly.io (with more to come)—with all the ruby.wasm compilation complexity handled for you.
- HTTP support for tutorials heavily depending on external APIs.
- A complete real-world tutorial for Action Policy showcasing all the capabilities (and limitations) of TutorialKit.rb.
Here are the topics we want to focus on in this post:
- From zero to a ready-to-create tutorial development environment
- Showcase: Action Policy tutorial
- Bringing HTTP support
- Packing dependencies into ruby.wasm
- Future work
From zero to a ready-to-create tutorial development environment
The primary goal of TutorialKit.rb is to lower the bar for both tutorial authors and learners and make creating and taking Ruby-related courses online a genuinely pleasant experience.
We want anyone with a Ruby gem to be able to create a polished, interactive tutorial without fighting the toolchain (and there are plenty of things to fight with, trust us).
Technically speaking, our ultimate goal is giving authors a few commands to set things up and let them focus solely on writing Markdown and example Ruby files for their tutorials.
Did we meet this goal? Time will tell. For now, let’s go through the steps required to get from zero to a ready-to-create development setup.
npx create-tutorialkit-rb my-tutorial
The journey starts with a single command that scaffolds a new tutorial project:
npx create-tutorialkit-rb my-tutorialCompared to the early pre-release versions of TutorialKit.rb which was based on our Rails Tutorial project, the scaffold has changed a lot.
First of all, we’ve upgraded the template Rails application to better reflect typical tutorial needs. Here’s what’s included:
-
Pure Rails 8. No frontend framework or JavaScript bundler, no Turbo, etc. It’s just Ruby on Rails with server-rendered HTML/ERB views. This keeps the tutorial simple and focused on what matters: Ruby.
-
Built-in authentication. The app ships with a Rails-default authentication system. You get a couple of users preconfigured, as well as the single-click authentication flow (you don’t want tutorial users to type emails and passwords all the time). There’s also a pre-authentication feature that allows you to define an already-authenticated user for the lesson simply by dropping a
tmp/authenticated-user.txtwith the user email into the lesson’s files. -
A clean, customizable design system. The app includes a BEM-based CSS design system built with custom CSS properties. Buttons, cards, forms, badges, alerts, tables—all styled consistently and easy to override. No Tailwind or CSS framework here. Instead, plain CSS that you can read and modify.
The generated project now also includes two lessons suitable for most tutorials, giving authors a good starting point:
- A welcome lesson that introduces the tutorial and how to use it.
- A “meet the demo app” lesson that encourages learners to play with the base version of the application, try running a server or running tests, and so on.
After a project is generated, you’re just two steps away from running the tutorial in the browser:
# Builds a ruby.wasm with all Ruby gems packed
npm run build:wasm # or npm run pack:wasm for a faster alternative
# Starts the Astro dev server
npm run dev
We explain the difference between the two build commands in the packing dependencies section.
With that, you’re ready to work on your tutorial’s contents! In 2026, there’s a good chance you’ll be collaborating with an AI coding agent. We’ve got you covered.
Agent-friendly development
While polishing the installer and experimenting with building tutorials ourselves, we made an observation: in today’s world, it’s increasingly likely that engineers will turn to coding agents for help scaffolding and writing tutorial content.
And coding agents, just like human authors, need to understand the rules.
TutorialKit.rb tutorials have specific constraints that aren’t obvious.
For example, we have to deal with WebAssembly limitations: (almost) no networking, no threads, no process spawning.
Working with TutorialKit’s content structure also requires some guidance: a three-layer template inheritance model, frontmatter configuration rules, and file organization patterns.
An agent that doesn’t know about all of these will tend to produce content that looks right but doesn’t work right.
So, we developed a set of Claude Code skills that ship with every generated tutorial project. Six skills, each covering a specific aspect of crafting tutorials:
tutorial-quickstart—an end-to-end tutorial setup: scaffolding, gem addition workflow, WASM build steps, branding customization, deployment configuration.tutorial-content-structure—content hierarchy and markdown features: directory naming conventions, metadata files, callout blocks, code imports, expressive code attributes.tutorial-lesson-config—the frontmatter configuration reference: inheritance cascade, which fields merge vs. replace, defaults, constraints, and invalid combinations.rails-lesson-recipes—blueprints for five common lesson types: terminal-only, code-editing, database, full-app, and console/IRB lessons.rails-file-management—file organization and the three-layer merge model (template →_files→_solution), path formulas, protected infrastructure files.rails-wasm-author-constraints—the WASM compatibility matrix: hard limitations, gem compatibility tiers, PGLite behavior, boot timing, filesystem boundaries.
With these skills loaded, an agent can scaffold lessons, add new chapters, customize the demo app, and avoid the pitfalls of WASM-based development.
Here are a few example prompts:
- “Customize the look and feel of the tutorial and the demo app to match my project styles"
- "Upgrade the baseline demo application to include posts and comments—represent a blogging platform"
- "Create a new lesson that teaches users how to write model validations”
Claude Code is the first-class citizen here, but the skill format it introduced—structured Markdown with frontmatter—has been adopted by other coding agents as well. Porting to another assistant should be straightforward.
Going live
Building a tutorial is one thing, deploying it is another. Especially when your build pipeline involves compiling a custom ruby.wasm binary.
The generator ships with predefined CI workflows for the most popular deployment targets (you pick one during the installation): Netlify and Fly.io, with more to come. Each workflow handles the full pipeline:
- Set up Rust toolchain (required for
wasi-vfs) - Install
wasi-vfsfor packing the virtual filesystem into the Wasm binary - Set up Ruby and bundle gems for cross-compilation
- Build
ruby.wasmwith all dependencies (with aggressive caching of build artefacts) - Build the Astro site
- Deploy with the correct headers
That last point (headers) is easy to miss, but critical.
WebContainers require Cross-Origin-Embedder-Policy: require-corp and Cross-Origin-Opener-Policy: same-origin headers on every response. Without these, the browser won’t allow the SharedArrayBuffer access that WebContainers need to function. Each deployment workflow includes the appropriate header configuration.
Here’s a simplified example from the Action Policy tutorial’s deployment workflow:
# .github/workflows/tutorial-deploy.yml
jobs:
  build:
    runs-on: ubuntu-latest
    steps:
      - uses: actions/checkout@v6
      - uses: actions-rust-lang/setup-rust-toolchain@v1
        with:
          toolchain: 1.74.0
      - name: Install wasi-vfs
        run: |
          curl -LO "https://github.com/kateinoigakukun/wasi-vfs/releases/download/v0.5.4/wasi-vfs-cli-x86_64-unknown-linux-gnu.zip"
          unzip wasi-vfs-cli-x86_64-unknown-linux-gnu.zip
          mv wasi-vfs /usr/local/bin/wasi-vfs
      - uses: ruby/setup-ruby@v1
        with:
          ruby-version: 3.3
          bundler-cache: true
      - uses: actions/setup-node@v4
        with:
          node-version: 20
      - name: Cache ruby.wasm artefacts
        uses: actions/cache@v4
        with:
          path: |
            tutorial/ruby-wasm/build
            tutorial/ruby-wasm/rubies
          key: $-ruby-wasm
      - name: Build ruby.wasm
        run: npm run build:wasm
      - name: Build tutorial
        run: npm install && npm run build
      - name: Upload dist
        uses: actions/upload-artifact@v4
        with:
          name: tutorial-dist
          path: './tutorial/dist'
  deploy:
    needs: build
    runs-on: ubuntu-latest
    steps:
      - uses: actions/checkout@v6
      - uses: actions/download-artifact@v4
        with:
          name: tutorial-dist
          path: tutorial/dist

      # ... deploy dist/ contents to Netlify / Vercel / whatever
The key takeaway: tutorial authors don’t need to understand any of this. The generator creates the workflow, the CI handles the compilation and caching, and the tutorial just goes live.
More tech goodies
The release also includes some advanced and low-level features worth mentioning.
Blocking prepare commands
There is a new directive in the lesson’s (or part’s) configuration—terminalBlockingPrepareCommandsCount. It allows you to specify the number of prepare commands (such as npm install, rails db:prepare) to wait before allowing users to interact with the terminal. We need it to prevent the situations when users try to interact with the app that is not fully loaded: cold starts could be slow since we need to download Wasm binaries and provision the database (if needed).
Headless smoke tests
The npm run smoke command runs the WASM binary through node:wasi on the host machine—not inside WebContainer—exercising the same boot sequence: VM initialization, Rails bootstrap, database provisioning, and the Express-to-Rack HTTP bridge. It catches native extension incompatibilities and boot regressions without requiring a browser. The trade-off is coverage: node:wasi and WebContainer are different WASI hosts with different syscall behaviors, so some edge cases only surface inside the browser.
Embed mode
Tutorials can now be embedded into external pages—blog posts, documentation sites, READMEs—as iframes. Appending ?embed=true to any lesson URL hides the navigation sidebar, giving you a self-contained interactive widget. Pair it with ?activate=Try+It to defer WebContainer boot until the reader clicks—no resources wasted on a tutorial someone scrolled past. You’ll see this in action later in this post when we embed a live RubyLLM lesson.
Showcase: Action Policy tutorial
The Action Policy tutorial is now complete and publicly available at tutorial.actionpolicy.evilmartians.io. Check out an example lesson from it:
A lesson on Failure Reasons feature of Action Policy
The tutorial demonstrates many features available at TutorialKit.rb: various combinations of templates and per-lesson files; solutions to challenges (the “Solve” button in the editor); different interactivity techniques: running tests, using a web server.
What’s not visible in the tutorial (or its source code) is how the actual content was produced. Let’s give a quick overview of the creative process.
First, we drafted the tutorial plan: it’s a markdown file with the list of key takeaways, the library features we want to highlight and the curriculum.
We used Claude Code with the access to the Action Policy source code and documentation for assistance. One particular task where having an LLM at hand was especially useful was brainstorming the domain field, or the legend, for the tutorial.
Among all the suggestions, we picked the “help desk application” idea.
The next step was to customize the scaffolded tutorial template and its UI. Thanks to the Claude skills included in the generated tutorial, customization was just a matter of a single prompt.
Then, for each lesson from the plan, we repeated the same flow:
- Ask Claude to plan the lesson contents (again, skills help AI produce good-quality results right away)
- Adjust the plan if needed and let the LLM generate the contents
- Run the tutorial (
npm run dev) and thoroughly check the lesson contents, tasks and solutions—every lesson in the Action Policy tutorial was reviewed and tuned by a human (you know your library or framework better than anyone else, including AIs)
Eight iterations in, and the tutorial was ready!
The source code is available at github.com/palkan/action_policy. Check out this PR to see how the tutorial (and TutorialKit.rb) has been shaped.
That concludes the demo. Now let’s get into the more technical stuff we tackled as part of the Ruby Association grant.
Bringing HTTP support
The problem: Ruby in WASM has no network access
WASI (WebAssembly System Interface) is the standard that gives WebAssembly modules access to operating system resources. Preview 1—the current stable version—gives you filesystem access, clocks, and random numbers, but no sockets. No sockets means no TCP, and no TCP means Ruby’s Net::HTTP hits a dead end the moment it tries to open a TCPSocket.
This isn’t a Ruby-specific limitation. It’s the WASI standard itself. WASI Preview 2 would fix this with native wasi:sockets/tcp support, but we can’t use it today—multiple layers of our stack would need to catch up first. We break down exactly what’s blocking P2 adoption in the Future work section.
So, we needed a different approach—and it turned out the answer was already sitting in our architecture! Let’s recall the three-layer setup we covered in Part 1: Ruby WASM runs inside WebContainer’s Node.js, which itself runs in the browser. Ruby can’t open sockets—but the Node.js layer can call fetch(). All we needed was a way to route Ruby’s HTTP requests up through that layer.
The JS bridge approach
RunRuby.dev project, which we referenced in Part 1, showed us the way. It solves the same problem for a browser-based Ruby playground by invoking JavaScript fetch calls from Ruby via JS.eval. We adapted that pattern into something cleaner for a framework context: a dedicated wasmHttpBridge global object.
On the JavaScript side, we expose a bridge object at boot time:
// lib/http-bridge.js (simplified)
export function initHttpBridge() {
  global.wasmHttpBridge = {
    async fetch(url, method, headersJson, body) {
      const headers = JSON.parse(headersJson);
      const options = { method, headers };
      if (body && method !== 'GET' && method !== 'HEAD') options.body = body;
      options.signal = AbortSignal.timeout(30000);
      const response = await fetch(url, options);
      // Binary responses are base64-encoded for transport
      const contentType = response.headers.get('content-type') || '';
      const isBinary = /octet-stream|image\/|audio\/|video\//.test(contentType);
      // ... returns JSON-serialized { ok, status, headers, body, binary }
    }
  };
}
On the Ruby side, we patch Net::HTTP to route all outbound requests through that bridge instead of attempting real sockets:
# lib/patches/http_bridge.rb (simplified)
module WasmHTTP
  class Connection
    class << self
      attr_accessor :proxy_url, :proxy_hosts
    end

    def request(uri, method: "GET", headers: {}, body: nil)
      target = resolve_proxy(uri.to_s)
      result_js = JS.global[:wasmHttpBridge].fetch(
        target, method.to_s, headers.to_json, body.to_s
      ).await
      result = JSON.parse(result_js.to_s)
      raise SocketError, "HTTP request failed: #{result['error']}" unless result["ok"]
      build_response(result)
    end
  end
end

Net::HTTP.prepend(Module.new do
  def request(req, body = nil, &block)
    scheme = use_ssl? ? "https" : "http"
    uri = "#{scheme}://#{address}:#{port}#{req.path}"
    headers = {}
    req.each_header { |k, v| headers[k] = v }
    response = WasmHTTP::Connection.new.request(
      uri, method: req.method, headers: headers, body: req.body
    )
    yield response if block
    response
  end
end)
The full call chain is: Ruby Net::HTTP → monkey-patch → WasmHTTP::Connection → JS.global[:wasmHttpBridge].fetch() → WebContainer Node.js fetch() → browser fetch() → external API. Five hops, but it works.
Many Ruby HTTP-dependent gems use Faraday as their HTTP adapter layer. For those, we also ship a Faraday adapter that auto-registers when Faraday is present:
# lib/patches/http_bridge.rb (continued)
if defined?(Faraday)
  class Faraday::Adapter::WasmHTTP < Faraday::Adapter
    def call(env)
      super
      response = ::WasmHTTP::Connection.new.request(
        env.url.to_s,
        method: env.method.to_s.upcase,
        headers: env.request_headers.to_h,
        body: env.body
      )
      save_response(env, response.code.to_i, response.body) do |resp_headers|
        response.each_header { |k, v| resp_headers[k] = v }
      end
    end
  end
  Faraday::Adapter.register_middleware(wasm_http: Faraday::Adapter::WasmHTTP)
  Faraday.default_adapter = :wasm_http
end
This means any gem that uses Faraday under the hood works without modification. You add the gem, you get HTTP. Well, almost—one more wall to hit first.
The CORS problem and proxy solution
Browser fetch() is subject to CORS restrictions. And because our Node.js layer is actually a Web Worker running in the browser (not a real server process), it inherits those same restrictions. Every external API call will either need Access-Control-Allow-Origin headers from the server… or it gets blocked.
The uncomfortable reality: most server-to-server APIs don’t set permissive CORS headers, and those are exactly the APIs you’d want to teach in a tutorial.
Our solution is a self-deployable Cloudflare Worker template that acts as a CORS proxy. Tutorial authors deploy their own instance and configure it once:
# config/initializers/wasm_http.rb
WasmHTTP::Connection.proxy_url = "https://your-proxy.workers.dev"
WasmHTTP::Connection.proxy_hosts = ["api.openai.com", "api.anthropic.com"]
The proxy_hosts list controls which domains route through the proxy—everything else hits the network directly. This keeps authors specific about what they’re proxying, which matters for security: a proxy without origin validation is an open relay. The template includes Origin header allowlisting out of the box.
Limitations
We won’t oversell this. The JS bridge works, but it’s not transparent networking:
- No streaming. Responses are collected in full on the JavaScript side, JSON-serialized, and handed to Ruby as a complete string. Streaming APIs (like OpenAI’s server-sent events) must be called in non-streaming mode.
- Binary responses are base64-encoded in transit. The bridge detects binary content types and base64-encodes the body before passing it through the JSON envelope. It works, but adds overhead for large binaries.
- All requests are synchronous from Ruby’s perspective.
.awaiton the JS promise blocks the Ruby fiber until the response arrives. Fine for tutorials, not for high-throughput production code. - CORS proxy is required for most real APIs. Without it, you can only reach endpoints that explicitly allow browser origins.
Proof of concept: RubyLLM tutorial
We built a single-lesson proof-of-concept for RubyLLM—a Ruby library for interacting with LLMs. Learners write Ruby code to call a language model API directly in the browser, no local installation required. The tutorial exercises every layer we described: the Net::HTTP monkey-patch, the Faraday adapter (RubyLLM uses Faraday internally), and the CORS proxy for reaching the API endpoint. RubyLLM doesn’t know anything about WASM or JS bridges. It calls Faraday the way it always has. The infrastructure handles the rest.
Remember the embed mode we mentioned earlier? Here it is in action (please note Safari is not supported just yet):
Insert your OpenAI API key (it’s sent through the tutorial’s CORS proxy to reach the API—we recommend using a key with spending limits) and experience a whole new way of talking to an LLM—from Ruby on Rails app running entirely in the browser. Bet you didn’t see that coming.
Now, onto the other research track from the previous report: making the ruby.wasm build pipeline faster.
Packing dependencies into ruby.wasm
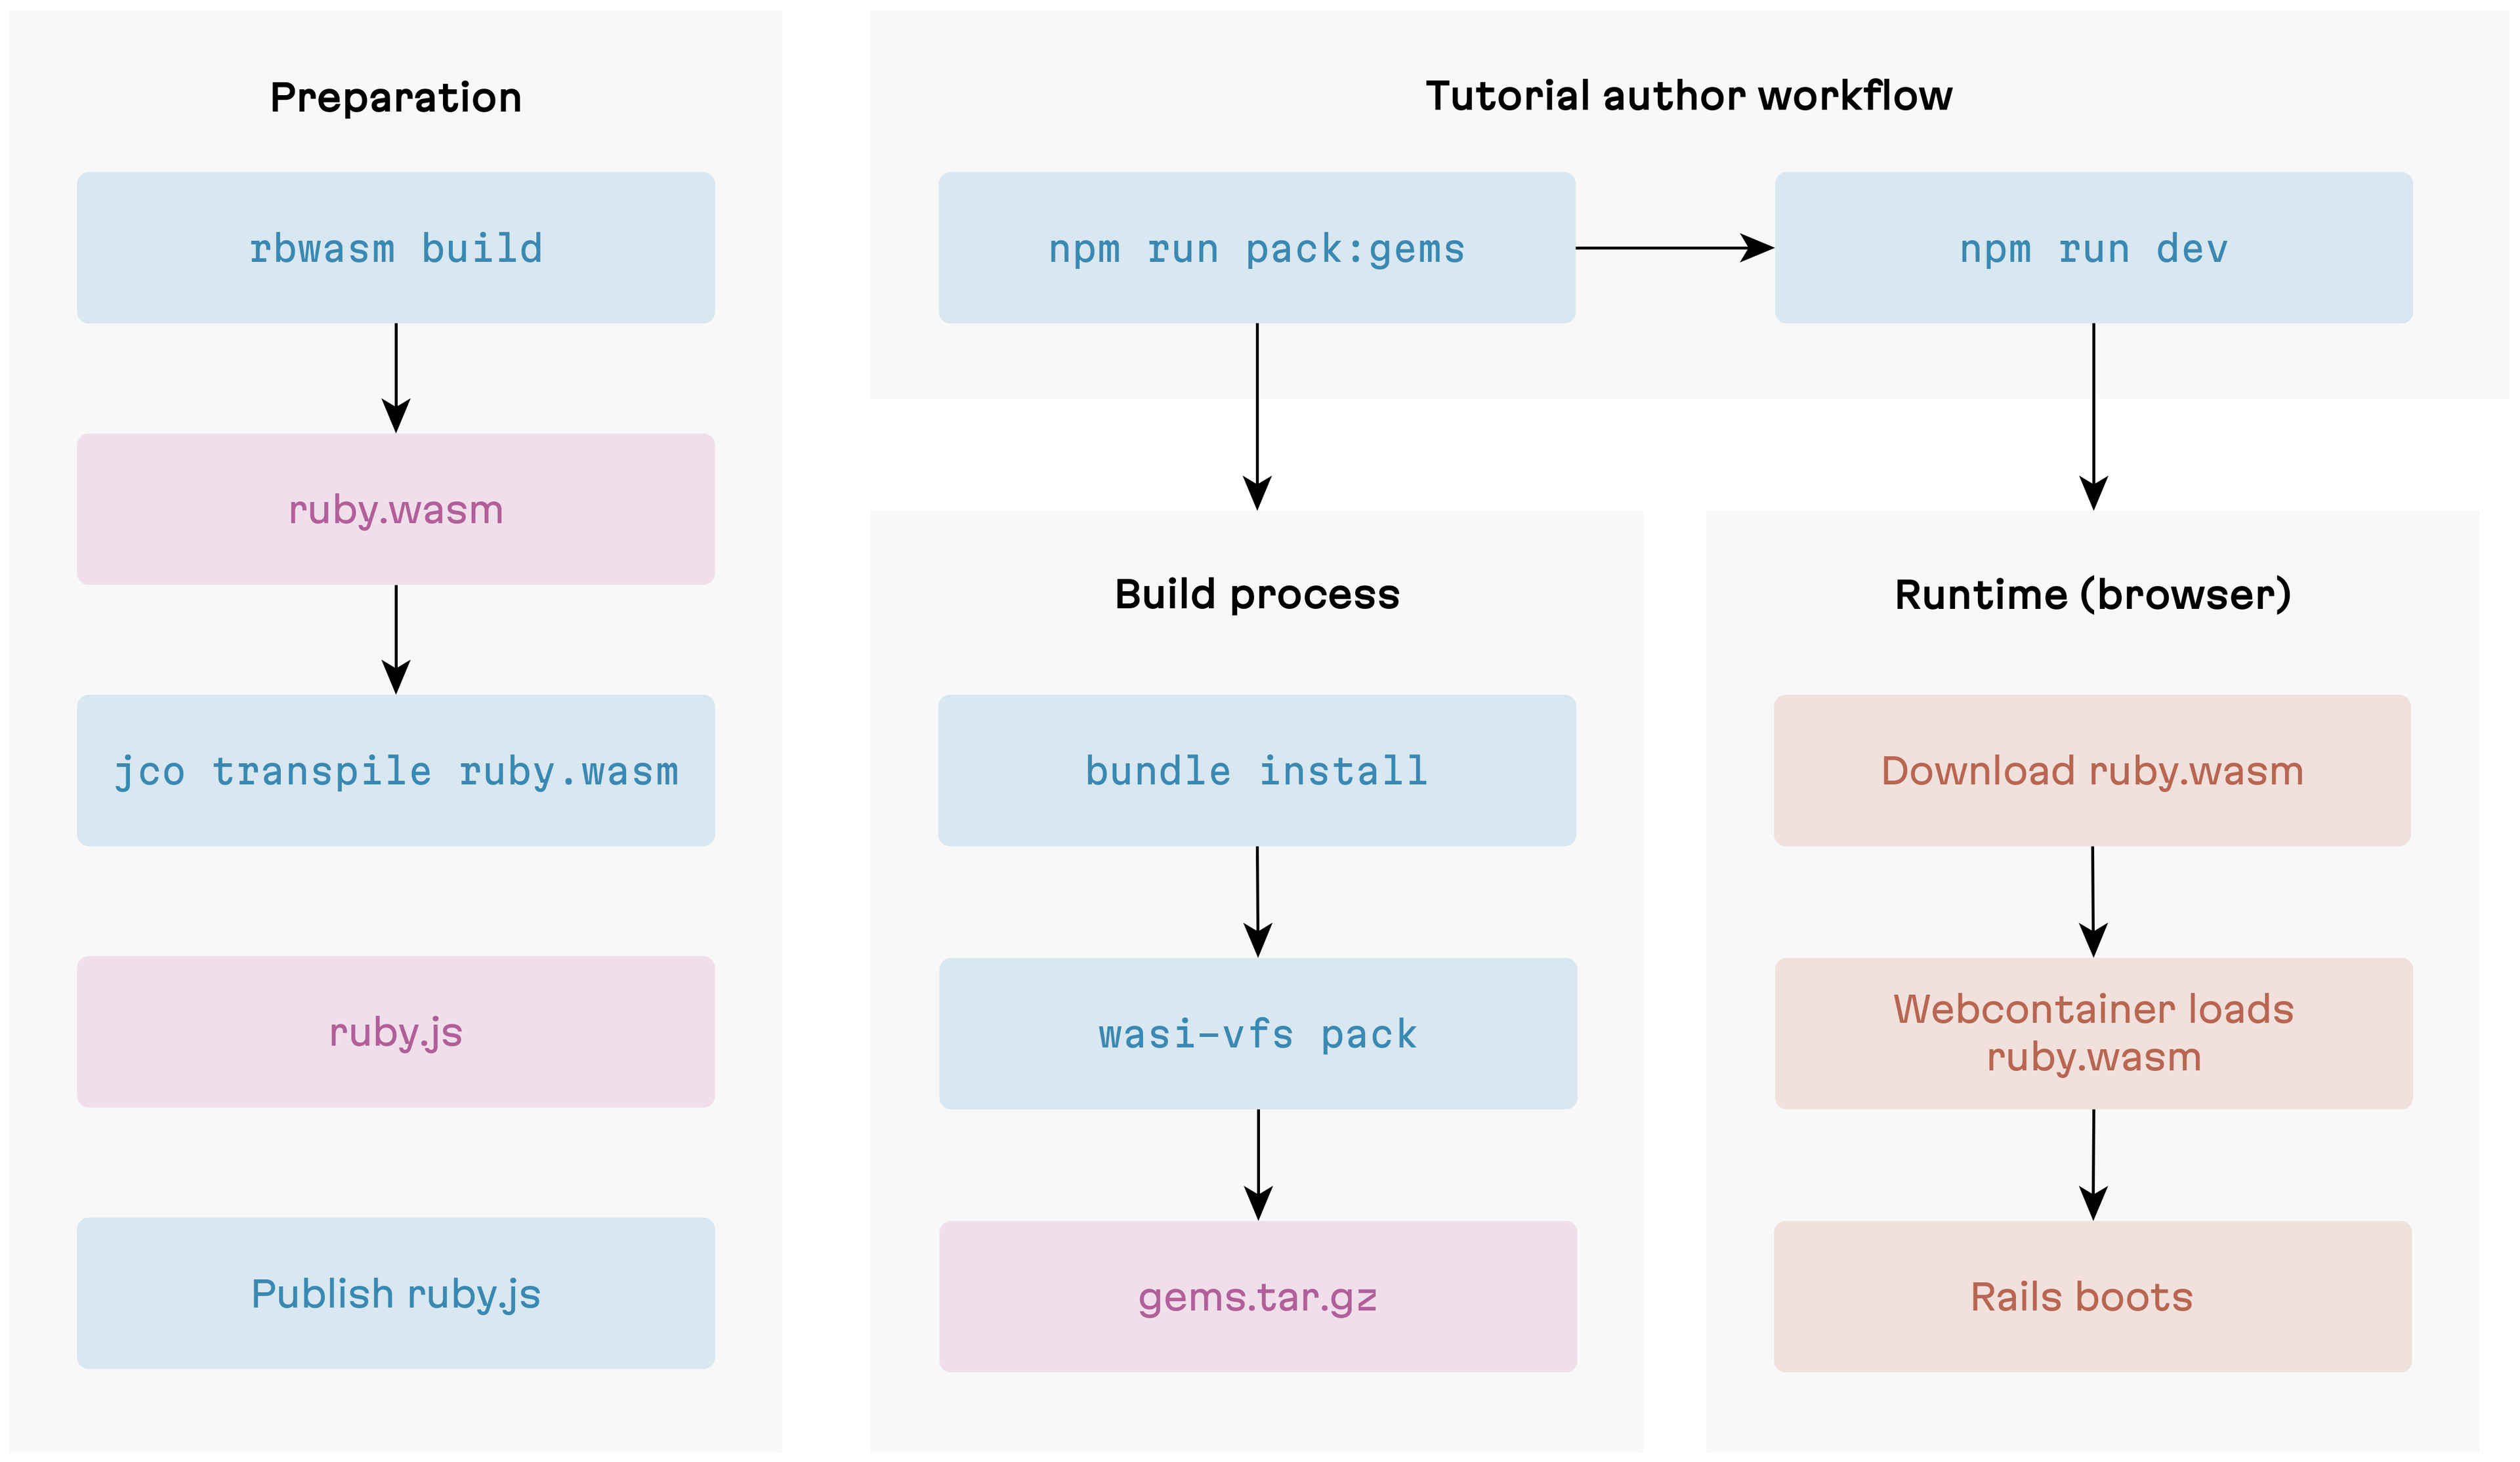
The tarball approach: death by a thousand syscalls
In Part 1, we explored a “tarball” approach: build the Ruby interpreter once, cross-compile gems separately, and ship them as an archive extracted into the WebContainer filesystem at runtime. The goal was to reduce friction for tutorial authors—instead of triggering a full interpreter recompilation on every Gemfile change, you’d just repackage the gems.

This was our plan…
The rebuild story improved, but boot time regressed dramatically. We had a hunch this could happen, given how WASI filesystem access works under the hood. Benchmarks showed we’d underestimated the impact.
Why tarball boot is slow: the WASI boundary problem
In the tarball approach, gems are extracted onto WebContainer’s virtual filesystem, and a WASI preopen points the Ruby module at that directory. But a preopen doesn’t “bake” files into the module—it’s just a pre-opened file descriptor, a handle pointing to host-side storage. No file data is copied into the module’s memory. Every read crosses the boundary between the WASM module and its JavaScript host: when Ruby calls require, the compiled C code hits a WASI syscall like fd_read—which is actually an imported JavaScript function. Execution suspends inside the WASM module, jumps to JavaScript, performs the filesystem operation on WebContainer’s virtual FS, and jumps back with the result. That round trip is the boundary crossing.
Ruby makes this worse by searching its entire $LOAD_PATH for each file. With dozens of load path entries and three extensions to try (.rb, .so, .bundle), a single require can trigger hundreds of stat calls—most of which fail. Rails requires hundreds of files at boot. The syscalls add up fast.
This isn’t implementation overhead that a smarter algorithm could reduce. It’s the fundamental cost of WASI’s host-function model for filesystem access. Mastodon.wasm uses a similar tarball approach—and even with WASI Preview 2 tooling, every file access still crosses the boundary. For a production-like environment where boot happens once, the delay is tolerable. For a development workflow where authors reload constantly, it’s a dealbreaker.
So the tarball approach was shelved. To get boot times back down, we needed to eliminate the boundary crossings entirely.
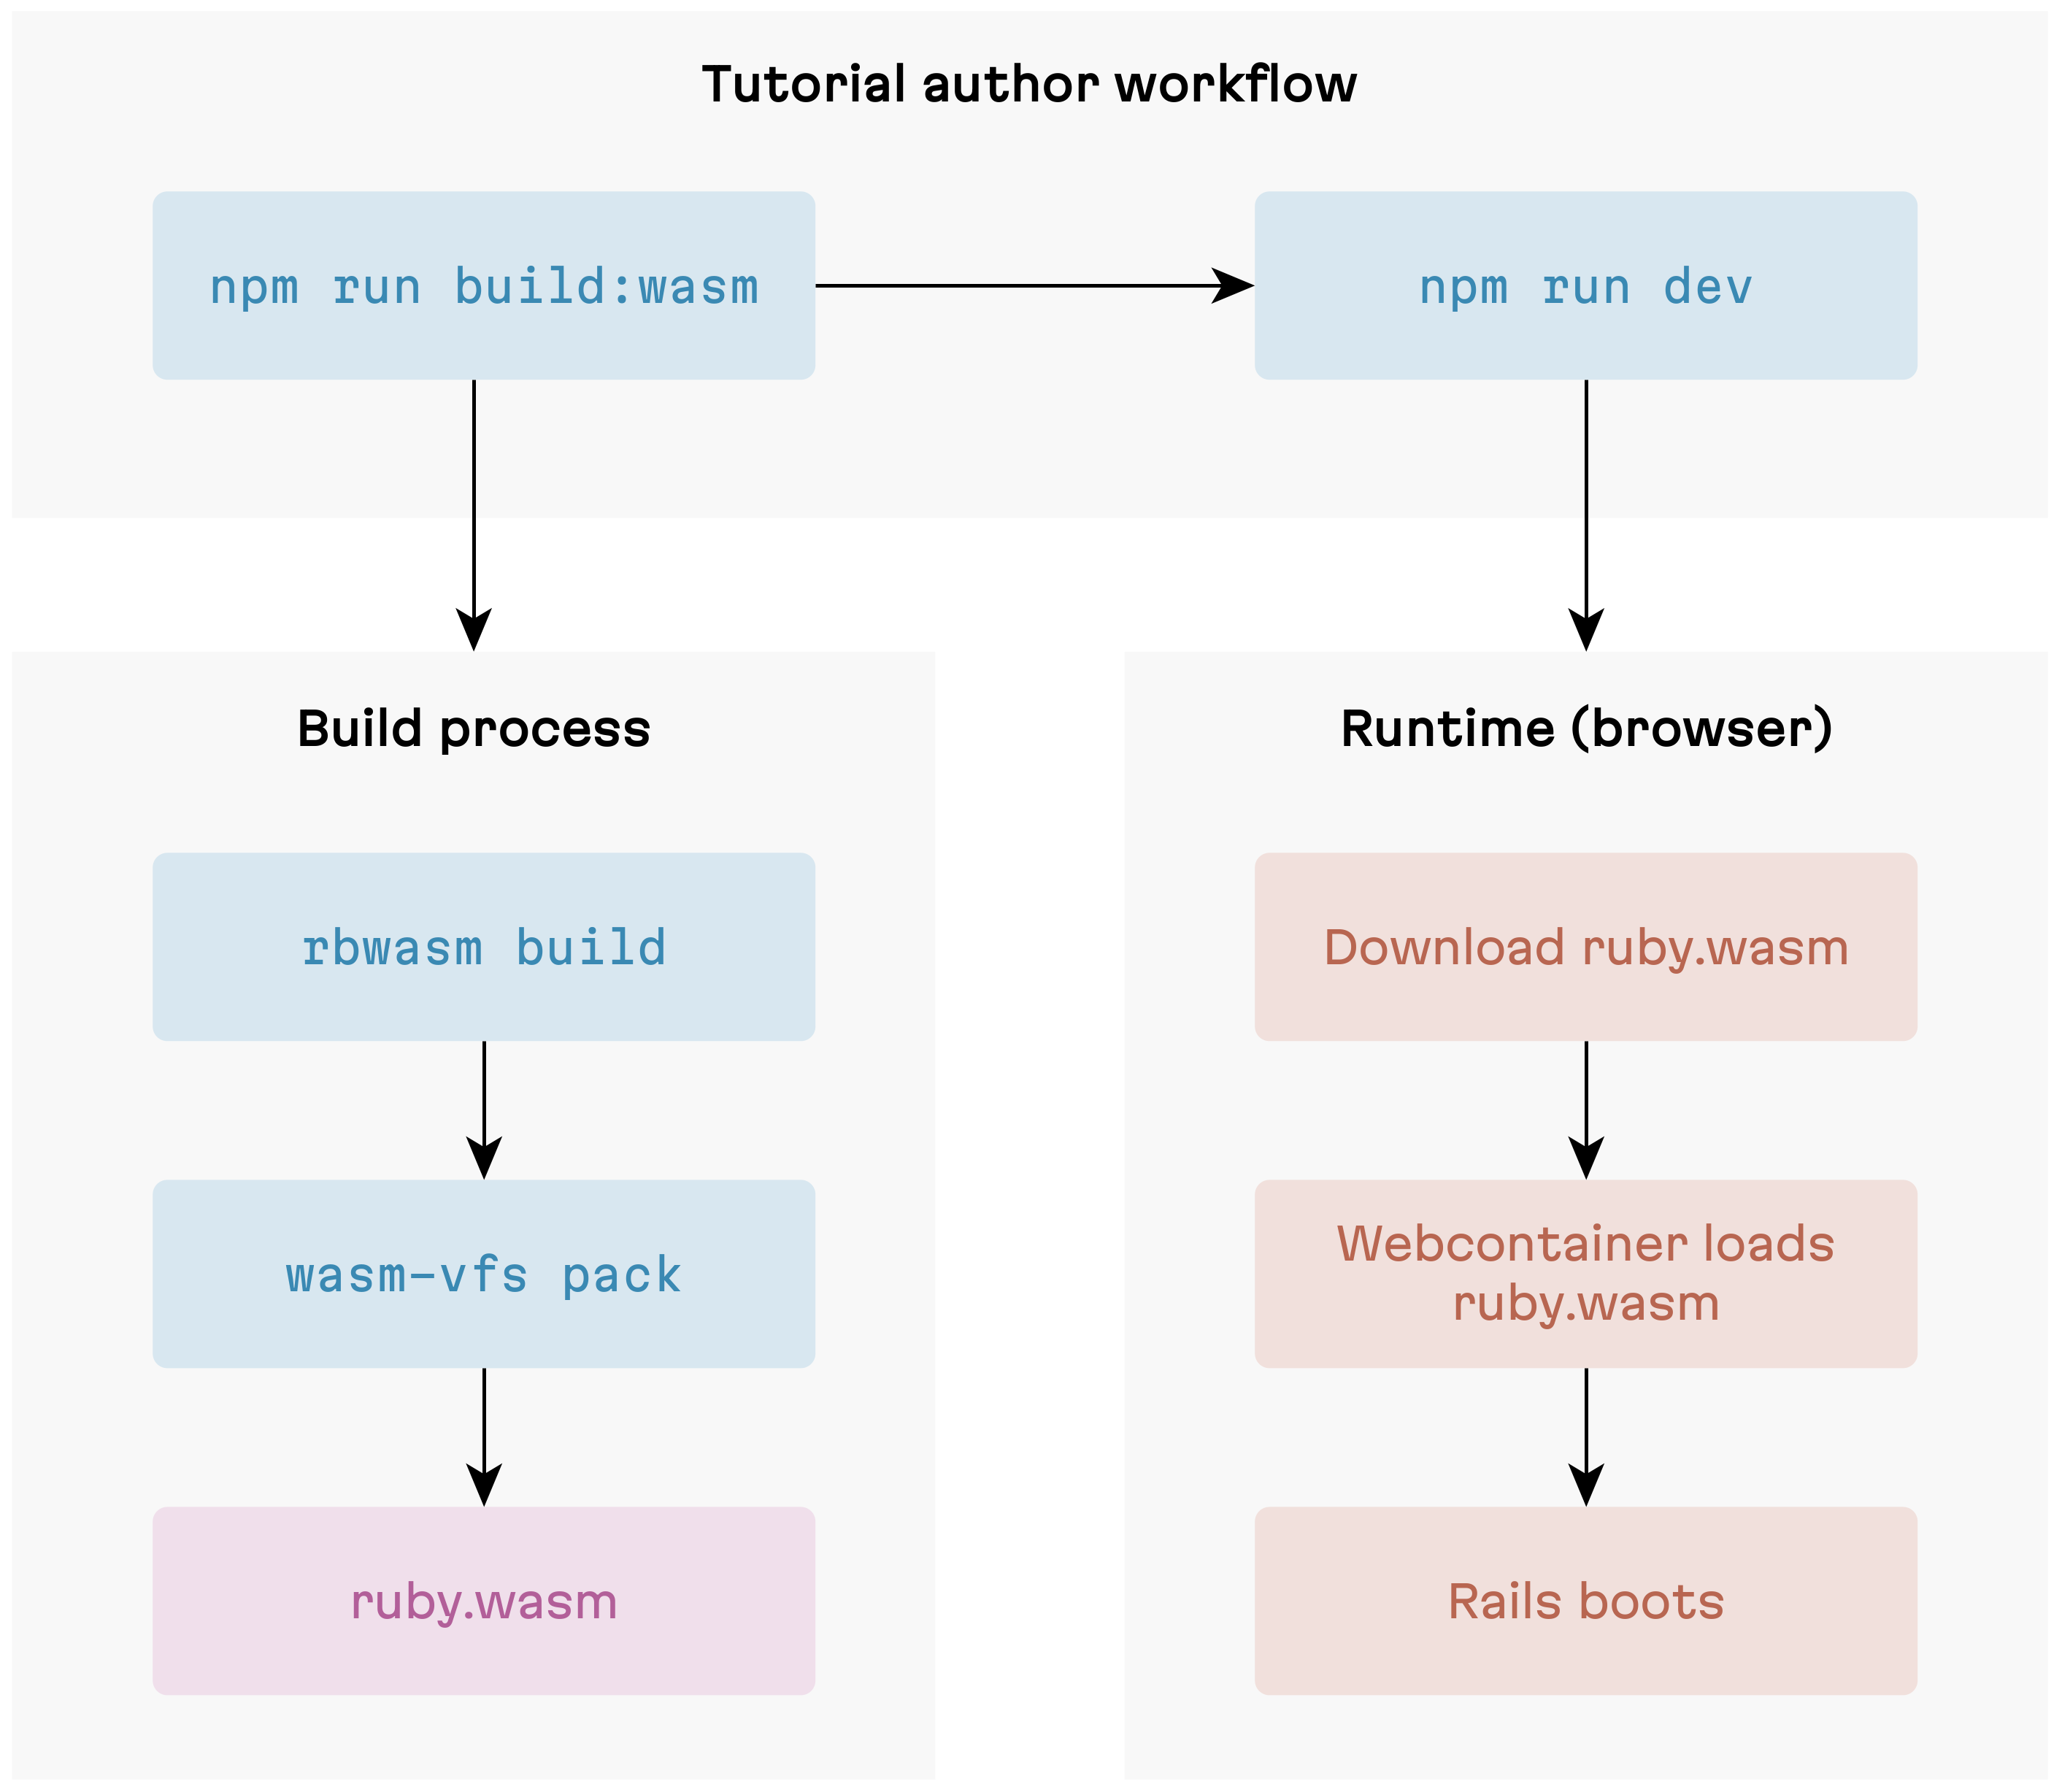
Monolithic build
Our monolithic build pipeline ensures exactly that. Everything—Ruby interpreter, stdlib, all gems—compiles into a single WASM binary via rbwasm build, then wasi-vfs pack embeds the gem files into the binary’s Data section.

Old-school monolithic approach
At runtime, wasi-vfs intercepts file-read syscalls at the linker level. When Ruby calls require "rails", the VFS runtime resolves it against in-memory data structures in WASM linear memory—never touching the WASM-JS boundary.
The trade-off is rebuild time. Any Gemfile change—even adding a single pure-Ruby gem—triggers a full rbwasm build from scratch. Minutes, not seconds. For tutorial authors iterating on their dependencies during development, this is real friction. The monolithic build remains the fallback, but it’s not where we wanted to stay.
Deferred packing: the hybrid strategy
The tarball experiment wasn’t a total loss—it gave us an idea. What if we kept the fast-boot property of monolithic builds but only repackaged the parts that actually change? The insight is that not all gem changes are equal.
- C extension gems (bcrypt, websocket-driver, anything with
.cfiles) need to be statically linked into the binary at compile time. WASI has nodlopen()—there’s no dynamic linking, and a WASM module’s Code section is frozen afterWebAssembly.compile(). These gems must go throughrbwasm build. There’s no shortcut. - Pure-Ruby gems (the vast majority of the Rails ecosystem: devise, pundit, kaminari, and most of what you’d put in a tutorial) are just Ruby source files.
wasi-vfs packcan embed them into an existing base binary without touching the Code section—it only appends to the Data section.

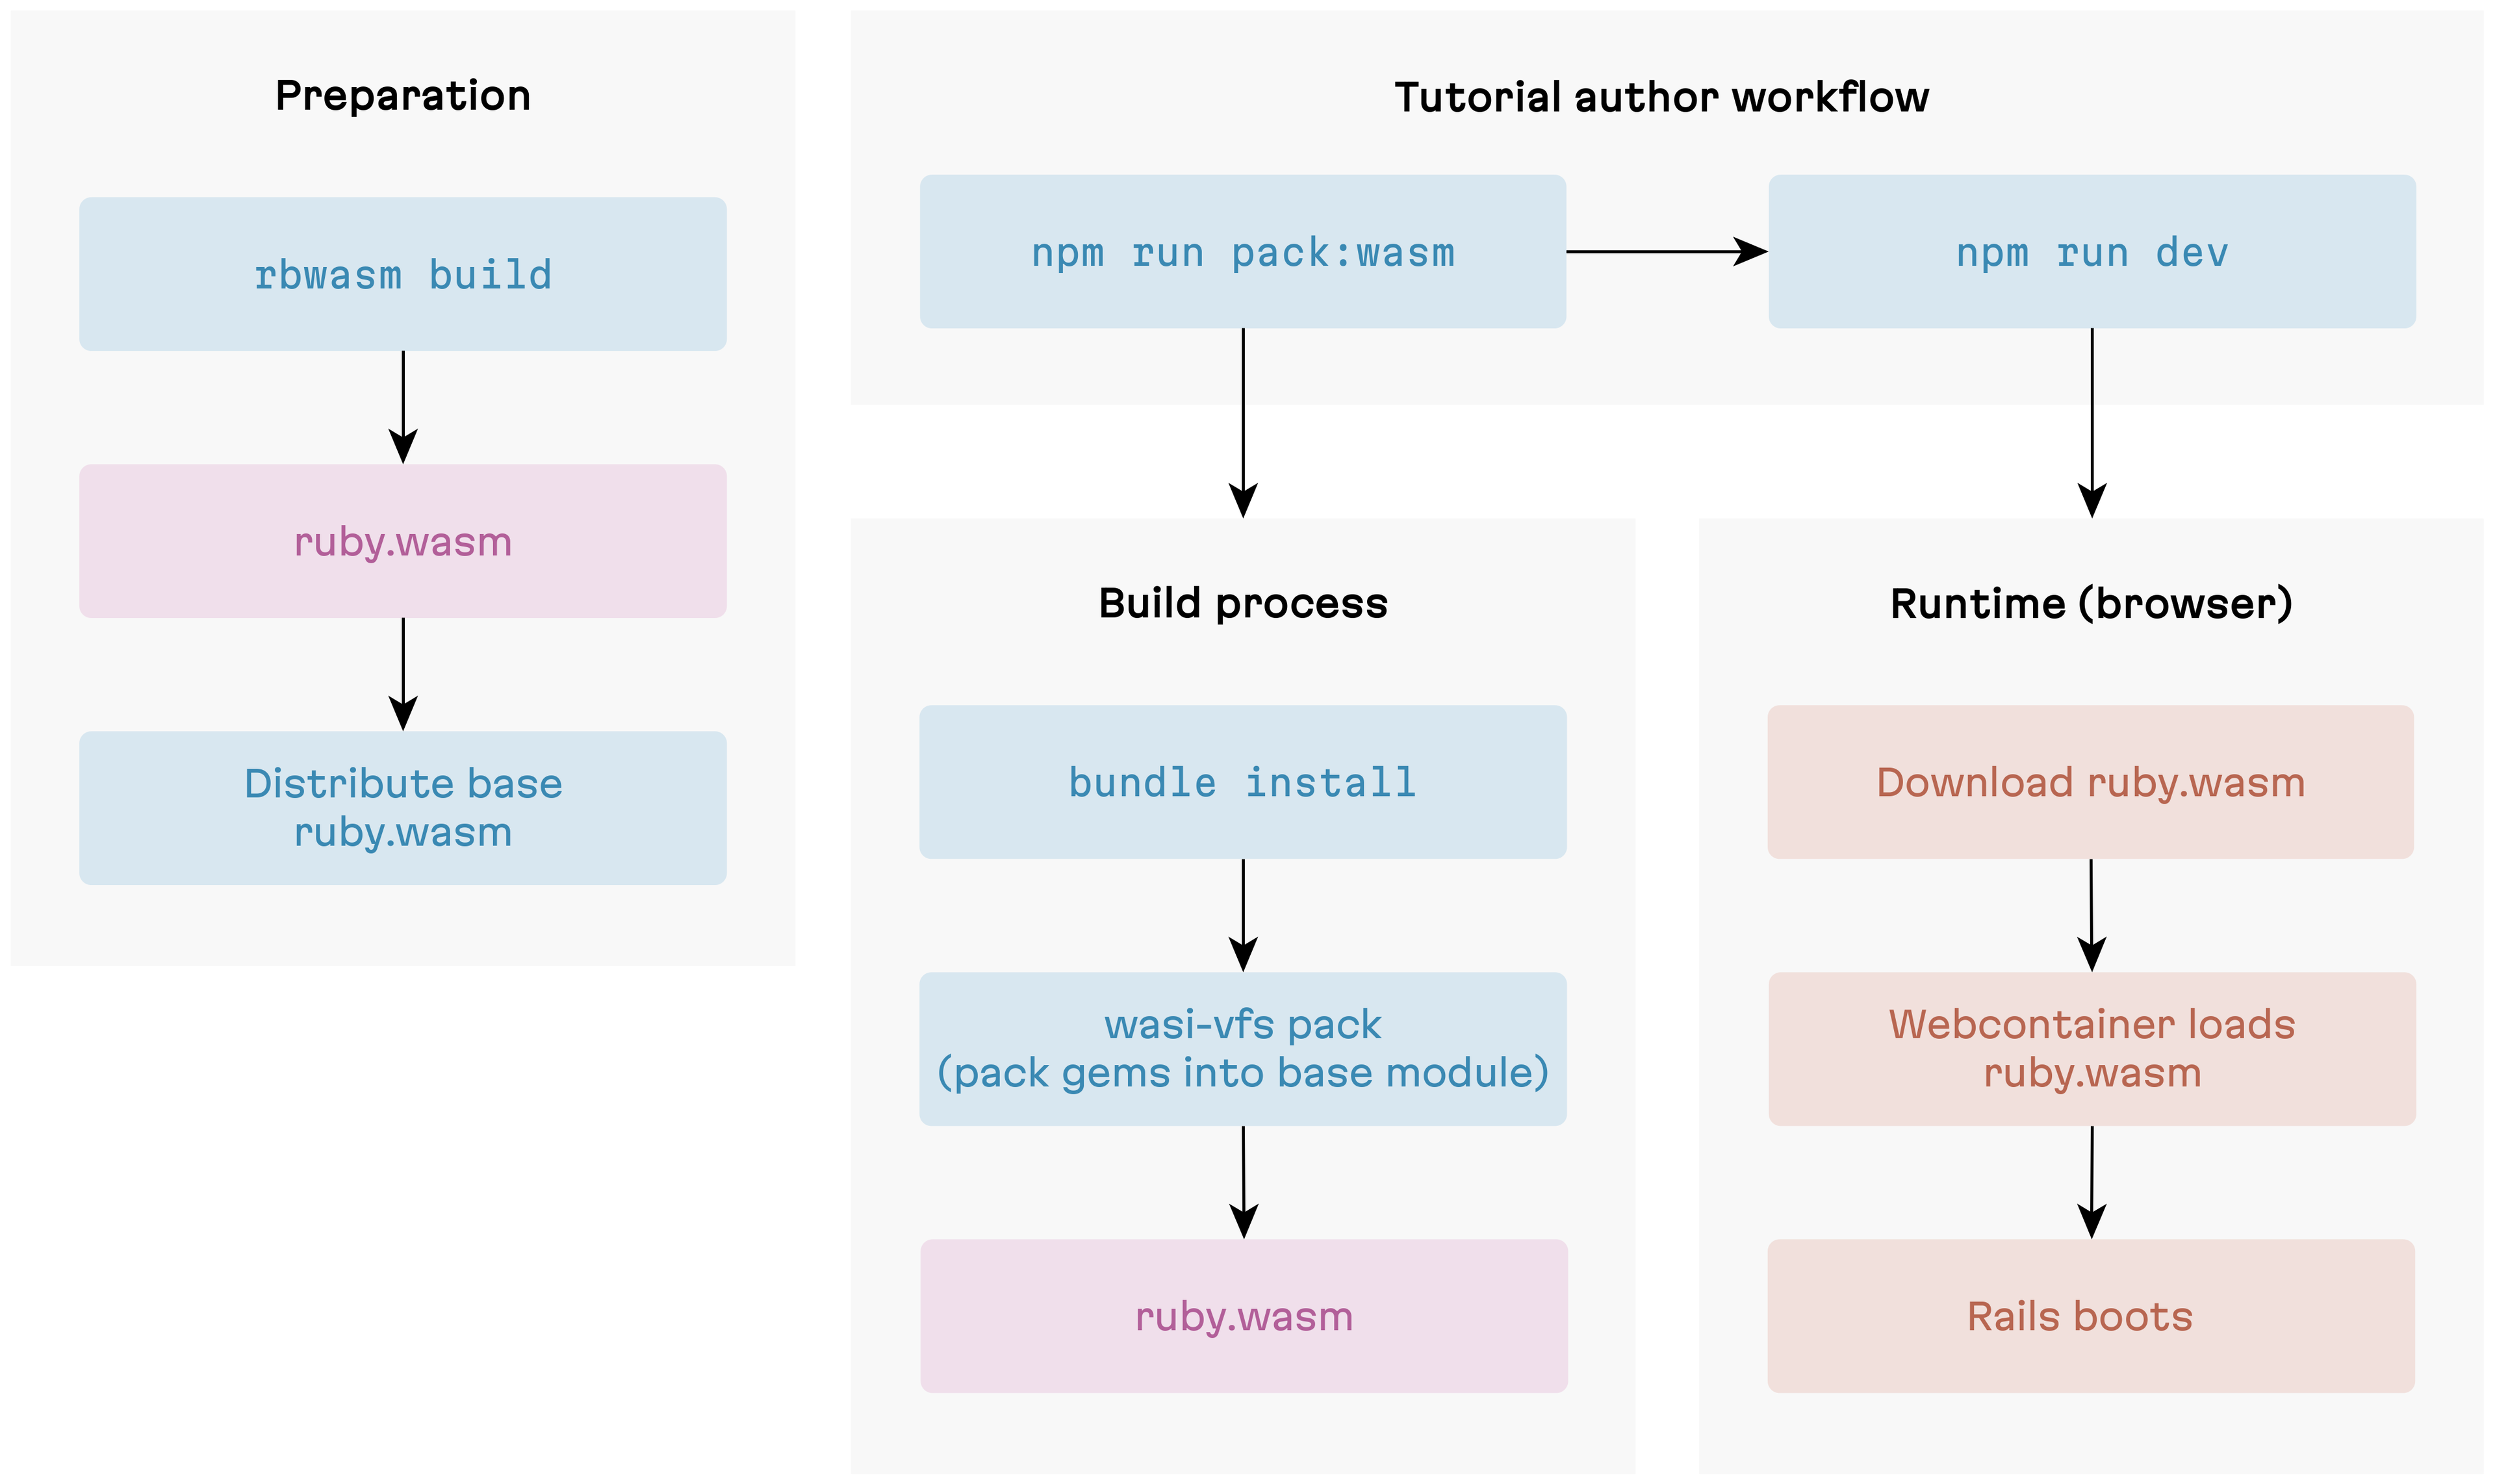
Deferred packing: the best of both worlds
This gives us a two-tier build strategy. We distribute a pre-built base binary that includes the Ruby interpreter, stdlib, and all C extension gems statically linked. Tutorial authors then use wasi-vfs pack to layer in their pure-Ruby gems on top. Building the base binary is a one-time cost. Packing gems on top runs on every Gemfile change and takes seconds.
One wrinkle we hit: the initial packed output was nearly 100MB—significantly larger than the monolithic binary. The culprit turned out to be the ruby_wasm gem: a 23 MB native extension pulled in as a transitive build dependency. Useful for building the base binary, completely useless inside WASM. We added an exclusion list for build-only gems and stripped test/spec/ext artifacts from the gem sources. Final result: ~77 MB—even a bit slimmer than the monolithic build.
| Approach | Boot time | Rebuild time | Binary size | Status |
|---|---|---|---|---|
| Monolithic | ~2-5s | 5-20 min | ~81 MB | Fallback |
| Tarball | ~10s | seconds | ~80 MB + tarball | Abandoned |
| Deferred packing | ~2-5s | seconds | ~77 MB | Current |
For tutorial authors, this translates to two commands:
npm run pack:wasm— deferred packingnpm run build:wasm— the full monolithic rebuild
We keep the monolithic pipeline around because some tutorials genuinely need C extension gems—and when they do, there’s no way to avoid a full rbwasm build. In practice though, the pool of third-party C extension gems that compile cleanly for wasm32-unknown-wasip1 is small. Most hit missing POSIX functions or threading assumptions. The common case is pure-Ruby gems, and for that case the build is now much faster.
Why not the official Ruby binary?
You might wonder why we distribute our own base binary instead of using the official @ruby/3.3-wasm-wasi package from the ruby.wasm project. The short answer: it can’t run Rails.
The official binary’s wasi-libc headers include POSIX function stubs (fchmod, chmod, realpath) that Ruby’s autoconf detects at link time and compiles code paths for. At runtime, these stubs crash with NotImplementedError deep in the C layer—before any Ruby rescue block can intervene. The crash surfaces during Rails boot when ActionPack loads Rack, which initializes StringIO (a C extension), which reaches a POSIX stub. Monkey-patching can’t help here—it’s C code all the way down.
The fix is a set of compile-time flags (ac_cv_func_fchmod=no, etc.) passed to rbwasm build. When autoconf believes these functions don’t exist, Ruby never compiles the branches that call them. The stubs are never reached because the code that would reach them isn’t in the binary. This is why every distribution strategy—monolithic, deferred packing, whatever comes next—requires a custom build.
Future work
We’ve got no shortage of ideas for where to take this next. Some items are things we control, others depend on the broader WASM ecosystem catching up. Here’s how we’re thinking about both.
Expanding template options
The current template is opinionated: Rails, PostgreSQL via PGLite, the full stack. That’s the right default for most interactive Rails tutorials. But not every Ruby library needs ActiveRecord, and not every gem needs Rails at all.
We’re planning two lighter template variants:
- Rails without a database — for gems that work with Rails but don’t touch the ORM. Cuts out PGLite initialization and the database provisioning step, shaving time off cold boot.
- Pure Ruby — for plain Ruby gems (parsers, formatters, data processors) where pulling in Rails would be noise. Smaller binary, simpler boot sequence, and no web server unless the author wants one.
WASI Preview 1, 2, and what comes next
Throughout this post we’ve worked around WASI Preview 1’s limitations. “Upgrade to WASI P2” sounds like the obvious fix, but it’s not that simple.
WASI Preview 1 (what we target today) gives you filesystem access, clocks, and random numbers—but no networking, no threads, no component model.
WASI Preview 2 adds wasi:sockets/tcp (native networking—no more JS bridge or CORS proxy) and the Component Model (composable WASM modules with typed interfaces). But we can’t use it yet—two things stand in the way:
- ruby.wasm targets P1. The
headbranch has experimental P2 support, but it’s not production-ready. - WebContainer’s WASI polyfill is P1. We’ll need to wait for the StackBlitz team to ship P2 support.
Even once those blockers clear, there’s adaptation work on our side: P2’s Component Model uses a new binary format that’s incompatible with WebAssembly.compile() and wasi-vfs pack, so our build and boot pipeline would need reworking too.
Beyond P2, the WASM threads proposal and WASI Preview 3 would bring genuine concurrency and full async I/O. We’re keeping a close eye on both.
Production-quality P2 support in ruby.wasm feels within reach. WebContainer’s timeline is less clear. What if we could take that dependency out of the equation?
Beyond WebContainers: a migration roadmap
We can—some of the hardest pieces have already been figured out. Mastodon.wasm runs full Mastodon—Rails, Active Record, background jobs—entirely in the browser without WebContainers, using a Service Worker to intercept HTTP and route requests to the Ruby VM. RunRuby.dev validates browser-native Ruby WASM execution with real Bundler. The biggest remaining challenge is the virtual filesystem—synchronizing file state between the editor, the Service Worker, and the Ruby VM using browser WASI shims like @bjorn3/browser_wasi_shim. That’s where most of the engineering effort would go.
Here’s a rough roadmap of how we currently see this playing out:
Phase 0: Abstraction layer. Define a RuntimeBackend interface wrapping every WebContainer API we use: boot, mount, writeFile, readFile, eval, createTerminal. Pure refactoring, no behavior change—but it lets us A/B test backends and makes the migration incremental.
Phase 1: Service Worker HTTP layer. Replace the Express.js bridge with a Service Worker that intercepts fetch() and routes requests to Ruby via Rack::MockRequest—the mastodon.wasm pattern.
Phase 2: Virtual filesystem and editor integration. Replace wc.fs.* with a browser-native virtual filesystem. The hard part is synchronizing state between the editor thread and the Service Worker—Ruby and the editor need to see the same files. This is probably the hardest engineering problem in the migration.
Phase 3: Terminal and command dispatch. Replace the JSH shell with a custom CommandDispatcher that routes rails, ruby, and bundle commands to vm.eval() and streams stdout/stderr to the terminal UI.
Phase 4: Remove WebContainer. Strip all @webcontainer/api dependencies and run final integration testing. At this point, TutorialKit.rb has no proprietary infrastructure dependencies.
A big challenge—but we’re ready for it.
Wrapping up
The goals we committed to in the Ruby Association grant are delivered: a complete real-world tutorial for Action Policy, a resolved gem distribution strategy, HTTP support for API-dependent tutorials, and a polished framework with a frictionless authoring workflow. The Action Policy tutorial is live and ready to use as a reference.
The rough edges are real. WASI Preview 1 is limiting. The CORS proxy adds friction for external APIs. C extension compatibility is still a lottery. But for the vast majority of Ruby tutorial content, TutorialKit.rb works today—without a server, without Docker, without asking learners to install anything.
If you maintain a Ruby gem and have been meaning to write a tutorial for it—give it a try:
npx create-tutorialkit-rb my-tutorialThe Claude Code skills will help you scaffold lessons and iterate quickly. And if you hit a wall, the GitHub repo is the right place to tell us about it.