How to make web videos way smaller in 2025 using the AV1 codec

Topics

Translations
Instantly improve the online viewing experience for your users by embracing the new AV1 video format, already supported by Chrome, Safari and Firefox. This short guide will also show how to replace your GIFs with videos using AV1 or H.264, and how to make your files twenty to forty times smaller.
The bets have long been placed: both YouTube and Netflix have named AV1 the video codec for the future and they’ve been using it for several years now.
For our part, at Evil Martians, we’ve already been using AV1 on our landing page, and in this post, we’ll share our experience with this new video format and give step-by-step instructions for optimal encoding strategies.

Irina Nazarova CEO at Evil Martians
Codecs and containers
First up, let’s zoom out and note that when dealing with static images, there’s no need think twice: opt for WebP, JPEG or PNG supported by all browsers, or experiment with a more compact Google-developed AVIF for newer browsers.
You can almost always (barring some dirty hacking tricks that tools like imgproxy can protect you against) be sure that an image file with .png extension is, indeed, a PNG.
Now, with video files, it’s a bit more tricky. File extensions (.mp4, .wmv, .webm or .mov) barely represent containers, and up to three different formats are used to make a video file happen:
- Video codecs: determine the compression strategy for your video; this is where the trade-offs are made between quality and quantity. On the web, some popular video codecs are H.264, HEVC, VP9, and now AV1.
- Audio codecs: do the same for audio. If your video doesn’t have sound, you can do without it. Otherwise, the popular choices are MP3, Opus, and AAC.
- Containers store both video (compressed by some video codec) and audio streams (compressed by some audio codec), and can also add extra details like subtitles and meta information. The popular containers are MP4, MOV, WebM.
So, when you see the .mp4 extension, the only thing you can be sure about is that the MP4 container was used to package a file. The choice of codecs depends entirely on the creator: it can be H.264/AAC, or AV1/Opus, or something else.
Meet AV1
The AV1 video codec was first released in March 2018 and it’s designed to compete with previous codec generations like HEVC/VP9 and H.264/VP8.

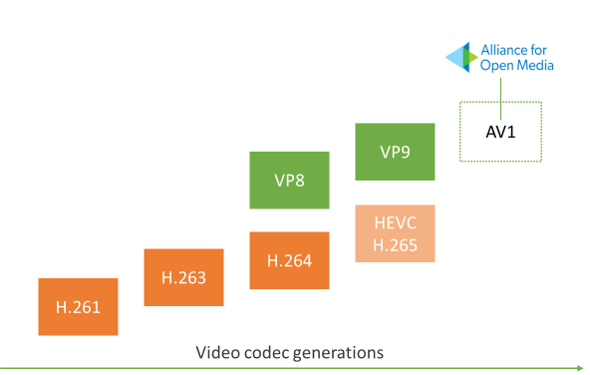
Video codecs generations diagram by Tsahi Levent-Levi (source)
With some low-level trickery involved, AV1 is capable of generating files that are up to 30-50% smaller than H.264/VP8 and up to 30% smaller than HEVC. Although it has some problems:
- The encoder is slower since it uses more complex algorithms.
- While supported by Chrome and Firefox, only the latests iPhones 15 + 16 and MacBook M3 support AV1. So you need to have at least two versions of all your videos: AV1 and H.264 for old devices.
The central promise for of AV1 is maintaining high image quality even at low bitrates, thus allowing for smaller files without apparent compression artifacts.

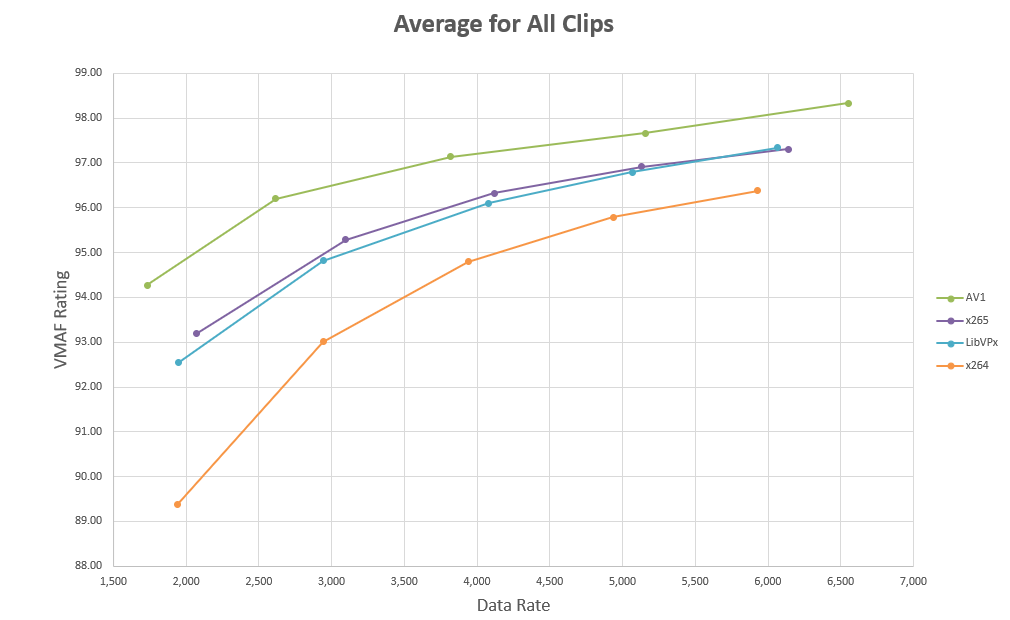
A chart by Jan Ozer plots data rate against the VMAF quality metric. AV1 is the clear winner
How to use AV1 right now
Now, let’s go through the steps to produce the quality AV1 video content for the web. First, you need to choose a container: in theory, this does not matter, but MP4 is recommended and seems to be the most popular at the moment. For the audio codec, we will use Opus with AV1 as it is an efficient and free alternative.
To ensure the best cross-browser compatibility, we’ll produce not one, but three files:
- For desktop Chrome, Safari, Firefox, Edge, and mobile Chrome, mobile Safari on iPhone 15 (74% of users as of September 2023): MP4 container with AV1 video codec and Opus audio codec.
- For Safari on old iPhone and macOS (19% of users) and other browsers: a larger file in MP4 container with H.264 for video and AAC for audio.
For conversion, I recommend using FFmpeg in the terminal. There are plenty of GUI tools for video compression, but CLI allows for steps that are easily reproducible and can be automated with a script.
Here are the steps to install it. Starting with Mac:
- Make sure you have Homebrew.
brew install ffmpeg
For Linux, install FFmpeg from your distribution.
For Windows, you can use this guide.
Once the ffmpeg executable is available in your command line, let’s generate the H.264 file (to ensure compatibility with older browsers). Since all our files will use MP4 as a container, I’ll use .av1.mp4 and .h264.mp4 file extensions. Here’s the command you’ll need to use (don’t worry, we’ll walk you through all the options in a moment).
# Replace SOURCE.mov with a path to your source video file

ffmpeg -i SOURCE.mov -map_metadata -1 -c:a aac -c:v libx264 -crf 24 -preset veryslow -profile:v main -pix_fmt yuv420p -movflags +faststart -vf "scale=trunc(iw/2)*2:trunc(ih/2)*2" video.h264.mp4
Now, open the resulting video.h264.mp4 file and check your quality. If you’re satisfied with the result, but the size still seems too big, try adjusting the -crf option (try -crf 26 or -crf 28): this will reduce the file size, but also the quality, so try to find an acceptable trade-off. That process, frankly, is more art than science.
Now it’s time to generate the AV1 file. (The command below will take longer than the one for H.264, but that’s to be expected.)
ffmpeg -i SOURCE.mov -map_metadata -1 -c:a libopus -c:v libsvtav1 -qp 30 -tile-columns 2 -tile-rows 2 -pix_fmt yuv420p -movflags +faststart -vf "scale=trunc(iw/2)*2:trunc(ih/2)*2" video.av1.mp4Play around with the -qp setting for an optimal size/quality balance. Lower values correspond to higher quality and greater file size.
Then, copy all three resulting files (video.h264.mp4 and video.av1.mp4) to the root of your web project.
If you want put more affort to support older iPhone and Mac versions, you can also create an HEVC file for them (which will be smaller than H.264, but bigger than AV1):
ffmpeg -i SOURCE.mov -map_metadata -1 -c:a aac -c:v libx265 -crf 24 -preset veryslow -pix_fmt yuv420p -movflags +faststart -tag:v hvc1 -vf "scale=trunc(iw/2)*2:trunc(ih/2)*2" video.hevc.mp4Understanding compression options
For now, the commands above look like black magic, but all those keys are used for a purpose. And here’s what they do:
-
-i SOURCE.movsets the source video file for input. FFmpeg will take video and audio streams from this file, convert them, and pack into a new container. -
-map_metadata -1will remove video metadata (like the name of a tool that was used initially to create a video). Sometimes metadata is useful, but for web development this is rarely the case. -
-c:a libopusor-c:a aacselects an audio codec. You may try to replaceaccwithlibfdk_aacoraac_atfor better result, but they don’t work on any system. -
-c:v libsvtav1selects a video codec, a library to compress images into a video stream. -
-crf 34stands for Constant Rate Factor and sets your size/quality balance. Think of it as the quality slider for JPEG, but it goes in the opposite direction (0stands for best quality and bigger size). CRF scale for H.264 goes from 0 to 51. -
-qp 30sets your size/quality balance forlibsvtav1codec for AV1. The scale is from 0 to 63 (lower is better quality and bigger size). -
-preset veryslowforces H.264 codec to generate smaller video file even if it will be much longer. -
-profile:v mainthat we use in our H.264 command selects the video codec profile. We can only use “Main”, as our video will not be played in Safari otherwise. -
-pix_fmt yuv420p(pixel format) is a trick to reduce the size of a video. Basically, it uses full resolution for brightness and a smaller resolution for color. This is a way to fool the human eye, and you can safely remove this argument if it does not work in your case. -
-movflags +faststartmoves the important information to the beginning of the file. It allows browser to start playing video during downloading. -
-vf "scale=trunc(iw/2)*2:trunc(ih/2)*2"is a way to ensure the produced video will always have an even size (some codecs will only work with sizes like300x200and302x200, but not with301x200). This tells FFmpeg to scale the source for the closes even resolution. If your video dimensions were even in the first place, this option wouldn’t do anything. -
-tile-columns 2 -tile-rows 2is for speed enhancements, at the cost of a small loss in compression efficiency. -
video.av1.mp4sets the name for the output file.
Playing nice with browsers
Now, you need to make sure that browsers will display the right file depending on whether it is supported or not.
Luckily, we can set a type attribute on a source element, and only the supported file will be played. For more <video> tag options, look here.
<video controls width="600" height="400">
  <source
    src="video.av1.mp4"
    type="video/mp4; codecs=av01.0.05M.08,opus"
  >
  <source
    src="video.h264.mp4"
    type="video/mp4; codecs=avc1.4D401E,mp4a.40.2"
  >
</video>
Source tags work similarly to if...else statements: the browser will read the list of <source> tags top to bottom and play the first one with supported video type.
Type attribute describes a file format: which container (video/mp4 for MP4), video codec (av01.0.05M.08 for AV1 and avc1.4D401E for H.264), and audio codec (opus for Opus and mp4a.40.2 for AAC) should be used.
If you decided to put more affort to support older iPhone and Macs, you can add <source> with the HEVC file:
  <source src="video.av1.mp4" …>

  <!-- Put it after AV1, so AV1 will be used on supported devices -->
  <source
    src="video.hevc.mp4"
    type="video/mp4; codecs=hvc1"
  >

  <source src="video.h264.mp4" …>
Bonus: how to convert GIFs to AV1 and H.264
In modern times, using GIF for video fragments is a poor practice. First of all, GIFs take 20-40 times more space than H.264 or AV1. They also require more CPU and power and drain more battery than modern video formats. If you need short animation sequences on your website in 2019, always opt for video codecs. Luckily, FFmpeg supports GIF files as an input source.
Here’s how to convert your GIF to H.264:
ffmpeg -i IMAGE.gif -map_metadata -1 -an -c:v libx264 -crf 24 -preset veryslow -profile:v main -pix_fmt yuv420p -movflags +faststart -vf "scale=trunc(iw/2)*2:trunc(ih/2)*2" animation.h264.mp4And here’s how to go even further and convert it to AV1:
ffmpeg -i IMAGE.gif -map_metadata -1 -an opus -c:v libsvtav1 -qp 30 -tile-columns 2 -tile-rows 2 -pix_fmt yuv420p -movflags +faststart -vf "scale=trunc(iw/2)*2:trunc(ih/2)*2" animation.av1.mp4We can now use animation.h264.mp4 and animation.av1.mp4 in our HTML. Just replace VIDEO_WIDTH, VIDEO_HEIGHT, and PATH_TO_VIDEO:
<video
  autoplay
  loop
  muted
  playsinline
  width="VIDEO_WIDTH"
  height="VIDEO_HEIGHT"
>
  <source
    src="PATH_TO_VIDEO/animation.av1.mp4"
    type="video/mp4; codecs=av01.0.05M.08"
  >
  <source
    src="PATH_TO_VIDEO/animation.h264.mp4"
    type="video/mp4"
  >
</video>
autoplay and loop attributes will emulate the expected behavior of a GIF: looping an animation after the website was loaded. playsinline will forbid Safari from opening the video in full-screen mode.

And that concludes our practical guide to AV1!
You can leverage its high-quality, low-bitrate features for a sizable chunk for your web audience on modern devices.
Of course, you would not want to leave users with old devices hanging, but the attributes for <video> and <source> tags make implementing this logic easy, and in pure HTML, you don’t need to go at length to detect user agents with JavaScript.
Mastering a few FFmpeg commands also seems like an easy way to improve the video experience for your visitors. We’re already using AV1 in production on a couple of our projects and haven’t encountered any significant problems (except for video compression times, but, again, we mostly deal with short static sequences).
Last, feel free to give us a shout on social media if you want to share your experience with AV1, or tell us whether or not this guide worked for you!
Changelog
2025-02-23
- Moved to SVT-AV1 codec as much faster alternative to
librav1e. - Removed HEVC codec from recommendations since modern iPhones/Macs support AV1.
2023-09-20
- Add Safari on iPhone 15 support of AV1.
2021-06-03
- Use faster
librav1eencoder instead oflibaom.
2022-08-23
- Fix source video codec for HEVC.