imgproxy: Resize your images instantly and securely


Learn how to get started with imgproxy—a fast and secure standalone server written in Go. It only does one thing—and does it well—imgproxy takes care of all your image resizing needs.
Is an image worth a thousand lines?
Let’s say you have an idea for a startup. Maybe you’re already working on it. You’ve scaffolded your MVP, and everything works fine under minimal loads. Users can do things in your app. Now, you want to accept images from them, allowing them to upload an avatar or a profile page cover. Everyone does that, right? Why shouldn’t you?


A small rounded avatar and a big rectangular background cover—minimal personalization users expect from your startup today.
By now, you probably know that implementing image upload isn’t just some walk in the park. Many questions instantly arise, including some big ones like:
- Where do I keep my images? Locally or remotely?
- How do I handle image transformations? Where do I keep various versions of the same image?
- How do I plug everything into my existing app?
- Last but not least, how do I protect myself against image bombs (a sub-class of decompression bombs)?
Certinaly, there are a plethora of ready-made solutions available, and so, you decide to pick one.
Everything goes smoothly until, with a few thousand images on your hands, suddenly, your design requirements change.
Now, you want your avatars to be more high-res! And you want to change the crop mode and dimensions. It’s one thing to write new code, letting tools like ImageMagick, well, do the magic. But this is another matter altogether: with every requirement change you have to waste time, storage, and processing power to handle all the transformations again and again. And with startups, requirements do change, and quite often.
Let’s try something different
What if the image hosting problem (and perhaps you don’t even want to host anything, and just re-use images from a remote source) was the only problem you had to solve?
What if you could offload image resizing, not to some foreign cloud, but to a microservice under your full control? And what if that tool was completely language and framework agnostic, meaning you could use it right away, no matter the stack? Meet imgproxy—a tool created exactly for these purposes.
You can quickly test it out yourself right now, by following simple steps below:
- Check imgproxy’s installation docs and read the instructions. If you’re comfortable with Go and Docker, you can set it up on a local machine or a remote server right away. If that’s not your cup of tea, no problem, just click on the “Deploy to Heroku” button inside the repo’s README file, and you’ll instantly get an up-and-running instance of imgproxy. That is what it looks like:

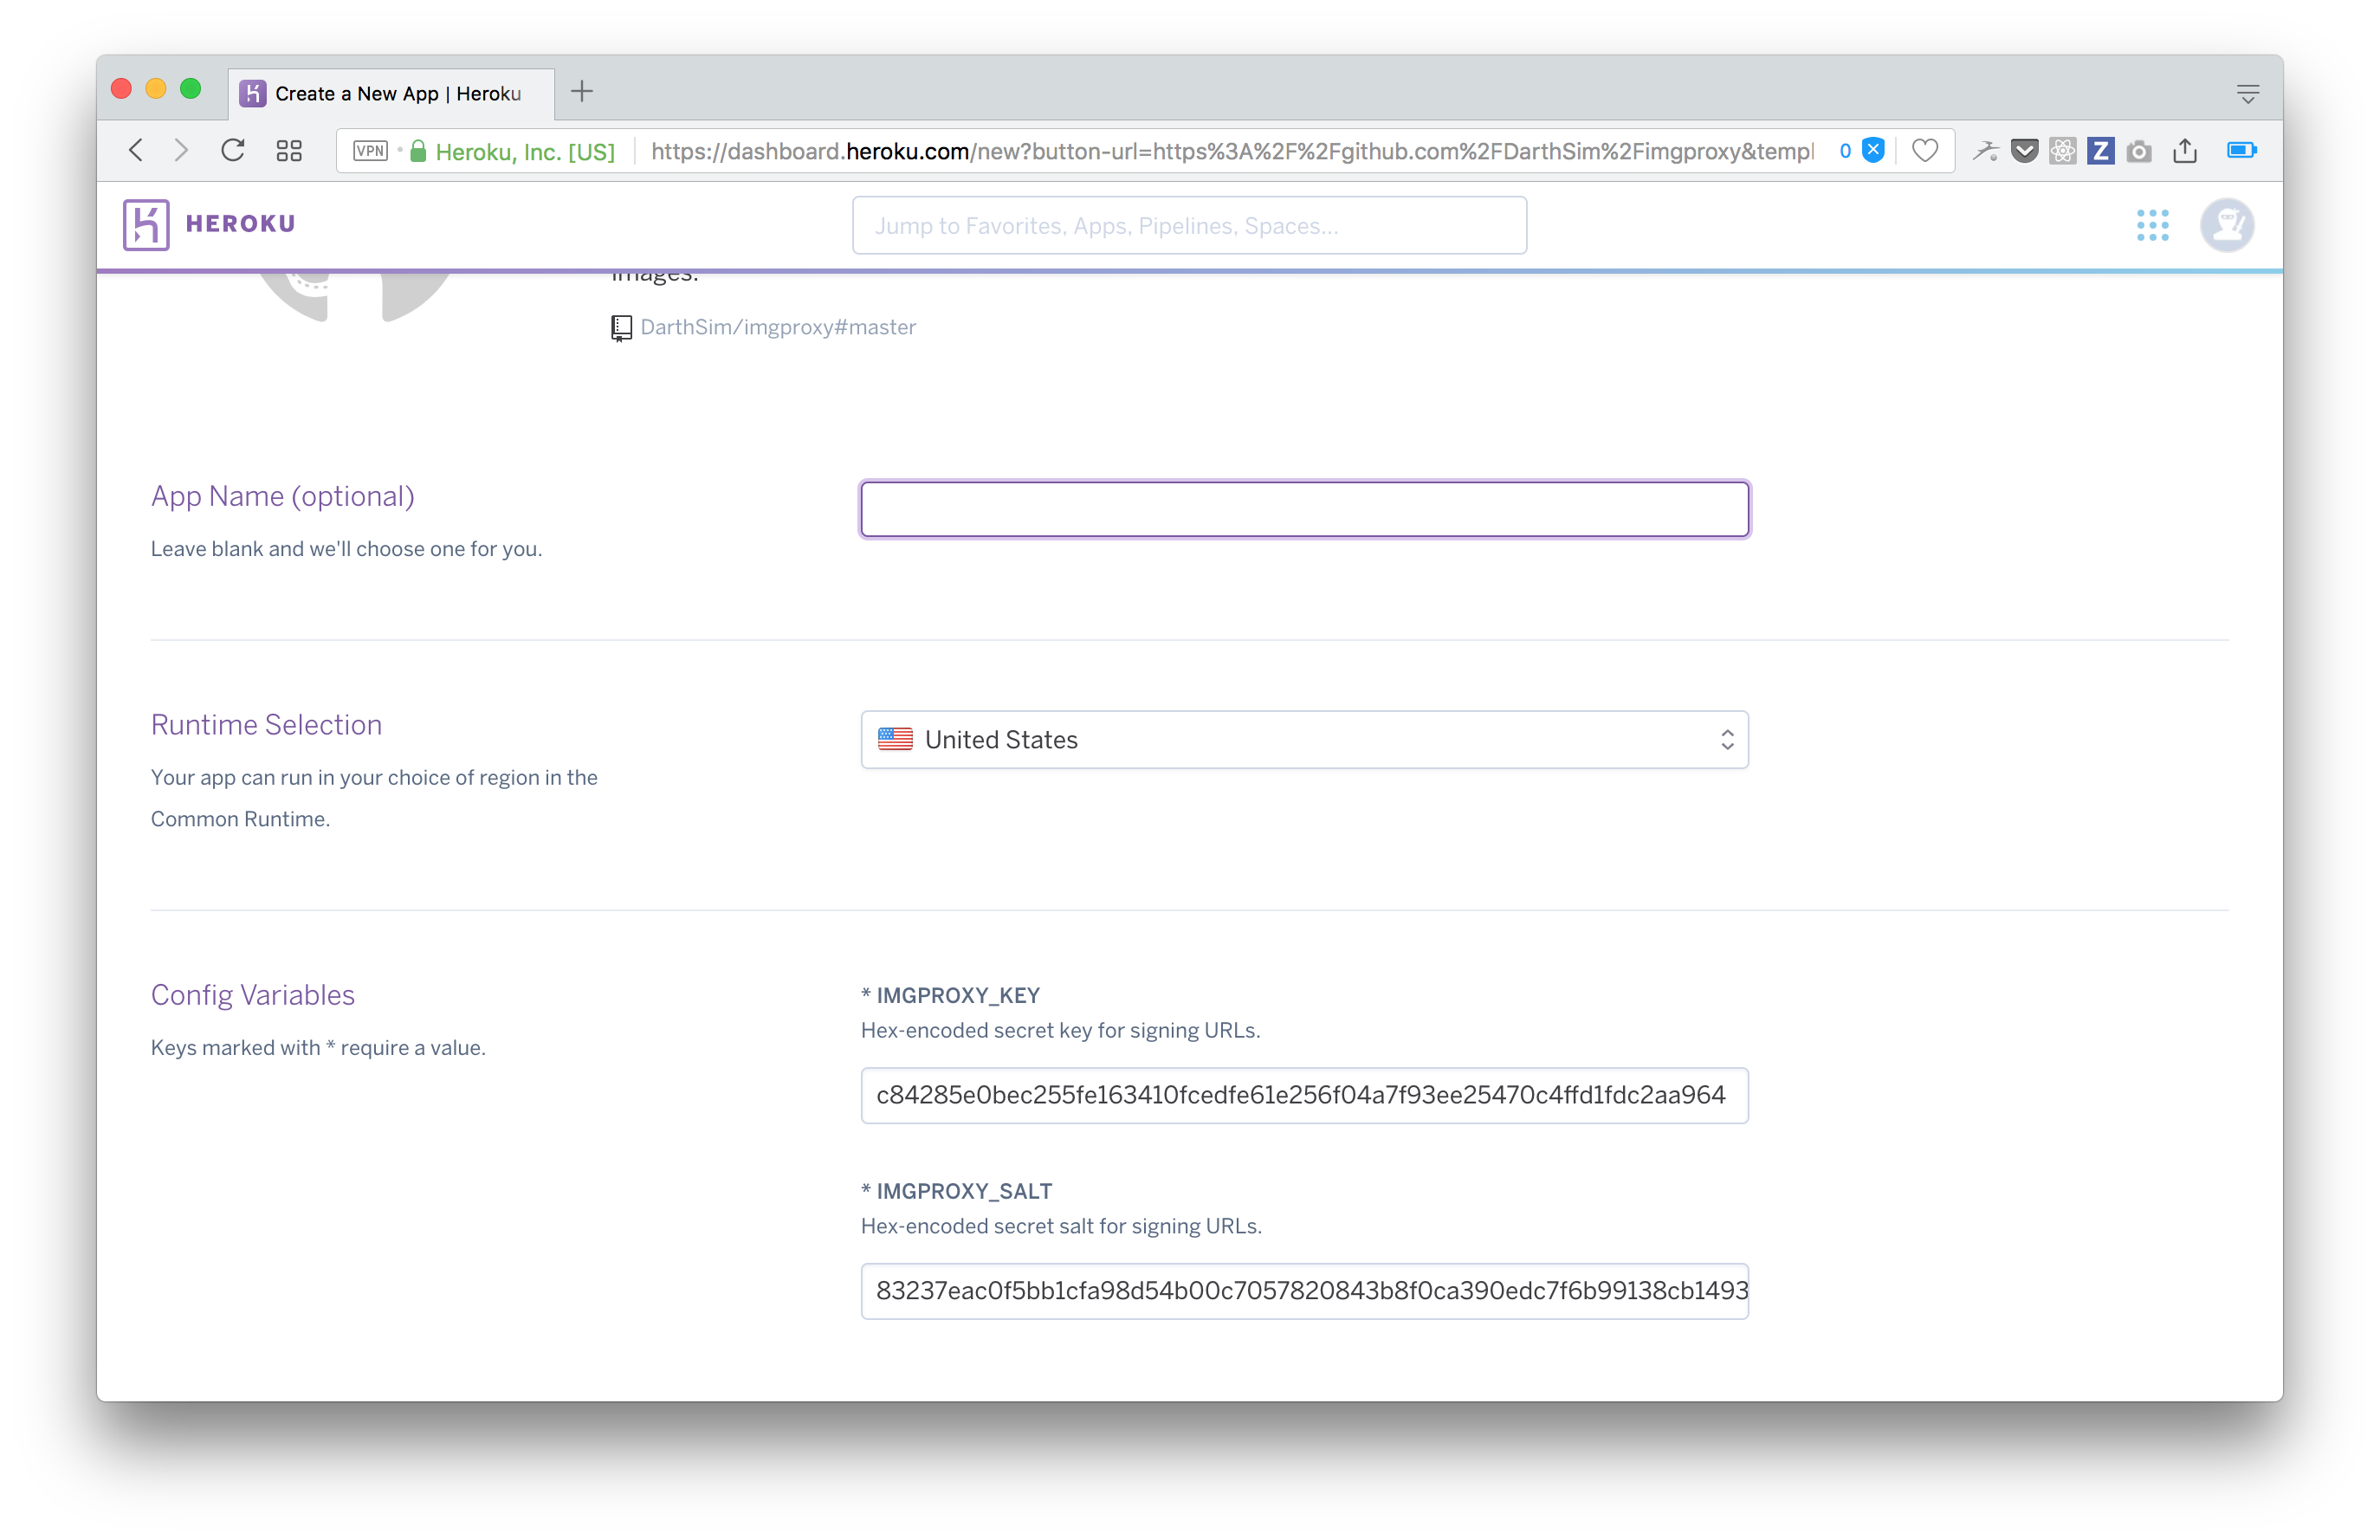
Deploying imgproxy to Heroku
- Now, all you have to do is pick a name for your app and note the values of
IMGPROXY_KEYandIMGPROXY_SALT(they’ve already been generated, so just cut and paste them somewhere). Together, they make up a powerful security feature that no imgproxy alternative currently has. We’ll talk about that later.
NB: for actual production you’ll want to create your own unique set of keys: any random hex-encoded strings will do. Here’s some *nix magic to quickly generate such a string (try it in your shell):
$ xxd -g 2 -l 64 -p /dev/random | tr -d '\n'- Once you have a URL for your imgproxy instance and a key/salt pair close at hand, go to the imgproxy URL generator. Now, pick a random remote image: this 4000x2000 NASA image of Martian landscape will do perfectly. Note that, by default, imgproxy will reject images with dimensions larger than 4096 pixels on either side, but you can change this via settings (more on that later).
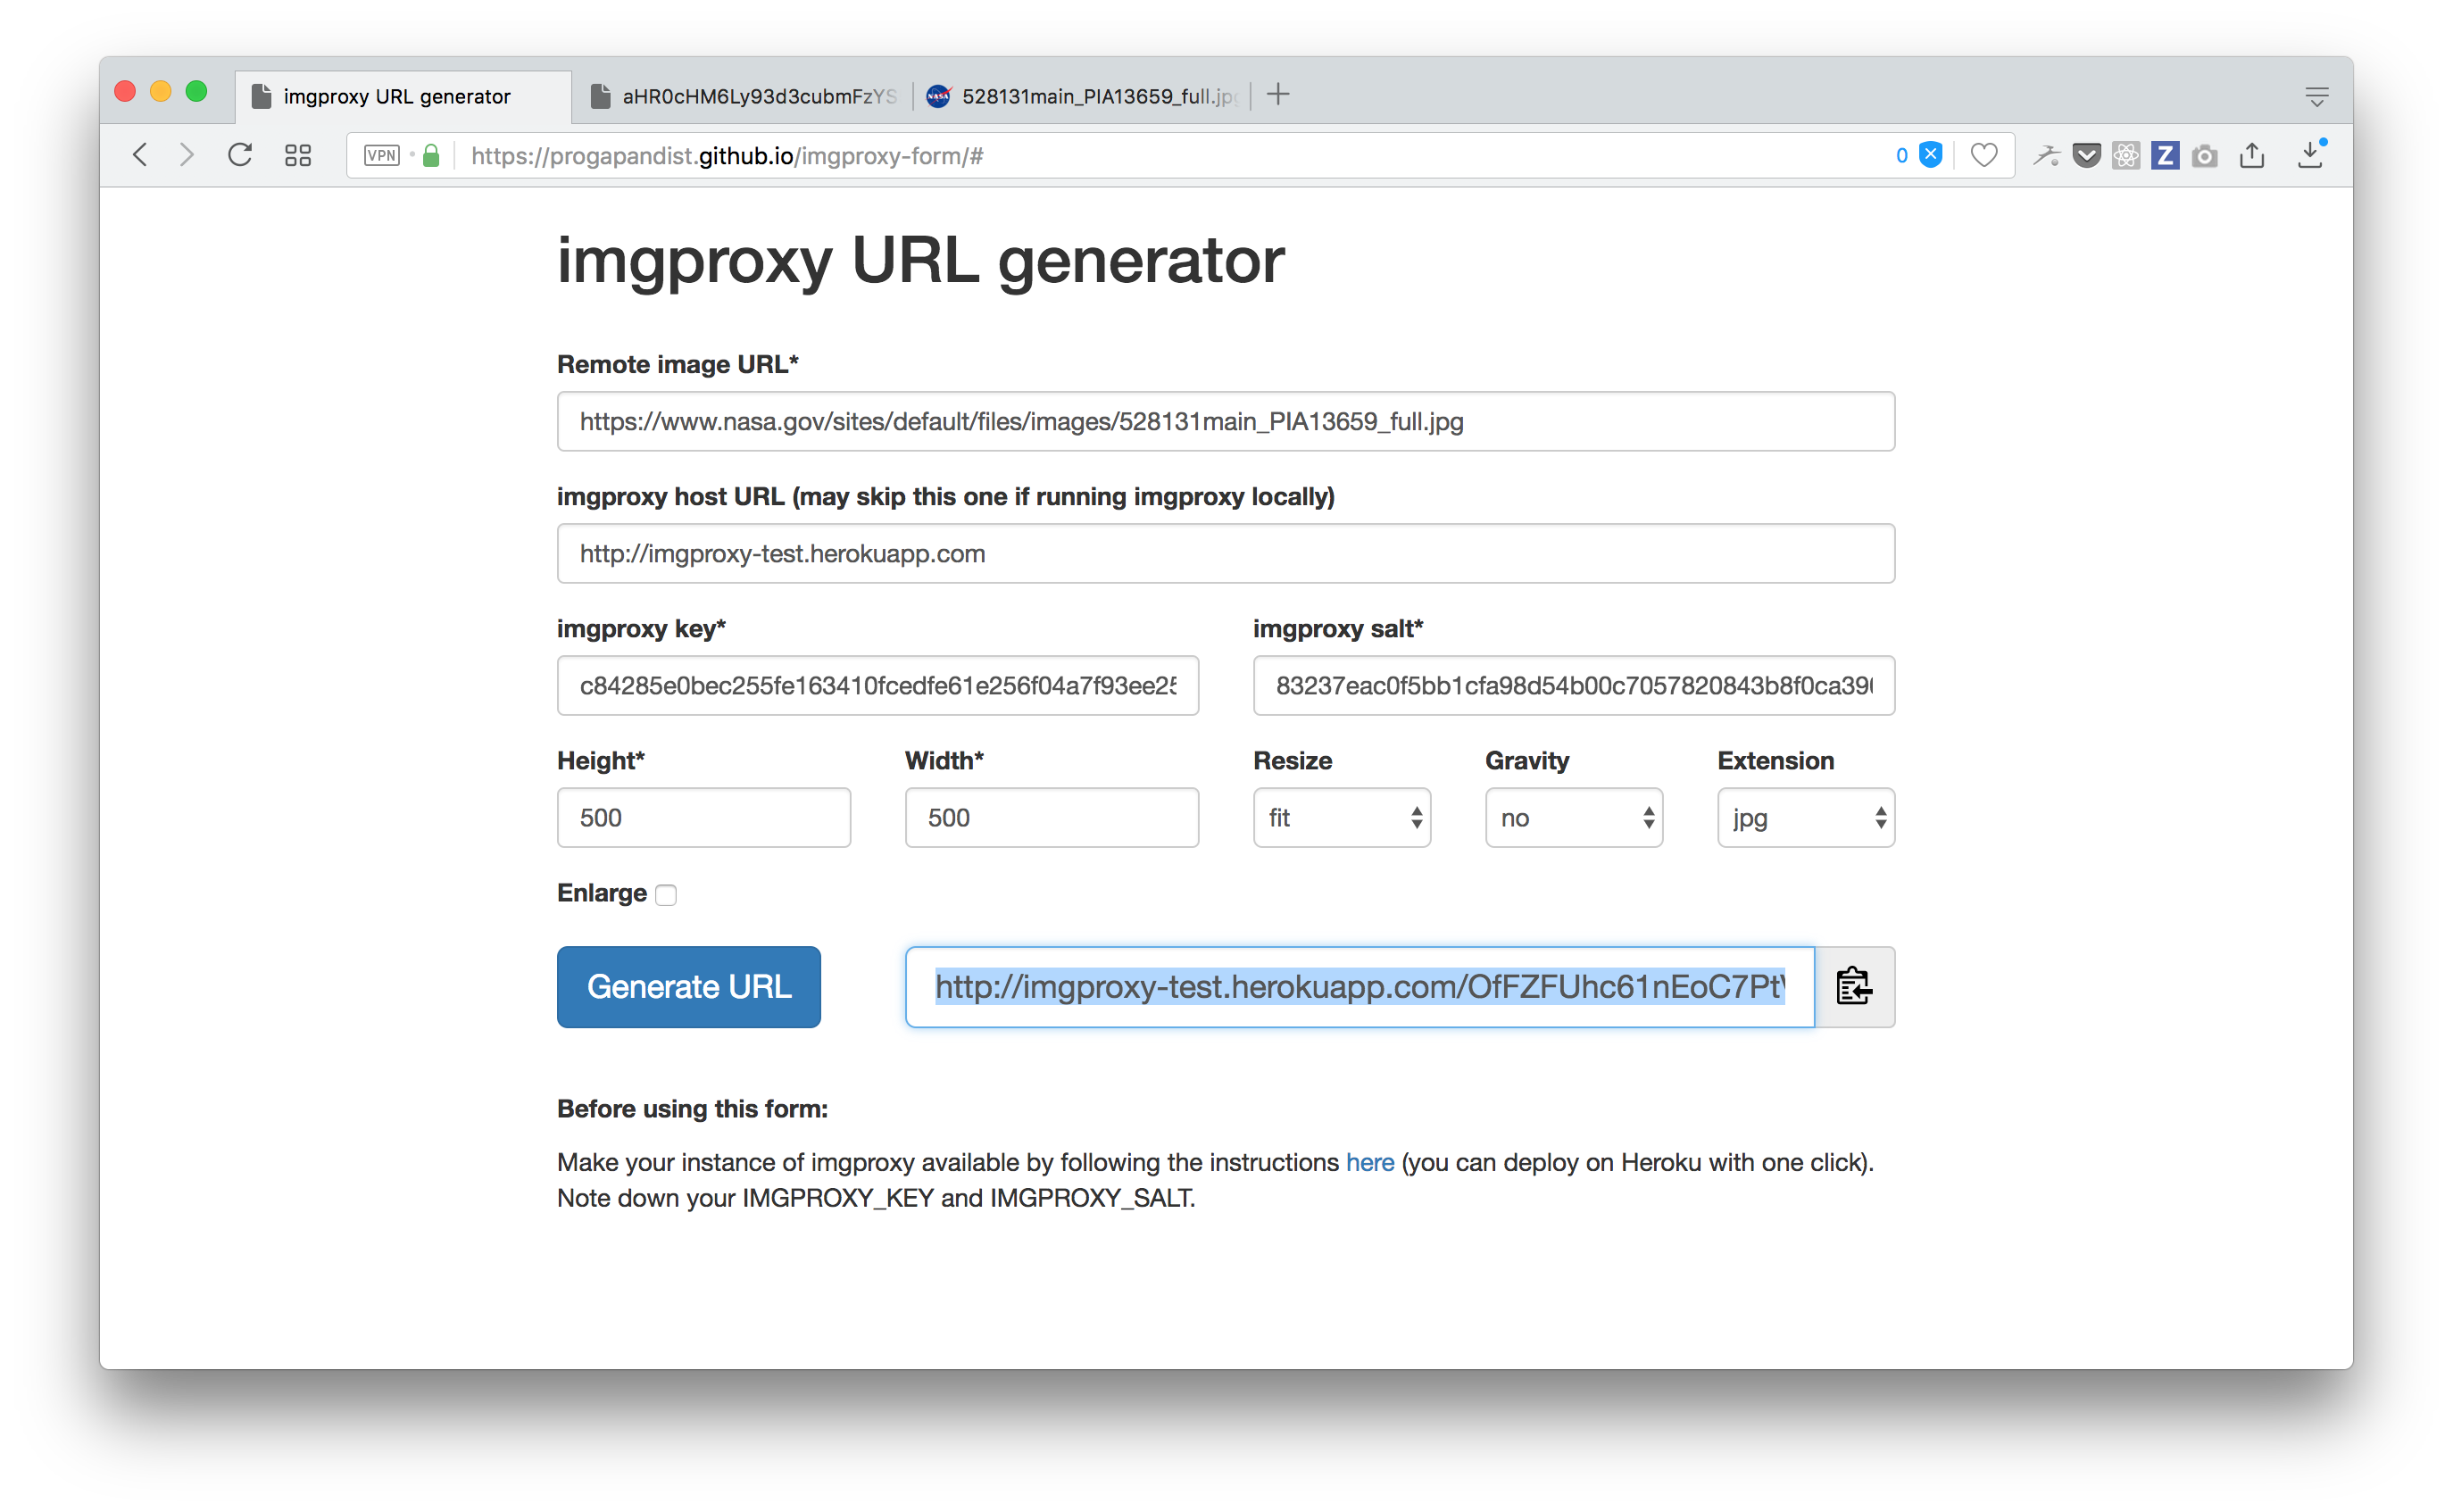
Testing imgproxy in action
Paste this URL, along with your imgproxy host URL, key, and salt into their respective fields. Set the desired dimensions and crop mode and hit “Generate.” Now, copy the resulting URL and paste it in a new browser window.
- Bingo! Your very own imgproxy instance has just resized a heavy remote image on the fly!

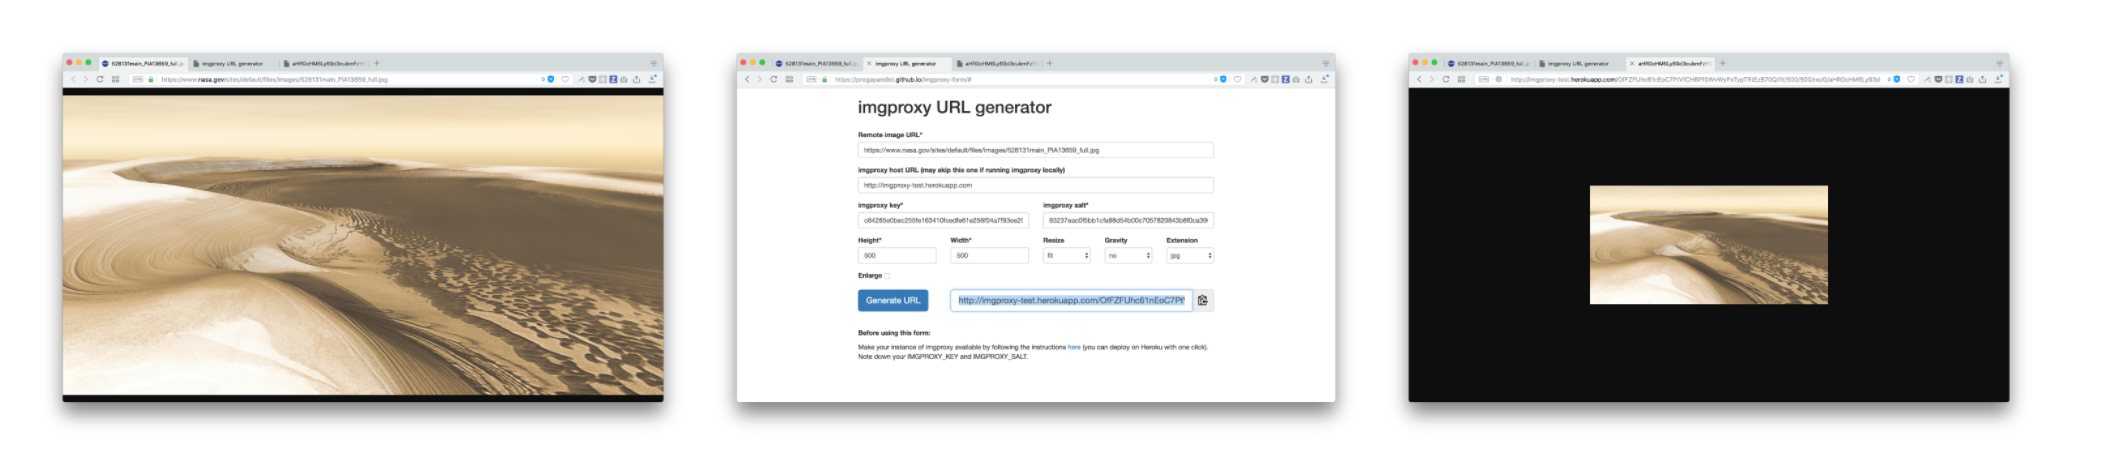
Original 4000x2000 image weighing over 650KB; creating imgproxy URL; resized 500x250 image weighing 19KB
The three S’s: Simplicity, Speed, Security
imgproxy receives the image source and instructions on what to do with it as a cryptographically signed URL. Here are the steps to create a signature:
- Take the path after the signature—
/rs:%resizing_type:%width:%height:%enlarge/g:%gravity/%encoded_url.%extension - Add salt to the beginning
- Calculate the HMAC digest using SHA256
- Encode the result with URL-safe base64
You don’t have to be familiar with cryptography to do this. Even if terms like HMAC, base64, and SHA256 don’t mean much to you, just take our word for it: implementing these steps are a trivial task in any modern programming language. Once you do that, you can be confident that no one will be able to use your imgproxy server for their own needs, unless they know both your key and your salt.
The project repo contains a folder with scripts for generating proper URLs in Ruby and Go. The web form we used for the demo is implemented in frontend JavaScript with the help of the jsSHA cryptographic library. Of course, in the real world, you’d like to keep your cryptographic calculations exclusively to your backend.
As an extra layer of security, you can set up an authorization token to be used in the header of all incoming HTTP requests.
What about those image bombs we discussed at the beginning? Well, imgproxy also checks the image type and its “real” dimensions when downloading it, so, if it has an unknown format, or the dimensions are too big, the image won’t even be fully downloaded.
Speed and memory footprint is also something to take into consideration. libvips, the library behind imgproxy that performs image transformations, is arguably the fastest out there.
In siege testing with 100 concurrent users performing 50 transformations each, imgproxy only used 200MB of RAM. Under a real-world, heavy load, the service rarely consumes more than half of that.
As a bonus, imgproxy follows the Twelve-Factor App paradigm to the letter and can be fully configured using environment variables only. Among other things, you can set read, write, and download timeouts, maximum dimensions for accepted images, and the number of image requests to be processed simultaneously (default: 100).
Sounds great! Any alternatives?
Sure! Doing a quick Google search for “image proxy” or “thumbnail service” will yield tools like Thumbor, imageproxy (not to be confused with our imgproxy), picfit or imaginary. They all pretty much do the same thing: resize images.
So, if these exist, why write yet another one? As imgproxy’s README states: “imgproxy does one thing—resizing remote images—and does it well.” The trick was to implement only the must-have features, and to do it right.
For example, it would be great if we could:
- Rotate, flip and apply masks to images. (Still, it is easier with CSS.)
- Have built-in HTTP caching of some kind, (but it is way better to use a CDN or a caching proxy server for this, as you will need it anyway once your project grows).
- Have built-in HTTPS support (but it makes more sense to give this task to a proxy server such as nginx).
Cutting out extra features and focusing in on the core functionality allows for a very lightweight, memory-efficient solution.
Thumbor, for instance, is very powerful, but its Docker container is nearly twice that of imgproxy. It uses Pillow as an underlying library, which is considerably slower than vips. It also expects you to use additional software for caching. imgproxy has no such dependencies.
imaginary doesn’t support 12factor and isn’t super actively maintained.
Picfit uses storage to keep track of transformations. Pilbox does not use vips, does not support 12factor and relies on Tornado web server, that you might not need.
imgproxy and eBay: a real-life success story
We didn’t start working on imgproxy out of nowhere: it was a conscious decision in response to our client’s needs. For one of our most technically challenging projects, eBay Social, we started out with CarrierWave.
Once we ran into first scaling problems, we had to carefully consider all of the alternatives described above. Consider this: at the time of writing, in only the last three months, we had to transform 1 217 934 images coming from parent eBay. At this rate, storing (and re-transforming) all those thumbnails very quickly becomes a daunting task and can easily take up an entire day if you’re locally storing image variants.


imgproxy URLs at eBay Social. Caching is performed with Amazon CloudFront CDN.
But, using imgproxy in production allowed us to reduce the time needed for updating an entire image collection to, well, nothing. As images come from a remote source, only those requested would be transformed on the fly and cached by a CDN for further requests.

imgproxy is open source and can be used in any project, big or small, to deal with resizing remote images. It will help your team embrace a microservice approach and reduce the overhead from handling image assets. imgproxy is easy to set up with Heroku or Docker and is completely language or framework agnostic—any web developer can benefit from it!