How to make complex Chrome extensions: a zero gravity guide

Building a complex browser extension isn’t exactly easy—especially for first-timers or folks who feel unsure of what they’re doing! Not to worry. We’ll show you the essentials for building a full-featured Chrome extension using a real example from the Evil Martians casebook! We’ll also share some other useful tips and cool recommendations, so read on!
As mentioned, we’ll demonstrate Chrome extension creation using our work with a real client as an example. This material will be relevant no matter your situation, and the approaches and solutions described in this article can be applied in many, many cases. Further, while this article was written from the POV of a frontend engineer, most should still be able to follow along!
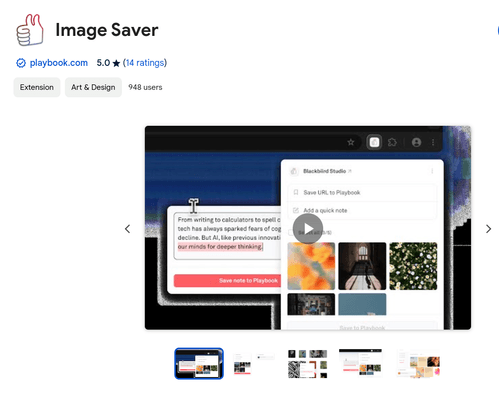
Playbook recently launched this extension on Product Hunt and received a great reception and valuable feedback. Plus, the plugin, Image Saver, also gained hundreds of new users in the Chrome Web Store. So, let’s dive in.
Hire Evil Martians
Chrome extension for 1M+ creatives: 0 to MVP in 3 weeks. Expand your product next?
Some background info
First, a bit of context: Playbook is a creative cloud storage platform for visual assets, making them easy to organize, browse, and share.
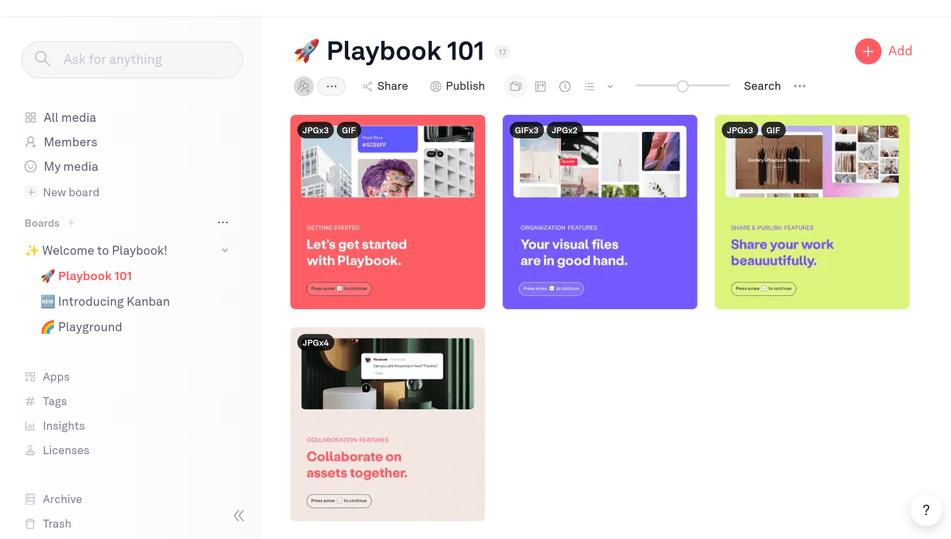
We started working with Playbook in 2021, helping to implement a lot of things: ML-powered search, AI generation tools, a Figma plugin, and much more. It is trusted by 1M+ creatives and companies, has had a number of successful Product Hunt launches, and raised more than $22M in funding.
Back to our main topic, Playbook approached us with the idea of building a complex Chrome plugin for their project. This was to be a browser extension that would allow designers, artists, and marketers to automatically download and upload all of the images from any website directly to Playbook.
When working with online design tools like Midjourney, Canva, or Figma, a higher level of seamlessness and speed for downloading assets is always a better experience, right? This meant that our feature needed to be equal or, ideally, better than those offerings.
With our goal in sight, we started working.
Preparing to create the extension
Working together with Playbook, we determined the initial iteration needed the following features:
- Playbook account login functionality
- The ability to select a default Playbook organization and board for saving assets
- An upload feature, allowing an image to be uploaded directly to Playbook by clicking on the context menu
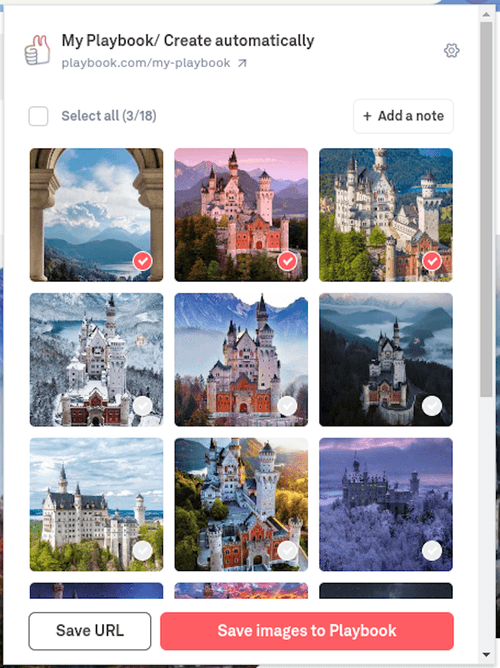
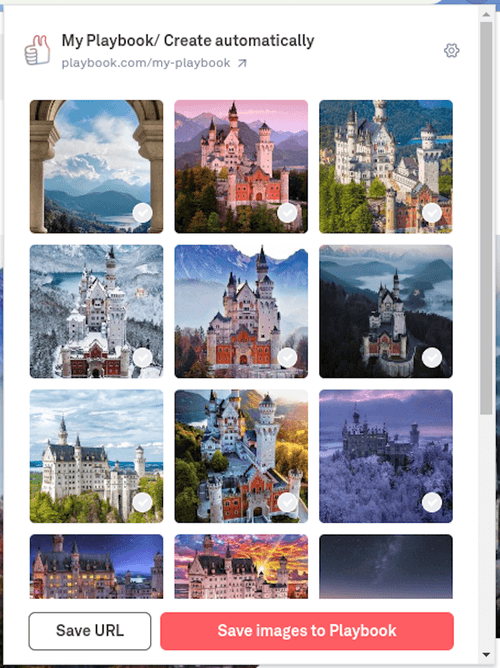
- A feature where a preview of all images on the current webpage would be displayed inside the extensions’s popup window (as well as the ability to select them and save to Playbook)
- The ability to save the URL of the current webpage and a text note
- The ability to work both in Chrome and other Chromium-based browsers, like Opera
In line with the above, here’s what the first version of the extension looked like:
Now, let’s share the step-by-step details of how we got there.
Adding authorization via OAuth to a Chrome extension
With the requirements out of the way, we started by implementing authorization. Since the extension is tightly connected with the main application, we wanted to connect their user sessions so that the extension could fetch the current authorized user by getting the Playbook’s JWT token from the cookies. This would make the authorization process seamless and invisible to the user.
This is the point where we were first faced with browser-extension specific features and limitations.
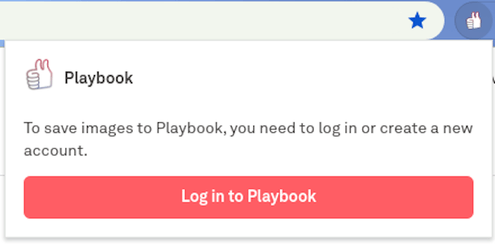
The signed-out state (when no JWT token in the cookies). Clicking on the ‘Log in to Playbook’ button opens their website with the auth form in a new tab
Here’s the important thing to remember: none of the extension code is private, it can be observed, and this means there’s no way to safely use secrets!
Although you can’t place any sensitive information in the code itself, you can safely store the access token in chrome.local.storage (but this isn’t some usual web page plain local storage; it’s a kind of special storage from the extension itself!)
This is the entire OAuth flow we used for the Playbook Chrome extension:
- Create an OAuth2 app on your server for the extension. (We used Doorkeeper). We’ll need to use the
uidfrom the application as aclient_idto identify the Chrome extension so we can trust authentication requests with thatclient_id. - From the extension side, we need to check if we’ve already stored an access token in
chrome.storage.localand verify that the access token is still valid. If not, we’ll continue the flow; if yes, we can use it and skip the rest. - Before we start the process of granting the authorization code, we need to generate a string called
code_verifierand a matchingcode_challengefrom the extension. For that purpose, we’re using the NPM package pkce-challenge. - The Chrome extension makes a POST request to the server (with
client_idin the params) to get thewrite_key. - If we receive the key, the extension tries to get the current JWT token from Playbook’s cookies using
chrome.cookies.get({ name: "jwt" })method. The extension needs special permission for a particular host to request these cookies, so we add"host_permissions": ["*://*.playbook.com/*"]and"permissions": ["cookies"]to themanifest.json. - Then, the extension makes a request to the server with the
urlwhich includesclient_id,write_key(as a state param),redirect_uri(you can get this aschrome.identity.getRedirectURL()) andcode_challengeas search params. In theAuthorizationheader we include the JWT token that we got in the previous step. - Within the server’s answer, we receive the
redirect_uri. Then, using the search parameters from this string, we can getaccess_grant, which is stored as acodeparam; for parsing URL strings, we use the library query-string. - After this, the extension sends a POST request to the server with
client_id,access_grant,redirect_uri, andcode_verifierthen we getaccess_tokenin the response. - We add
access_tokentochrome.storage.local - We then use this
access_tokenin all our requests to fetch data from the server (in the request body or as a URL parameter).
We invoke all of this in a special place within the Chrome extension: the extension’s service worker. This is a script that runs in the background separately from a web page. Contrary to the popup (the window shown after clicking on an extension’s icon), after loading, the service workers can run as long as they are actively receiving events; but note that they can’t access the DOM.
You can read more details about extension service workers in this section of the official documentation.
We’ll listen to the cookie updates for the main application (which has the domain .playbook.com). Every time the user logs out in the main application (or the session expires), the JWT cookie is removed from the cookies, which means that we also need to log the user out from the extension by clearing the local storage of the extension; this is the place where we store the access token (the “proof” that the user has currently logged in).
Additionally, on the flip side, when a JWT cookie is added, we need to invoke the OAuth flow.
In the background.ts file, add the next listener:
chrome.cookies.onChanged.addListener(async (reason) => {
 if (reason.cookie.domain === '.playbook.com' && reason.cookie.name === 'jwt') {
   if (reason.removed && reason.cause !== 'overwrite') {
     chrome.storage.local.clear();
   } else {
     signIn(); // Invoke the oAuth flow
   }
 }
});
Now, we need to add some setup both for the background script and for the popup. Add the paths to the service worker and the popup (as well as related permissions) to your manifest.json file:
"background": {
   "service_worker": "src/background.ts"
 },
 "action": {
   "default_popup": "src/Popup.html"
 },
"permissions": [
   "storage",
   "identity",
   "cookies"
 ]
Note that the file that you specify for the default popup should be HTML, otherwise it won’t work. The file, Popup.html, should look like this:
<!DOCTYPE html>
<html lang="en">
<head>
 …
</head>
<body>
  <div id="root"></div>
  <script type="module" src="Popup.tsx"></script>
</body>
</html>
Then, you just need to inject the Popup component into the root; this file is called Popup.tsx:
const Popup = () => {
  const [token, setToken] = useState(null); // Storing access token inside the component’s state

  useEffect(() => {
    chrome.storage.local.get(['access_token'], (result) => {
      if (result.access_token) {
        setToken(result.access_token);
      }
    });
  }, []); // Receive the stored access token from the extension's local storage


   chrome.storage.onChanged.addListener((changes, namespace) => {
     if (namespace === 'local') {
       if (Object.keys(changes).some((key) => key === 'access_token')) {
         setToken(changes.access_token.newValue);
       }
     }
   }); // Listen to the token’s value’s changes in the local storage

  return <div className={styles.container}>
    {token ? <LoggedInView /> : <LoggedOutView />}
  </div>;
};


const container = document.getElementById('root');
const root = createRoot(container!);
root.render(
  <React.StrictMode>
    <Popup />
  </React.StrictMode>,
);
After these additions, the auth flow should work as expected, and the extension will show the current auth state inside the popup.
Creating a content script to save all images
Now that we’ve set up the popup and added authentication, let’s create a content script that can store all image sources from the current web page in Chrome local storage.
We’ll use this script when the popup is opened, and then we’ll display the stored images inside the popup.
But first, what is a content script? It’s a file that runs in the context of the current web page and which can read the details of the page by checking the document variable; it can then pass information to its parent extension.
To add a content script, we first need to create a file called saveAllImagesToPreview.ts in the folder named content_scripts (it’s better to store all content scripts in one separate folder for a more understandable project structure), and add the related permission to our manifest.json:
"content_scripts": [
   {
     "matches": ["http://*/*", "https://*/*"], // Specifies pages where content scripts will be injected. We only need to run the script on the pages where URLs start with HTTP or HTTPS
     "js": [
       "src/content_scripts/saveAllImagesToPreview.ts",
     ] // The list of files to be injected into matching pages
   }
 ],
"permissions": [
   …,
   "activeTab",
   "scripting",
 ]
When the popup component is initially rendered, we’ll execute this script on the active tab in the file Popup.tsx:
useEffect(() => {
  saveAllImagesOnActiveTab();
}, []);

const saveAllImagesOnActiveTab = () => {
  chrome.tabs.query({ active: true, lastFocusedWindow: true }, (tabs) => {
    chrome.scripting
      .executeScript({
        target: { tabId: tabs[0]?.id },
        files: ['src/saveAllImagesToPreview.ts.js'],
    })
  });
};
In the file with the content script we’ll add a function that will be invoked immediately after the script is injected in saveAllImagesToPreview.ts:
(() => {
  let images = document.querySelectorAll('img'); // Select all the images from the current page
  let imageSources = Array.from(images)
    .filter(
      (img) =>
        Img.src &&
        img.naturalWidth > 128 &&
        img.naturalHeight > 128
    )
    .map((img) => img.src); // We exclude too small images and get sources

  chrome.runtime.sendMessage({
    action: 'saveAllImagesToPreview',
    sources: imageSources,
  });
})();
In the last part of our function, we’ll send a message to background.ts with the filtered sources in the arguments, and we’ll also pass the name of this action (saveAllImagesToPreview) so we’ll be able to recognize the meaning of this message.
Meanwhile, in the background.ts file, we need to listen to the onMessage event from Chrome API; this event is fired whenever a message is sent from either an extension process or a content script (as is our case!)
chrome.runtime.onMessage.addListener((message) => {
  if (message.action === 'saveAllImagesToPreview') {
    createNewImagesPreview(message.sources);
  }
});
Finally, we invoke the createNewImagesPreview function, which assigns the new preview images array to the extension’s local storage. We also generate the unique IDs for the stored–here we use nanoid, a mini-sized unique string ID generator for JavaScript:
const createNewImagesPreview = (sources: string[]) => {
  chrome.storage.local.set({
    images_preview: sources.map((source) => ({
      id: nanoid(),
      src: source
    })),
  });
};
Now, once the images are stored inside local storage, we can get them in the Popup component and display them inside of it:
const [images, setImages] = useState([]); // Storing images inside the components’ state

useEffect(() => {
   chrome.storage.local.get(['images_preview'], (result) => {
     if (result.images_preview) {
       setImages(result.images_preview);
     }
   });
 }, []); // Receive the stored images from extension's local storage


 chrome.storage.onChanged.addListener((changes, namespace) => {
   if (namespace === 'local') {
     if (Object.keys(changes).some((key) => key === 'images_preview')) {
       setImages(changes.images_preview.newValue);
     }
   }
 }); // Listen to the value’s changes in the local storage

return <div>
  {images.map((image) => (
    <img
      key={image.id}
      className={styles.image}
      src={image.src}
      alt={`Preview with the source ${image.src}`}
    />
   ))} // Displaying the stored images
   <Button action={onSave} text="Save to Playbook" /> // on click to ‘Save’, we just send the array of images sources to the Playbook’s backend
</div>;
Let’s take a look:
Creating a extension context menu in the background script
Beyond the ability to select and save the images inside the popup’s preview, we wanted to allow users to be able to save a certain image on the site directly to Playbook by selecting the option inside Google Chrome’s context menu:
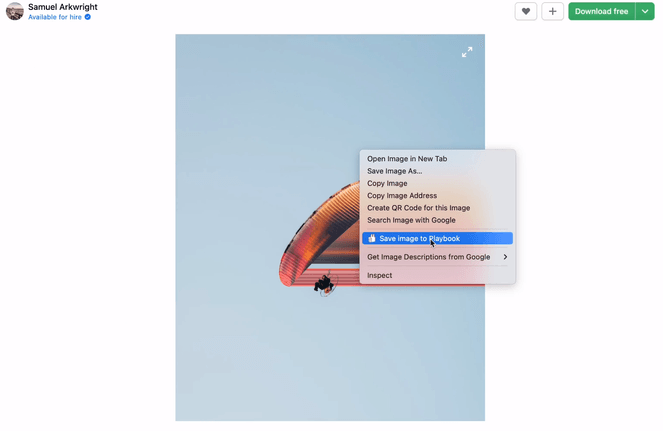
To implement this, we’ll use the chrome.contextMenus API to add a new option to the context menu. Then, after clicking this option, we’ll save it to Playbook.
First, we must add the related permission to manifest.json. We also need to specify a 16-by-16 pixel icon for display next to our new option:
"icons": {
  "16": "16x16.png",
  ...
 },
"permissions": [
  ...,
  "contextMenus"
 ]
Next, we’ll create the context menu option inside the listener for the onInstalled event. This event is fired when the extension is first installed, when updated to a new version, or when Chrome is updated to a new version.
background.ts:
import { createContextMenu } from './contextMenu';

chrome.runtime.onInstalled.addListener(() => {
  createContextMenu();
});
This is inside contextMenu.ts:
const createContextMenu = () => {
  chrome.contextMenus.create({
    id: 'Playbook Extension Context Menu',
    title: 'Save image to Playbook',
    contexts: ['image'], // We want to apply the context menu addition only to images – we don’t need other types of elements
  });
};
After that, we just need to add the listener to the background script; it tracks the click to the context menu option and then saves it by sending the request to the backend.
Note that in the code below from background.ts, the srcUrl inside the object exists because we’ve set our contexts only to ‘image’:
chrome.contextMenus.onClicked.addListener((info) => {
 saveImageToPlaybook(info.srcUrl); // Save the image’s source to Playbook
});
Now our context menu works and can successfully send a request to save the selected image:
Adding error handling and reporting for a Chrome extension
Having error reporting is crucial for any product’s ability to react quickly to user issues or prevent revenue losses. As in the main Playbook application, for the extension’s error reporting, we use Sentry.io. To keep the bundle small, we used only the @sentry/browser package without tracing: this still allowed us to receive all of the needed information about possible errors or critical crashes.
We can add a separate file called sentry.ts with a function that will invoke Sentry.init(). We’ll also set the current release by importing the version from the manifest.json, this will help us understand which version of the extension the error occurred in.
This is inside sentry.ts:
import manifest from '../../manifest.json';

const initSentry = () => {
  if (config.ENVIRONMENT === 'production') {
    Sentry.init({
      dsn: <your Sentry DSN>
      release: manifest.version,
      // Other options
    });
  }
};
In background.ts, we’ll invoke this function inside the listener for onInstalled event (we already used it to create a context menu):
import { initSentry } from './sentry';

chrome.runtime.onInstalled.addListener(() => {
  initSentry();
  createContextMenu();
});
Now, whenever an error occurs, we notify the user by setting an error badge for the extension using Chrome API, storing error details inside local storage (we can show them a popup to let users know more about that error), and sending a message to sentry:
const handlePluginError = (error: string) => {
  chrome.action.setBadgeBackgroundColor({ color: '#FFA500' }); // Set red error badge
  chrome.action.setBadgeText({ text: '!' }); // Set a warning symbol inside badge
  chrome.action.setBadgeTextColor({ color: '#FFF' }); // Set white text inside badge
  chrome.storage.local.set({
    general_error: error,
  }); // Save error details to LC
  Sentry.captureMessage(error); // Send message to Sentry
};
Let’s take a look at this one.
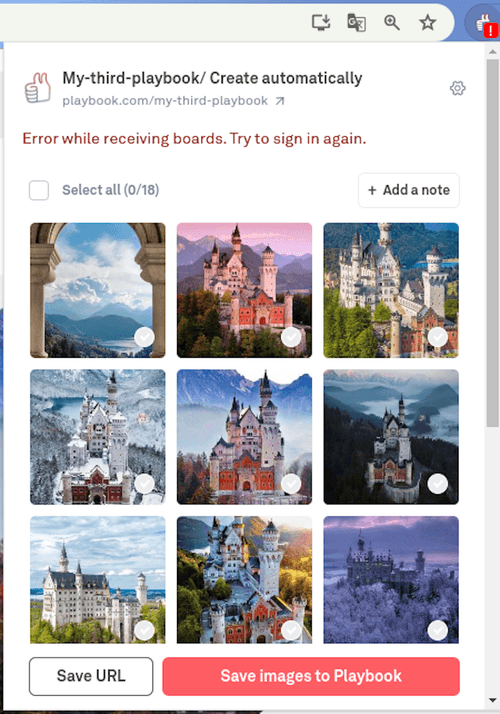
Note that you probably only want to send errors to Sentry in production environments, so, before initializing Sentry or sending a new message, it’s appropriate to check the environment variable in the configuration file.
Preparing to publish your extension in the Chrome Web Store
Now, once the extension development process is finished, we can finally publish it in the Chrome Web Store! But first, we need to finish some extra preparation:
- Review the Chrome Web Store policies to ensure your extension complies with all requirements and guidelines
- Register your developer account and fill out some additional information (publisher name, verifying email, and so on)
- Review your
manifest.json, and specify thename,description, andversionfields. Note that each new version that you upload to the store must have a larger version number than the previous version, so it’s better to start with the initial version with a low value, like 0.0.1 - Pull the latest main Git branch, run all linters and tests, and then build your production bundle. Make sure that your extension works as intended, and try this build version locally
- Zip your extension files, make sure you place the
manifest.jsonin the root directory
At long last, all is ready for launch! Upload the extension to the Chrome Web Store and submit it for review.
Note that review times can vary, but in most cases, it takes a few days. Very rarely, it can take several weeks, especially if you’ve set up your manifest.json to have broad permissions (like a host permission https://*/*), or when the amount of code is too large.
But, if all is good, after the review process, your extension will be published! Congratulations!
Summing up
We hope our journey will inspire you to create a Chrome extension (and help sidestep some common difficulties). Of course, a shout out is in order: if you’re looking for the ideal modern file manager solution for creatives, we totally recommend Playbook!
And to name drop the extension we’ve been discussing, check out Image Saver because using it makes saving those sources of inspiration super easy!
