How to quickly (and weightlessly) convert Chrome extensions to Safari


Created a useful browser extension for Chrome and now you want it to be available in Safari as well? In this post, we’ll share how to quickly (and with minimal effort) convert your Chrome extension into a Safari one, plus we’ll cover any extra implementations necessary to be ready for App Store publication!
We’ll explain how to do this by mining a real case from our experience for knowledge. That said, the lessons here will be transferable! So, first, some context: the task to convert an existing Chrome extension into a Safari extension came to us from our long-standing client, Playbook.
Playbook is a cloud storage platform platform for the modern creator, allowing users to store, share and collaborate on visual content. For a better understanding, take a look at the main page of Playbook below.

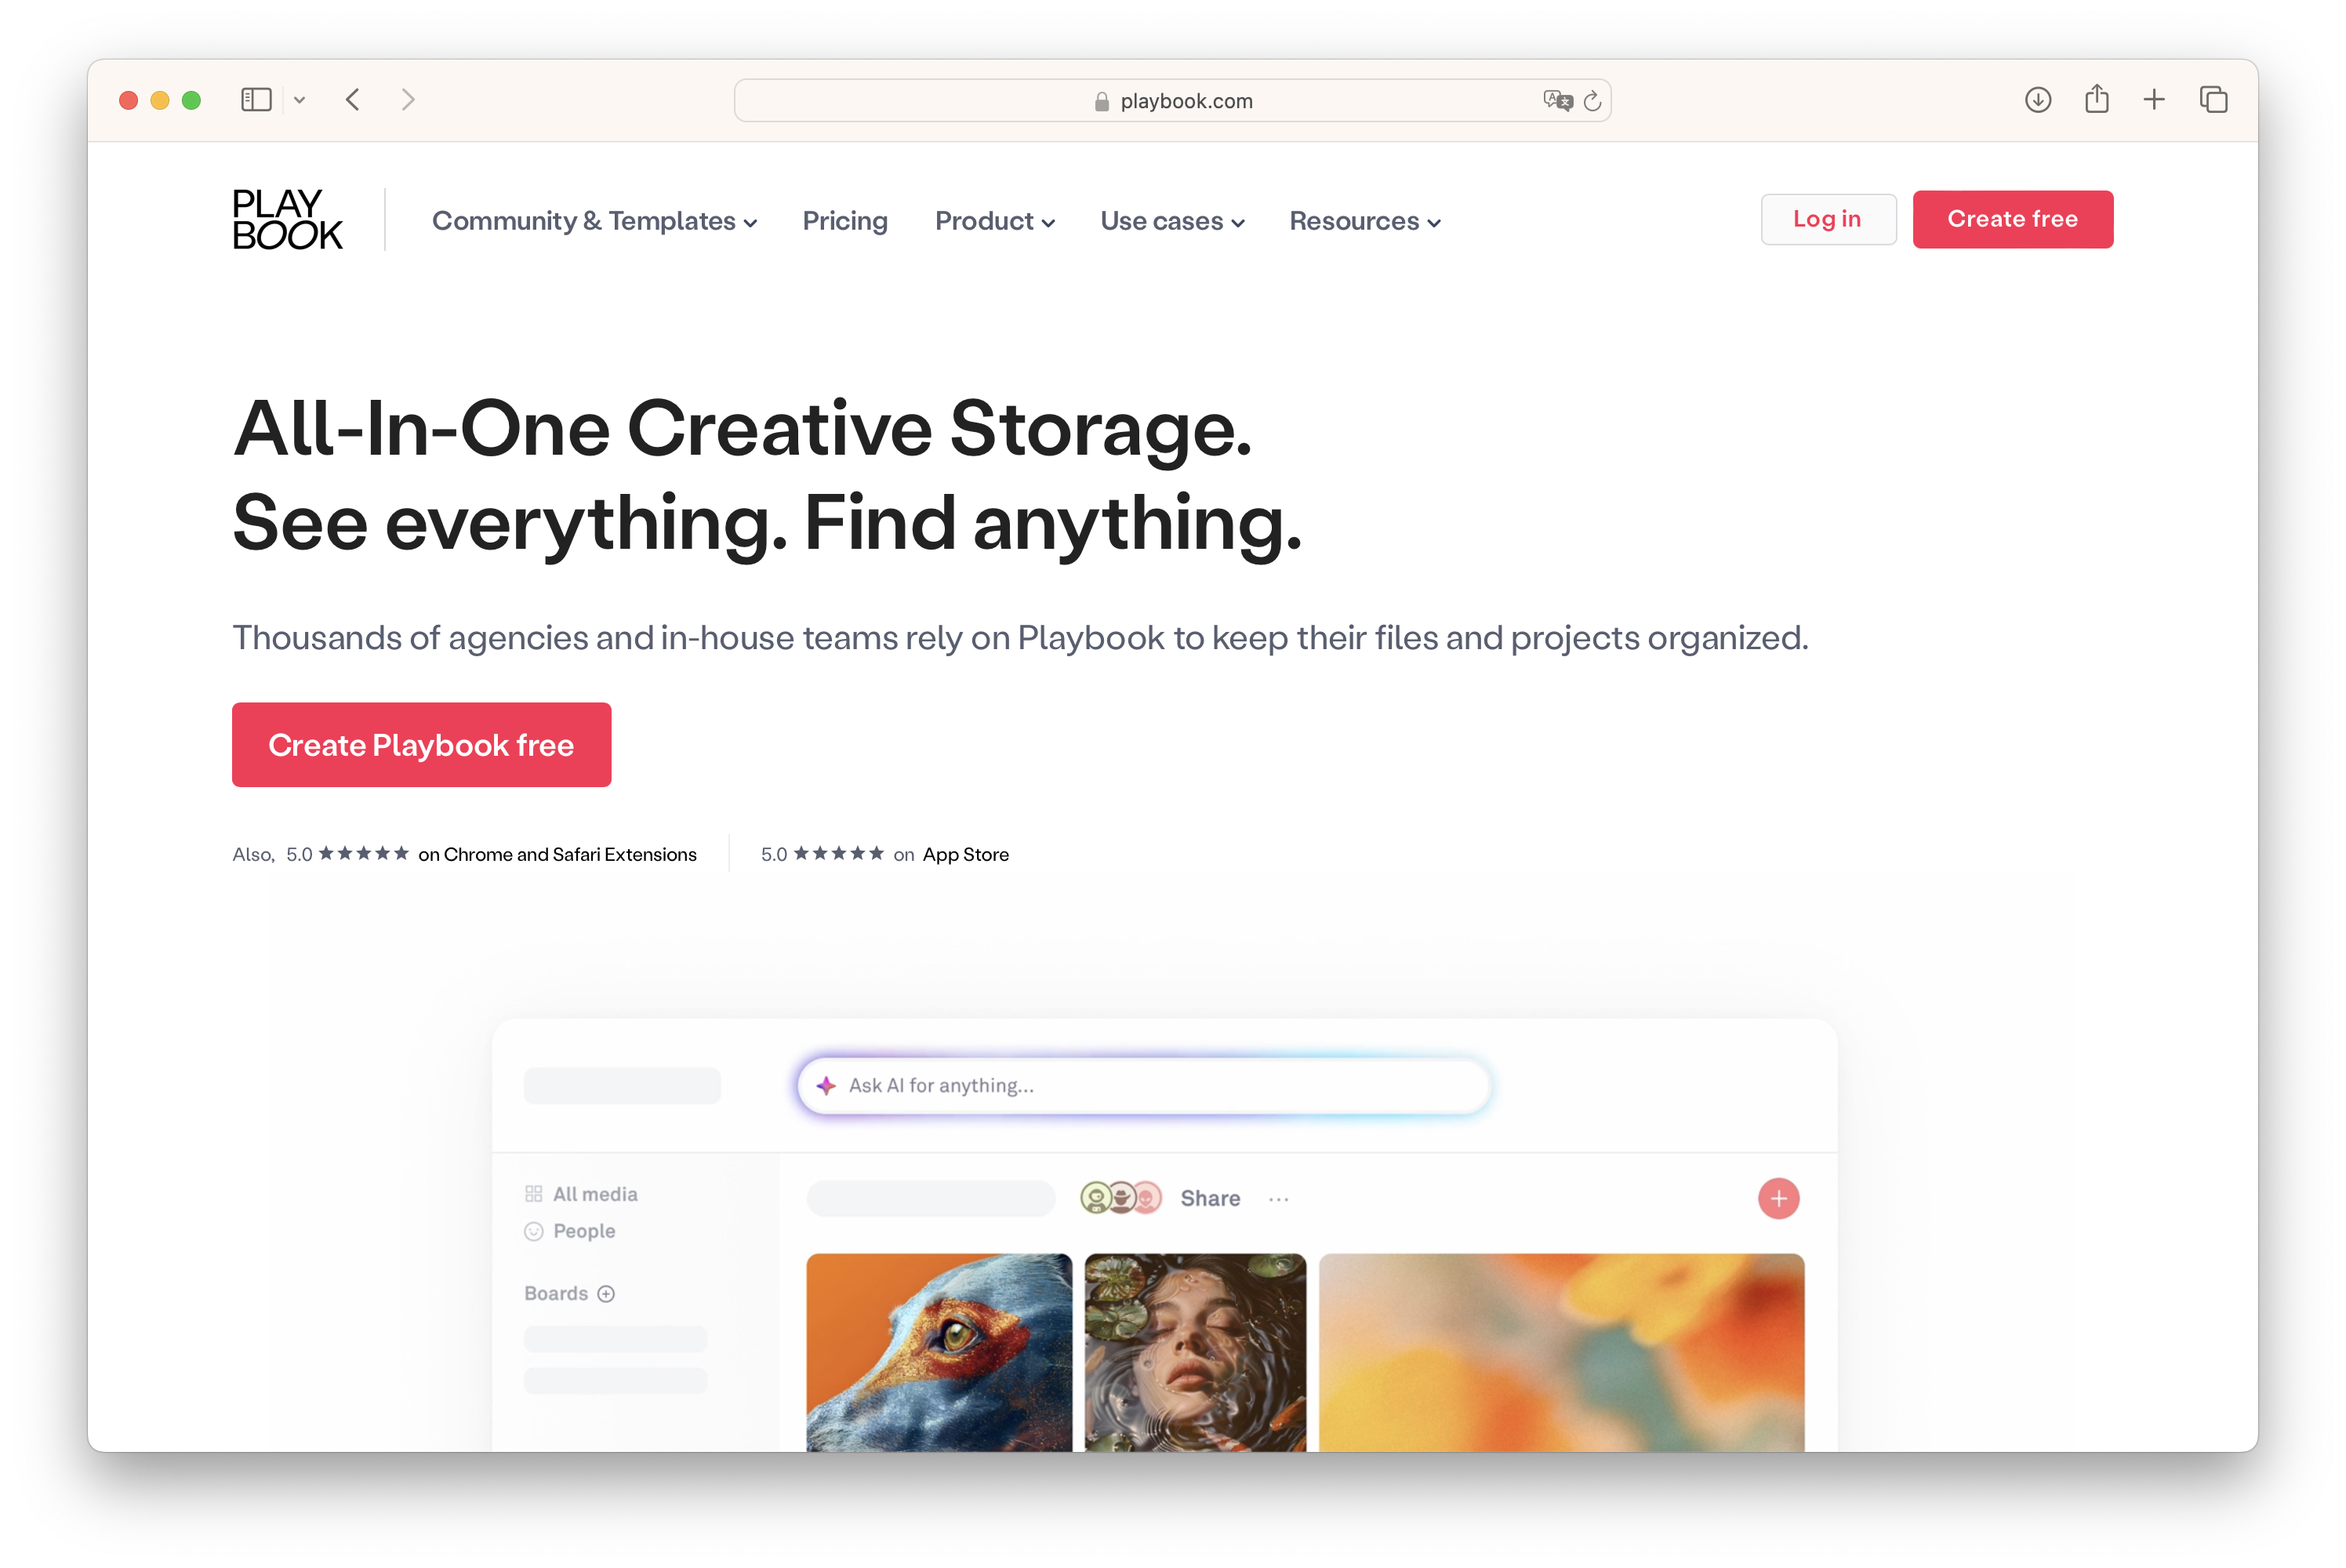
Playbook’s main page
Now, continuing our backstory: besides a lot of features and third-party integrations, we also helped Playbook to create Image Saver, a Chrome extension that allows users to automatically download and upload all of the images from any website directly to Playbook.

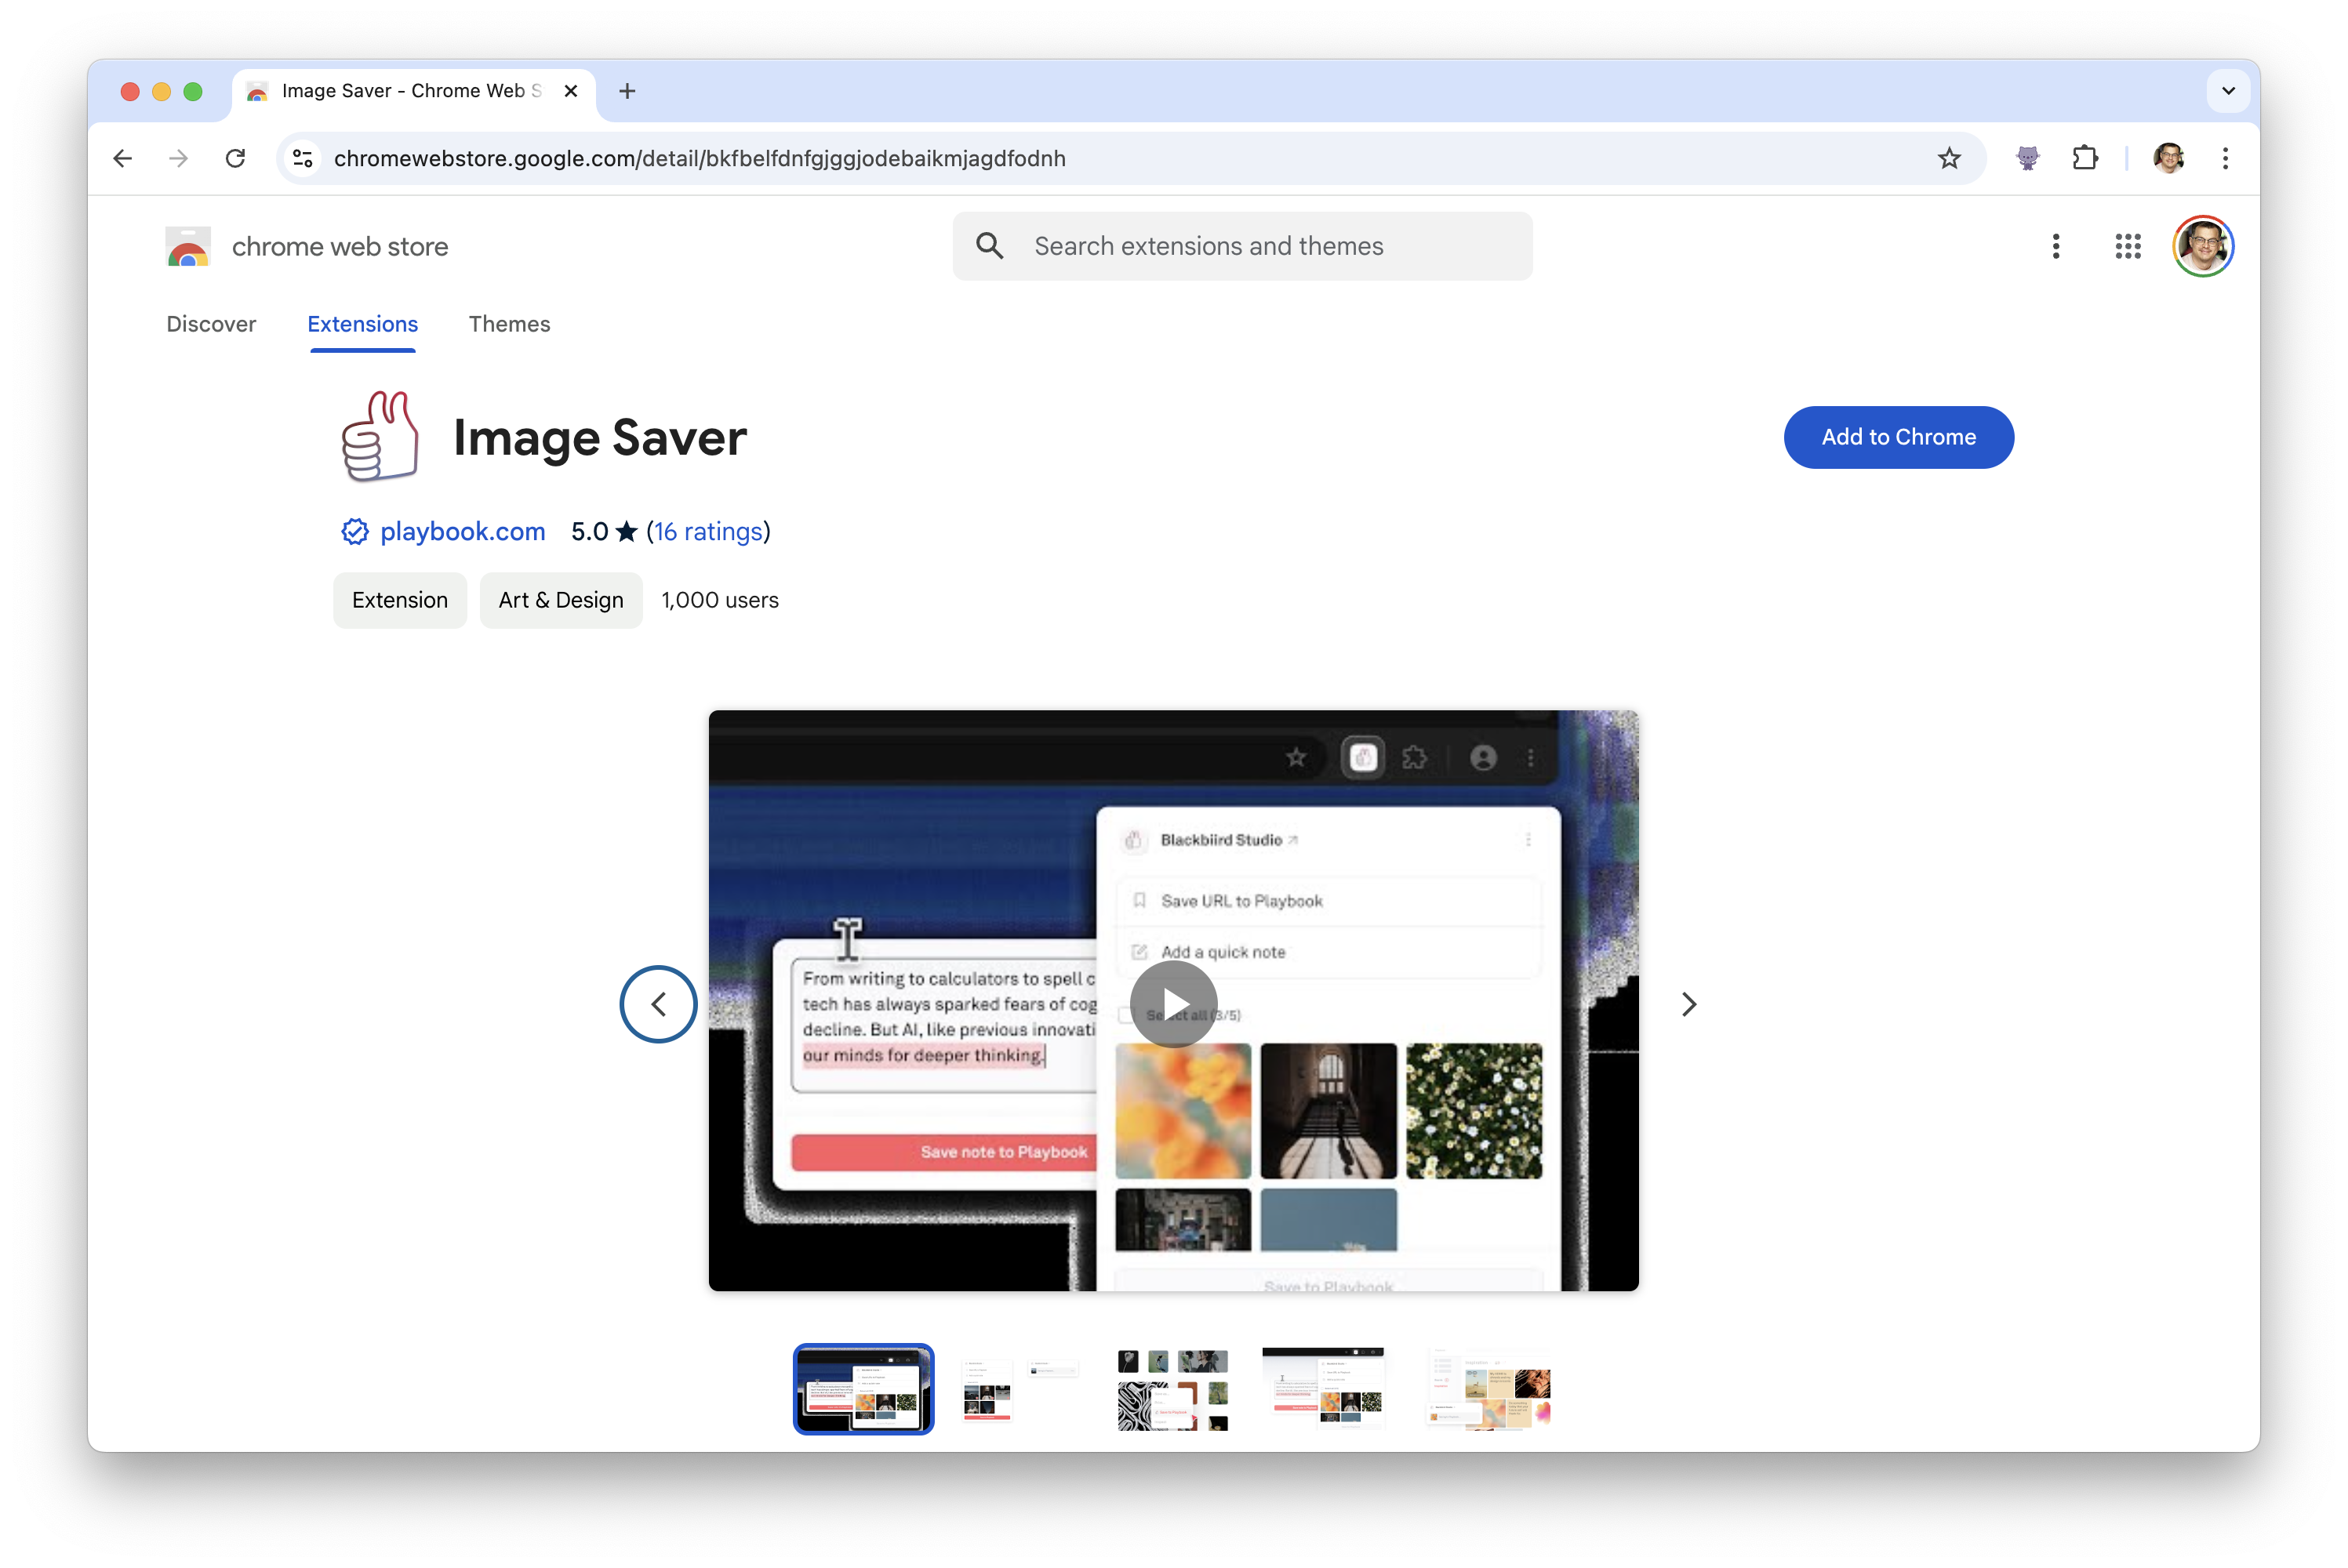
Image Saver on the Chrome Web Store
At the time of writing, the Image Saver Chrome extension has more than 1K users in Chrome Web Store and a 5 star rating. So, with the basics covered, let’s talk about why we ended up converting our Chrome extension to Safari.

Irina Nazarova CEO at Evil Martians
Why a Safari extension?
The idea to support a Safari extension came shortly after the successful launch of the Chrome extension. After all, Safari is the second most popular browser after Chrome, and according to statistics from Browser Market Share Worldwide, almost it’s preferred by nearly 20% of users. Not to mention Apple’s association with creatives and Safari’s status as the default browser on their machines. Additionally, many Playbook users prefer Safari over other browsers.
A Safari extension just made sense, so, we decided to support Image Saver on that browser. And we also decided to use the already existing Chrome extension as a basis, as this appeared to be a quick and effective solution.
But how? Is it just a matter of changing some code or using a program? Not exactly! Below, we’ll share how did it, and the extra features necessary for publication in the App Store (for example, authorization using ASWebAuthenticationSession).
Again, although this is a specific project example, you can apply these instructions to any extension!
Overview of the Chrome extension code: the manifest, popup, background, and content scripts
Let’s quickly see what the existing Chrome extension looked like, and how its code works in general. This is easily done by taking a look at manifest.json, the key file for every browser extension.
manifest.json is located inside the root directory and contains the important information about the structure and behavior of the extension. Here’s the content of our manifest.json file:
{
 "manifest_version": 3,
 "name": "Image Saver",
 "description": "Save your assets to Playbook",
 "version": "1.x",
 "icons": {
   "16": "src/icons/16x16.png",
   "48": "src/icons/48x48.png",
   "128": "src/icons/128x128.png"
 },
 "background": {
   "service_worker": "src/background.ts",
   "type": "module"
 },
 "action": {
   "default_popup": "src/components/Popup/Popup.html"
 },
 "content_scripts": [
   {
     "matches": ["http://*/*", "https://*/*"],
     "js": [
       "src/content_scripts/saveAllImagesToPreview.ts"
     ]
   }
 ],
"permissions": [
   "storage",
   "identity",
   "contextMenus",
   "activeTab",
   "scripting",
   "cookies"
 ],
}
The first five keys, manifest_version, name, version, description, and icons are the minimal set required for manifest.json, all of them are either needed by the Extensions platform or by Chrome Web Store. If you’re not familiar with any of them, you can learn more by checking Chrome’s Manifest file format documentation.
Now, let’s look at some others.
In the background key, we define the path to the extension’s service worker; this is a special script that runs in the background separately from a web page. Service workers can run as long as they are actively receiving events; so, we place the listener to the main application’s cookies change event in background.ts.
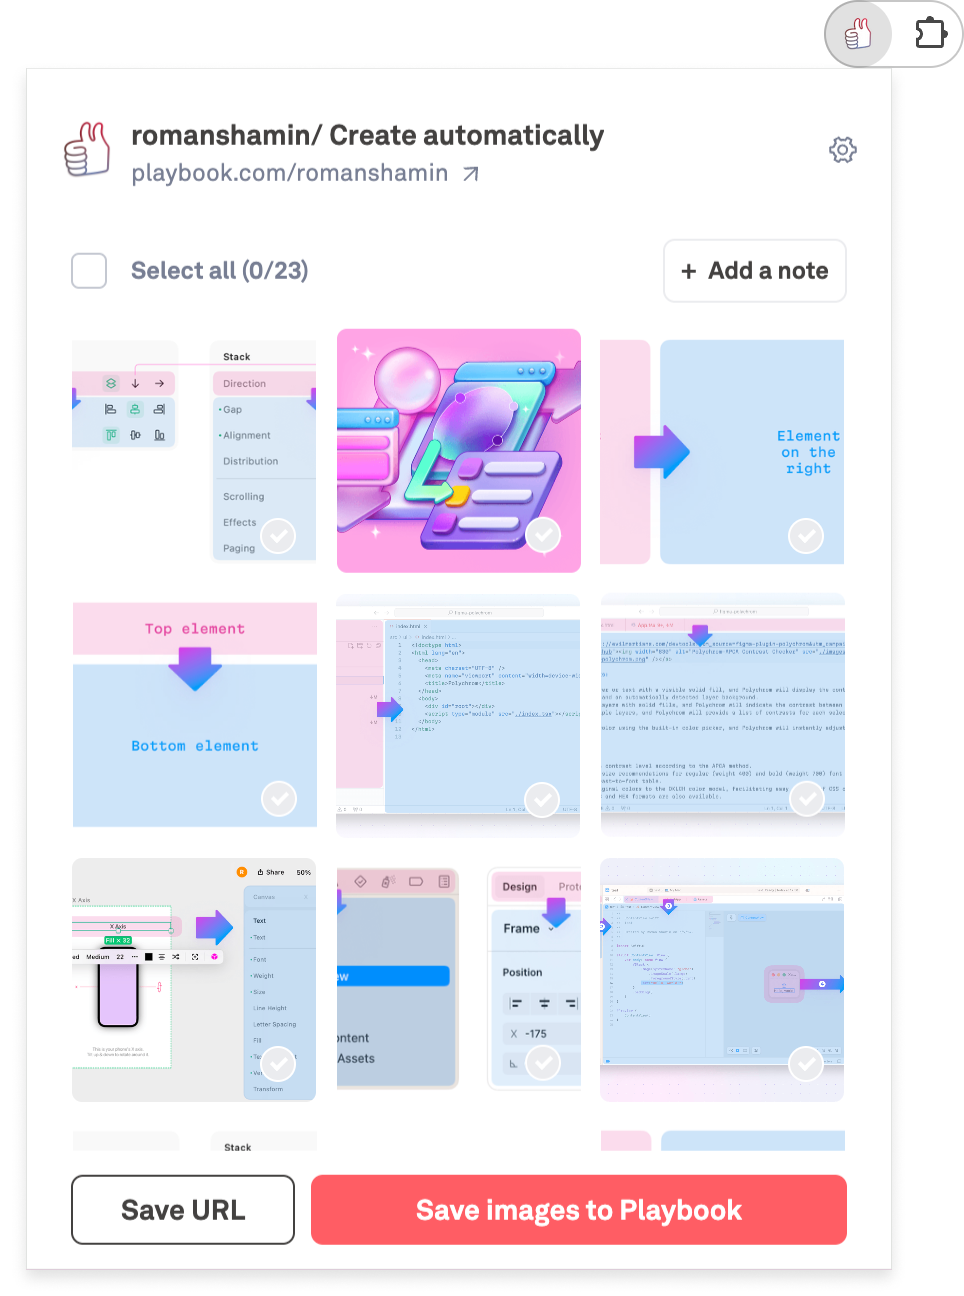
In the action key, we define the path to the extension’s popup; this is the window shown after clicking on the extension’s icon. The user interacts with this window to view all the images on the current page, then to select the desired images, and then to save them to Playbook.
In content_scripts, we, well, define the path to our content scripts. These are files that run in the context of the current web page and which have access to the page’s DOM. Specifically, the content script called saveAllImagesToPreview saves all the images from the DOM’s current page for the popup. This script is invoked each time a user opens the popup window, ensuring the popup content is always up-to-date.
Finally, the permissions array contains all the necessary permissions that we use for different popup features.
Ultimately, our popup looks like this:

We also must mention the core idea behind the extension’s authentication logic: we’re syncing the JWT cookie between the extension and the main application by listening to the event chrome.cookies.onChanged in the background script; the logged-in state depends on whether or not there is a JWT token in the cookies.
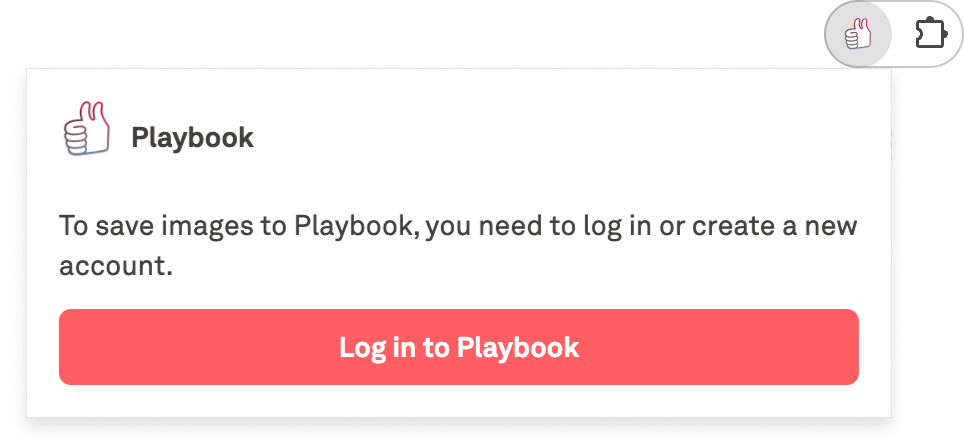
If the JWT token persists, we start the authentication flow, and after this is successful, we save the access token inside chrome.storage.local. If there is no JWT token or if it was expired or the cookies were cleared, we display the following logged-out view instead:

Clicking on the ‘Log in to Playbook’ button opens their website with the auth form in a new tab
And with that, we’ve covered the main points of the Chrome extesnion! There are actually a lot more features (which you can check it by installing the extension from the Chrome Web Store), but let’s dive into how we can convert the extension for Safari.
Converting a Chrome extension to Safari
To do this, you will need XCode, Apple’s integrated development environment for macOS, specifically with version 12 or newer. With version 12, XCode introduced the Safari Web Extension Converter which gives us the ability to convert Chrome extensions to Safari extensions.
Open the Terminal app and run the following command with the safari-web-extension-converter option, providing the path for your existing Chrome extension folder, like so:
xcrun safari-web-extension-converter /path/to/chrome-extensionLet’s note that this command had some additional options; for instance you can set the name of the generated app and XCode project by using the --app-name or set the --macos-only flag if you only need the extension for macOS. (For more information regarding converting options, check this section of the docs.)
Take a look at the extension structure in XCode after the conversion process:

And basically, that’s 90% of the conversion process done!
But if your extension is more complex (like ours was) you can’t relax just yet…
Making converted extensions Safari perfect
So, you’ll likely need to make some fixes in order to make the converted extension work flawlessly in Safari.
To elaborate, after running that last command, the converter may display warnings regarding any manifest keys unsupported by the current version of Safari, as seen below.


It’s worth noting that some of these warnings may not impact extension functionality and working processes, but some do require significant code changes.
If curious, the Apple Developer docs provide a whole list of differences and potential incompatibilities in this article.
That said, in this post, we’ll be covering the most common issues after converting a Chrome extension to Safari, including some which actually are not explicitly mentioned in that list.
#1: Never use browser.storage.local.get() inside the popup components, beyond the functions. If you want to subscribe to local storage changes, place the browser.storage.onChanged.addListener in the useEffect hook.
The thing is when developing Chrome extensions, some may neglect this rule (even though it’s a really bad practice), yet, in many cases there are no negative consequences (like significant UI freezes due to constant updates from get()).
However, if you convert code like that for use in a Safari version of the extension, you’ll inevitably end up with freezes. Why? This is because Safari is more prone to UI freezes than Chrome as a result of its not-as-aggressive JavaScript engine optimizations, differences in memory management, and less efficient hardware acceleration.
#2: browser.identity isn’t supported in Safari. So, specifically, you can’t use launchWebAuthFlow for authentication (like you can in Chrome). This limitation requires developers to find alternative auth methods.
#3: browser.cookies.onChanged is also not supported in Safari. Therefore, we cannot rely on real-time cookie change events, as we do for in the Chrome extension in order to sync the cookies of the main Playbook application with the extension (an approach which made our auth process seamless).
#4: browser.notifications isn’t supported in Safari, which limits the ability of web extensions to create user notifications. As a result, we must implement alternative methods for providing this feature (for example, by adding a content script that shows and hides the Notification component when the extension’s background sends a message via some trigger).
#5: In macOS, Safari has limited support for the browser.webRequest API, restricting the ability of developers to block web requests. In iOS, it’s completely unsupported.
In the case of our project, the constraints above primarily affected the authentication flow, and this impact was quite critical–we couldn’t implement seamless cookie syncing with the main app (as in the Chrome extension), and we couldn’t implement launchWebAuthFlow as we could with Chrome.
Moreover, after an AppStore review, we were asked to implement auth through ASWebAuthenticationSession, a session that an app uses to authenticate a user in iOS and macOS. This task required adding a portion implemented with Swift, which we did.
Since this happened to us, let’s try to be useful and describe this process in more detail.
Implementing ASWebAuthenticationSession with Swift
During the ASWebAuthenticationSession process, the browser loads and displays a page where the user can authenticate. In macOS, this happens inside the user’s default browser, assuming it supports web authentication sessions, otherwise, it takes place in Safari.
That meant that we needed to change our auth flow from the beginning. In our Chrome extension, clicking on the “Log in to Playbook” button will open the Playbook website with the auth form in a new tab—but that’s not how ASWebAuthenticationSession works.
Instead, with Safari, clicking on this button will invoke the function safariSignIn in the auth.ts file:
const safariSignIn = (searchParams: string) => {
    browser.runtime.sendNativeMessage("application.id", {
        messageName: 'startAuthFlow',
        url: `${config.FRONTEND_HOST}/oauth2/authorize?${searchParams}`,
    });
};
Here, the safariSignIn function sends a native message from a web extension to a native application using browser.runtime.sendNativeMessage API. Safari ignores the application.id parameter and only sends the second argument, which is the message. This message includes a messageName identifying the action (‘startAuthFlow’) and a URL that leads to the Playbook’s sign-in page, to initiate an OAuth2 process.
We listen to this native message at the SafariWebExtensionHandler.swift in the Shared (Extension) folder. The Swift function beginRequest processes incoming messages, and then checks the message name to determine if it should start an auth flow. If so, it calls the startAuthFlow function:
import SafariServices
import os.log
import AuthenticationServices


@available(macOSApplicationExtension 10.15, *)
class SafariWebExtensionHandler: NSObject, NSExtensionRequestHandling, ASWebAuthenticationPresentationContextProviding {
   func beginRequest(with context: NSExtensionContext) {
       let request = context.inputItems.first as? NSExtensionItem

       let message = request?.userInfo?["message"] as! [String: Any]

       if let messageName = message["messageName"] as? String, messageName == "startAuthFlow" {
           if let urlString = message["url"] as? String, let url = URL(string: urlString) {
               startAuthFlow(url: url, context: context)
           }
       }
   }
}
The startAuthFlow function initiates an OAuth2 authentication session using ASWebAuthenticationSession. We launch this session with the provided URL of Playbook’s sign-in page, then handle the callback URL to extract the access grant (which is stored inside the code query parameter) and invoke the function sendMessageToExtension:
func startAuthFlow(url: URL, context: NSExtensionContext) {
    let webAuthSession = ASWebAuthenticationSession(
        url: url,
        callbackURLScheme: <SCHEME>,
        completionHandler: { (callbackURL: URL?, error: Error?) in
            if let callbackURL = callbackURL {
                guard let queryItems = URLComponents(url: callbackURL, resolvingAgainstBaseURL: false)?.queryItems,
                        let grant = queryItems.first(where: { $0.name == "code" })?.value else {
                    print("No access grant found in callback URL")
                    return
                }
                self.sendMessageToExtension(grant: grant)
            } else {
                print("Error: \(String(describing: error?.localizedDescription))")
            }
        })
    webAuthSession.presentationContextProvider = self
    webAuthSession.prefersEphemeralWebBrowserSession = true
    webAuthSession.start()
}
This function, sendMessageToExtension, sends a message back to the extension containing the access grant using SFSafariApplication.dispatchMessage method (more on that here). It allows the extension to receive the access token for further authentication steps.
func sendMessageToExtension(grant: String) {
    let messageName = "Swift Message"
    let messageInfo = ["grant": grant]
    SFSafariApplication.dispatchMessage(withName: messageName, toExtensionWithIdentifier: <EXTENSION_ID>, userInfo: messageInfo) { error in
        debugPrint("Message attempted. Error info: \(String.init(describing: error))")
    }
}
Above, <EXTENSION_ID> is the string value of the bundle identifier for the app extension; you can choose it yourself. But it should be the same value as the variable extensionBundleIdentifier in the Shared(App) folder -> ViewController file.
To prepare the extension to receive messages from the Swift code, use browser.runtime.connectNative to establish a port connection.
In background.ts:
let port = browser.runtime.connectNative("application.id");Safari again ignores the application.id parameter and only allows the script to establish a port connection with the containing macOS app.
Then, we’ll listen to the message that contains the access grant. With this access grant, we can receive the access token and finish the process of authorization:
port.onMessage.addListener(async (message) => {
    const accessGrant = message.grant;
    if (accessGrant) {
        const { accessToken } = await requestAccessToken(accessGrant); // Receive the access token using the access grant
        storeAccessToken(accessToken); // Store the received access token in the extension’s local storage
    }
});
To make our auth flow work, we also need to add the function presentationAnchor (more info here on that) to the SafariWebExtensionHandler class, otherwise, this class won’t conform to protocol ASWebAuthenticationPresentationContextProviding (and more info here on that).
func presentationAnchor(for session: ASWebAuthenticationSession) -> ASPresentationAnchor {
    return ASPresentationAnchor()
}
After that, the new auth flow for Safari will work just fine!
Take a look at the Playbook sign-in page which opens upon starting ASWebAuthenticationSession:
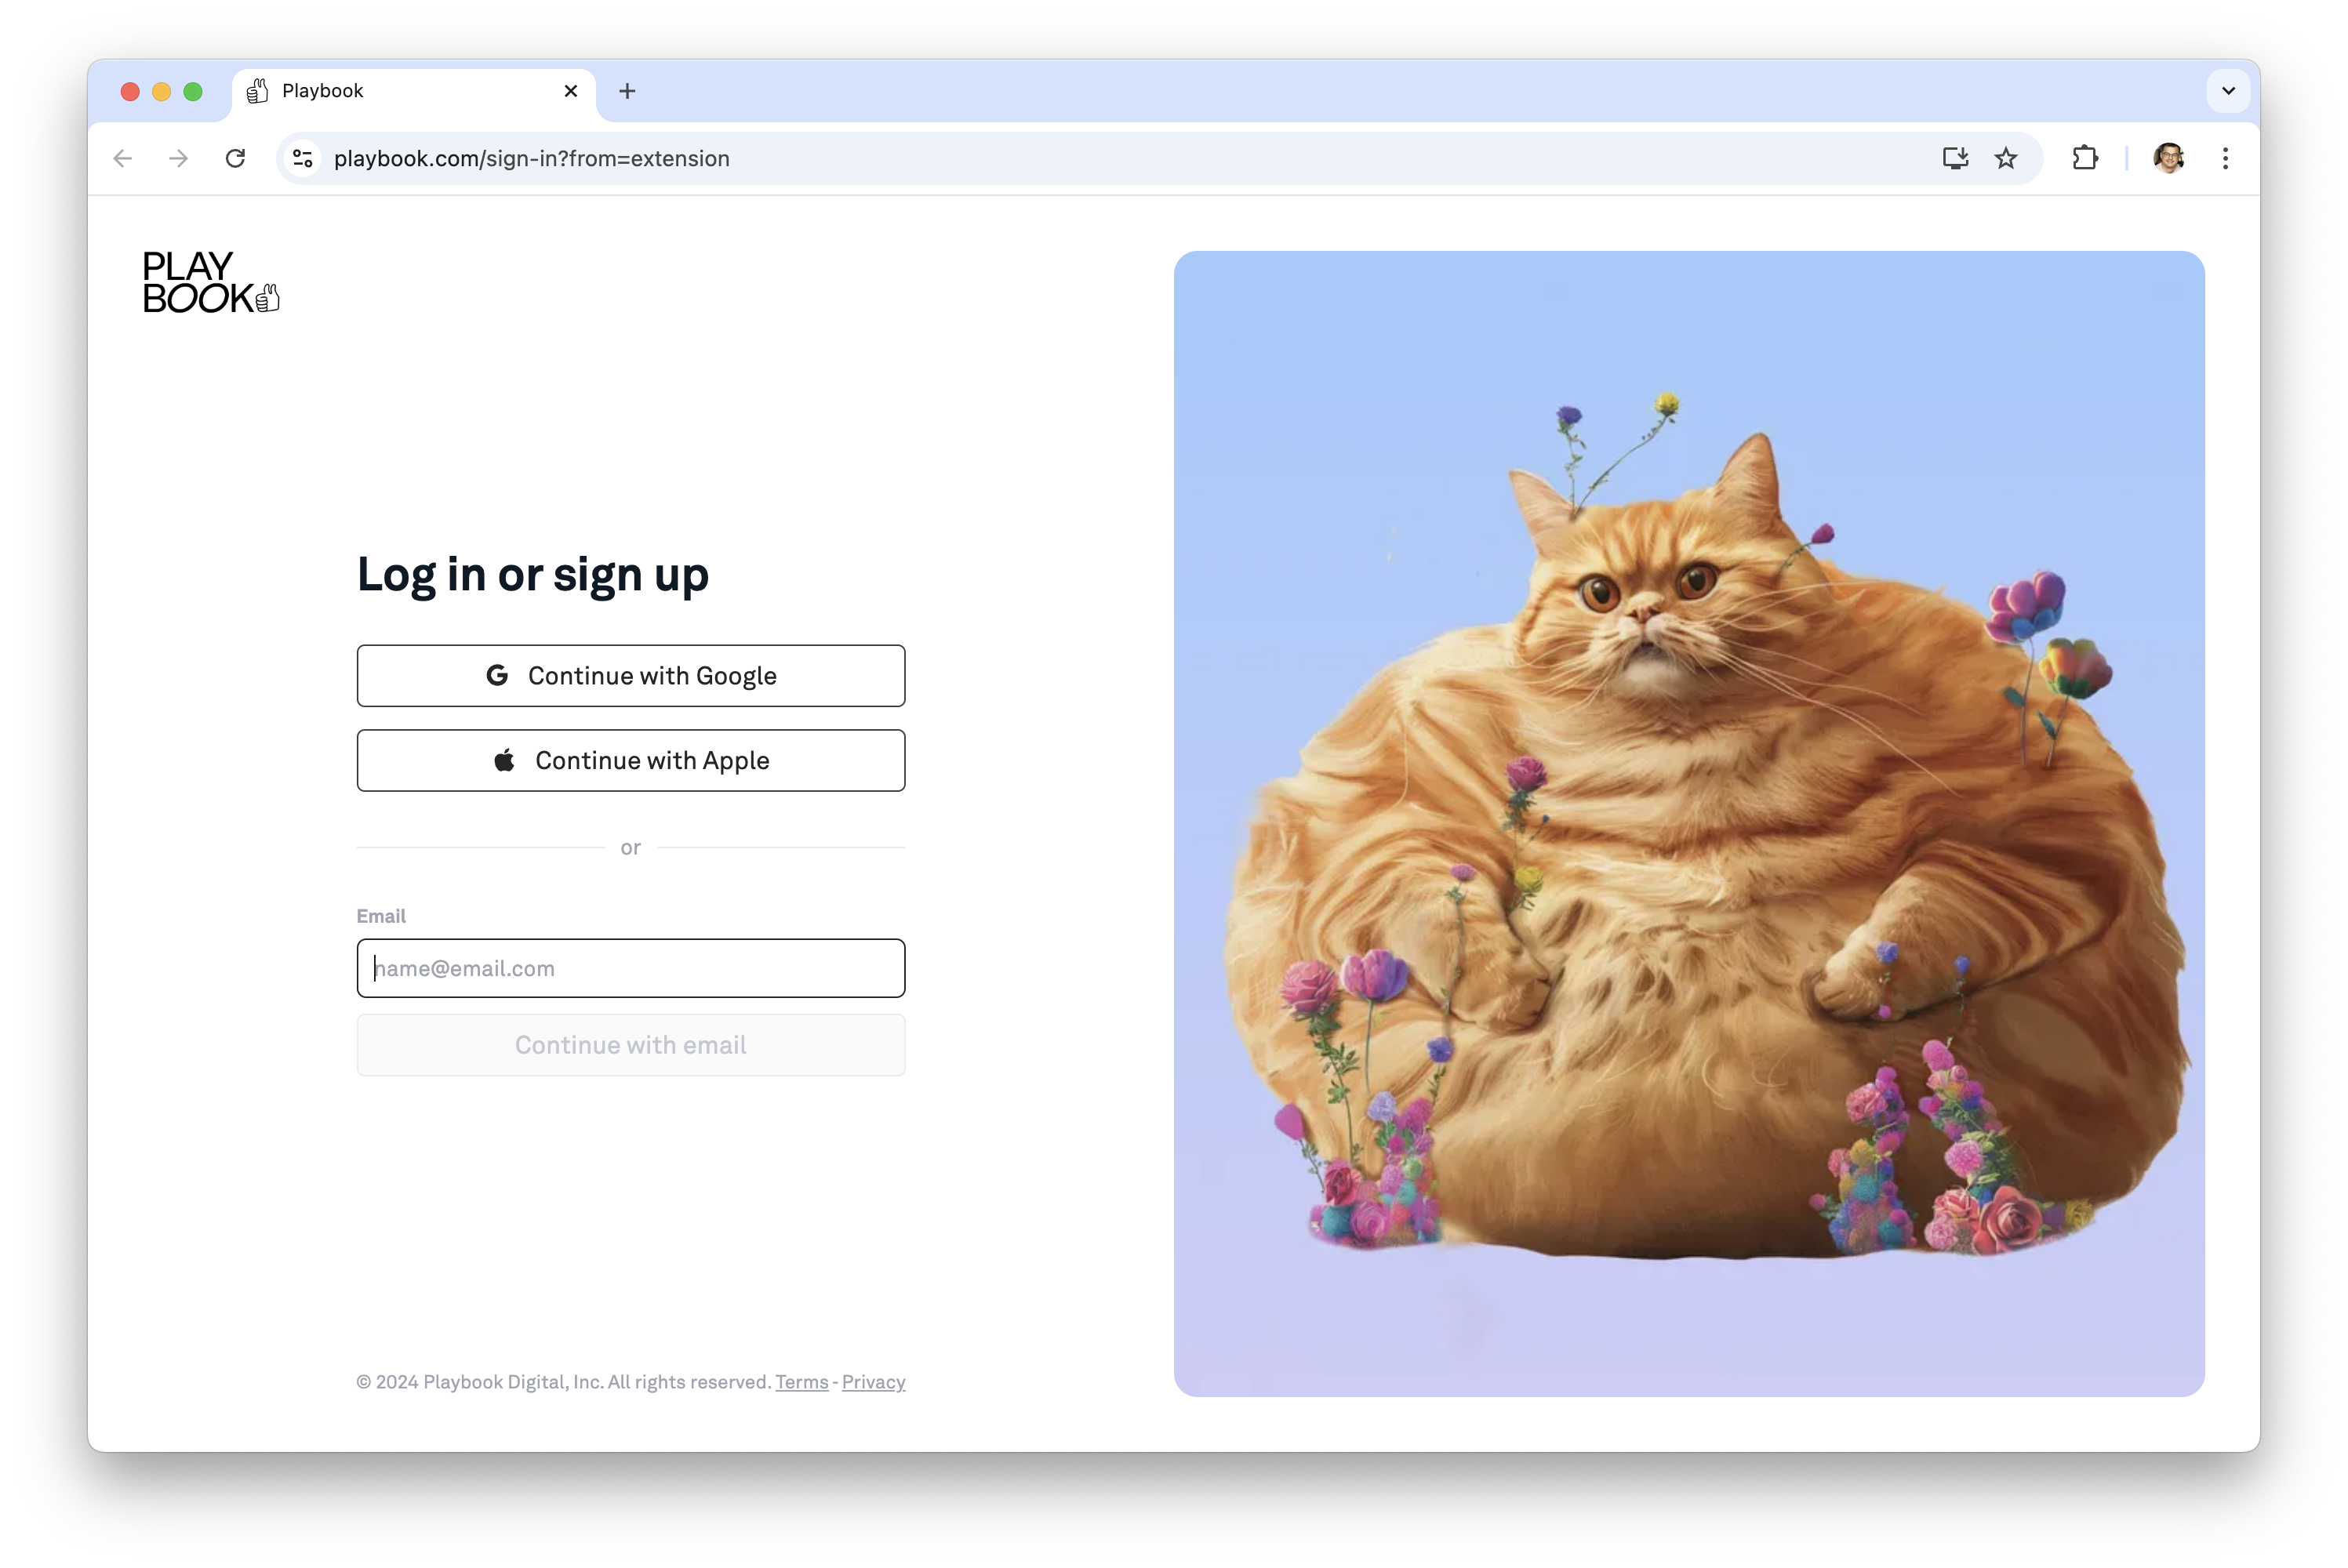
Playbook sign-in page when starting ASWebAuthenticationSession
Preparing a Safari Web Extension for distribution and publishing
With a Safari Extension ready in technical terms, it’s time to move forward! Naturally, we want to distribute it to beta testers, then publish it on the App Store. But before we can do that, we need to undertake some more preparations.
-
First, install the extension locally and test it properly. Follow this guide from the docs on how to install and run an unsigned extension in Safari.
-
Add an app icon and App Store icon if you haven’t already; for more information on configuring your icons, check the section of the docs on configuring your app icon.
-
Assign the project to a team. To do this, in the project editor, select the “Signing & Capabilities” pane and choose your team from the Team pop-up menu.
-
Add missing
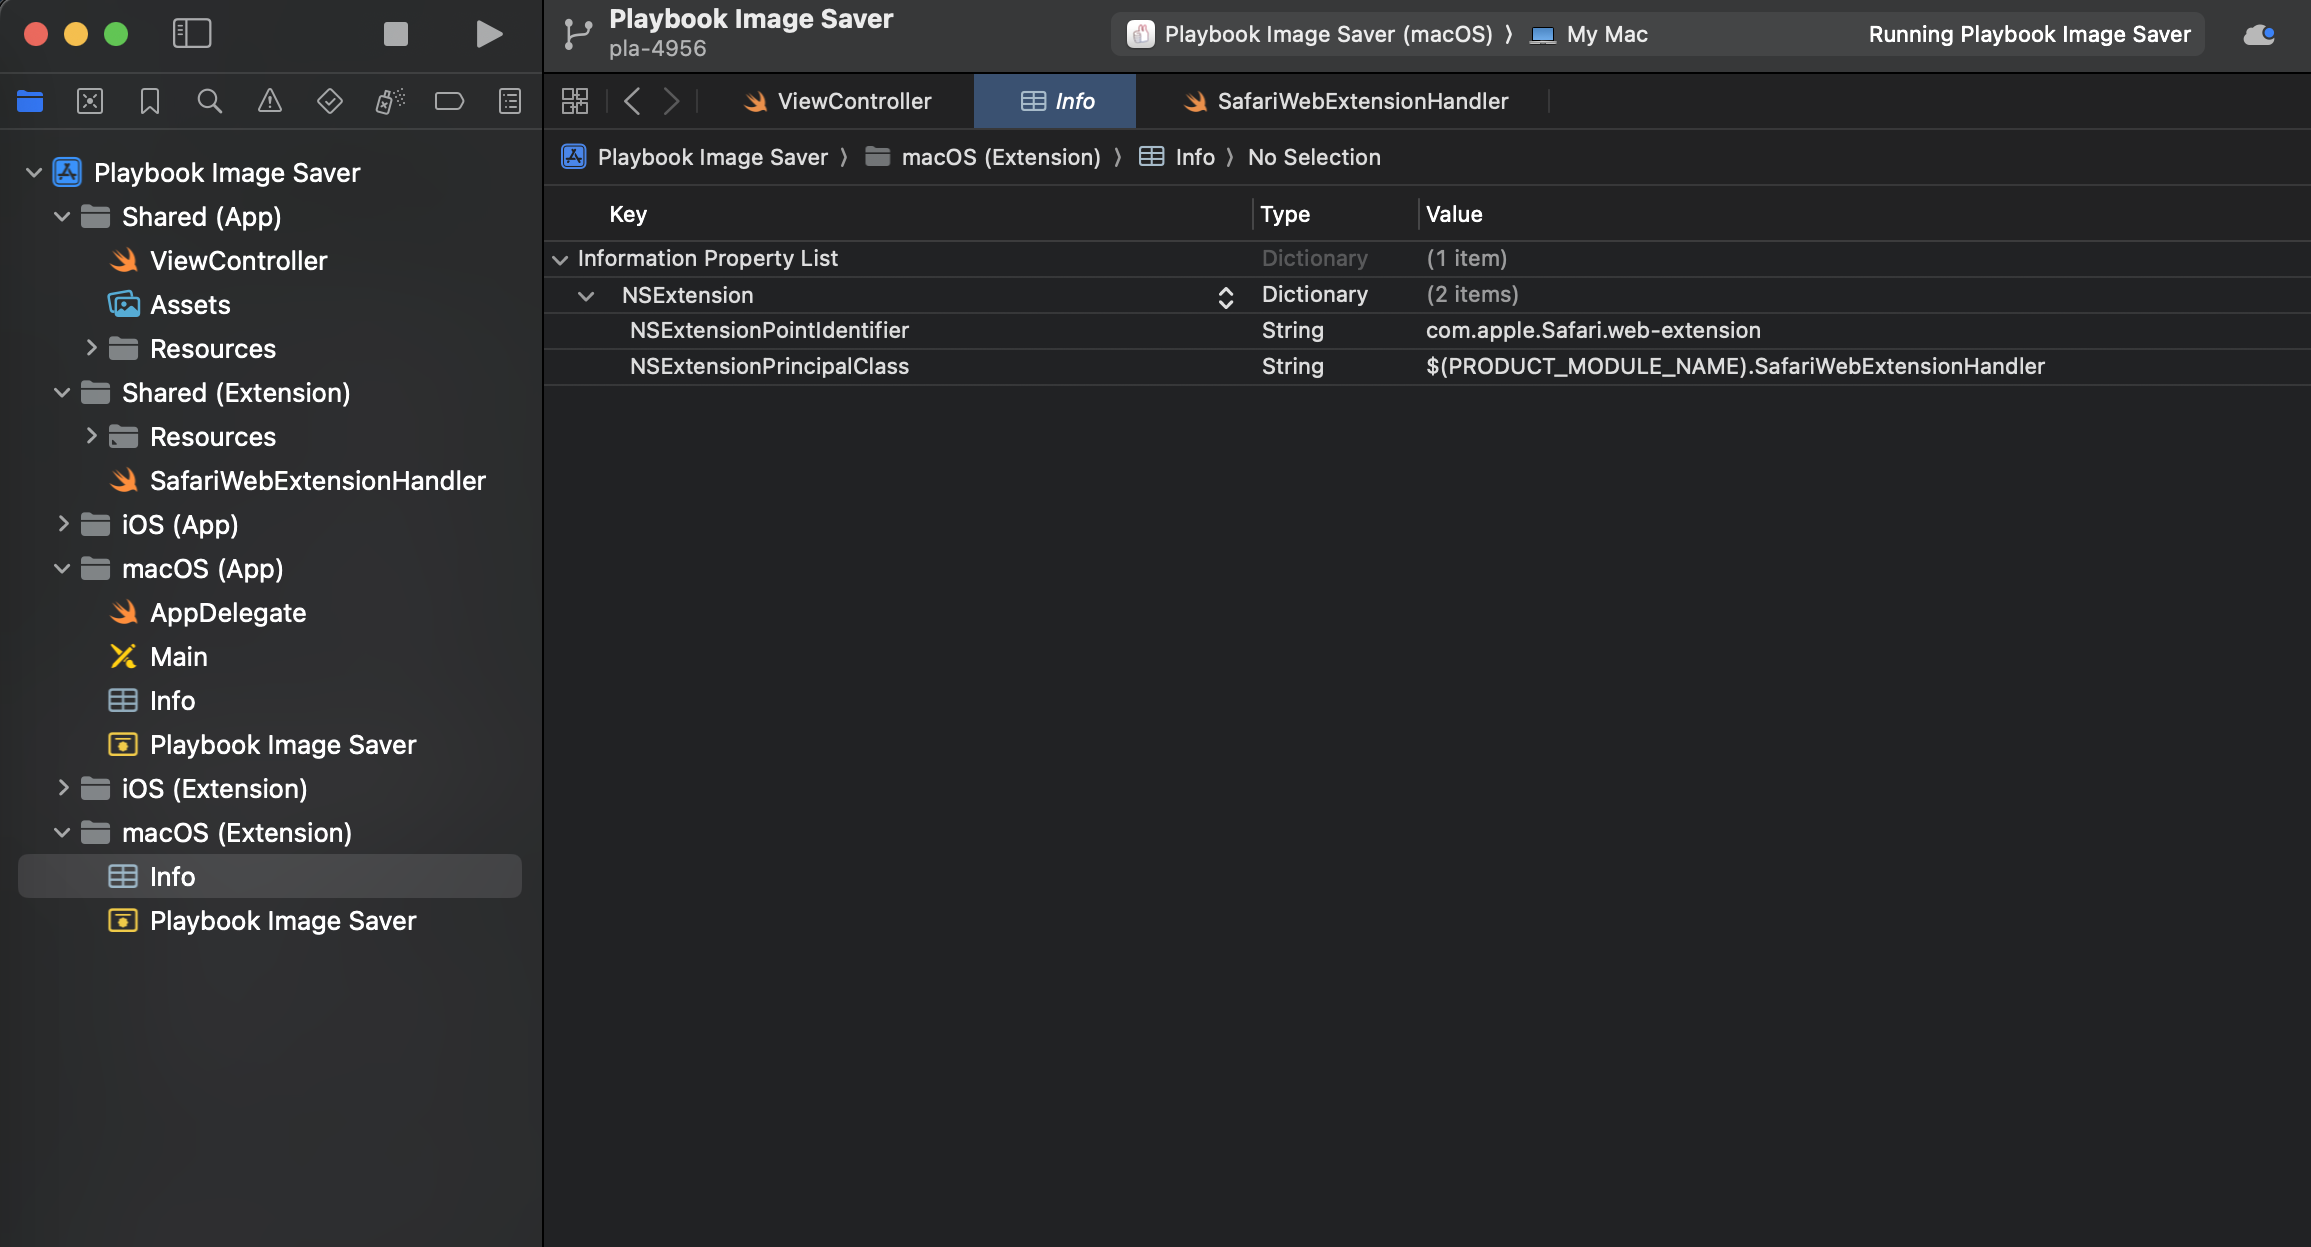
Schemas, start by selecting: Product -> Schemes -> Manage Schemes; there should be both App and Extension schemes. Then, in the “Signing and Capabilities” section, setBundle Indentifierto<APP_ID>for App and<EXTENSION_ID>for Extention; in the same section, change “Signing Certificate” to “Development”. -
In General -> Identity, set up an App Category for your app which is appropriate for your application. In
Info.plistfor App and Extension add a new row calledApp Categorywith the same value. -
Build the project by selecting
Appin the top build section, then select: Product -> Archive -> Validate.
Congrats! Now you’re ready to distribute your app! From this point on, you can simply follow the section of Apple’s docs that provides detailed information on how to create a distribution and then publish your plugin on the App Store.

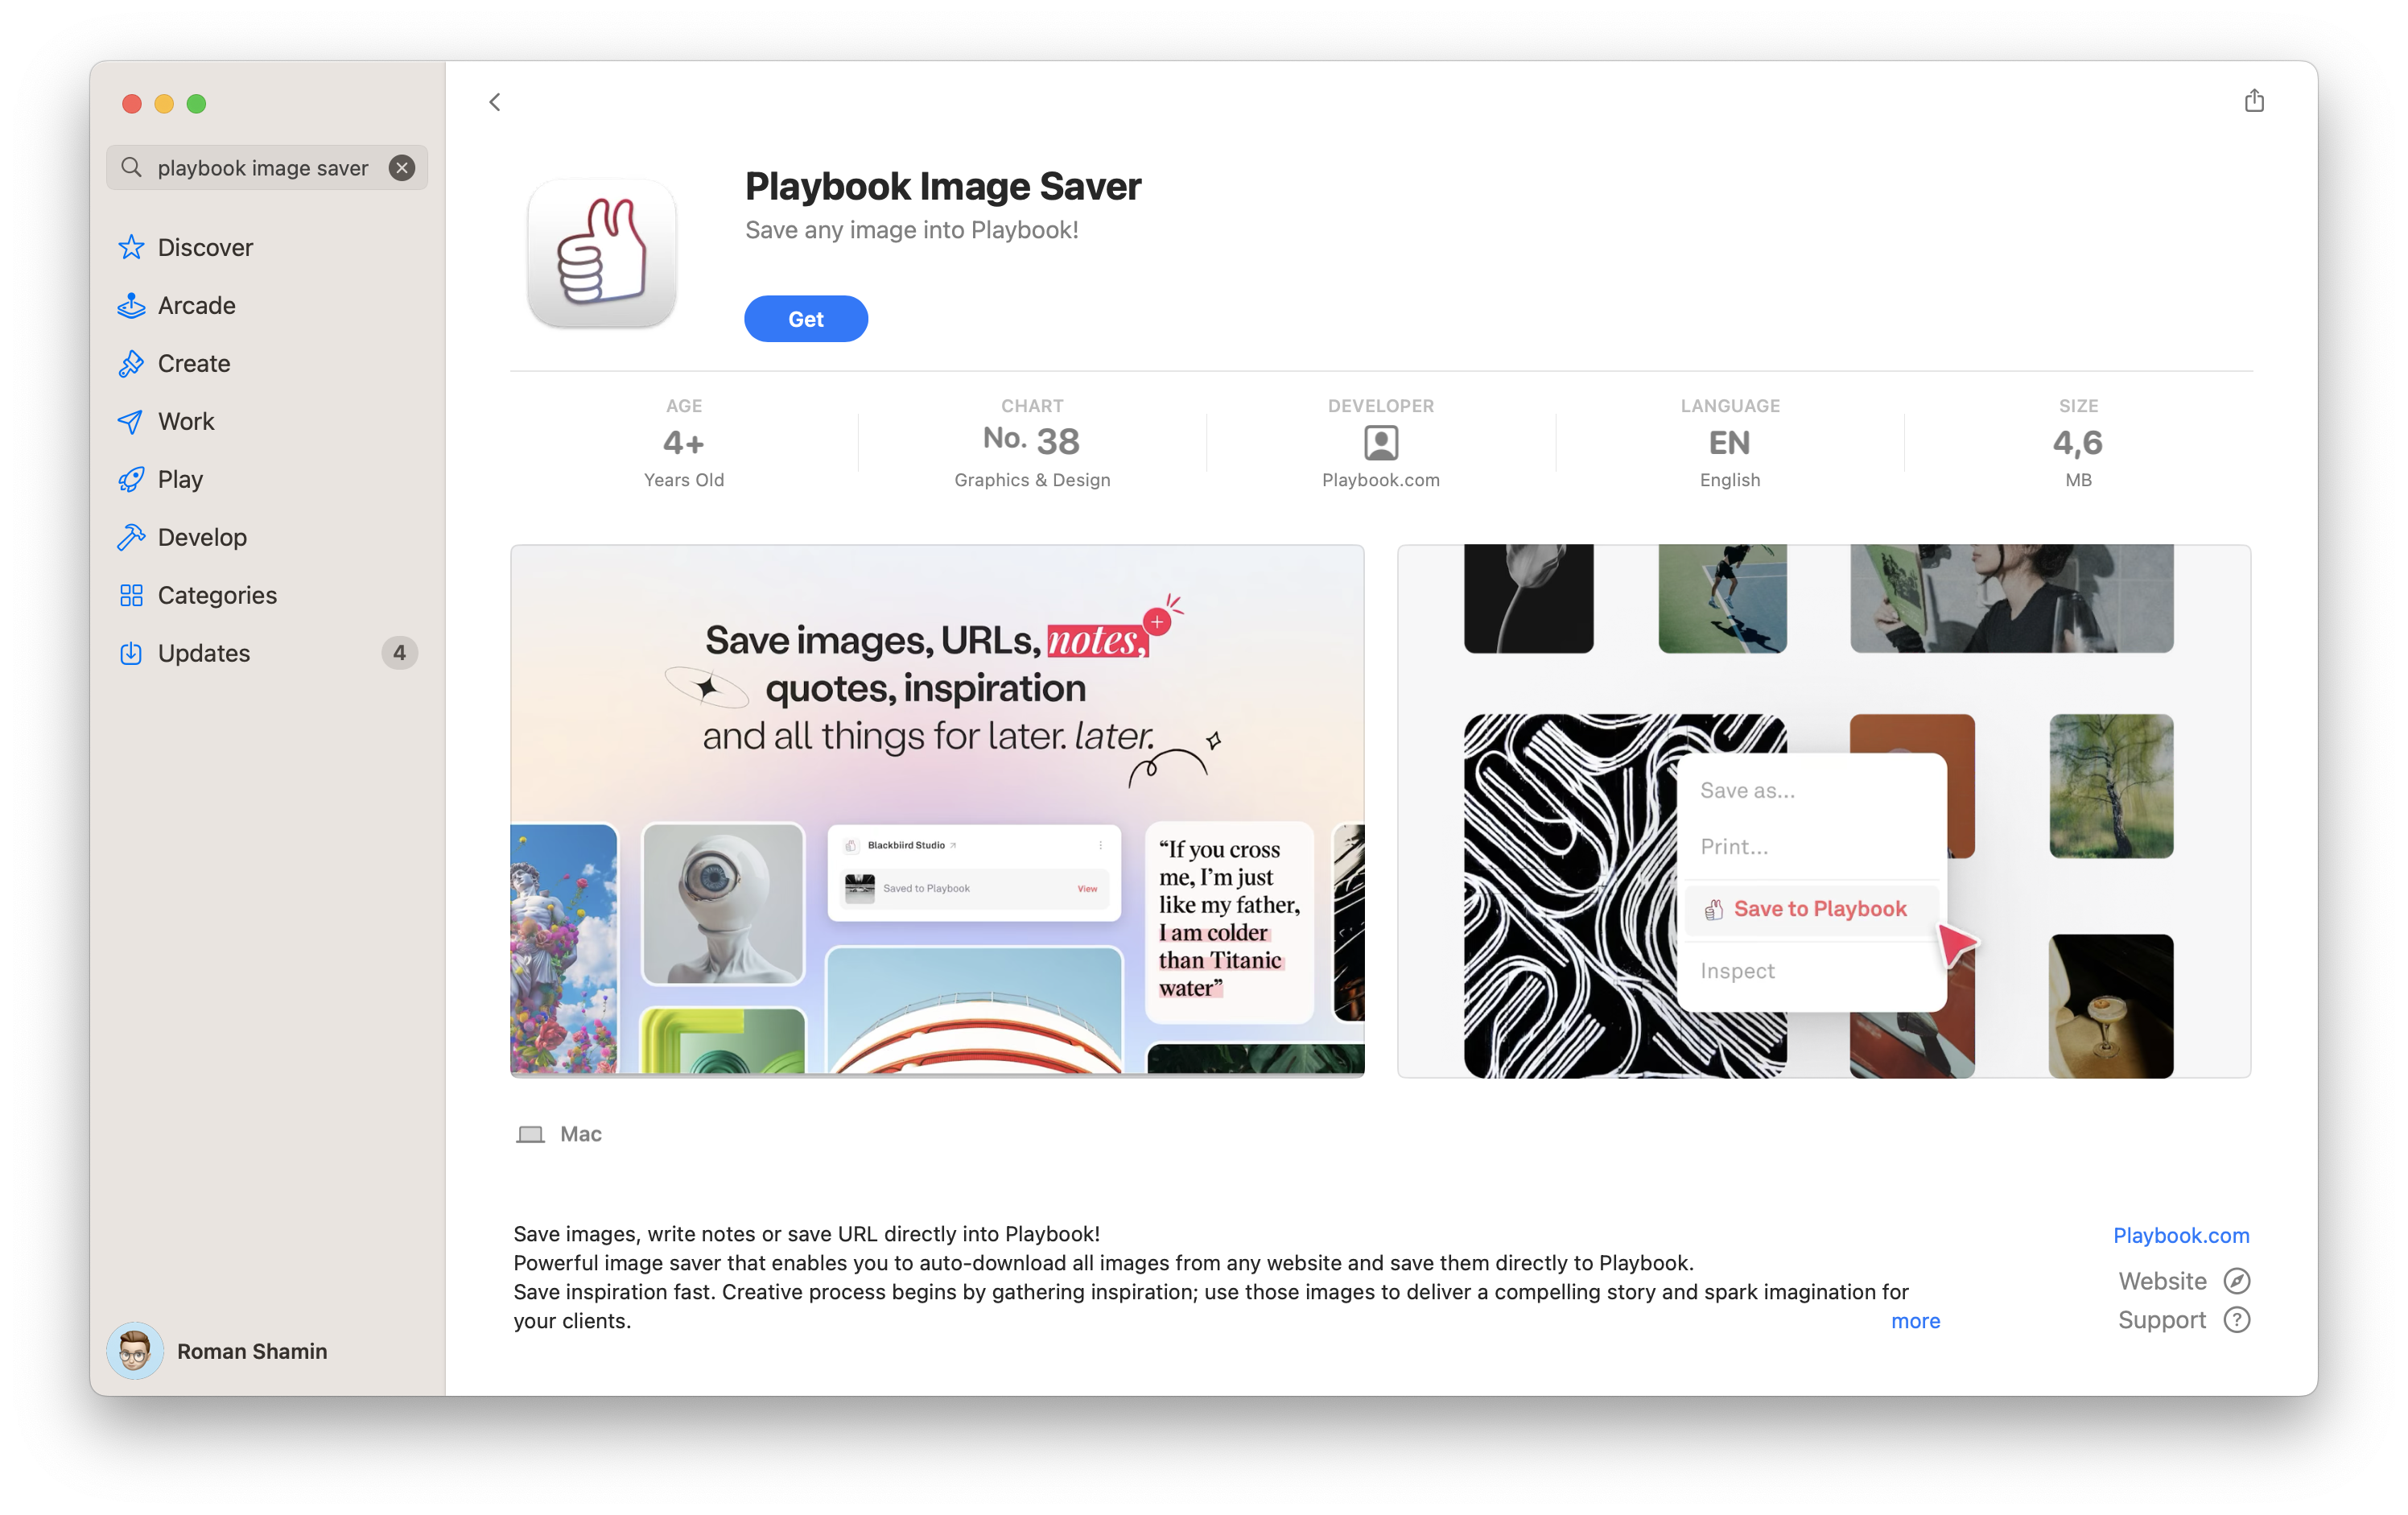
Playbook as featured on the Apple App Store
Summing up
So, maintaining extensions across browsers isn’t as difficult as it might initially seem! And hopefully this guide will help you (nearly) effortlessly create a Safari extension from a pre-existing Chrome extension.
Finally, if you’re looking for the ideal cloud file manager solution for creatives, we have to recommend trying Playbook. Plus, with Image Saver, saving your inspirations is so easy–and can check out the browser extensions on both the Chrome Web Store or the Apple App Store.
Good luck, thanks for reading, and do let us know if you encountered any other issues we missed here!