Figma plugin API: diving into advanced algorithms & data structures


When developing a Figma plugin, one may encounter issues not covered by the official documentation. This happened to us while making Polychrom, a (soon-to-be renowned) UI-text readability plugin. In our case, we had to think of solutions like applying algorithms and tree traversal techniques to finish the job. Read on as I go “outside the docs”!
Polychrom is our free Figma plugin allowing for more precise control over UI text readability. A big part of Polychrom involves automatically detecting contrast levels between selected items and their background layers using the APCA method.
Considering this is a plugin with such a simple UI and (seemingly) straightforward functionality some might be tempted to think there isn’t much going on behind the scenes.
But there is. And now, we not only have a product we’re proud of, I have an article full of lessons I learned on the journey to get there.
The fact of the matter is, while some issues were easily navigated thanks to the Figma API documentation, like all documentation, there’s no way they could account for everything a developer might encounter. So, what do you do? Well, years ago, when I started getting into the world of frontend, I’d have turned to an article like the one you’re about to read right now!
Now, the following misconception is probably already well on its way into oblivion, but, as frontend developers, we can do so much more than just focusing on website aesthetics, or the shade of a particular warning notification. Specifically, we can also incorporate more traditional elements of computer science into our work, like algorithms, data structures, and tree traversal techniques.
And, in the course of making Polychrom the best product possible, that’s exactly what we did.
I hope you’ll read this and take something from it. Learning to work with the material we’ll tackle here is also beneficial because these techniques are useful across a wide range of situations. I’ll share our process, some possible problems and pitfalls, and the ways we got ourselves unstuck. And, if this text inspires the development of the next great Figma plugin, that’s even better.
Looking at the final result
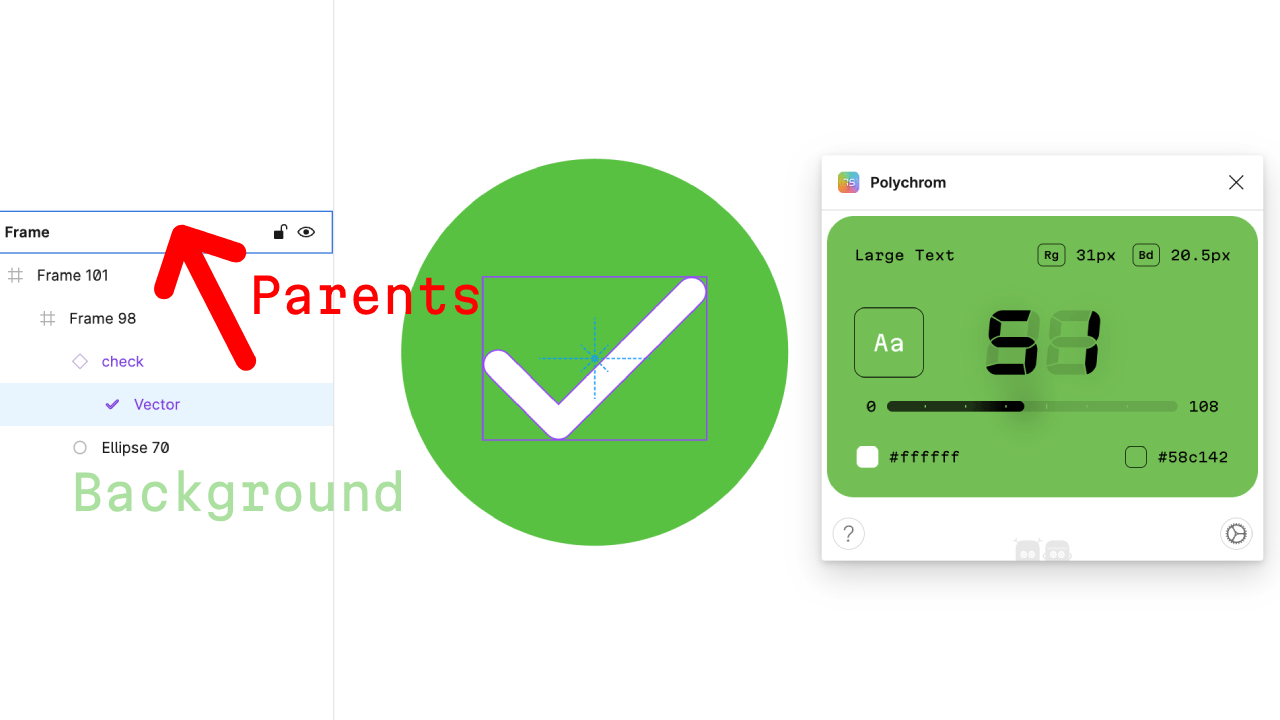
From the user POV, Polychrom is basically a no-pain solution: they just select an element in a Figma document and the plugin displays the contrast level between the selected element and its background.
A basic example of Polychrom in action
Polychrom’s automatic background search is a big part of why this story is interesting at all.
This feature is essential for users because we don’t want to force anyone to manually specify which object is the background for a selected element; as you can see in the video below, it’s quite seamless:
The automatic background search really shines here
But from the development perspective, this algorithm in particular comprises a significant portion of the plugin’s source code, and creating it was a fascinating adventure, filled with many interesting twists and turns.
So, let’s talk about the problems we faced, the decisions we made, and I’ll share exactly how this feature works (as well as its connection to tree data structures).
User scenarios explained
So, the examples above look both satisfying but simple. However, just starting to lay out the possible user scenarios, a bit of complexity larger than initially assumed may begin to emerge.
From the user’s point of view there can be a number of scenarios:
- One or more elements selected
- If the element is in a frame or not
- If the element is in a group or inside a component
- If the element is simply placed on the page
- If several other elements are at levels below the element
There are also some scenarios with regards to the element fills themselves:
- Simple solid fills
- Multiple solid fills
- Background over strokes
- Gradient fills
- Whether there is transparency on the element or on the fill


Example Figma nodes with various fills
For release, we’d need to solve all of these scenarios above. But, to start, we’ll explore the simplest case we can: this is when we’ve selected an element with a solid fill and no transparency.
The basics of the algorithm
So, let’s say we’ve selected an element with a solid fill and no transparency. We need to find the proper background for this element. But how do we do that?
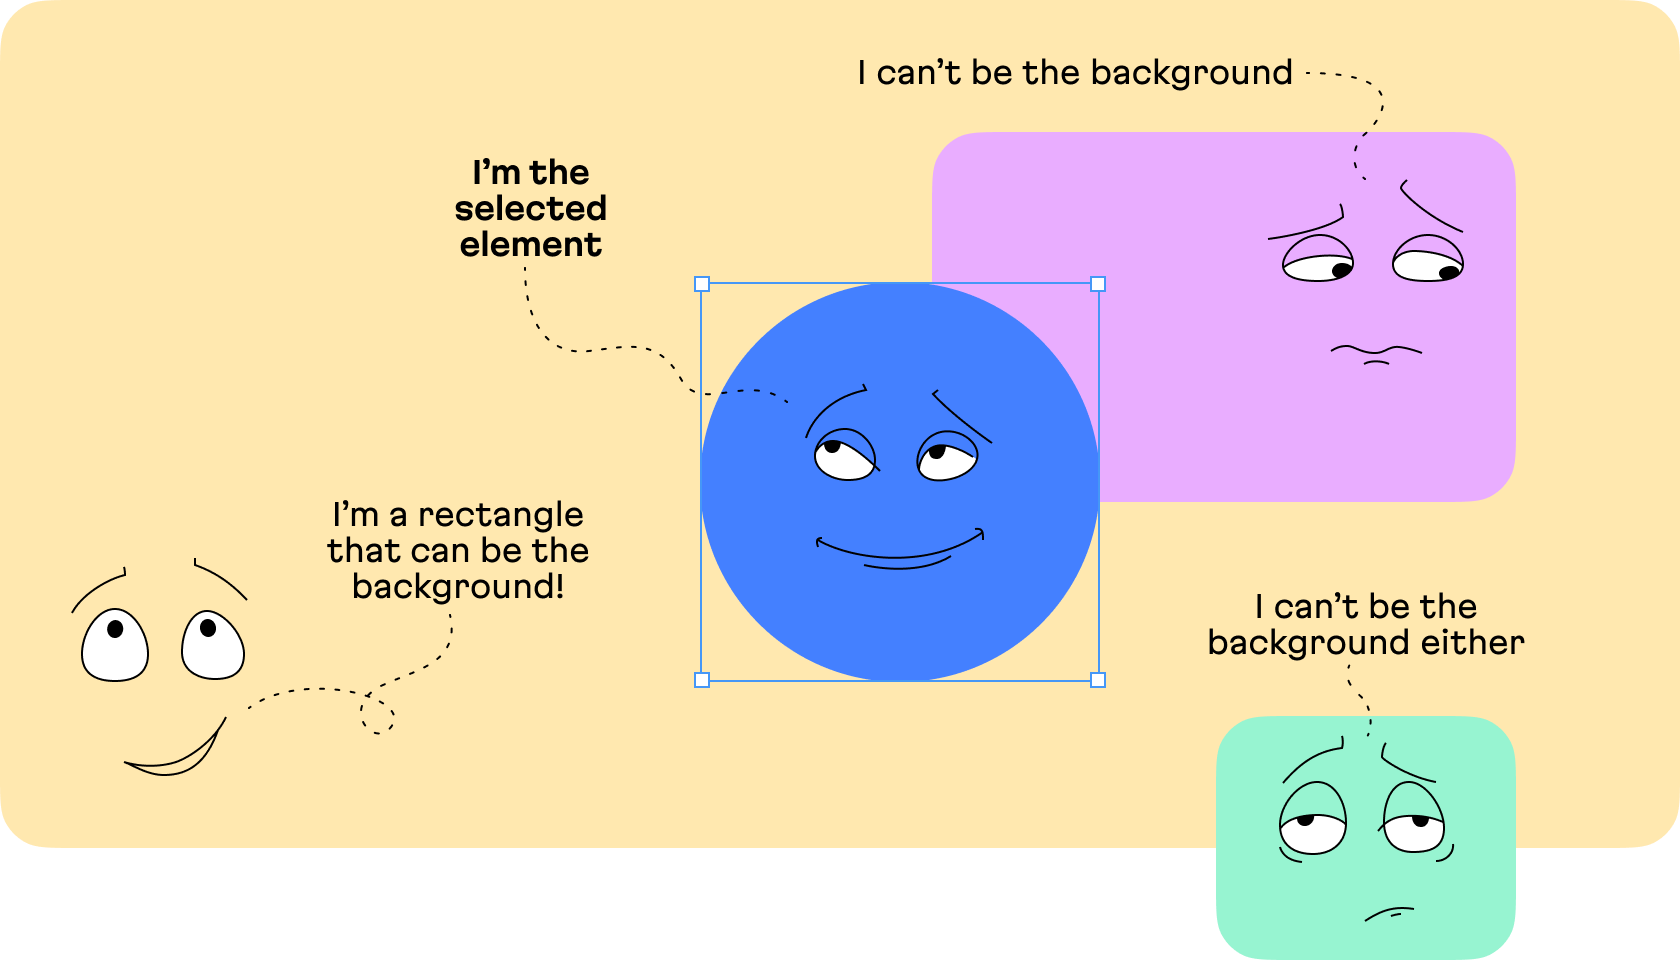
First, we want to detect all the elements that completely underlap the selected element which also have a solid fill and no transparency:

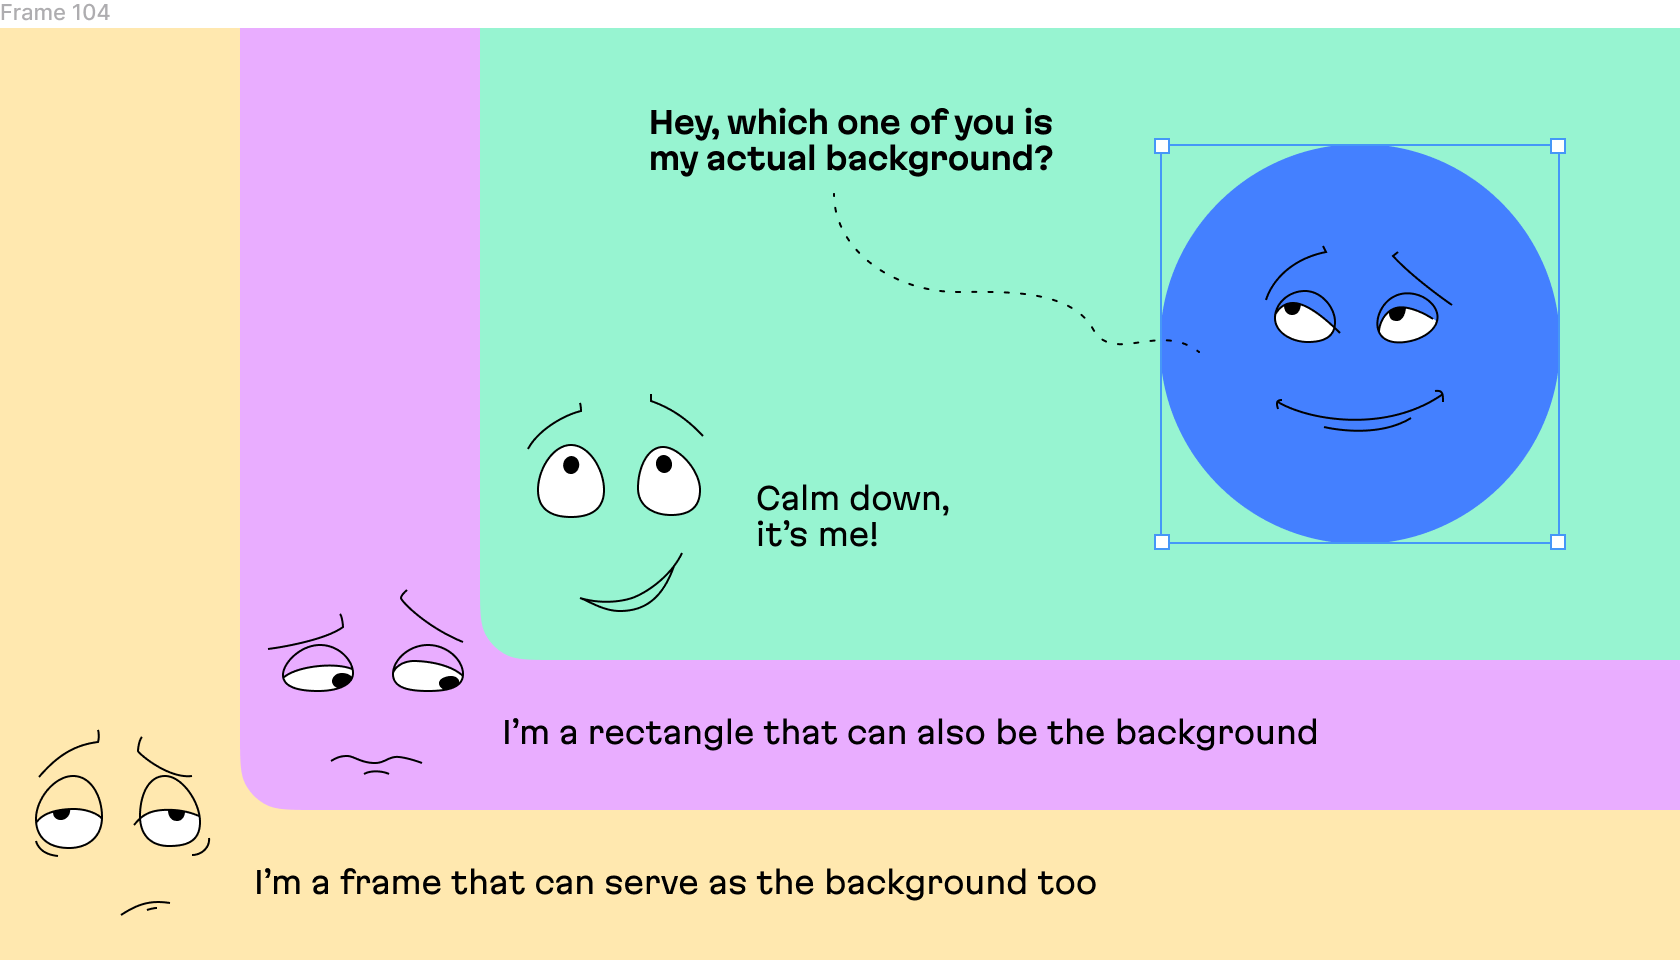
Second, we want to be able to detect the element that is the actual background, i.e. the element that is directly under the selected element.
The intricacies of Figma’s plugin API
Each element in the Figma document API has properties that describe its block model: the coordinates, height, width, and so on. So, we can start by determining the conditions of a complete geometric intersection. To do so, we’ll need to set several criteria.
The thing we’ll need to note: whether the selected element’s coordinate origin is lower and located to the right of the coordinate origin of the assumed background element (in Figma, the coordinate origin for all documents and pages is the upper-left corner).
Second, we must know whether the selected element’s dimensions are within the dimensions of the assumed background itself.
interface Rect {
  readonly x: number
  readonly y: number
  readonly width: number
  readonly height: number
}

export const isContainedIn = (outer: Rect, inner: Rect): boolean =>
  inner.x >= outer.x &&
  inner.y >= outer.y &&
  inner.x + inner.width <= outer.x + outer.width &&
  inner.y + inner.height <= outer.y + outer.height;
And that’s the criteria we use to filter the elements on the page. Now, let’s take a look at how to perform this sort of filtering or bypassing.
Filtering elements: behind the scenes
The first approach that might come to mind is to traverse the entire document tree, starting from the selected element, and then checking each element for compliance with our aforementioned criteria.
The Figma API provides methods to traverse the document completely, i.e. to traverse all elements. These methods are node.findOne() and node.findAll(); a callback with search conditions must be passed to each method.
// Finds the first rectangle node with a fill color of '#FF5733'
const node = figma.root.findOne((node) => {
  return node.type === 'RECTANGLE' && node.fills[0]?.color === '#FF5733';
});

// Finds all ellipse nodes that don't have strokes applied to them
const nodes = figma.root.findAll((node) => {
  return node.type === 'ELLIPSE' && node.strokes.length === 0;
});
But, considering these methods check every element in the document, if we start searching from the root of a page, we’ll just go ahead and categorize them as being unoptimized.
The Figma API also provides methods for optimized searches: for example, performing a search by descendants only, or search by element type (text, rectangle, frame, and so on.)
interface ChildrenMixin {
  findAll: (callback?: (node: SceneNode) => boolean) => SceneNode[];
  findAllWithCriteria: <T extends NodeType[]>(
    criteria: FindAllCriteria<T>
  ) => Array<
    {
      type: T[number];
    } & SceneNode
  >;
  findChild: (callback: (node: SceneNode) => boolean) => null | SceneNode;
  findChildren: (callback?: (node: SceneNode) => boolean) => SceneNode[];
  findOne: (callback: (node: SceneNode) => boolean) => null | SceneNode;
  findWidgetNodesByWidgetId: (widgetId: string) => WidgetNode[];
}
So, in theory, we could use any of these methods to find what we need. That is, we could if it weren’t for one problem…
The big freeze
And this is that really big problem: the interfaces freeze during execution of long scripts. And, in huge documents, these freezes could be so long that the user might think that the plugin is outright broken. Figma itself will freeze, too.
Figma warns against using full, unoptimized, document-wide searches. Large documents with many pages and elements can cause slow execution of the traversal function, leading to UI freezes.
That said, Figma’s documentation does suggest some ways to prevent UI freezes.
For example, we can divide work into smaller parts (such as traversing a fixed number of elements, or running for a few milliseconds), and perform limited computations before passing control to the main thread.
This allows the browser to continue rendering the page or handle user events, like mouse clicks. For example, we can use a combination of the Promise API and the setTimeout function to schedule some computation before rendering each subsequent frame.
Formulated abstractly, this looks like so:
const pauseForMainThread = async () => {
    return await new Promise((resolve) => {
        setTimeout(resolve, 0);
    });
}

const storeUserPreferences = async () => {
    // List of procedures to execute:
    const operations = [
        checkInputForm,
        displayLoadingIcon,
        writeToDatabase,
        refreshUserInterface,
        logActivityMetrics,
    ];

    // Iterate over each operation:
    while (operations.length > 0) {
        // Retrieve the first operation from the list:
        const currentOperation = operations.shift();

        // Execute the operation:
        currentOperation();

        // Pause and allow the main thread to run:
        await pauseForMainThread();
    }
}
The evolution of Polychrom’s algorithm
Now that we’ve laid out the problem, let’s get back to Figma proper and our work on Polychrom. In the case of our project, unoptimized methods worked badly, as predicted. For instance, when we used it inside a document with a design for our site, identifying the background for the selected document froze the page for several (!) seconds.
Needless to say, that was not going to work for us, and we had to find another way. More specifically, this meant building our own way around the elements in the tree structure of the document in Figma.
Here’s an example from the Figma API documentation on how to work with tree traversal from the root without using the built-in Figma API methods:
// This utility computes the total layers excluding the sub-layers within instances in your design file.
let layerCounter = 0;

const analyzeLayers = (layerNode: SceneNode) => {
  if ('children' in layerNode) {
    layerCounter++;

    if (layerNode.type !== 'INSTANCE') {
      for (const subLayer of layerNode.children) {
        analyzeLayers(subLayer);
      }
    }
  }
}

analyzeLayers(figma.root); // Initialize layer analysis starting from the document's root

alert(`Total Layers: ${layerCounter}`);
OK, so, looking ahead, this was the approach I eventually chose: writing a generic algorithm so that really huge Figma documents could be explored in less than a few milliseconds. But even though it was my ultimate choice, it wasn’t my first attempt to solve the problem.
The first solution
By the time the plugin was released, I had come up with a primitive element traversal algorithm that solved the problem for most user scenarios.
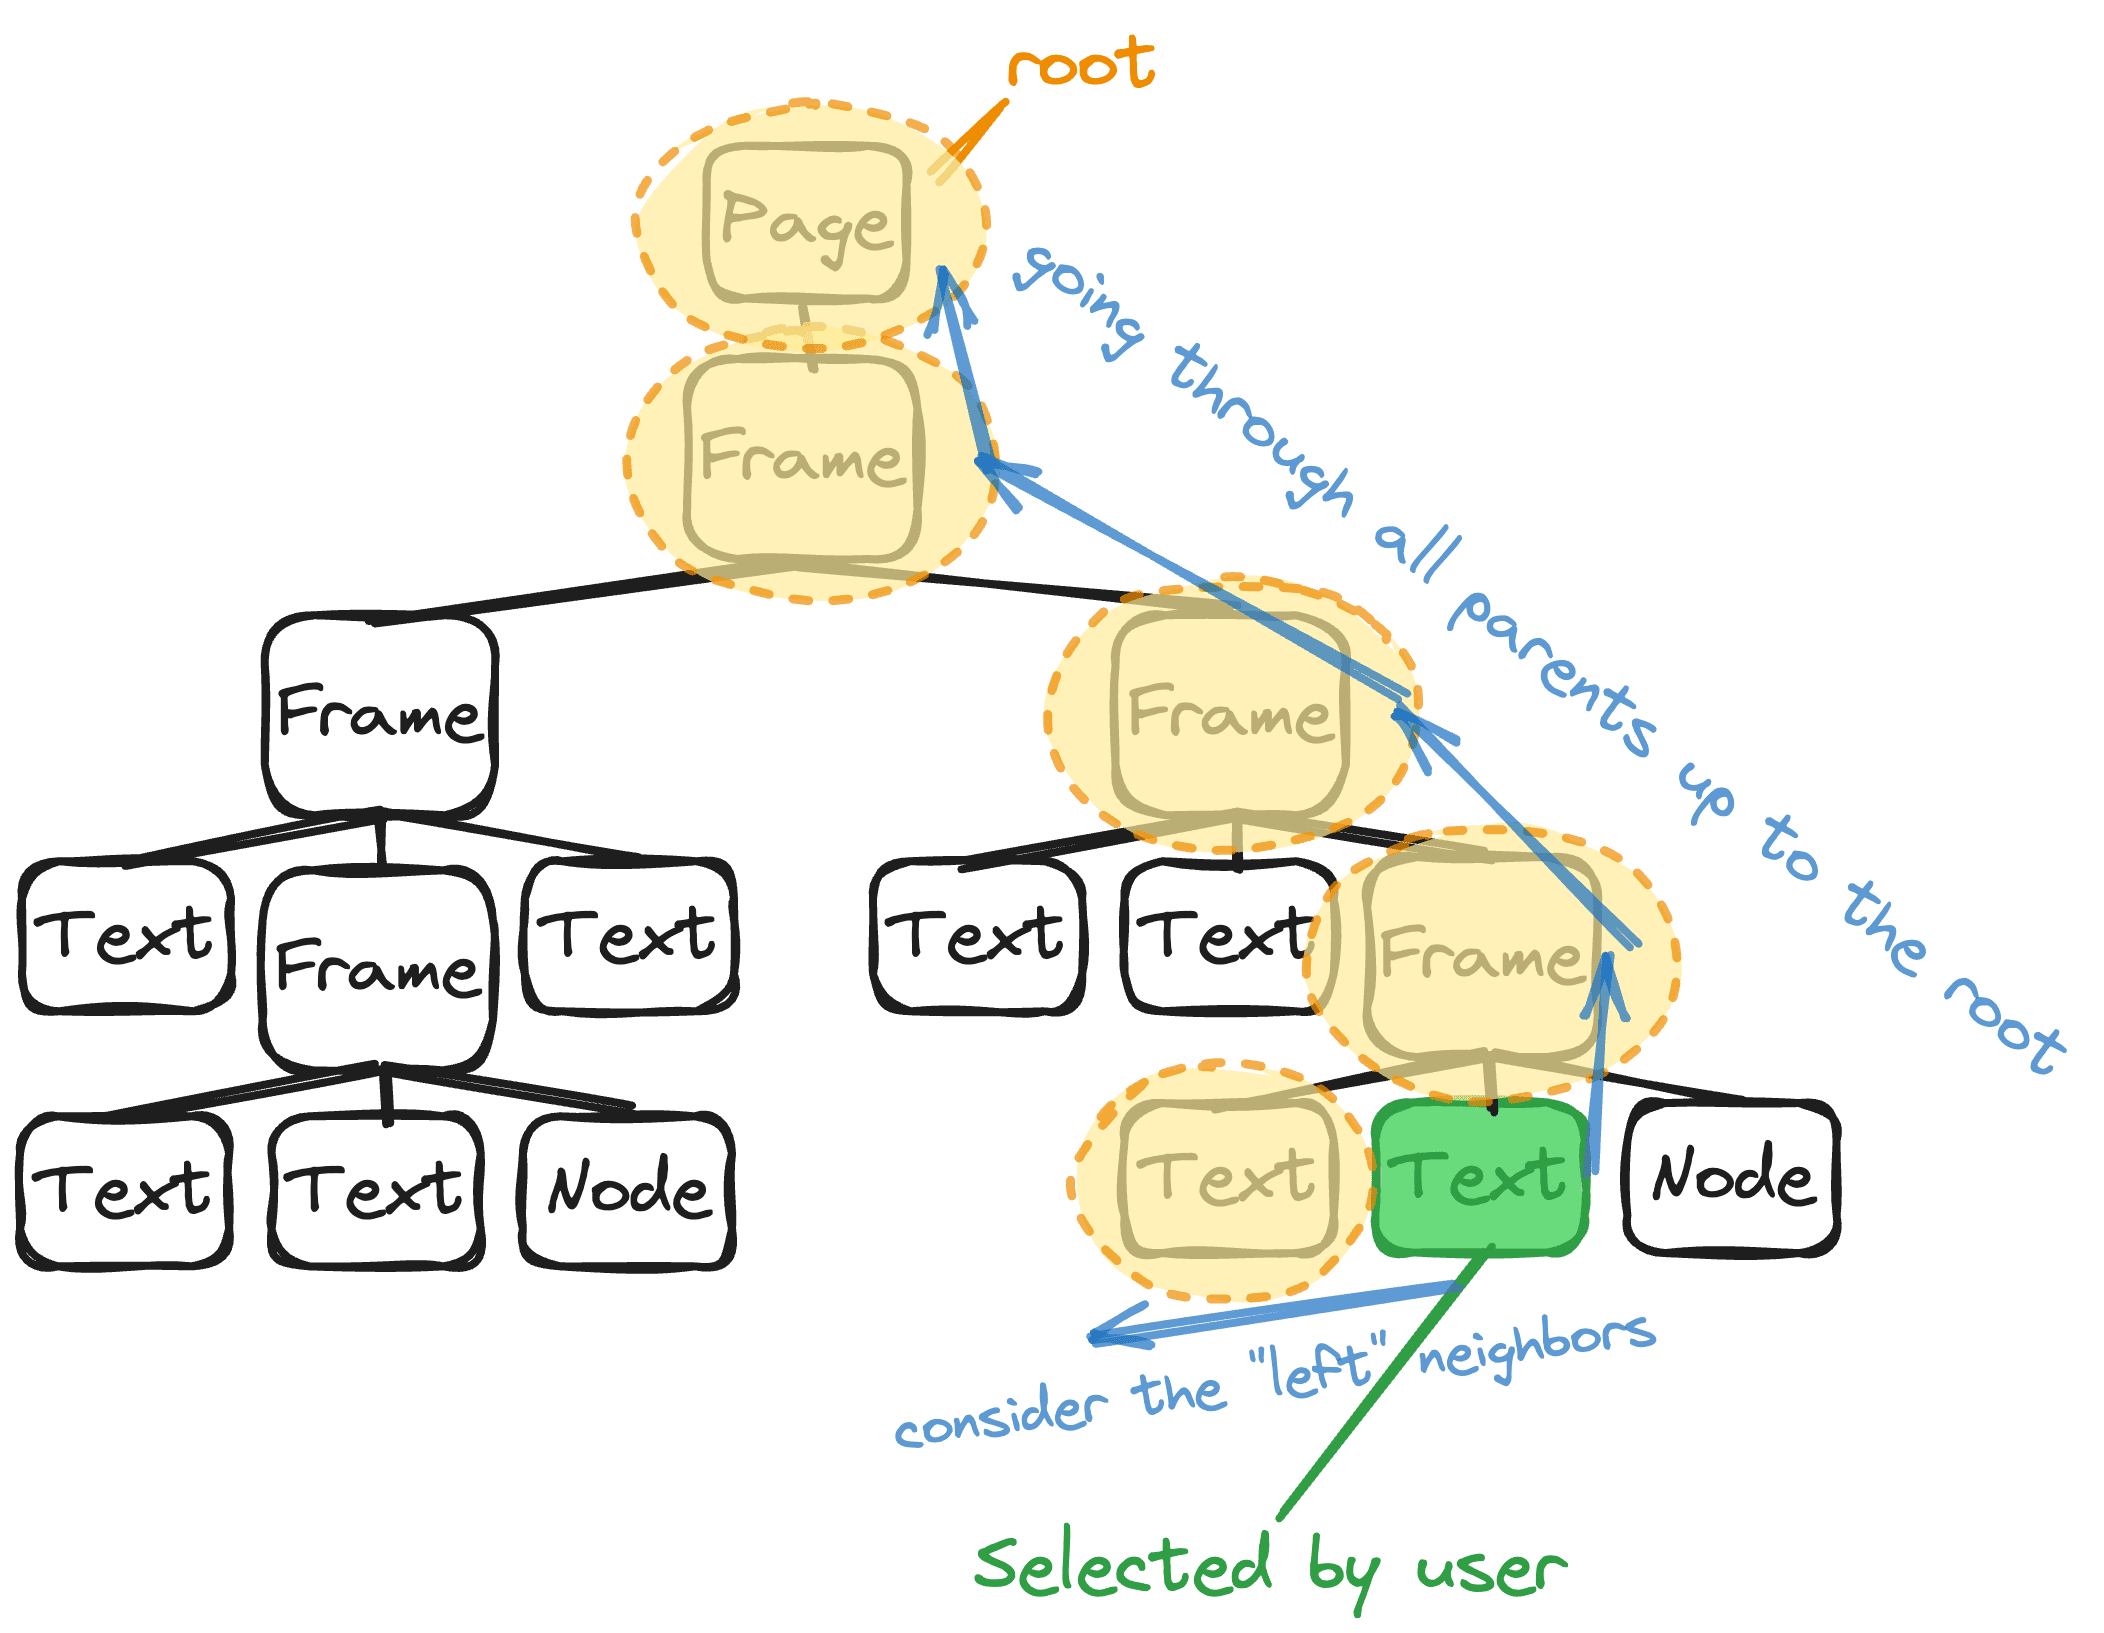
The algorithm searched all the way through the tree, from the selected item to the root, collecting only siblings below (“left” in terms of placement within an array) and parents. Note: we only need the “left siblings”, because, in terms of the visual composition of Figma layers, only these will lay below the selected item.
export const getSiblingsBefore = (
  targetNode: SceneNode,
  allNodes: readonly SceneNode[]
): SceneNode[] => {
  const targetIndex = allNodes.indexOf(targetNode);
  return targetIndex === -1 ? [] : allNodes.slice(0, targetIndex);
};

export const traverseToRoot = (node: SceneNode): SceneNode[] => {
  const parents: SceneNode[] = [];

  while (notEmpty(node)) {
    parents.unshift(node);
    node = node.parent as SceneNode;
  }

  return parents;
};
The first bypass approach illustrated
Each list, encompassing siblings and parents, was filtered based on our geometric intersection criteria with the selected element. It evaluated each item for this intersection, theorizing them as potential backgrounds for the selected element in Figma.
export const isNodeIntersecting = (
  node: SceneNode,
  selectedNode: SceneNode
): boolean => {
  if (!hasBoundingBox(selectedNode)) return false;

  return (
    isDifferentNodeWithBoundingBox(node, selectedNode.id) &&
    isContainedIn(node.absoluteBoundingBox, selectedNode.absoluteBoundingBox) &&
    nodeHasFills(node)
  );
};
Later, I thought of something: if a parent element can be used as a background, then can one of its children be used as one too? 🤔 If yes, then we would have a problem: either we’d have to check all the children and all the parents, or we could miss grabbing the real background.

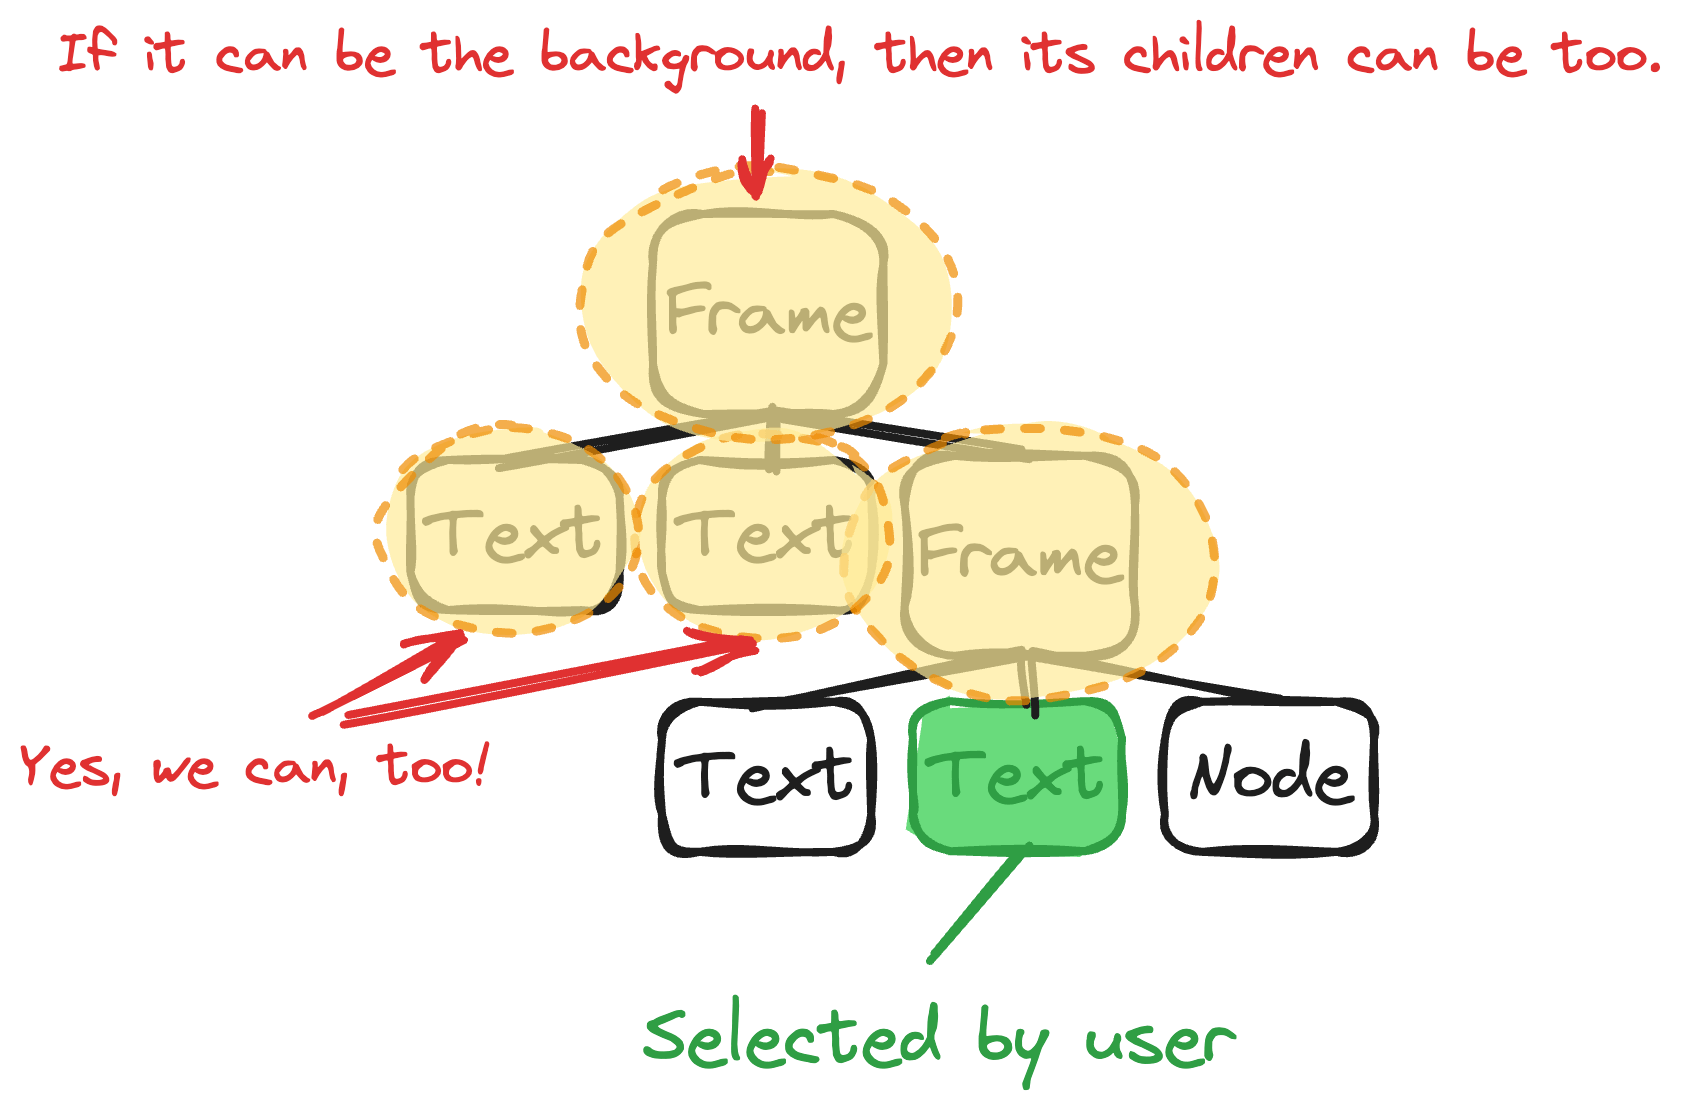
For better of worse, this turned out to be true, so the background could be almost anywhere in the document tree:

Needless to say, we didn’t want to leave the algorithm less than perfect, and that meant we had to improve it, or try a different approach.
The aha! moment
After thinking about it for a day and a half, I let my brain go off and try to independently search for the solution running in the background on its own. And, conveniently, the solution came the next morning, over a cup of coffee.
I realized that since each node in the tree has a set of properties that allow us to determine geometric matching, we can first change the search direction (starting not from the depth, from the selected element, but from the root)…
…and second, and cut off entire branches of a tree (a.k.a. frames on the page in Figma) by the same criteria of geometric matching:


So, if we checked a parent that had, for example, a huge number of children, and this parent did not overlap geometrically with the selected element, it means that we don’t need to check its children further. In terms of script execution time/operations, this is significantly more efficient.
import { areNodesIntersecting } from './are-nodes-intersecting.ts';

export const traverseAndCheckIntersections = (
  nodes: SceneNode[],
  selectedNode: SceneNode,
  accumulator: SceneNode[] = []
): SceneNode[] => {
  nodes.forEach((node) => {
    if (areNodesIntersecting(node, selectedNode)) {
      accumulator.push(node);

      if ('children' in node && node.children.length > 0) {
        traverseAndCheckIntersections(
          Array.from(node.children),
          selectedNode,
          accumulator
        );
      }
    }
  });

  return accumulator;
};
The final touch: z-index sorting
The last thing I had to do was to sort the found elements “by z-index”. This is necessary to determine the real background for the selected element.
Since Figma does not provide a z-index property for elements, I had to create a helper function to determine the nesting level of the element in the tree and its position in the array of children of the parent element:
So in a helper function, I had to determine the nesting level of the element in the tree and its position in the array of children of the parent element:
export const createPolychromNode = (node: PageNode | SceneNode): PolychromNode => {
  const parents = collectNodeParents(node);

  return {
    nestingLevel: parents.length,
    parents,
    zIndex: node.parent?.children.findIndex((child) => {
      return child.id === node.id;
    }),
  };
};

export const collectNodeParents = (
  node: PageNode | SceneNode,
  parents: SceneNode[] = []
): SceneNode[] => {
  if (notEmpty(node.parent)) {
    if (node.parent.type === 'PAGE' || node.parent.type === 'DOCUMENT')
      return parents;

    parents.push(node.parent);

    collectNodeParents(node.parent, parents);
  }
  return parents;
};
And after that, it was just a matter of sorting the found elements by nesting level and z-index:
export const sortNodesByLayers = (nodes: PolychromNode[]): PolychromNode[] =>
  nodes.sort((a, b) => {
    const levelDifference = b.nestingLevel - a.nestingLevel;
    const zIndexDifference = Math.abs(b.zIndex ?? 0) - Math.abs(a.zIndex ?? 0);

    return levelDifference !== 0 ? levelDifference : zIndexDifference;
  });
This solved the problem completely.
Concluding thoughts and a nudge to innovate
Let’s quickly wrap up. First of all, think about making your own Figma plugin. It’s easy and fun!
Second, as I mentioned at the beginning, try to remember that frontend isn’t just about coloring buttons. Sometimes you need to (or have the priviledge of, rather) introducing algorithms and data structures. So, don’t neglect them, even if your main focus is on interface development.
And of course, please feel free to use Polychrom on Figma!

At Evil Martians, we transform growth-stage startups into unicorns, build developer tools, and create open source products. If you’re ready to engage warp drive, give us a shout!