Keep up with the Tines: Rails frontend revamp


Topics

Translations
Bringing complex UI to life with React, MobX, GraphQL, Tailwind CSS, and Webpacker—all without breaking pre-existing jQuery + CoffeeScript frontend served with Asset Pipeline. Read the story of a complex feature we implemented for Tines security platform and see how one can approach the incremental refactoring of a mature Rails monolith.
Tines is the no-code security automation platform that helps the world’s leading security teams automate time-consuming manual tasks and quickly react to threats. It combines alerts from external systems in a single workflow—called an automation story—that consists of dozens (sometimes even hundreds) of interconnected steps called agents.
Make sure to read the full case study on our collaboration with Tines that describes all the UX, frontend and backend improvements we’ve implemented. It helped Tines to attract customers and increase system performance by 100 times in target areas!
Here’s an example of a story that can tell dad jokes:

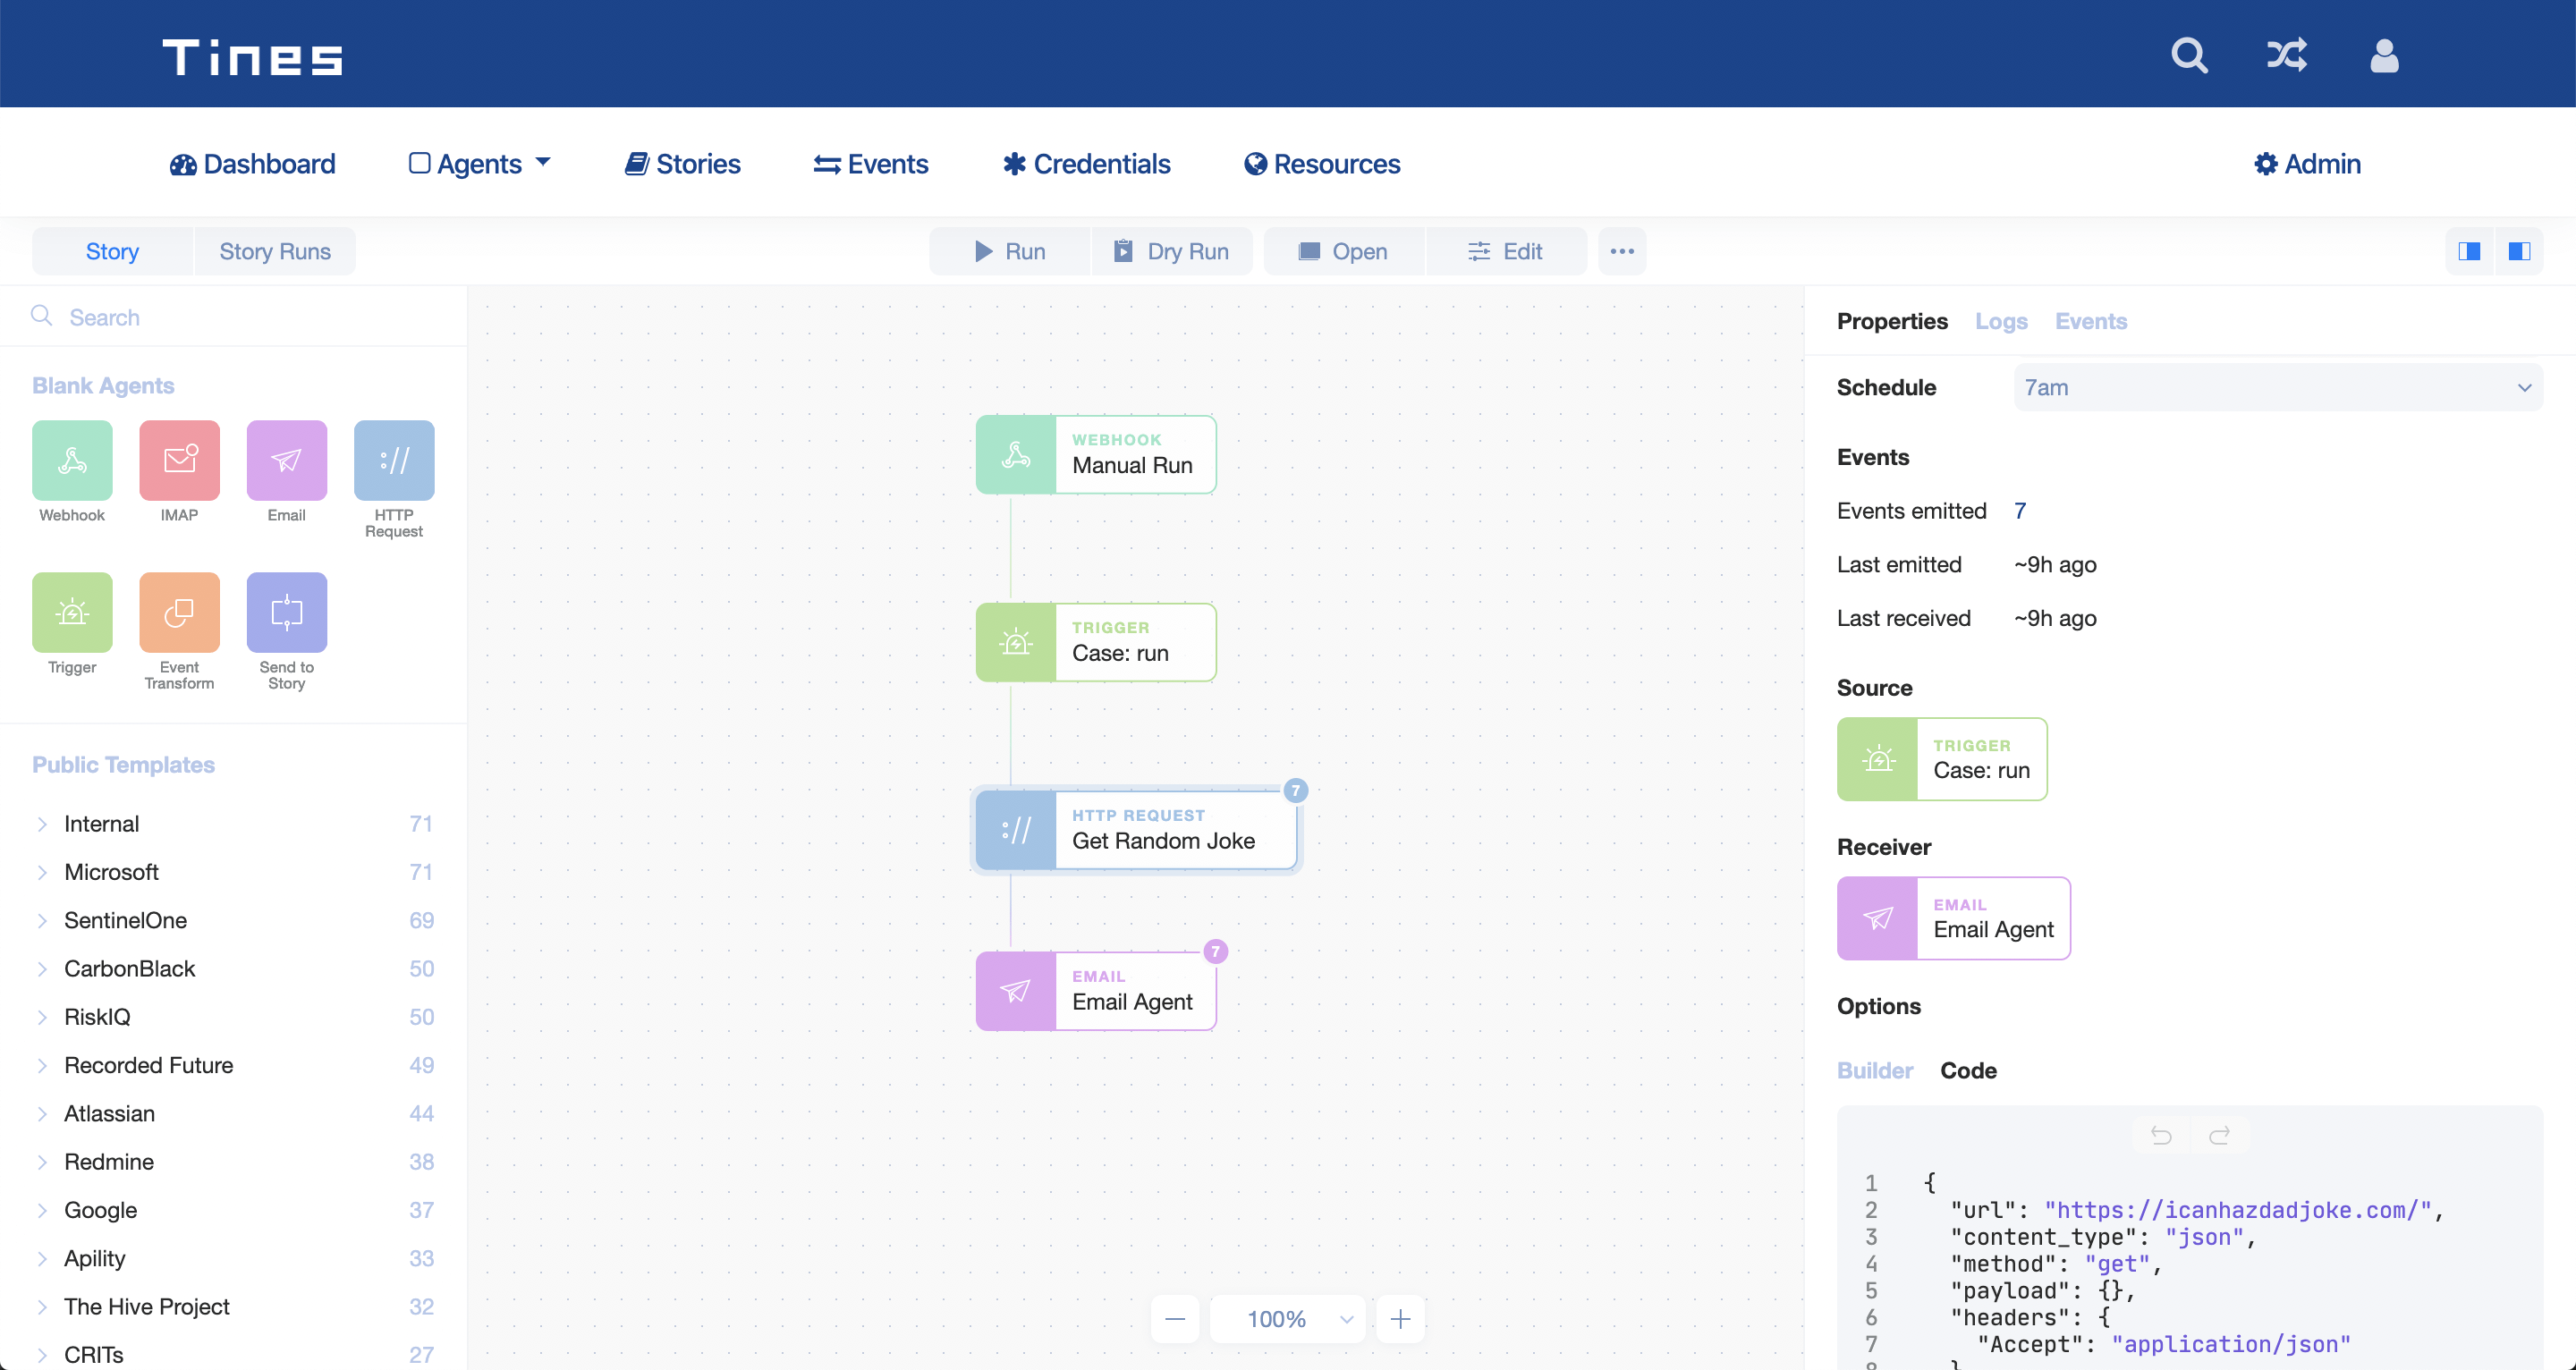
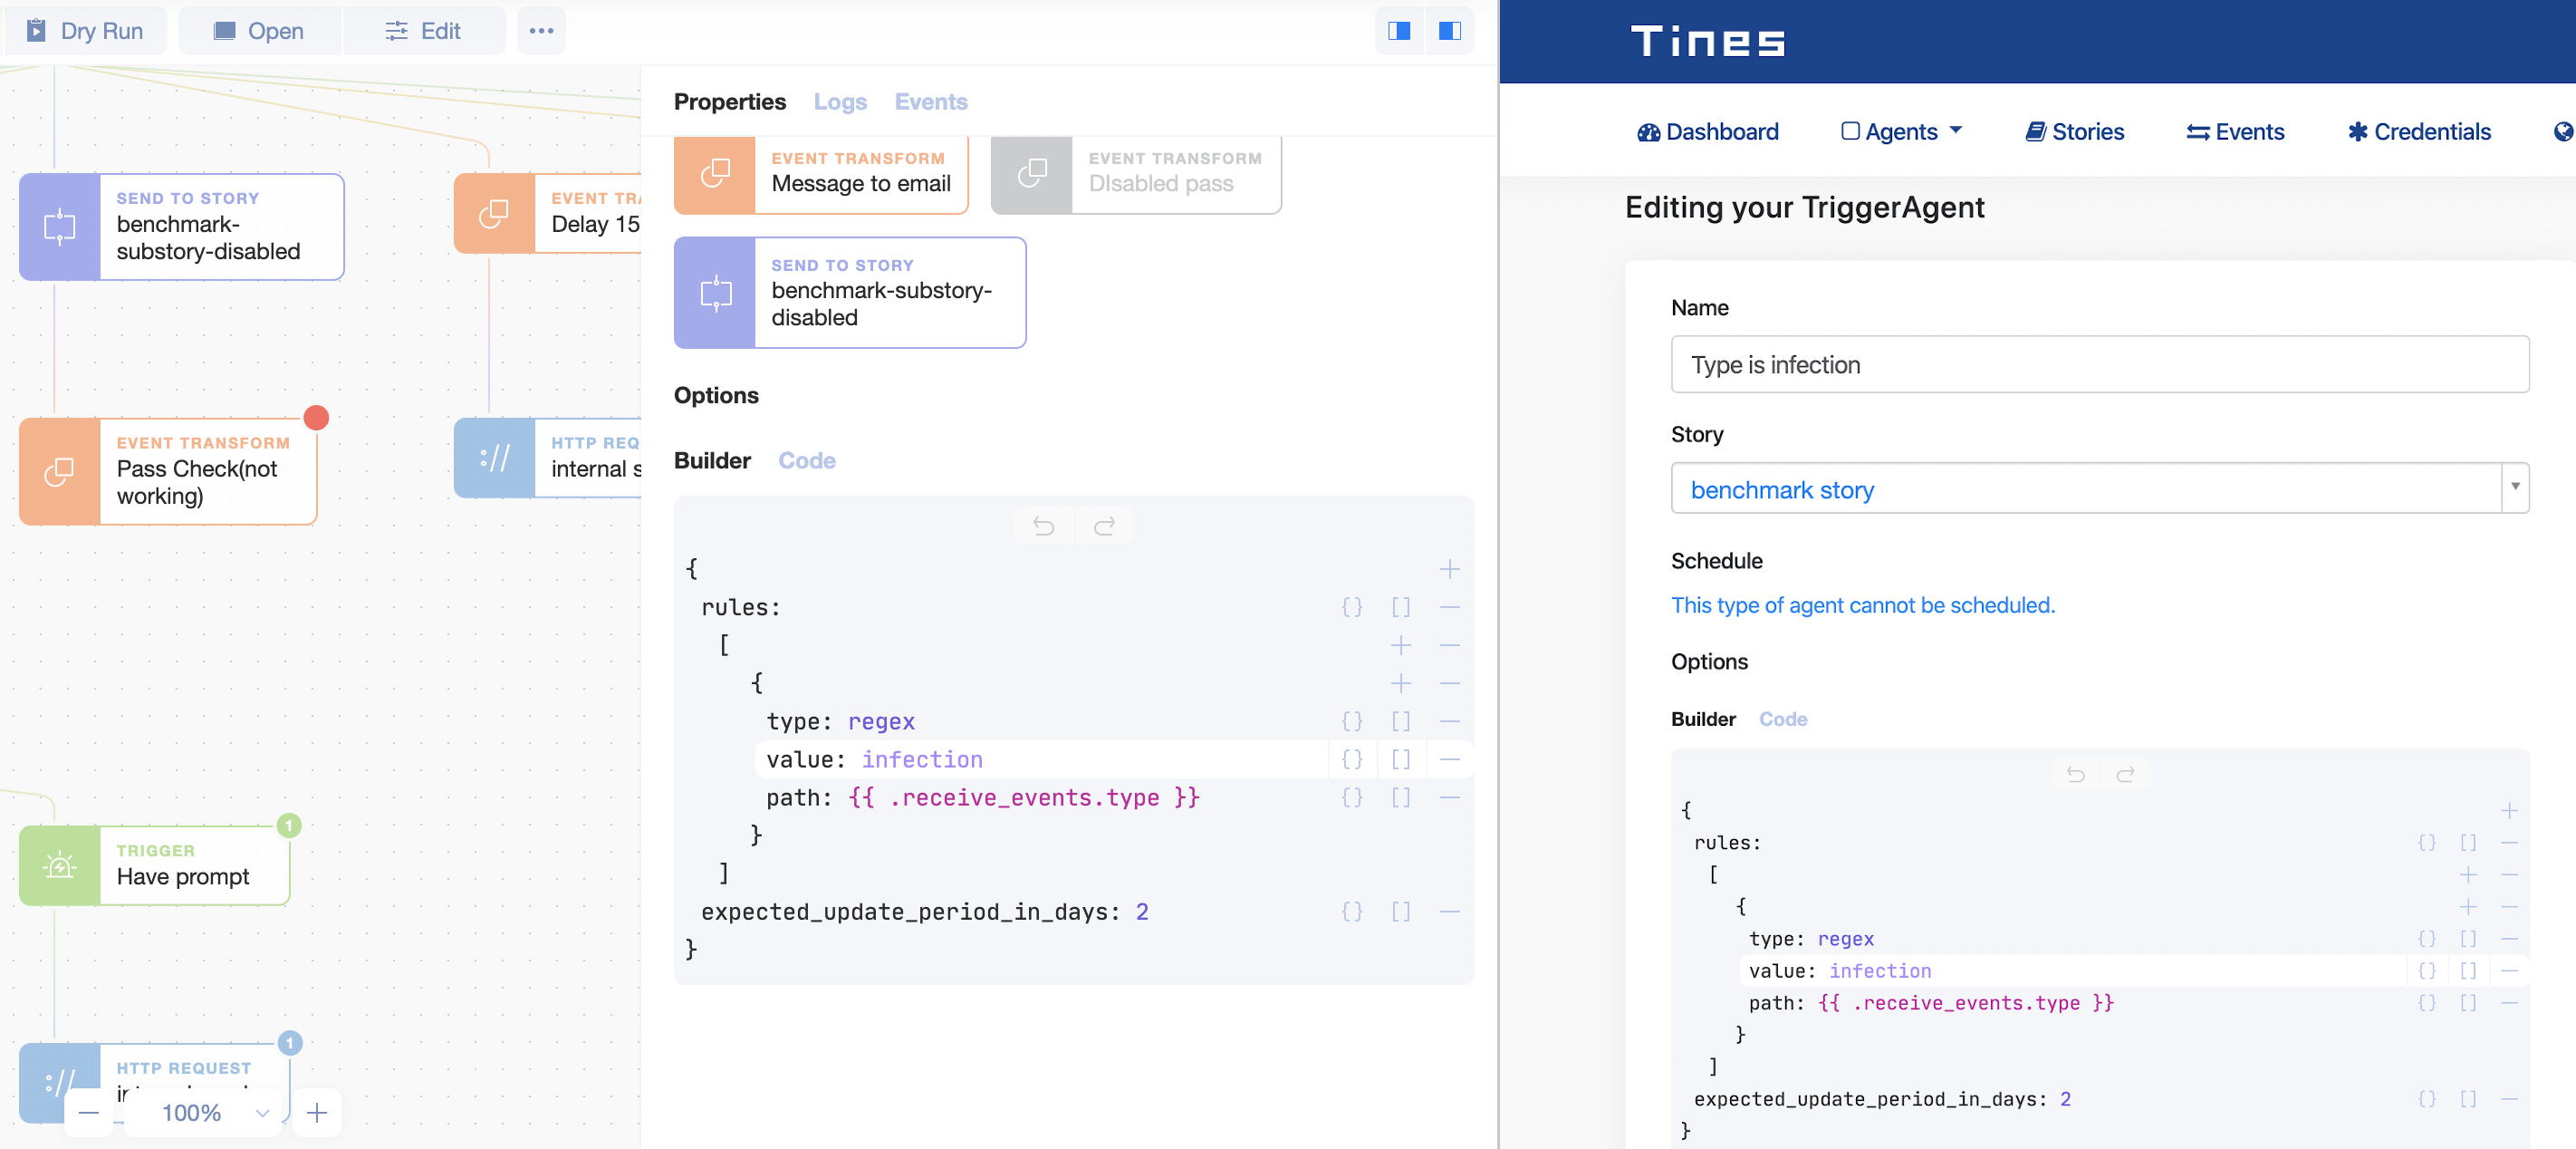
Dad jokes story
In reality, a diagram below will have dozens of nodes that perform actions like inspecting email attachments for malware and verifying email link URLs against a blacklist of phishing websites.
Our task was to breathe new life into a time-proven interface while also modernizing the frontend stack of a mature Rails “majestic monolith” which is the Tines application.
In the real world of high-stakes development at the fast-growing startups, refactoring is rarely a dedicated full-time job. Our case was not the exception: we rewrote the frontend in a modern stack while working on new features. The strategy we chose was to redesign the whole component by respecting the old stack (including the changes in logic), ship it to production, then drop it and rewrite from scratch in a new style. Yes, that leads to “double” commits, but it also makes sure that the system continues to function normally even during the makeover.
Plus, it gives the unprecedented pleasure of making a PR that removes 500 lines of code! Stay with us while we show concrete code examples that you are free to reuse if you face a similar challenge at your company.
A “tiny” diagram
The power of the Tines dashboard comes from diagrams: they allow clients to visualize their security workflows. In a past implementation, the agents’ diagram was pre-calculated on the backend and rendered as a static image with Graphviz.

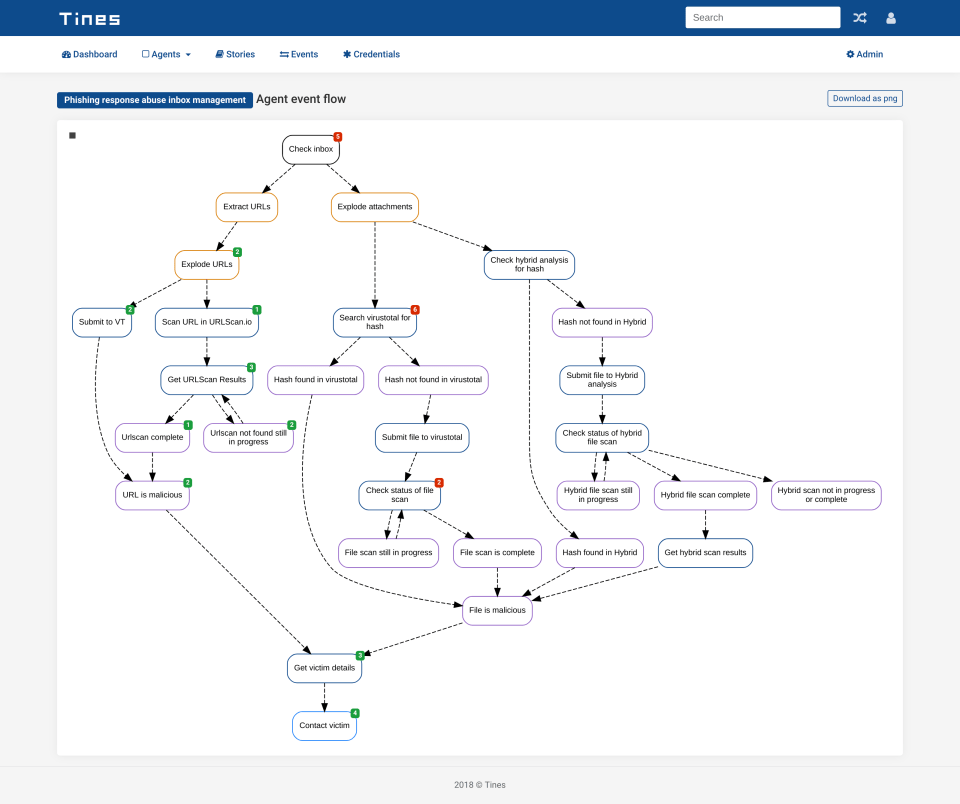
A previous diagram design
Our task was to turn the picture above into an interactive drag‑n‑drop frontend-centric extravaganza.
After we came up with a new design system, it was time to settle on a technology stack. The main challenge was to integrate new JavaScript code for the dashboard with the existing system or Rails template views and assets served with Asset Pipeline (old-school Sprockets way).
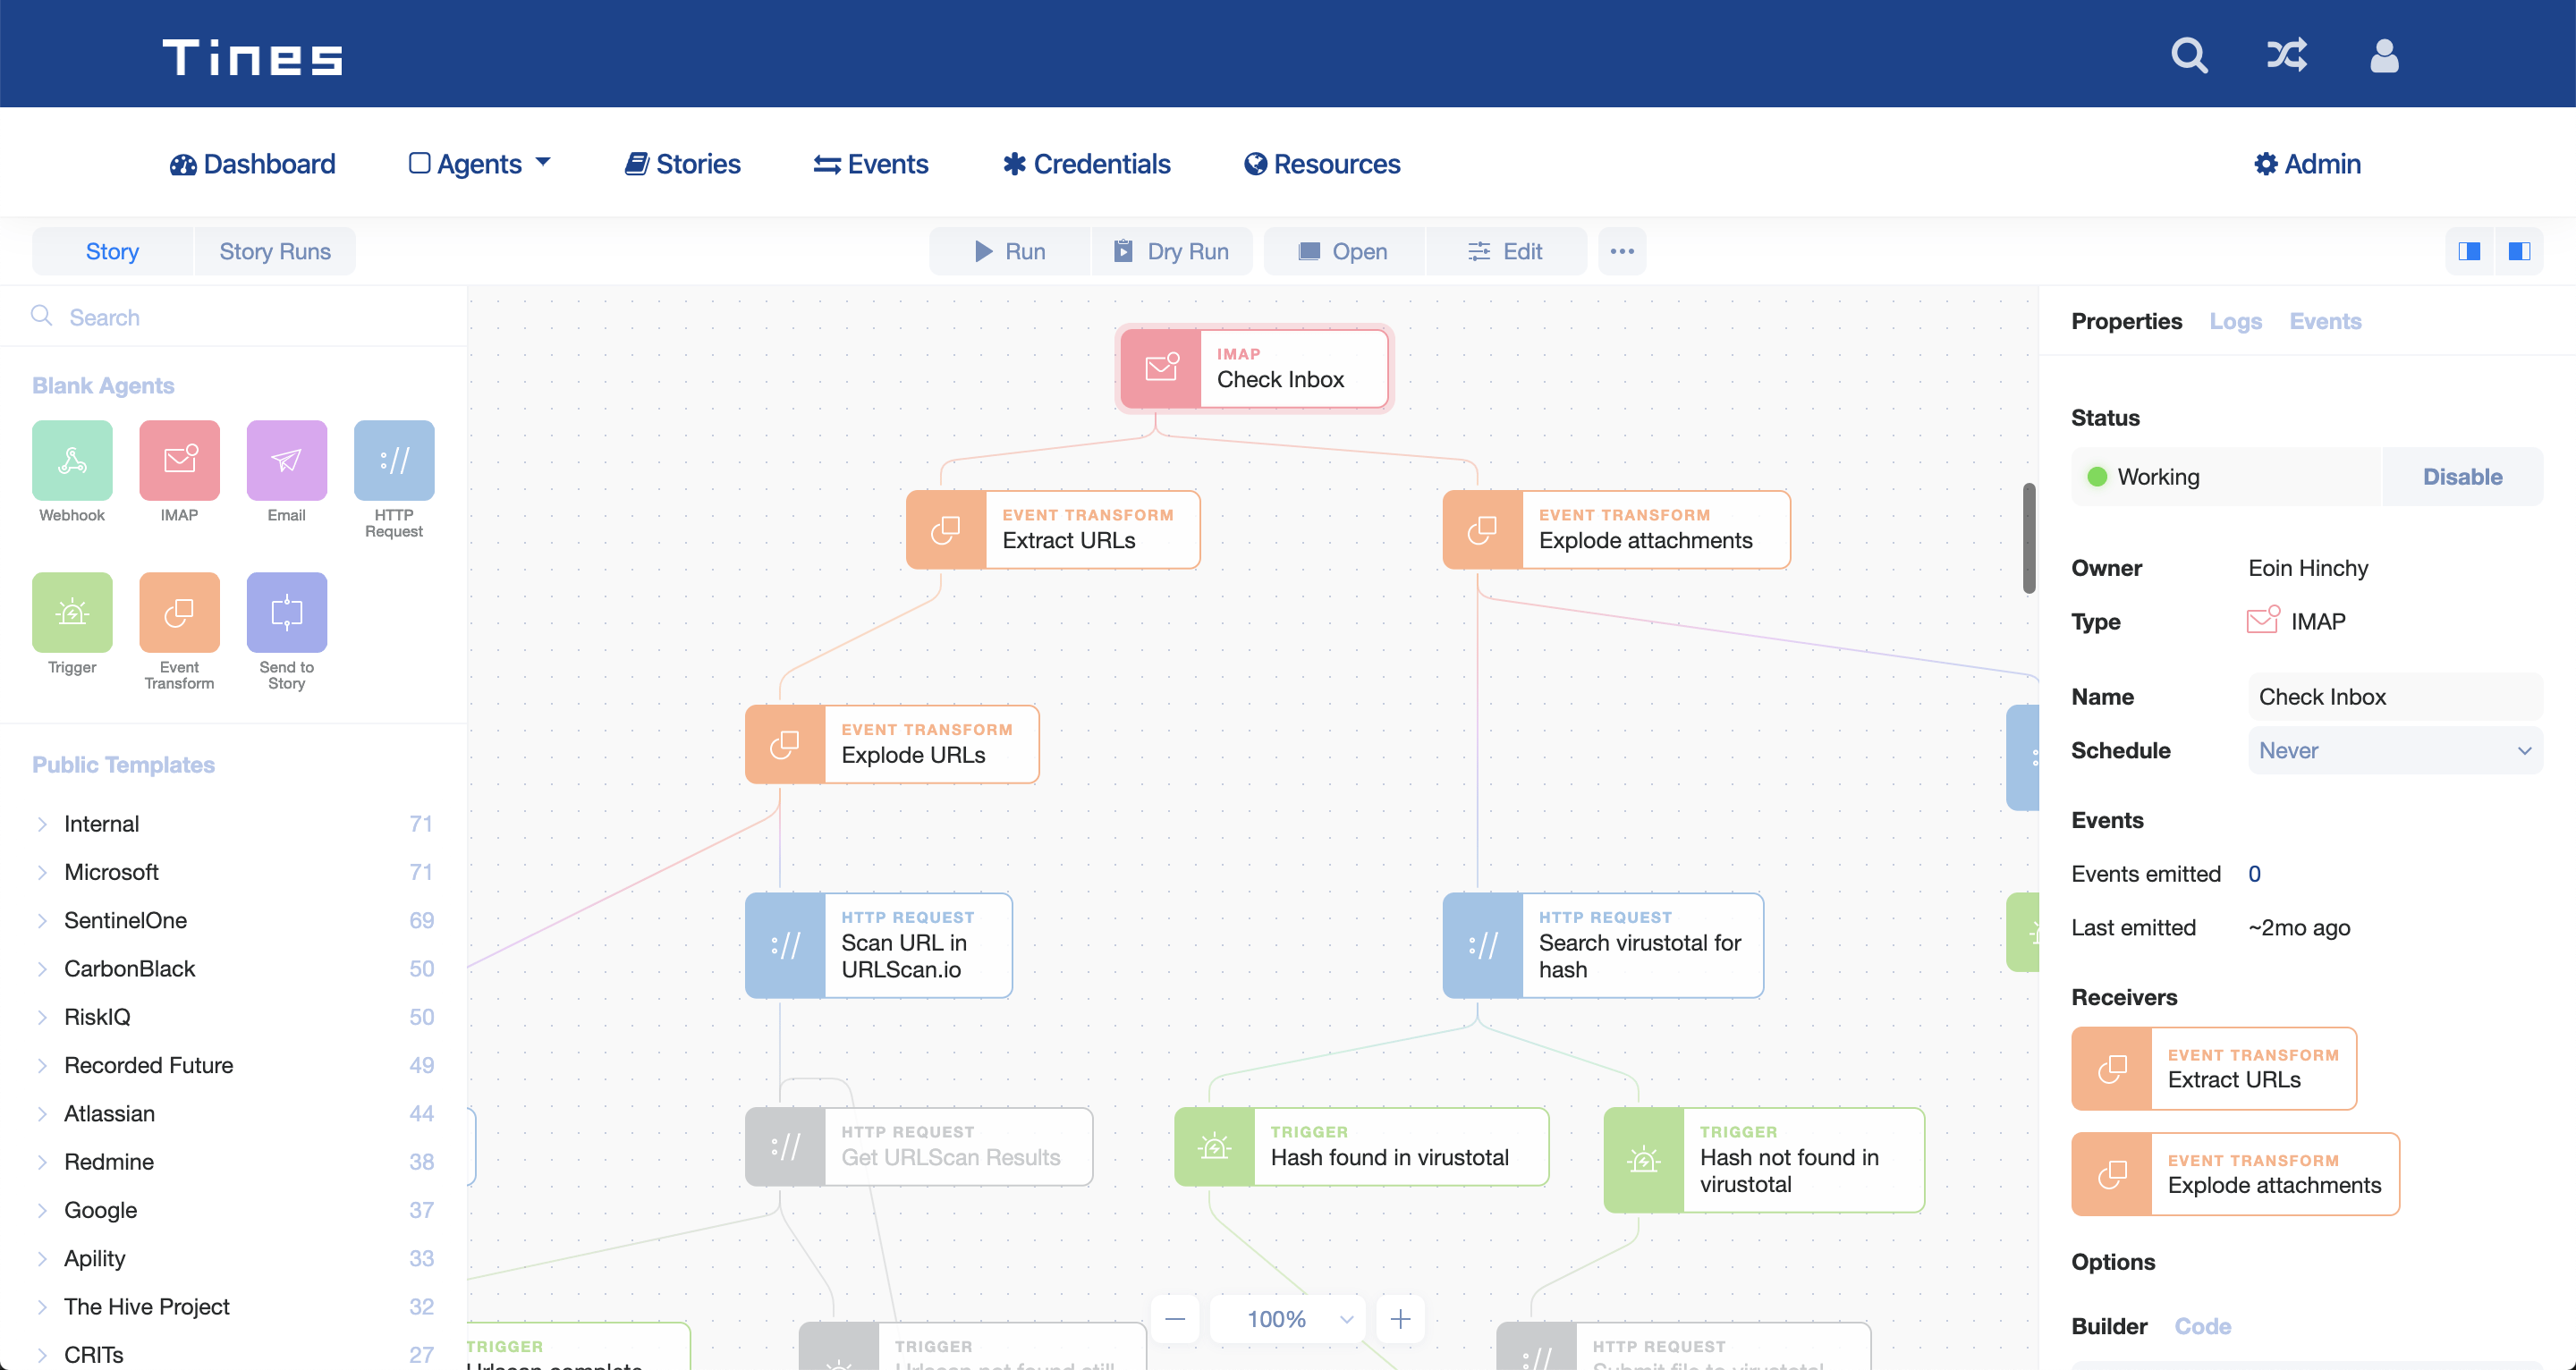
A new diagram design
Even the basic implementation of the mockup above is several thousand lines of JavaScript. However, Asset Pipeline back in the day was not built with rich frontend applications in mind: these were simpler times ruled by classic HTTP request-response cycle with server-rendered assets. Most of the existing frontend code in the app was written with CoffeeScript and jQuery—a common stack for early 2010-s that becomes harder and harder to maintain as jQuery slides into oblivion and modern JS syntax like ES6 renders CoffeeScript obsolete.
Connecting the dots
So after the functional proof-of-concept was implemented in vanilla JS, the goal was to gradually bring in the modern frontend stack into the confines of the “classic” Rails application that has no clear separation between the frontend and the backend.
Luckily, the Rails ecosystem nowadays has great support for modern frontend technologies.
- Webpacker. “Just works” with Rails (ships with Rails since version 5.2, default from Rails 6.0). The default config is good enough not to lose time on custom webpack setup: processes all kinds of standard assets out of the box, easily extendable.
- React. Our frontend framework of choice for commercial projects: wide adoption makes sure that the code won’t turn into “legacy” before the time comes for the next frontend rewrite.
- TypeScript + ESLint. Adding types to vanilla JavaScript makes refactoring a breeze with the help of integrated developer tools: we can be sure that newer and older parts of the application send the right data to each other even before we run the code.
- MobX. Even though Redux is a more popular choice, maintaining a single immutable store can be a challenge if you don’t start from a clean slate. MobX allows for multiple stores and is simpler to use.
- GraphQL with graphql-request and graphql-codegen to fetch only required, strongly typed data from the server.
- Tailwind as the primary styling tool and CSS modules for complex animations and custom styles. The design system we developed for the task is based on a micro-grid where all the sizes, including spacing, are the multiples of 3px—atomic CSS systems like Tailwind are the perfect match for this approach. As CSS modules and PostCSS come with Webpacker out of the box, we could write isolated styles at escape velocity right inside our components.


Design microgrid
One helper at a time
Thousands of users rely on Tines in production for their security tasks. Hence, a blank rewrite was never an option: we needed to move step by step, gradually bringing new features to the existing codebase.
First of all, we’ve moved all our vanilla JS code into a separate bundle served with Webpacker (in Rails/Webpacker world such bundles are called “packs”). The core HTML of the diagram and its surrounding dashboard elements remained inside Rails server-rendered view templates.
That allowed us to serve new frontend even before React was in place, by relying on global functions and Rails helpers.
// frontend/components/diagram/index.js

const renderDiagram = function renderDiagram(agents, story) {
  // Thousands lines of diagram logic
};

export default renderDiagram;
A definition for a global function contains the vanilla JS source code for new diagram.
// frontend/packs/diagram.tsx

import renderDiagram from "../components/diagram";
// ...
window.renderDiagram = renderDiagram;
And here’s how we load everything into the respective server-rendered view.
<!-- app/views/diagrams/show.html.erb -->

<script type="text/javascript">
  window.addEventListener('DOMContentLoaded', function() {
    renderDiagram(
      <%= raw(@agents.to_json) %>,
      <%= raw(@story.to_json) %>,
    );
  });
</script>
We’ve also created custom path helpers that allowed us to use standard Rails routes from our JS bundle when requesting resources from the rest of the application.
// frontend/api/paths.ts

export function eventPath(id: string): string {
  return `/events/${id}`;
}
It’s time to React
After we made sure that new code works in production, we started to gradually introduce React components, starting from the tiny bits of UI—like a button group that controls individual agents in the diagram.

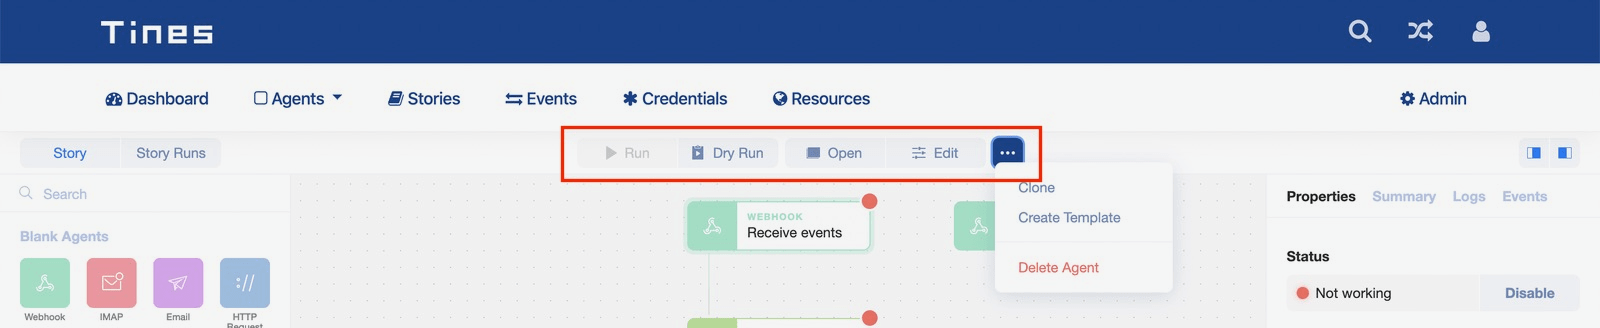
Agent Panel is in React, while the rest of the page is still not
Luckily, you don’t have to use React as a full single-page application framework. It is possible to inject autonomous parts of UI anywhere you wish:
// frontend/packs/diagram.tsx

import * as React from "react";
import { render } from "react-dom";

render(<Panel />, document.getElementById("diagram-panel"));
Those top panel controls had click event handlers that affected “non-Reactified” parts of the UI (some still written in CoffeeScript), so we could not use MobX stores just yet.
As a temporary solution, we introduced the events directory under JavaScript assets to store functions that dispatch events on the document object through the CustomEvent interface that enjoys wide browse support (sorry, Internet Explorer).
// frontend/events/diagram.ts

export function deleteAgent(): void {
  const event = new CustomEvent("diagramDeleteAgent");
  document.dispatchEvent(event);
}


// frontend/components/panel.tsx

import * as React from "react";
import { deleteAgent } from "../../events/diagram";

export default function Panel() {
  return <button onClick={deleteAgent}>Delete Agent</button>;
}
You could also add any data to these custom events with the detail property.
// frontend/events/diagram.ts

export function agentNameChanged(guid: string, id: string, name: string): void {
  const newEvent = new CustomEvent('agentNameChanged', {
    detail: { guid, id, name }
  });
  document.dispatchEvent(newEvent);
}
This also works with the existing CoffeeScript assets so we can put off re-writing them for later, we just have to create events directly in .cofee files:
// app/assets/javascripts/components/utils.js.coffee

newEvent = new CustomEvent("dryRunModalLoaded", {
  detail: { json: newEventJSON },
});
document.dispatchEvent(newEvent);
Now we can add handlers for these custom events in any part of the app. Easy!
// frontend/components/diagram/index.js

document.addEventListener("diagramDeleteAgent", () => {
  // Delete agent logic
});

document.addEventListener("agentNameChanged", (event) => {
  const { guid, id, name } = event.detail;
  // Change eagent name logic
});

// Anywhere in the app

document.addEventListener("dryRunModalLoaded", (event: Event): void => {
  const { json } = event.detail;
  // Dry run logic
});
What’s in store?
There’s only so far you can go with emitting and catching custom browser events. Ultimately, we want to put a proper state manager into our application.
If we keep combining server-rendered HTML with bits of JavaScript on the frontend—we have to manually manipulate the DOM every time we want to do something dynamic, like modifying a link after the user has clicked on an “agent” in a diagram:
const link = document.getElementById("agent-action-run");
link.setAttribute("href", "<%= run_agent_path(@agent) %>");
link.removeAttribute("disabled");
This approach does not scale too well, and with the continuing “JSX-fication” of a frontend, things will only become more complicated. It is time to introduce a common place where we can store the current application state and subscribe our components for automatic updates. We’ve done it with a root MobX store that has access to all our agents and stories (reminder: story is a diagram of agents). We chose MobX for its flexibility and the fact that it does not force us into overly rigid architectural choices.
// frontent/store/index.ts

export class Store {
  agents: Agent[] = [];

  story: Story;

  setInitialData(agents: Agent[], story: Story): void {
    this.agents = agents;
    this.story = story;
  }
}

export default new Store();
We don’t have all the fetchers set up yet, and all the data from Rails comes only through a renderDiagram plain JS function call, so setting up an initial state may look counterintuitive at first sight. Here’s where the main advantage of MobX kicks in: you can just import your store into any file and use all its methods (or even redeclare some properties):
// frontend/components/diagram/index.js

import store from "../../store";

const renderDiagram = function renderDiagram(agents, story) {
  store.setInitialData(agents, story);
  // ...
};
It is that easy because MobX, unlike Redux, deals with mutable structures, and you can use pretty much anything as your store: array, object, or a class. Any part of the app can now refer to the same instance of a Store class that we declared in our frontend/store/index.ts.
Now we can add some properties to our very simple store: one observable, for an agent ID, and another computed one—to hold all the agent’s data for use in other parts of the application.
// frontent/store/index.ts

import { observable, computed } from "mobx";

export class Store {
  // ...
  @observable selectedAgentId?: number;

  @computed get selectedAgent(): Agent | undefined {
    if (this.selectedAgentId === undefined) {
      return undefined;
    }

    return this.agents.find((agent) => agent.id === this.selectedAgentId);
  }
}
We can now import the full store to the rendered React component as a simple prop:
// frontend/packs/diagram.tsx

import * as React from "react";
import { render } from "react-dom";

import store from "../store";

render(<Panel store={store} />, document.getElementById("diagram-panel"));
Also now we can call the store methods or redefine its properties directly anywhere, even in the plain JS file:
// frontend/components/diagram/index.js

import store from "../../store";

const renderDiagram = function renderDiagram(agents, story) {
  store.setInitialData(agents, story);
  // ...

  const selectAgent = (id) => {
    store.selectedAgentId = id;
  };
};
All the changes will be reflected in the store. No special action creators or reducers needed; the architecture here is just one file with a JS class. Any React component can reactively observe the store’s properties if we wrap them into an observer, so now we can finally create a link that changes its URL and enables status change for an agent without any explicit DOM manipulations:
// frontend/components/panel.tsx

import * as React from "react";
import { observer } from "mobx-react";
import { Store } from "../../store";
import { runAgentPath } from "../../api/paths";

interface Props {
  store: Store;
}

export default observer(function Panel({ store }: Props) {
  return (
    <a
      href={store.selectedAgentId && runAgentPath(store.selectedAgentId)}
      disabled={!store.selectedAgentId}
    >
      Run Agent
    </a>
  );
});
At some point you may face a lot more complex React components, so it might be helpful to use React’s Context to pass the store data around, that makes it easier to declare only nested components as observers and allows you to avoid messing up the props:
// frontend/store/context.tsx

import * as React from "react";
import rootStore from ".";

const StoreContext = React.createContext(rootStore);
export default StoreContext;


// frontend/packs/diagram.tsx

import * as React from "react";
import { render } from "react-dom";

import store from "../store";
import StoreContext from "../store/context";
import Panel from "../components/panel";

render(
  <StoreContext.Provider value={store}>
    <Panel />
  </StoreContext.Provider>,
  document.getElementById("diagram-panel")
);


// frontend/components/panel.tsx

import StoreContext from "../../store/context";

export default observer(function Panel() {
  const store = React.useContext(StoreContext);
  // ...
});
The whole stor-ey
Another great thing about MobX is that you can create as many stores as you need. For instance, you might want to move your in-app notification logic into a separate store. But sometimes some core properties from the index store should be accessed from other stores. And a root store might need to reference them too. It can be solved in an elegant way:
- Create separate classes for the substores.
- In a root store’s constructor, create an instance of every substore, pass
this(the root store) as an argument to it and use it in a substore’s constructor.
// frontend/store/notifications.ts

import { Store } from ".";

export default class NotificationsStore {
  rootStore: Store;

  constructor(rootStore: Store) {
    this.rootStore = rootStore;
  }

  showError = (text: string): void => {
    // Logic to show error in the UI
  };
}

// frontent/store/index.ts

import NotificationsStore from "./notifications-store";

export class Store {
  notificationsStore: NotificationsStore;

  constructor() {
    this.notificationsStore = new NotificationsStore(this);
  }
}
So now any file in a common bundle can access the notificationsStore and trigger in-app errors (we can even render these errors with React now):
// frontend/components/diagram/index.js

import store from "../../store";

const renderDiagram = function renderDiagram(agents, story) {
  // ...

  store.notificationsStore.showError("Something went wrong");
};
Tines They Are a-Changin’
Mostly, we worked on improving one page: the diagram. But some components that were the next candidates for rewriting still existed in the old interface too. As it happens, with Webpacker “packs,” it is possible to make as many standalone React apps as you need without tweaking any settings: just create a new input file inside the app/javascript/packs folder and import it in a Rails view.

JSONEditor within the new and the old interface
The new bundle can render one or more components inside the particular elements on any page. So even the old jQuery + CoffeeScript page can embed a modern Monaco editor from the refurbished part of the app. If we need to pass some initial props to that component, we can use data-attributes around the component wrapper on which we call React-DOM’s render:
<!-- app/views/agents/_form.html.erb -->

<div
  id="agent-options-editor"
  name="agent[options]"
  data-options="<%= JSON.pretty_generate(agent.options) %>"
></div>
// frontend/packs/jsoneditor.tsx
import * as React from "react";
import { render } from "react-dom";
import JSONEditor from "../components/json-editor";
const optionsEl = document.getElementById("agent-options-editor");
if (optionsEl) {
const value = options.getAttribute("data-options") || "{}";
render(<JSONEditor value={value} />, optionsEl);
}Who said that the old and the new frontends could not coexist peacefully? Modern Rails makes it entirely possible!

The approach we have developed for Tines can be used on any mature Rails application that cannot spare a downtime: you can gradually rewrite the whole frontend to a modern stack without sacrificing your business priorities, user retention, and technical resources. There is no need to completely revamp the existing engineering culture. Embracing the incremental approach will also help your team to stay in the loop, even if you hire an external consultancy to implement changes.
What else have we done for Tines? Check out our freshly published case study: “Product design that sells: the smart UX for Tines”
And don’t hesitate to drop us a line if you want to plan a Martian intervention for your fast-growing startup.